While there is most likely nothing new or revolutionary in this article, it is intended to be useful to those new to game graphics working as a freelance artist or as an outsourced resource. The tips below will help you in avoiding typical mistakes that arise from the misunderstanding of requirements, badly thought-out pipelines and other common issues. You'll also find some rules for proper presentation of your work here.
General Recommendations for Game Art Creation
- Once you have the specifications from the game studio, read them attentively and carefully thinking over all points. Ask questions if something is not clear, because even the smallest misunderstanding may lead to problems later on. If problems are addressed until later in the project, the fixes become more difficult. When working on your model, check it against the specification periodically so as not to miss some important stage or requirement. Think over the way you are going to create your asset before starting the work so you don't end up having to redo a significant volume of work due to using the wrong approach.
- If you are provided with a certain pipeline for the asset's creation, don't ignore it, especially when completing the first set of models. As you continue, it's possible that you'll invent a better way to get the same result, but trying to find a better way when working on the first models usually leads to a significant volume of fixes and extra work.
- When working on models and textures remember that there's a good chance you will not get your work approved the first time. It's also likely that you or somebody else will need to change or fix your model or texture. Therefore it is important that you create both model and texture so they can be easily modified. In terms of modeling, this means using proper geometry, a minimal amount of UV seams (and in the least noticeable places), the absence of UV stretches, and a uniform scale on UVs. For textures, it means creating a properly structured PSD file.
- Check the model twice after you are done. First, check it against the client's technical requirements, and then check for typical technical mistakes (such as unwelded vertices, wrong units, incorrect object names, pivot placements, etc.). If your client provided you examples of the desired quality, then check your model against the example provided. Even if the asset looks very nice, if it doesn't fit the style, then it could be rejected.
- Learn from your mistakes. Make proper conclusions from client's feedback and apply it to future models as well so you don't make the same mistakes again.
Modeling Requirements
Keep the following in mind regarding modeling to requirements:- References: This is one to watch! Clients do not always provide high quality references. If you are worried about your model being rejected because you don't have enough good references, spend some time looking for extra references. Look for additional hi-res blueprints, more detailed images or photos, descriptions of how this object is utilized in real life. You can also request that the client provide additional references.
- Polycount and level of details: Spend your polycount budget thoroughly. Allocate more polys for large details and fewer polys for those areas that are small and less noticeable. Don't model those details that can be done better with texture and normal maps, such as small bolts. If you see that the provided polycount budget is so small that you can't manage to dedicate enough polys to large details then model using the needed polygons and then you can always optimize your model later. Use 5-6 sided cylinders for thin details, 8-sided cylinders for medium details, and more than 8 for large details. If you are supposed to make LODs for the asset use multiples of 4 (8, 12, 16, 20, etc) - this lets you remove each 2nd edge at least twice.
- Smoothing: It's imperative to adjust the smoothing on your models. In most cases you can use auto smoothing and fix it where needed. Always review your model after you use auto smooth because you may get undesired effects in some places. Also, check that you don't use more smoothing groups than are needed. Try to get by with 3 unique smoothing groups, but don't use 5 or more.
- File: Check to ensure you don't have any extra objects in the file.
- Units: Check to ensure units in the scene correspond correctly to the provided requirements. If you are not provided with any specific requirements on units - use meters and make all assets match a natural scale, i.e. a normal human is 1.8 meters high, etc.
- Object scale: If the requirements don't include a blueprint with dimensions of the asset provided, use real world objects as a guide. Check to ensure your model is proportional.
- Proportions: Both during and after modeling check proportions of separate parts with the references. It happens sometimes that the geometry is right, but the proportions are wrong.
- Pivots: If there are no requirements for the asset concerning pivots, set them as shown in Figure 1, for buildings and characters:
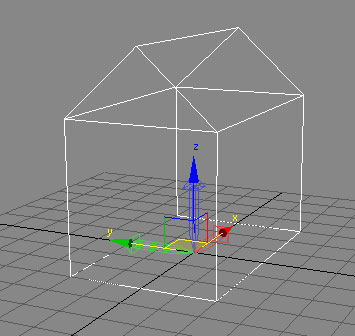
Figure 1: An example of default pivot placement in 3DS MaxIf your asset contains rotating parts (wheels, doors, etc) - ensure that pivot points are set properly at the rotation center or the hinge center on the model.
- Object location: Unless otherwise specified, the asset should be located in the center of the scene. If it is symmetrical, it should be absolutely symmetrical related to the axis of symmetry. If there are no reasons to make different mappings for symmetric parts then UVs for symmetric parts should also be identical.
- Geometry: Check to ensure all vertices are welded and that there are no double edges or polys.
- Naming: Objects should be named as specified in the requirements. If this is not specified, create convenient names and follow some consistent logic when naming the meshes. Do not name
your assets generically like "building", "house", etc. as it's very easy to get duplicate names this way. If you have a reference, you can name your assets the same as the reference provided. For
instance, if you are going to model the King Tiger tank, the main mesh could be named kingtiger and objects such as wheels and turrets could be kingtiger_wheel and kingtiger_turret. To mark left and
right use "_l" (left) and "_r" (right), as shown in Figure 2.
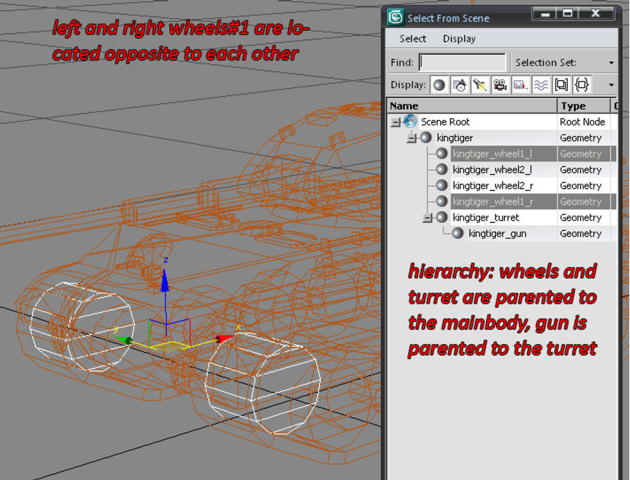
Figure 2: Naming conventions should be consistent - Hierarchy: If nothing is specified, create a hierarchy based on the most probable supposed usage and animation of parts of your mesh. For instance, if is the requirements specify to separate the tank into a main body, wheels, turret and gun, then it's obvious that wheels and turret will be parented to the main body and the gun will be parented to the turret.
- Topology: Check to ensure meshes with complex shapes have correct topology. To ensure this, shapes should be represented correctly, and there should be no smoothing issues. When working on characters, be attentive to joints and the face.
- File Format: Deliver your model exactly in the format that is specified in the requirements. This means that if you are asked to deliver your models in Maya7, you should deliver an .mb file that can be opened in Maya7.
- Materials (shaders): Unless otherwise specified, name materials the same as the file such as kingtiger. If you have several textures use a multi-sub-object material, not many different standard materials. Remove any extra materials that you've got after modeling, and exporting.
- Normal maps allow you to make beveled edges, but it's still better to make edge bevels by geometry if polycount allows. Note: To avoid bugs when making edge bevels with a normal map you should separate the UVs on the edge and move them to get some space between them, otherwise you'll get a very thin but noticeable artifact on the edge. This happens because a normal map has different colors for different polys at the same edge that are blended when being mipmapped.
- Normal maps plus darkened textures represent concavities.
- Normal maps are good for small surface details such as bolts and rivets.
- Normal maps are good for representing narrow and deep seams between the details. These seams look almost perfect, but they are not as good for convex details.
- e. Normal maps don't work as well for large, prominent details. The problem is that if you make large prominent details with normal maps, they will be more or less okay when viewed in front or at some angle, but will become absolutely flat when viewed from the side.
- Normal maps are not very good for smoothing the geometry.
UV Mapping Recommendations
Some game engines don't allow you to mirror UVs, but most game engines support correct rendering of normal maps and mirrored UVs. For the following tips, we're assuming that you are using a game engine that allows you to mirror UVs.When mapping the game models, the most important thing is to thoroughly use UV space:
- Most mapping details should have the same scale, though you can scale up small parts that need a lot of details (for instance, small wheels on a cart), and scale down large details that are hardly visible or have a smooth surface, such as bottom and back polys, thin wires, etc. It's not desirable to scale the UVs more than twice as this will cause the differences in resolutions will become too obvious. Moreover, if you scale something more than twice, then the UVs are packed badly and there is too much free space on the UVs and you should consider rearranging the UVs.
- Remember that most textures will be mipmapped and you should leave at least 4 pixels between your UV parts, or, if possible, 6-8 pixels. You can easily check the distance between your UV parts by making the UV snapshot and viewing it in ACDSEE or Photoshop.
- Position map parts that will have the same or similar color close to each other. This also relates to the parts of the same detail. It's causes trouble when the top of a small bolt, for instance, is mapped to one corner of the UV quad and to the side to the opposite corner.
- If you are using an alpha channel for transparency, leave at least 10 pixels around the parts that will use the alpha channel to avoid issues with mipmapping.
- Place the UV seams in the least noticeable places.
- Minimize stretching. Avoid stretching UVs where details with the regular form (bolts, for instance) or text is located.
- Mirror the UVs only in such places where it is not going to look too obvious. Fold all cylindrical and symmetric details.
- Map to the same UV space those details that use the same texture and don't have any specific details such as wires, pipes, etc.
- Avoid hidden "wasted space" on UVs. Wasted space appears when some detail is located on top of another one on a mesh, but is mapped to separate space on UVs, as shown in Figure 3 below.
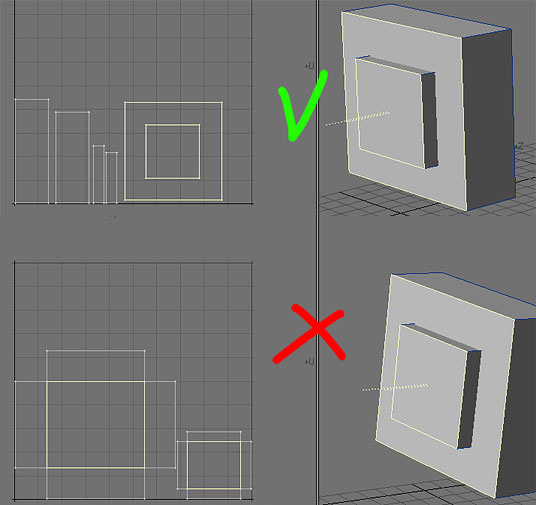
Figure 3: To avoid issues with texturing, scale down a bit the UVs for the part located on top of another one. - When mapping the cylindrical details, keep in mind which texture is going to be used for this part of the model. If the texture includes some concentric circles or some ornamental design, then
never map it using planar mapping, as this will cause the concentric circles to look pixelated. You can minimize this effect, but you'll be never able to remove it. It'll also be hard to paint
the ornament or locate the small details properly. See Figure 4 below for the correct option.
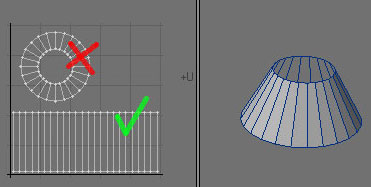
Figure 4: Correct cylindrical mapping. - Don't try to fill the UV quad. If optimized, UVs fit into the rectangle (half of UV quad) instead of the quad.
- When working on UV mapping, check the references periodically to see which details are going to be painted on the surface. By checking you can be certain to not map the same surfaces to different UV space and vice versa. Be careful to not map unique textures to the same place.
- Tile long details, such as wires, pipes, etc.
Recommendations on Texturing
Keep the following in mind regarding texturing:- Be attentive to the style. Check if your work is looking similar to the samples provided by the client.
- Check UVs before you start texturing so that you don't have to remap the model after you've completed a significant amount of texturing work. If you don't like anything about the model or UVs, inform your client or ask if you can fix it yourself.
- Realize that in some cases it is not possible to change the UVs (for instance, if you are given a model that has already got several texture sets and you are working on variations).
- Remember again that clients do not always provide high quality references. To avoid your model looking poor due to lack of details caused by bad quality references spend some time looking for extra references or ask your client to provide additional ones.
- Think over the best way to texture your model. Sometimes it's better to start with a normal map, sometimes with color, and sometimes with an ambient occlusion map.
- Structure your PSD file so that anybody can easily understand it. Do this by using layer sets, clipping masks and smart objects. Name each layer so that it's clear what they contain. Use the English language.
- Name textures properly. If a texture name is not specified in the requirements, then name it the same as the object. If you need to specify separate color, normal and specular textures (and you don't have any specs) add _clr (for color), _nm (for normal map), _spec (for specular).
- Save your textures to 24 bits TGA if there should be no alpha channel and to 32 bits if there is an alpha channel.
- Be careful with the scale of small parts and surface detail maps. If the surface texture is too big, it won't look natural. The same relates to small details, such as bolts and seams, if they are too big the object looks cartoony.
- Dirty objects and dirty textures are not the same. Paint dirt thoroughly. Don't think that the more dirt there is in your texture, the better it is.
- Check to ensure your texture is neither blurry, nor too sharp.
- Use good photos for your textures. I recommend using textures from http://cgtextures.com/.
- Check to ensure you don't use compressed JPEGs. Compressed JPEGs will cause your texture to look badly whatever you do. Figure 5 shows how a compressed JPEG appears (look at that "quads" - good
quality textures do not have such):
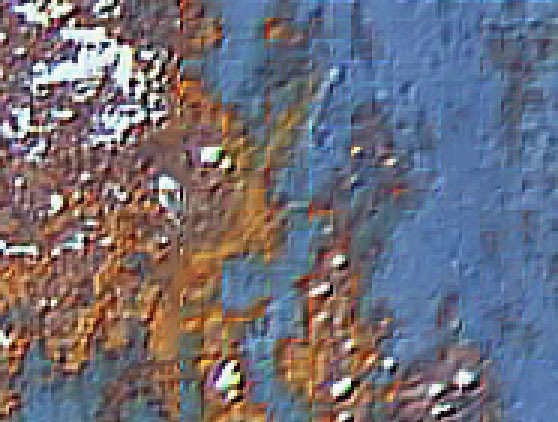
Figure 5: Avoid low quality JPEGs. - If your texture should have plenty of details, but the resolution is low and it's hard for you to paint all the details, try painting a higher res texture. Then, after working at a higher resolution, scale it down and check to see if the target resolution looks correct.
- Don't leave visible seams on a texture, and check to ensure everything tiles properly.