License: Ms-PL
Table of contents
Introduction
It has been a long time since my last article. This one is short and a bit less creative than the previous ones, but I hope you'll like it! 
I hope none of you have never particularly talked about that before, but probably you have already used what I will talk about, without naming it: the wrapper pattern in WPF and Silverlight.
Pattern sheet
Pattern type: Presentation pattern.
Problem: You want to create an animation or to bind on a property which does not exist on your object -the target- or doesn't support the use of Storyboard or Binding.
Solution: Create an object -a wrapper- which will expose this property, and will modify the target object accordingly.
Alternatives:
- Use attached properties; however, it will fail in Silverlight 3.0 (it does not support animation on attached properties in XAML).
- Use a decorator, but it doesn't exist on Silverlight, and sometimes makes your XAML harder to read.
Actor:
- The object we want to animate is called the "target".
- The object we will create to expose new properties to animate is called the "wrapper".
Concrete examples
- The first is a common problem in Silverlight: binding to the ActualWidth/Height property.
- The second is an element hider; it allows you to show or "push" an element at the border of the screen (like dockable views in Visual Studio).
For these two examples, the wrapper pattern provides a really nice solution.
Example 1 - Binding to ActualWidth and ActualHeight
Here is the example:

The sliders are bound to the Height and Width of a grid which wraps the green rectangle. The red rectangle's width and height are bound to ActualWidth and ActualHeight of the green rectangle. The Height and Width properties of the green rectangle are not set.
Here is the code:
		  Height="{Binding ActualHeight, ElementName=greenRect}"

		  Width="{Binding ActualWidth, ElementName=greenRect}">
Value="{Binding Height, ElementName=grid, Mode=TwoWay}">
Value="{Binding Width, ElementName=grid, Mode=TwoWay}">
I want the green and red rectangle to have the same size, and everything goes well in the world of WPF... but Silverlight can't bind to ActualHeight and ActualWidth. So, what is the solution? It's simple, we will create a wrapper, SizeWrapper, with three properties: RealWidth, RealHeight, and Element, the target element.
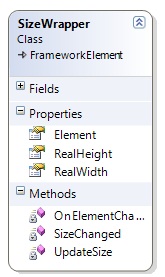
It will listen to the SizeChanged event of the target element and update its two properties. Here is the code:
public class SizeWrapper : FrameworkElement

{

	public FrameworkElement Element

	{

		get

		{

			return (FrameworkElement)GetValue(ElementProperty);

		}

		set

		{

			SetValue(ElementProperty, value);

		}

	}


	public double RealHeight

	{

		get

		{

			return (double)GetValue(RealHeightProperty);

		}

		set

		{

			SetValue(RealHeightProperty, value);

		}

	}


	// Using a DependencyProperty as the backing store for RealHeight.

	// This enables animation, styling, binding, etc...

	public static readonly DependencyProperty RealHeightProperty =

		DependencyProperty.Register("RealHeight",

		typeof(double), typeof(SizeWrapper), Helper.CreateMetadata(.));


	public double RealWidth

	{

		get

		{

			return (double)GetValue(RealWidthProperty);

		}

		set

		{

			SetValue(RealWidthProperty, value);

		}

	}


	// Using a DependencyProperty as the backing store for RealWidth.

	// This enables animation, styling, binding, etc...

	public static readonly DependencyProperty RealWidthProperty =

		DependencyProperty.Register("RealWidth",

		typeof(double), typeof(SizeWrapper), Helper.CreateMetadata(.));


	// Using a DependencyProperty as the backing store

	// for Element. This enables animation, styling, binding, etc...

	public static readonly DependencyProperty ElementProperty =

		DependencyProperty.Register("Element", typeof(FrameworkElement),

		typeof(SizeWrapper), Helper.CreateMetadata(null, OnElementChanged));


	private static void OnElementChanged(DependencyObject sender,

			DependencyPropertyChangedEventArgs args)

	{

		var wrapper = (SizeWrapper)sender;

		var oldElement = args.OldValue as FrameworkElement;

		var newElement = args.NewValue as FrameworkElement;

		if(oldElement != null)

			oldElement.SizeChanged -= wrapper.SizeChanged;

		if(newElement != null)

		{

			newElement.SizeChanged += wrapper.SizeChanged;

			wrapper.UpdateSize(new Size(newElement.ActualWidth,

										newElement.ActualHeight));

		}

	}


	void SizeChanged(object sender, SizeChangedEventArgs e)

	{

		UpdateSize(e.NewSize);

	}


	private void UpdateSize(Size size)

	{

		RealHeight = size.Height;

		RealWidth = size.Width;

	}

}
Now, here is the slightly modified version. The only modification is that the red rectangle binds to the wrapper's properties instead of the green rectangle directly. As you will expect, it works well. The wrapper is inside the canvas.
Element="{Binding ElementName=greenRect}">Height="100" Width="100">
Height="{Binding RealHeight, ElementName=sizeWrapper}"
Width="{Binding RealWidth, ElementName=sizeWrapper}">
Value="{Binding Height, ElementName=grid, Mode=TwoWay}">
Value="{Binding Width, ElementName=grid, Mode=TwoWay}">
Example 2 - Element hider
Some of you might say: well, it's just useful for a specific workaround; wait a second, read this second example, and you'll appreciate the simplicity!
This example should deserve its own article because I suspect lots people would want it.

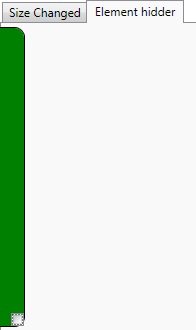
This time we will use a wrapper called 'ElementHidderWrapper' to "push" an element on the border of the screen (as you can do with the dockable views in Visual Studio).
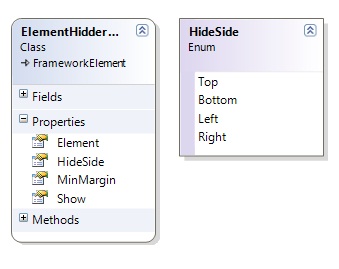
If Show is 0, then the target is completely collapsed; if it is 1.0, it's completely visible. MinMargin is the minimum margin to show when Show equals 0. HideSide is the side where the element will hide. Here is how to use it:
		x:Name="hidder"

		Element="{Binding ElementName=border}"

		MinMargin="20"

		HideSide="Left"

		Show="1.0"

		>
VerticalAlignment="Top" BorderThickness="1.0"
Width="100" Height="300"
BorderBrush="Black"
CornerRadius="0,10,10,0" Background="Green">
HorizontalAlignment="Center"
VerticalAlignment="Top">
HorizontalAlignment="Right"
VerticalAlignment="Bottom"
Click="CheckBox_Click">
The target element is the border. Initially, everything is shown. MinMargin is set to 20 px; this way, we can always click on the checkbox. When you click on the checkbox, it will hide/show the border to the left. It's easy to do, I just need to fire an animation on the Show property of my wrapper.
private void CheckBox_Click(object sender, RoutedEventArgs e)

{

	CheckBox checkBox = (CheckBox)sender;

	Storyboard storyBoard = new Storyboard();

	DoubleAnimation showAnimation = new DoubleAnimation();

	Storyboard.SetTarget(showAnimation, hidder);

	Storyboard.SetTargetProperty(showAnimation, new PropertyPath("Show"));

	showAnimation.Duration = new Duration(new TimeSpan(, , , , 400));

	showAnimation.To = checkBox.IsChecked.Value ? 1. : .;

	storyBoard.Children.Add(showAnimation);

	storyBoard.Begin();

}
The code of the wrapper is not the point, but I will quickly explain: every time a property of the wrapper changes, I recalculate the margins of the target, and it's done.
public enum HideSide

{

	Top,

	Bottom,

	Left,

	Right

}


public class ElementHidderWrapper : FrameworkElement

{

	public double MinMargin

	{

		get

		{

			return (double)GetValue(MinMarginProperty);

		}

		set

		{

			SetValue(MinMarginProperty, value);

		}

	}


	// Using a DependencyProperty as the backing store for MaxShow.

	// This enables animation, styling, binding, etc...

	public static readonly DependencyProperty MinMarginProperty =

		DependencyProperty.Register("MinMargin", typeof(double),

		typeof(ElementHidderWrapper),

		Helper.CreateMetadata(., MinMarginChanged));


	private static void MinMarginChanged(DependencyObject sender,

						DependencyPropertyChangedEventArgs args)

	{

		ElementHidderWrapper hidder = (ElementHidderWrapper)sender;

		hidder.UpdateElement();

	}


	public HideSide HideSide

	{

		get

		{

			return (HideSide)GetValue(HideSideProperty);

		}

		set

		{

			SetValue(HideSideProperty, value);

		}

	}


	// Using a DependencyProperty as the backing store

	// for HideSide. This enables animation, styling, binding, etc...

	public static readonly DependencyProperty HideSideProperty =

		DependencyProperty.Register("HideSide", typeof(HideSide),

		typeof(ElementHidderWrapper), Helper.CreateMetadata(HideSide.Bottom));


	public double Show

	{

		get

		{

			return (double)GetValue(ShowProperty);

		}

		set

		{

			SetValue(ShowProperty, value);

		}

	}


	// Using a DependencyProperty as the backing store for Show.

	// This enables animation, styling, binding, etc...

	public static readonly DependencyProperty ShowProperty =

		DependencyProperty.Register("Show", typeof(double),

		typeof(ElementHidderWrapper), Helper.CreateMetadata(1., ShowChanged));


	public FrameworkElement Element

	{

		get

		{

			return (FrameworkElement)GetValue(ElementProperty);

		}

		set

		{

			SetValue(ElementProperty, value);

		}

	}


	// Using a DependencyProperty as the backing store for Element.

	// This enables animation, styling, binding, etc...

	public static readonly DependencyProperty ElementProperty =

		DependencyProperty.Register("Element",

		typeof(FrameworkElement), typeof(ElementHidderWrapper),

		Helper.CreateMetadata(null, ElementChanged));


	private static void ElementChanged(DependencyObject sender,

						DependencyPropertyChangedEventArgs args)

	{

		ElementHidderWrapper hidder = (ElementHidderWrapper)sender;

		FrameworkElement oldValue = args.OldValue as FrameworkElement;

		FrameworkElement newValue = args.NewValue as FrameworkElement;

		if(oldValue != null)

			oldValue.SizeChanged -= hidder.SizeChanged;

		if(newValue != null)

			newValue.SizeChanged += hidder.SizeChanged;

		hidder.UpdateElement();

	}


	private void SizeChanged(object sender, SizeChangedEventArgs e)

	{

		UpdateElement();

	}


	private static void ShowChanged(DependencyObject sender,

			DependencyPropertyChangedEventArgs args)

	{

		ElementHidderWrapper hidder = (ElementHidderWrapper)sender;

		hidder.UpdateElement();

	}


	private void UpdateElement()

	{

		if(Element == null)

			return;

		var maxValue = GetMaxShowValue(Element);

		var minValue = MinMargin;

		var calculatedShowValue = minValue + (maxValue - minValue) * Show;

		var marginValue = maxValue - calculatedShowValue;

		SetMarginValue(Element, marginValue);


	}


	private void SetMarginValue(FrameworkElement element, double marginValue)

	{

		if(HideSide == HideSide.Left)

		{

			element.Margin = new Thickness(-marginValue,

			  element.Margin.Top, element.Margin.Right, element.Margin.Bottom);

		}

		else if(HideSide == HideSide.Top)

		{

			element.Margin = new Thickness(element.Margin.Left,

			  -marginValue, element.Margin.Right, element.Margin.Bottom);

		}

		else if(HideSide == HideSide.Right)

		{

			element.Margin = new Thickness(element.Margin.Left,

			  element.Margin.Top, -marginValue, element.Margin.Bottom);

		}

		else if(HideSide == HideSide.Bottom)

		{

			element.Margin = new Thickness(element.Margin.Left,

			  element.Margin.Top, element.Margin.Right, -marginValue);

		}

	}


	private double GetMaxShowValue(FrameworkElement element)

	{

		if(HideSide == HideSide.Bottom || HideSide == HideSide.Top)

			return element.ActualHeight;

		else

			return element.ActualWidth;

	}

}
Conclusion
This pattern is not great news; however, putting a name on something will help people to use and remember where it fits well. This pattern should definitively be in the toolbox of the WPF/SL developer.
About the Author
My goal as a developer, a community member, and enterpreneur is the same : making the minimal product that will help then getting myself out the way. My work is yours.
If you are interested for working with me, this way
License
This article was authored by Nicolas Dorier and reproduced for the benefit of our viewers under the terms of the Ms-PL license.
