The path ahead is an exciting one and we have a host of new challenges in store to enhance your skills as a game developer. Nonetheless, it would be foolish to undertake such a journey without making suitable preparations first. Each of you will bring your own unique skills to the journey ahead, but you won't get very far without some level of background knowledge. This chapter will equip you with that knowledge, so please make sure you are familiar with it before continuing. The majority of this information was covered in our first book, so this chapter simply summarizes the important facts as a reminder. It won't take long to cover the essentials, so let's make a start. This chapter will also serve as a handy reference if you need to check back on something later on in the book.
Resources
Video games are made up of different kinds of digital resources such as animations, sounds, music, and backgrounds. Game Maker lists all of its resources down the left-hand side of the main window (see Figure 1-1). These are grouped together into folders according to the different kinds of resources that Game Maker supports. You don't need to know every detail of every kind of resource, but you should be generally aware of what each type of resource is for.
- Sprites: Sprite resources are the digital images that you use to represent foreground objects in your games. Game Maker supports loading sprite images from .bmp, .jpg, and .gif file formats and now in Game Maker 8, .png and .gmspr as well. You can load animated images using the .gif and .gmspr formats, or by treating .png files as sequential strips of images by using _stripXX at the end of the file name (where XX = the number of frames in the image).
[nbsp]
- Sounds: Sound resources include both sound effects and music for your games. Game Maker supports .wav, .mid (MIDI), and .mp3 formats, but .mp3 music can take up a lot of space and often contributes to the large size of finished games.
[nbsp]
- Backgrounds: Background resources are digital images that you use to represent the background scene of your game. Backgrounds can only contain single images and Game Maker can load these images from .bmp, .jpg, .gif, and .png formats.
[nbsp]
- Paths: Path resources contain a series of points that define a route for object resources to follow in the game. These can be either closed looping paths or open paths with a start and finish point.
[nbsp]
- Scripts: Script resources contain programming instructions written in Game Maker Language (GML). GML provides a more advanced way of programming in Game Maker.
[nbsp]
- Fonts: Font resources provide a means of displaying text in your game using the fonts installed on your machine. Game Maker grabs images of each character in your chosen font so that the player doesn't need to have the same font installed on their machine.
[nbsp]
- Timelines: Timeline resources provide a way of triggering many different actions at specific points of time in your game (see Objects for more on actions).
[nbsp]
- Objects: Object resources are the most important of all the resource types in Game Maker as they are used to represent all of the active components of your game. Objects can respond to events in the game by following a series of actions that you add to the event. In this way, you can program the desired behavior for all the different components of your game.
[nbsp]
- Rooms: Room resources provide spaces for staging all the visible aspects of your game (levels, menus, cut scenes, and so forth) and contain all sorts of settings relating to backgrounds, views, and the game window. It also provides an editor for placing instances of objects into your rooms to determine their starting positions.
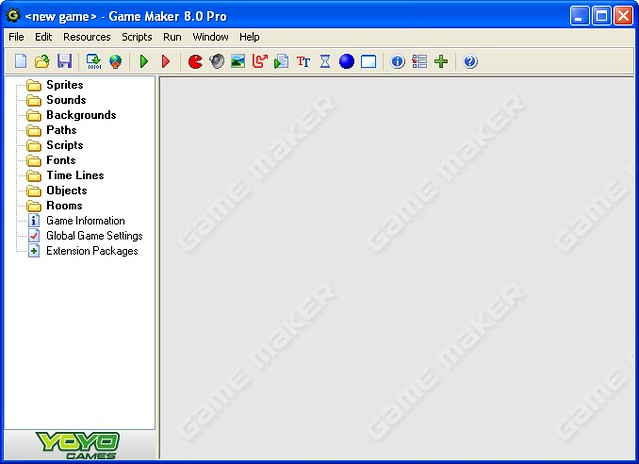
Figure 1-1. The main Game Maker interface with the resource list on the left
Instances and Objects
Objects are the programmable elements of your game and their behavior is directly determined by the events and actions that you choose to give them. However, there is an important distinction to be made between the object resources, which define the general behavior of objects, and the individual object instances, which occupy your game world. Once you have defined the behavior of an object resource, then you can place any number of instances of that object in your game. All these instances will behave in the same way (because they follow the same events and actions), but each has its own variables (position, speed, direction, and so forth) that are unique to that instance. If you like, you can think of object resources as being like jelly molds, and instances as the jellies you make with them. You only need one mold to make any number of jellies that have the same basic structure (see Figure 1-2).

Figure 1-2. Object resources are like jelly molds and you can use them to create any number of object instances
Variables
A variable is a general programming term for something that can store information. In Game Maker, variables can either store a number (for example, 3, -12, 151.33) or some text (for example, demons don't like dragons). You use variables in Game Maker to store all the unique information about individual instances, such as their position on the screen, or their speed. So if you create a new power variable in the Create event of a dragon object, then every dragon object will have this variable, but each instance can have its own different value for power. It's also worth noting that you must assign variables a value (using a Set Variable action, for example) before you can use them (with a Test Variable action); otherwise, Game Maker will produce an error.
Local Instance Variables
Game Maker uses a number of predefined variables for storing standard information about each instance in the game. All of the following variables either directly or indirectly affect the position of an instance in the room:
- x and y provide the current position of the instance in the room.
- xstart and ystart provide the starting position of the instance in the room.
- xprevious and yprevious provide the room position of the instance in the previous step.
- hspeed is the horizontal speed of the instance (in pixels per step).
- vspeed is the vertical speed of the instance (in pixels per step).
- direction is the instance's current direction of motion in degrees (360 degrees of rotation in an anticlockwise direction; 0 degrees is horizontally to the right).
- speed is the instance's current speed in the current direction.
- friction is the amount of friction reducing the speed of the instance (in pixels per step).
- gravity_direction is the current direction of influence for gravity (defaults to 270 =
downwards).
- gravity is the amount of gravity that pulls the speed of the instance in gravity_direction every step (in pixels per step).
The following variables are also predefined for each instance and affect the appearance or collision of the instance in some way:
- sprite_index is the sprite displayed for the instance.
- image_index is the current index into the images of an animated sprite displayed for the instance.
- image_speed is the animation speed of an animated sprite (in subimages per step). This is typically set to a value between 1 (normal forward speed) and -1 (normal backwards speed).
- mask_index is the sprite used for collision detection (usually set to -1, which makes themask_index the same as the sprite_index).
- depth is used to control the order in which instances are drawn on the screen. Highest depth values are drawn first and so appear behind those with lower values.
- image_xscale is a scaling value applied to the width of the sprite, where a value of 1.0 is 100% of the original width (normal size).
- image_yscale is a scaling value applied to the height of the sprite, where a value of 1.0 is 100% of the original height (normal size).
- image_angle is a rotation angle (0-360) applied to the sprite, where a value of 0 is no rotation. You can only change this variable in the registered, Pro version of Game Maker 8.
- image_alpha is the opacity of the sprite (how difficult it is to see through it), which can range from a value of 1.0 for fully opaque (unable to see through it at all) to a value of 0.0 for fully-transparent (invisible).
- image_blend is a color applied to the sprite when it is drawn. It is set to c_white by default, and using different values will change the color of the sprite when it is drawn. You can only change this variable in the registered, Pro version of Game Maker 8.
- visible determines whether the object is visible or invisible (true or false).
- solid determines whether the object is treated as solid in collisions (true or false).
- persistent determines whether the object will continue to exist in the next room, or whether it remains part of the room in which it was originally created (true or false).
Note The constants true and false correspond to the values 1 and 0, respectively.
These two variables hold information about the identity of the instance:
- id is a unique identifying number that distinguishes the current instance from any other.
- object_index is the index of the object resource that the current instance is an instance of.
There are also a number of other variables that you cannot change, but are maintained internally by Game Maker for each instance depending on the current sprite. So you can check to see what values these variables hold (using a Test Variable action, for example), but you cannot change them (using a Set Variable action):
- sprite_width is the width of the current sprite displayed for the instance.
- sprite_height is the height of the current sprite displayed for the instance.
- sprite_xoffset is the x position of the origin within the sprite.
- sprite_yoffset is the y position of the origin within the sprite.
- image_number is the number of images in the current sprite.
- bbox_left is the x coordinate of the left edge of the sprite's bounding box in the room.
- bbox_right is the x coordinate of the right edge of the sprite's bounding box in the room.
- bbox_top is the y coordinate of the top edge of the sprite's bounding box in the room
- bbox_bottom is the y coordinate of the bottom edge of the sprite's bounding box in the room.
Variables in Other Instances
You usually refer to an instance's variables within its own actions by entering their names in their basic form, as provided previously. Using actions to set or test an instance's variables in this way will only affect the instance concerned (hence, they are local to the instance). However, you can also refer to variables in other instances by using an object name followed by a dot (period/full- stop) and then the variable name (for example, obj_dragon.x). Used within a Test Variable action, this would retrieve the x position of the first instance of obj_dragon that was placed in the room (disregarding any other instances of obj_dragon). However, used within a Set Variable action, it would change the x position of all the instances of obj_dragon in the game--so be careful.
Game Maker also includes a number of special object names that you can use to refer to different objects in the game:
- other is an object that is used to refer to the other instance involved in a collision event. So other.x is the x position of the other object involved in a collision.
- all is an object that refers to all instances, so setting all.visible to 0 would make all instances of all objects invisible.
- global is an object used to refer to global variables that you create yourself.
Global Variables
You can also create global variables, which are common to all objects and instances in the game. These are useful for storing values that relate to the overall state of the game, such as the current player's name, or time playing the game. When you use a global variable of your own, you need to put the word global and a period (full-stop) in front of the variable name (for example, global.player_name). If you leave off the global part, then Game Maker will automatically assume you are referring to a local variable instead.
However, there are also a number of built-in global variables that do not require the use of the global object to access them. This can cause problems if you try and create local variables with the same name, so it's best to be aware of these so that you can choose different names:
- score is the global score value (as used by the actions on the score tab).
- lives is the global lives value (as used by the actions on the score tab).
- health is the global health value (as used by the actions on the score tab).
- mouse_x is the current x position of the mouse cursor in the room.
- mouse_y is the current y position of the mouse cursor in the room.
- room_caption is the caption shown in the window title bar.
- room_width is the width of the current room in pixels.
- room_height is the height of the current room in pixels.
Coordinates and Angles
If you want to position something in your room using actions (rather than the Room Editor), then you need to consider how Game Maker's coordinate system works. Traditionally, coordinates on computer screens are calculated slightly differently from how they are taught in school. As you might expect, the x-axis starts on the left-hand side of the screen with a value of zero and increases as you move horzontally to the right. However, the y-axis starts at the top of the screen with a value of zero and increases as you move vertically down (see Figure 1-3). This means that the origin of each room (x=0,y=0) is in the top left, rather than the bottom left and the y-axis is probably the other way from how you might have expected as well. Nonetheless, so long as you can remember that an increase in y moves something down the screen, then you won't go too far wrong.
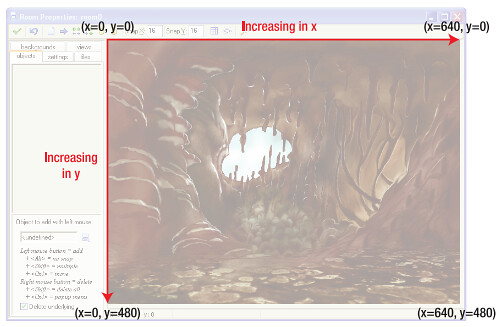
Figure 1-3. The screen coordinate system used in Game Maker, illustrated for a standard 640x480 room
Similarly, angles in Game Maker may not work in the way you expect, either. Angles can range from 0-360 degrees as normal, but an angle of 0 degrees represents a direction that points horizontally to the right. Game Maker angles also increase anti-clockwise, so 90 degrees points vertically upwards, 180 degrees points to the left, and 270 degrees points vertically downwards (see Figure 1-4). This can take a bit of getting used to, so it may be worth copying this diagram and sticking it to your monitor until you're completely comfortable with it.
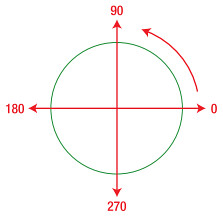
Figure 1-4. The angle system used in Game Maker
Transparency
One area that changed significantly in Game Maker 8 is the way that transparency works for sprites. Previous versions of Game Maker have only allowed one color to be transparent for each sprite, which meant that the pixels of sprites were either fully transparent or fully opaque (that is, nothing can be seen through it). This allowed simple punch-through transparency, where a single background color within the sprite is not drawn (see Figure 1-5). However, the edges of sprites could often seem quite harsh and jagged using this method--particularly when there was a large contrast in color between the sprites and the background behind them (see Figure 1-6, left).
Fortunately, Game Maker 8 supports a more advanced kind of transparency by which every pixel in a sprite can have its own level of opacity from 0 (fully transparent) to 255 (fully opaque). Opaque just means the opposite of transparent, so this value represents how hard it is to see through something. A low value means that it is easy to see through it (with a value of zero being invisible), and a high value means that it is hard to see through it (with a value of 255 being unable to see through it at all). A more general term for this measure in computer graphics is alpha, but you will come across both the terms opacity and alpha in Game Maker.
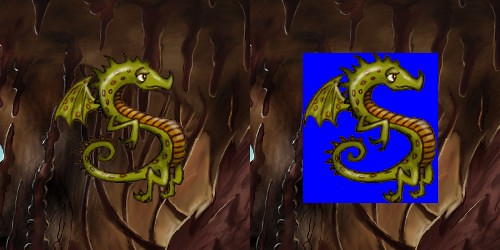
Figure 1-5. A sprite displayed in front of a background with and without punch-through transparency
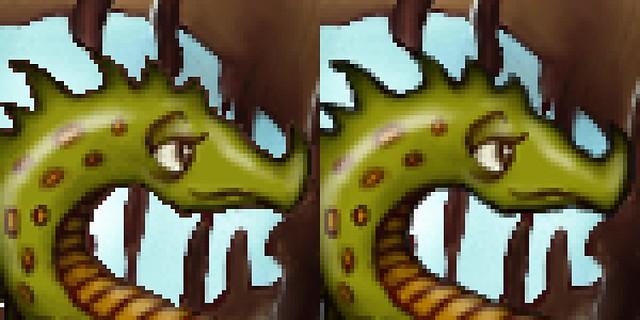
Figure 1-6. The jagged edges produced by punch-through transparency (left) compared to the smoother edges produced by alpha transparency (right)
Figure 1-6 (above) shows how this new alpha transparency can improve the look of your sprites when they appear against contrasting backgrounds. Only two of the file types supported by Game Maker can include transparency in this way. PNG files (.png) support alpha transparency, and you can create them in many different graphics packages, but you need to use animation strips (using _stripXX at the end of the file name) to support multiple frames of animation. This is the most common format we use in this book, but Game Maker 8 includes a new sprite format (.gmspr) that supports both alpha transparency and animation frames, so we sometimes use that as well. There are plenty more cool effects that you can achieve with this new level of alpha control such as creating shadows and advanced particle effects.
Note Perhaps you're wondering why many things seem to be measured between such strange values as 0 and 255 in computing rather than 0 to 100 (red, blue, and green components of colors, are another example). The answer has to do with the way that numbers are stored on computers. The numbers 10, 100, 1,000, 10,000, and so forth have significance to us because we use a number system called decimal. Our number system is based on the number 10 (because we have 10 fingers) and each of the numbers above is 10 times the last. However, computers use a number system called binary, which is based on the number 2 (because in electronics, things can either be on or off), so the numbers that are significant to them are 2, 4, 8, 16, 32, 64, 128, 256, and so forth, where each number is 2 times the last.
Congratulations
Fantastic--the necessary preparations have been made, and we're ready to get started. We'll begin on easy ground, but there are trickier paths ahead, so make sure you take the opportunity to begin with a sure footing. Each chapter will build upon the challenges of the last, so you can't afford to take any shortcuts. Anyway, we hope you're not scared of heights, because that's the least of your worries when you're a character in a platform game....