Recent Resources
-
GLSL 4.0: Using Subroutines to Select Shader Fu...
-
Building a Complete Board-based Puzzle Game wit...
-
JIRA: Programming Workflows
-
.NET Generics 4.0: Container Patterns and Best...
-
Raw Meat: Game Design Tips from Team Meat's...
-
Sedge: An Automated Error Reporting Tool
-
Wrapper Pattern for Silverlight and WPF
Basics of GLUT
By Ben Woodhouse | Published Jan 29 2002 10:57 PM in OpenGL
Download attached article resource
In this tutorial I'll cover the basics of setting up and using OpenGL and GLUT with VC++. I'll take you through initializing your GLUT display, opening a window and displaying a triangle in it. The program you'll learn how to create is a foundation for more complex GLUT projects you might want to undertake in the future.
What is GLUT?
GLUT stands for OpenGL Utility Toolkit. It's an API for OpenGL written by Mark Kilgard. GLUT is very easy to set up and use compared to traditional Win32 OpenGL, making it great for beginners. Because GLUT handles input and window setup, GLUT code is not platform specific, meaning any application you write will run on just about any platform (until you start adding DirectSound code, that is...).
Some preliminary links:
Getting the GLUT files
You can download the latest version of glut from here.
Once you've downloaded and unzipped the file, copy glut32.dll to your windows\system directory, glut32.lib to your compiler's lib directory and glut.h to your compiler's include\gl directory. Now you're ready to roll.
Creating your GLUT project
Start up VC++, then create an empty console application.
Link to glut32.lib, glu32.lib and opengl32.lib in project > settings
The Program
This code includes headers for the libraries we'll be using and declares our functions.
The glutInitDisplayMode function is used to set up the display mode. We'll call it with the following flags:
Between the glBegin() and glEnd() we need to specify 3 vertices with glVertex3f. The three values specified in the each glVertex3f() call are the vertex's X, Y and Z coordinates in world space. We can also specify a colour for each of the vertices by using glColor3f() before each call to glVertex3f. The parameters we call glColor3f() with are the red, green and blue elements (from 0 to 1), which make up the colour. OpenGL will then blend the colours across the triangle.
Hopefully with the help of this tutorial you should now be able to build and initialize a GLUT program and draw triangles. If you want to give some feedback on this tutorial or have any questions, please email me.
Download attached article resource
In this tutorial I'll cover the basics of setting up and using OpenGL and GLUT with VC++. I'll take you through initializing your GLUT display, opening a window and displaying a triangle in it. The program you'll learn how to create is a foundation for more complex GLUT projects you might want to undertake in the future.
What is GLUT?
GLUT stands for OpenGL Utility Toolkit. It's an API for OpenGL written by Mark Kilgard. GLUT is very easy to set up and use compared to traditional Win32 OpenGL, making it great for beginners. Because GLUT handles input and window setup, GLUT code is not platform specific, meaning any application you write will run on just about any platform (until you start adding DirectSound code, that is...).
Some preliminary links:
Mark Kilgard's GLUT page
The GLUT FAQ
The online GLUT 3 specification
Getting the GLUT files
You can download the latest version of glut from here.
Once you've downloaded and unzipped the file, copy glut32.dll to your windows\system directory, glut32.lib to your compiler's lib directory and glut.h to your compiler's include\gl directory. Now you're ready to roll.
Creating your GLUT project
Start up VC++, then create an empty console application.
Link to glut32.lib, glu32.lib and opengl32.lib in project > settings
The Program
This code includes headers for the libraries we'll be using and declares our functions.
#include <windows.h> //header file for windowsThe argc variable contains the number of arguments passed to our program, while argv is a pointer to the arguments. We don't need to worry about them particularly, except to pass them to glutInit() so it can process any command line parameters sent to GLUT. The glutInit() function initializes the GLUT framework.
#include <gl\gl.h> //header file for openGL
#include <gl\glu.h> //header file for the openGL utility library
#include <gl\glut.h> //header file for GLUT
static void redraw(void); //declarations
int main(int argc, char **argv);
The glutInitDisplayMode function is used to set up the display mode. We'll call it with the following flags:
- GLUT_RGB specifies we want an RGB colour buffer in our window
- GLUT_DOUBLE specifies we want a double buffer. Double buffering enables us to finish drawing before our image is sent to the screen, preventing flicker.
- GLUT_DEPTH specifies we want a depth buffer. The depth buffer ensures that objects near the camera will always be on top of those further away. The output tends to be a bit messy otherwise. While this isn't necessary when we're only drawing a single triangle, it's good practice, so we'll include it anyway.
int main(int argc, char **argv)Next we need to set up the projection matrix. The projection matrix is a 4x4 matrix which is used to translate points from their positions relative to the camera to their positions on the screen. We use it to specify how our scene will be projected. In order to change it we need to call glMatrixMode() with GL_PROJECTION. The gluPerspective() function creates a projection matrix with a perspective transform for us. All we need do is specify the view angle, aspect ratio and the positions of the near and far clipping planes.
{
glutInit(&argc,argv); //initializes the GLUT framework
glutInitDisplayMode(GLUT_RGB | GLUT_DOUBLE | GLUT_DEPTH); //sets up the display mode
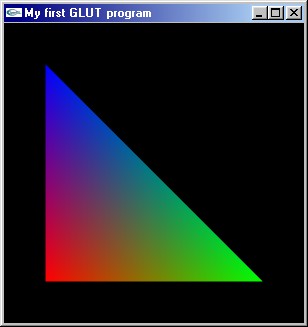
glutCreateWindow("My first GLUT program"); //creates a window
glutDisplayFunc(redraw); //specifies our redraw function
glMatrixMode(GL_PROJECTION); //changes the current matrix to the projection matrixWhen we're done we switch the current matrix to the modelview matrix. The modelview matrix is a 4x4 matrix used to transform points from their actual positions (in world space) into their positions relative to the camera. It's the matrix we use to specify our camera position and the position of anything we draw. The glutMainLoop() function is the main loop of the GLUT framework and we need to call it next.
//sets up the projection matrix for a perspective transform
gluPerspective(45, //view angle
1.0, //aspect ratio
10.0, //near clip
200.0); //far clip
glMatrixMode(GL_MODELVIEW); //changes the current matrix to the modelview matrixNext we need to create our redraw() function which will draw our triangle. glClear() called with GL_COLOR_BUFFER_BIT and GL_DEPTH_BUFFER_BIT will clear the colour and depth buffers in our window. We need to do this before we start drawing on it.
glutMainLoop(); //the main loop of the GLUT framework
return 0;
}
static void redraw(void) //all drawing code goes hereNow we're almost ready to start drawing. First though we need to store our camera's position ((0,0,0) on the x, y and z axes - the center of our world) with glPushMatrix() and then move it 100 on the Z axis, effectively moving the camera backwards, enabling us to see what we're drawing. Because the modelview matrix specifies where we are drawing relative to the camera, to move the camera we need to translate the matrix by the reverse of the translation we want from the camera, so to move the camera (0,0,100) we translate the modelview matrix (0,0,-100). This has the same effect as moving our triangle (0,0,-100).
{
glClear(GL_COLOR_BUFFER_BIT | GL_DEPTH_BUFFER_BIT); //clears the colour and depth buffers
glPushMatrix(); //saves the current matrix on the top of the matrix stackNow we're going to draw the triangle. In order to do this, we need to call glBegin(GL_TRIANGLES), which tells OpenGL we're going to begin drawing triangles. OpenGL will then treat every group of three vertices as a triangle, and when glEnd() is called it will render the triangle(s) to our window.
glTranslatef(0,0,-100); //translates the current matrix 0 in x, 0 in y and -100 in z
Between the glBegin() and glEnd() we need to specify 3 vertices with glVertex3f. The three values specified in the each glVertex3f() call are the vertex's X, Y and Z coordinates in world space. We can also specify a colour for each of the vertices by using glColor3f() before each call to glVertex3f. The parameters we call glColor3f() with are the red, green and blue elements (from 0 to 1), which make up the colour. OpenGL will then blend the colours across the triangle.
glBegin(GL_TRIANGLES); //tells OpenGL that we're going to start drawing trianglesNext we retrieve our saved matrix from the top of the matrix stack with glPopMatrix(), setting the camera's position back to (0,0,0), ready for the next frame. Because we're using double buffering, all drawing has been done on the back buffer (the invisible buffer). Now the frame is completed we call glutSwapBuffers() to swap the front buffer (the visible buffer) and back buffer over, making what we have drawn visible.
glColor3f(1,0,0); //sets the current colour to red
glVertex3f(-30,-30,0); //specifies the first vertex of our triangle
glColor3f(0,1,0); //sets the current colour to green
glVertex3f(30,-30,0); //specifies the second vertex of our triangle
glColor3f(0,0,1); //sets the current colour to blue
glVertex3f(-30,30,0); //specifies the third vertex of our triangle
glEnd(); //tells OpenGL that we've finished drawing
glPopMatrix(); //retrieves our saved matrix from the top of the matrix stackThat's it! The end of our program and this tutorial. Build the program and try it out.
glutSwapBuffers(); //swaps the front and back buffers
} //The end of our program!
Hopefully with the help of this tutorial you should now be able to build and initialize a GLUT program and draw triangles. If you want to give some feedback on this tutorial or have any questions, please email me.
This tutorial is Copyright © 2001 Ben Woodhouse
Download attached article resource


