
Sorry to keep hammering on "Voxel Cone Tracing", with a looong post, but since I'm pretty close (I think) I want to finish it for once and for all.
It works more or less now. I can sample GI and specular light from a mipmapped octree. But, it just doesn't look good. Some parts do, some absolutely not. The 3 major issues (besides performance):
- Light doesn't spread that far (1 bounce), especially not in narrow corridors that I have
- Light spreads unequal. Incoming colors & strength vary too much.
- Messy colors
- Banding artifacts (see previous post)
- Grainy result due low input resolution & jittering blur
However, when looking at Unreal4 or Crassins results, I believe better results should be possible. So I'm basically curious if someone with experience can point me to the cheats or critical implementation parts. Hence, if you have a interest & time, I would even invite you to help setting up VCT for our game "Tower22". I spend too much hours in GI the last year(s), the pain has to end!
--------
Let's walk through the issues. But first, there might be bugs in my implementation that contribute to these errors. Then again, ALL raymarch / 3D-texture related techniques I tried so far are showing the same problems, not VCT in particular. So maybe I'm always making the same mistakes.
1- Light doesn't spread that far
In Tower22, the environments are often narrow corridors. If you shine a light there, the opposite wall, floor or ceiling would catch light, making an "area" around a spotlight. But that's pretty much it. Not that I expect too much from a single bounce, but in Unreal4, the area is noticably affected by incoming light. Even if it's just a narrow beam falling through a ceiling gap. The light gradually fades in or not, nost just pops in a messy way on surfaces that suddenly catch a piece of light.
Or how about this:
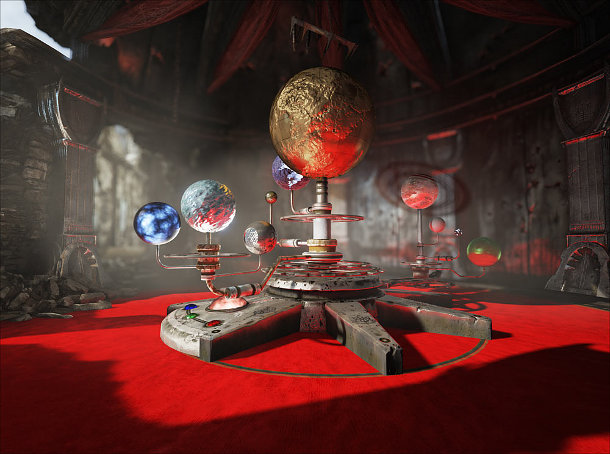
Assuming the light only comes from the topleft corner, then how does the shadowed parts of the red-carpet compute light if they only use 1 bounce?? The first bounce would fire the light back into the air, explaining the ceiling, spheres and walls receiving some "red" from the carpet. But the floor itself should remain black mostly.
Unless they use 2 bounces, or simply another trick (AO / Skylight?) in addition. Going to 2 bounces sounds like a must to me, but first I want to make sure I'm doing everything right in the first bounce. And buy a much faster computer.
[attachment=12874:VCT_ObesitasCones.jpg]
2- Unequal light spread
This is killing the quality. It could be code errors, although I don't see bugs in particular when looking at the specular results. Meaning the rays collide at the correct points, also in the higher mipmaps.
[attachment=12875:VCT_Darkness.jpg]
With GI though, it just becomes messy. This has to do with banding errors (see #4), but I suspect more is going on. For the info, I'm using 9 rays for GI. The cone angle is adjustable. When using a different cone, the results are different as well, but not "worse" or "better". Just different. I think the cones shouldn't be too wide (in narrow environments, see pic above), or your rays will quickly stop half way the corridor as they already collide. Making them narrow on the other hand gives undersampling issues, so 9 rays becomes too little.
When you look at some of my shots, you can clearly recognize tiles. I mask that a bit by varying the sample directions randomly a bit, and by blurring afterwards. But still. you can pick them out easily (not good!). This has to do with mipmapping problems, see picture. The higher mipmapped levels aren't always smoothed, making them look MineCrafted. This is because when I sample from the brick corners in their child nodes, those locations may not be filled by geometry at that exact location (thus black pixels). Ifso, the
mipmapper samples from the brick center instead to prevent the result turning black. Well, difficult story.
[attachment=12876:VCT_TilesAndBanding.jpg]
The badness becomes far more visible when I show AO instead of colors. AO is then simply based on the average distance the 9 rays traveled. But it just varies for each location. I'm guessing some of the rays slip through walls, giving the maximum travel distance. It's nowhere close to the smooth result Crassin showed.
3- Messy colors
In addition to #2, I wonder if I inject the lighting right into the octree. If you look at the shots, you see the octree basically contains a blurry version of the actual scene. You also recognize the textures back in it (see the wood or wallpaper varying colors). This variation in color will also have its effect on the result, making it more messy. Plus in this particular case, the room will get very orange/brownish because most of the reflected color comes from that brown wood floor. Maybe its better to saturate the colors more towards grayish values, and maybe use 1 single color per texture. To reduce the variation.
[attachment=12877:VCT_OctreeContents.jpg]
4- Banding
My previous post explained it with pictures pretty well, and the conclusion was that you will always have banding errors more or less. Unless doing truly crazy tricks. In fact, user Jcabeleira showed me a picture of Unreal4 banding artifacts. However, those bands looked way less horrible than mines. Is it because they apply very strong blurring afterwards? I think their initial input already looks smoother. Also in the Crassin video, the glossy reflections look pretty smooth. Probably he uses a finer octree, more rays, more steps, and so on. Or is there something else I should know about?
My approach takes 4 steps per octree node. Earlier with only 1 step, I would per accident skip walls if the ray would sample somewhere at the edge of a node (stored as a brick in a volume texture). By taking multiple smaller steps, this problem was solved more or less, and the bands got finer (but still very noticable). Maybe I should take way more steps, but obviously, it will kill the performance as the amount of octree traversals and volume texture reads would increase insanely.
Yet another thing I might be doing wrong, is quadrilinear sampling (am I spelling that right?). In a mipmapped 3D texture, hardware does this for you. But in our case the 3D texture is sparse, meaning the bricks are scattered everywhere. So instead of really mipmapping the volume texture, I just generete extra bricks for the higher mipmap levels that are placed elsewhere. When travering the octree, it remembers the target node, but also the previous node from 1 level higher. This gives access to two different bricks,
so I can lerp between them. Not very subtle though. Each time I have to read the textures, I actually read 6 times. Positive or Negative X value, positive or negative Y value, pos/neg Z value. And that for 2 mipmap levels.
5- Grain
The grain is easy to explain, and probably the easiest to fix. I'm doing the sampling at 1/4 size of the screen. Then upscale it with a jitter blur. This produces big random blurry pixels. Using 1/2 of the screensize would save a lot, but again makes the technique a lot slower. No idea what Unreal4 does.
Apologees for the long post, but I just don't know how to explain it shorter. Complex stuff!!
Rick
")


