The following is an excerpt from the book, Unity 2017 Game Development Essentials - Third Edition written by Tommaso Lintrami and published by Packt Publishing.
Unity makes the game production process simple by giving you a set of logical steps to build any conceivable game scenario. Renowned for being non-game-type specific, Unity offers you a blank canvas and a set of consistent procedures to let your imagination be the limit of your creativity.
Essential Unity concepts
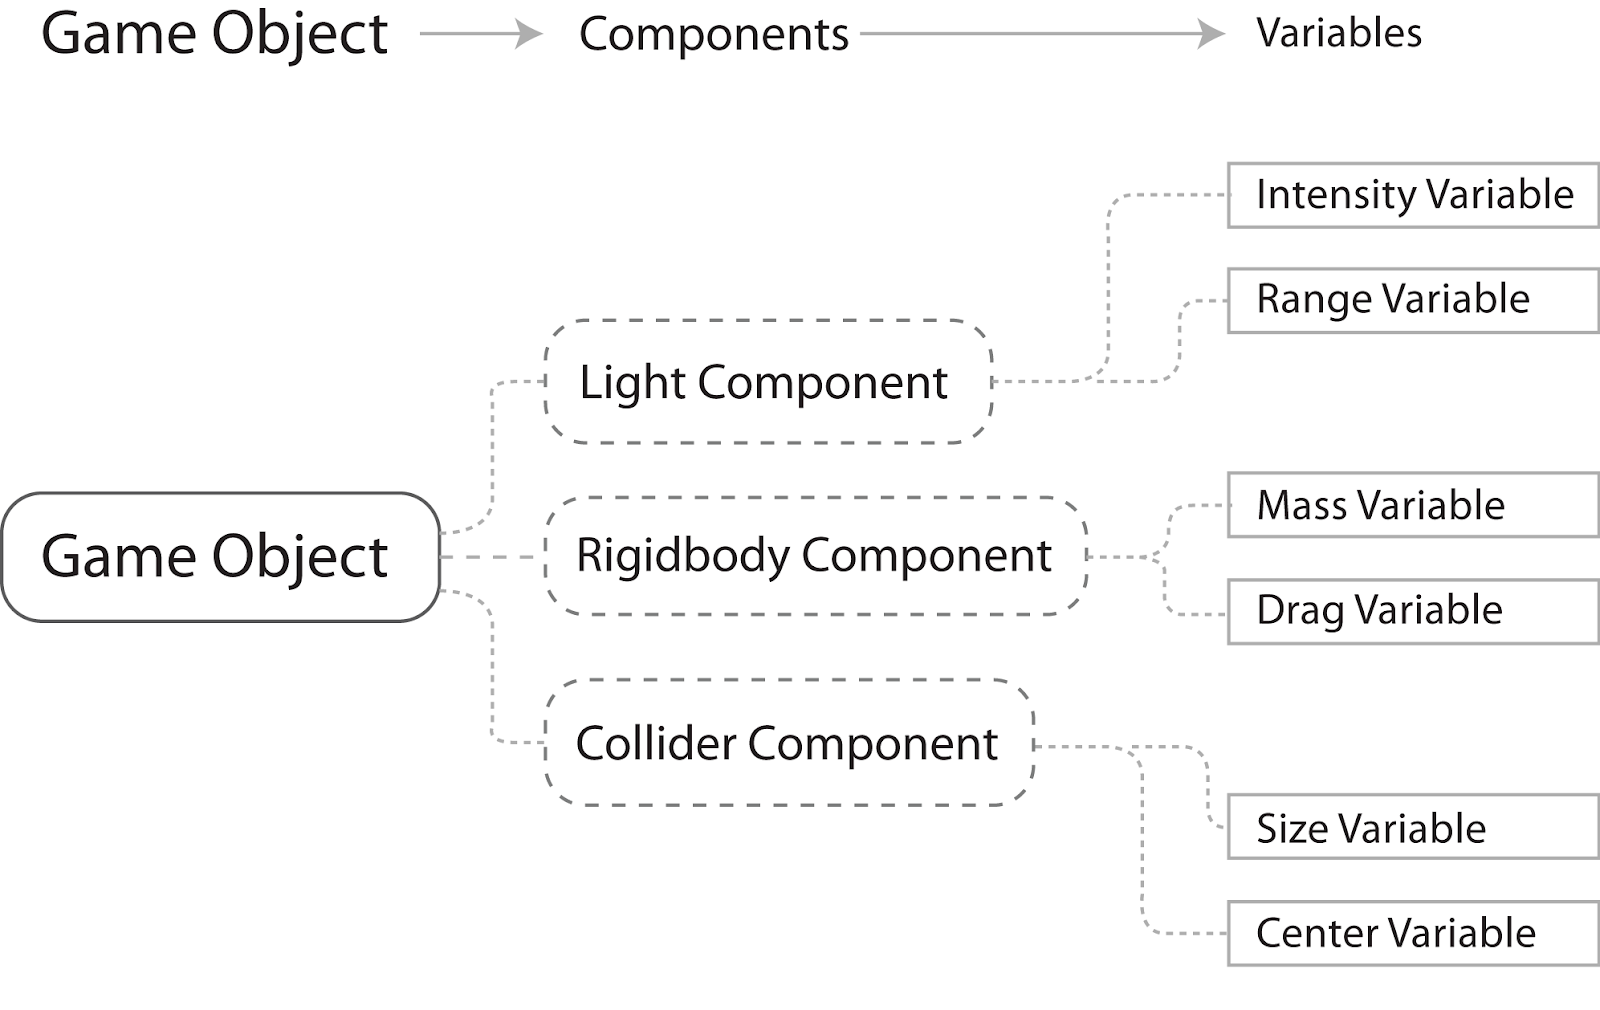
By establishing the use of the Game Object concept, you are able to break down parts of your game into easily manageable objects, which are made of many individual component parts. By making individual objects within the game, introducing functionality to them with each component you add, you are able to infinitely expand your game in a logical, progressive manner. Component parts in turn have Variables, which are essentially properties of the component, or settings to control them with. By adjusting these variables, you'll have complete control over the effect that a component has on your object. The following diagram illustrates this:
Assets
These are the building blocks of all Unity projects. From textures in the form of image files, through 3D models for meshes, and sound files for effects, Unity refers to the files you'll use to create your game as assets. This is why, in any Unity project folder, all files used are stored in a child folder named Assets. This Assets folder is mirrored in the Project panel of the Unity interface; see the interface section in this chapter for more detail.
Scenes
In Unity, you should think of scenes as individual levels or areas of game content. However, some developers create entire games in a single scene, such as puzzle games, by dynamically loading content through the code. By constructing your game with many scenes, you'll be able to distribute loading times and test different parts of your game individually. New scenes are often used separately to a game scene you may be working on in order to prototype or test a piece of potential gameplay.
Any currently open scene is what you are working on. In Unity 2017, you can load more scenes into the hierarchy while editing, and even at runtime, through the new SceneManager API, where two or more scenes can be worked on simultaneously. Scenes can be manipulated and constructed by using the Hierarchy and Scene views.
OK, now that we know what assets and scenes let’s start setting up a scene and building a game asset.
Setting up a scene and preparing game assets
Create a new scene from the main menu by navigating to Assets | Create | Scene, and name it ParallaxGame. In this new scene, we will set up, step by step, all the elements for our 2D game prototype. First of all, we will switch the camera setting in the Scene view to 2D by clicking on the button as shown by the red arrow in the following screenshot:
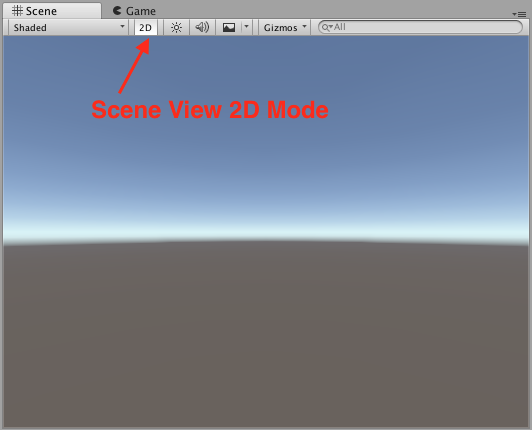
As you can see, now the Scene view camera is orthographic. You can't rotate it as you wish, as you can do with the 3D camera. Of course, we will want to change this setting on our Main Camera as well.
Also, we want to change the Orthographic size to 4.5 to have the correct view of the scene. Instead, for the Skybox, we will choose a very dark or black color as clear color in the depth setting. This is how the Inspector should look when these settings are done:

While the Clipping Planes distances are important for setting the size of the frustum cone of a 3D, for the Perspective camera (inside which everything will be rendered by the engine), we should only set the Orthographic Size to 4.5, to have the correct distance of the 2D camera from the scene.
When these settings are done, proceed by importing Chapter2-3-4.unitypackage into the project. You can either double-click on the package file with Unity open, or use the top menu: Assets | Import | Custom Package. If you haven't imported all the materials from the book's code already, be sure to include the Sprites subfolder. After the import, look in the Sprites/Parallax/DarkCave folder in the Project view and you will find some images imported as textures (as per default).
The first thing we want to do now is to change the import settings of these images, in the Inspector, from Texture to Sprite (2D and UI). To do so, select all the images in the Project view in the Sprites/Parallax/DarkCave folder, all except the _reference_main_post file.
Which is just a picture used as a reference of what the game level should look like:
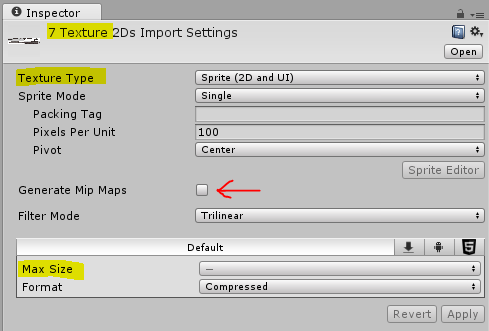
The Import Settings shown in the Inspector after selecting the seven images in the Project view
The Max Size setting is hidden (-) because we have a multi-selection of image files. After having made the multiple selections, again, in the Inspector, we will do the following:
- Set the Texture Type option to Sprites (2D and UI). By default, images are imported as textures; to import them as Sprites, this type must be set.
- Uncheck the Generate Mip Maps option as we don't need MIP maps for this project as we are not going to look at the Sprites from a distant point of view, for example, games with the zoom-in/zoom-out feature (like the original Grand Theft Auto 2D game) would need this setting checked.
- Set Max Size to the maximum allowed. To ensure that you import all the images at their maximum resolution, set this to 8192. This is the maximum resolution size for an image on a modern PC, imported as a Sprite or texture. We set it so high because most of the background images we have in the collection are around 6,000 pixels wide.
- Click on the Apply button to apply these changes to all the images that were selected:
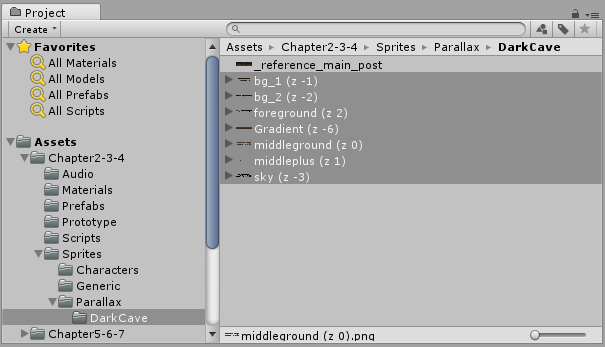
The Project view showing the content of the folder after the images have been set to Sprite in the Import Settings.
Placing the prefabs in the game
Unity can place the prefabs in the game in many ways, the usual, visual method is to drag a stored prefab or another kind of file/object directly into the scene. Before dragging in the Sprites we imported, we will create an empty GameObject and rename it ParallaxCave.
We will drag the layer images we just imported as Sprites, one by one, from the Project view (pointing at the Assets/Chapters2-3-4/Sprites/Background/DarkCave folder) into the Scene view, or more simply, directly in the Hierarchy view as the children of our ParallaxCaveGameObject, resulting in a scene Hierarchy like the one illustrated here:

You can't drag all of them instantly because Unity will prompt you to save an animation filename for the selected collection of Sprites; we will see this later for our character and for the collectable graphics.
QuoteThe ParallaxCaveGameObject and its children are in blue because this GameObject is stored as a prefab. When the link with the prefab is broken for a modification, the GameObject in the Hierarchy will become black again. When you see a red GameObject in the scene, it means that the prefab file that was linked to that GameObject was deleted.
Importing and placing background layers
In any game engine, 2D elements, such as Sprites, are rendered following a sort order; this order is also called the z-order because it is a way to express the depth or to cope with the missing z axis in a two-dimensional context. The sort order is assigned an integer number which can be positive or negative; 0 is the middle point of this draw order.
Ideally, a sort order of zero expresses the middle ground, where the player will act, or near its layer. Look at this image:
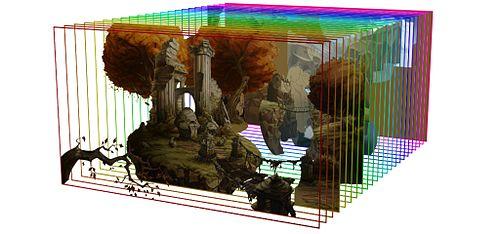
Image courtesy of Wikipedia: parallax scrolling
All positive numbers will render the Sprite element in front of the other elements with a lower number. The graphic set we are going to use was taken from the Open Game Art website at http://opengameart.org.
For simplicity, the provided background image files are named with a number within parentheses, for example, middleground(z1), which means that this image should be rendered with a z sort order of 1.
Change the sort order property of the Sprite component on each child object under ParallaxCave according to the value in the parentheses at the end of their filenames. This will rearrange the graphics into the appropriately sorted order.
After we place and set the correct layer order for all the images, we should arrange and scale the layers in a proper manner to end as something like the reference image furnished in the Assets/Chapters2-3-4/Sprites/Background/DarkCave/ folder.
You can take a look at the final result for this part anytime, by saving the current scene and loading the Chapter3_start.unity scene.
QuoteOn the optimization side, Sprites can be packed together in a single atlas texture with the Sprite Packer into a single image atlas (a single image containing a whole group of Sprites). We will see this passively with already-made-for-the-book Sprite sheets containing the animations of the character in this chapter and actively for packing all the generic graphics to make the best running performance possible in Chapter 13, Optimization and Final touches.
You just read an excerpt from the book, Unity 2017 Game Development Essentials - Third Edition written by Tommaso Lintrami and published by Packt Publishing.
Use the code ORGDA10 at checkout to get recommended eBook retail price for $10 only until April 30, 2018.