In this article by Nathan Burba, author of Cocos2d for iPhone 1 Game Development Cookbook, we will cover the following topics:
Drawing sprites
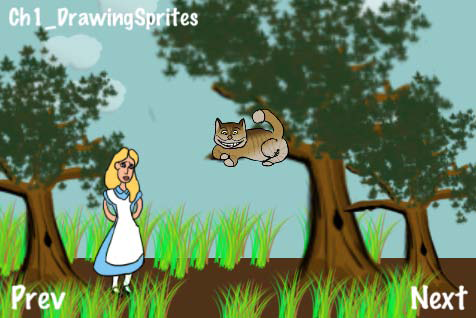
The most fundamental task in 2D game development is drawing a sprite. Cocos2d provides the user with a lot of flexibility in this area. In this recipe we will cover drawing sprites using CCSprite, spritesheets, CCSpriteFrameCache, and CCSpriteBatchNode. We will also go over mipmapping. In this recipe we see a scene with Alice from Through The Looking Glass.
Getting ready
Please refer to the project RecipeCollection01 for the full working code of this recipe.
How to do it...
Execute the following code:
@implementation Ch1_DrawingSprites

-(CCLayer*) runRecipe {

  /*** Draw a sprite using CCSprite ***/

  CCSprite *tree1 = [CCSprite spriteWithFile:@"tree.png"];


  //Position the sprite using the tree base as a guide (y anchor

point = 0)

[tree1 setPosition:ccp(20,20)];

  tree1.anchorPoint = ccp(0.5f,0);

  [tree1 setScale:1.5f];

  [self addChild:tree1 z:2 tag:TAG_TREE_SPRITE_1];


  /*** Load a set of spriteframes from a PLIST file and draw one by

name ***/


  //Get the sprite frame cache singleton

  CCSpriteFrameCache *cache = [CCSpriteFrameCache

sharedSpriteFrameCache];


  //Load our scene sprites from a spritesheet

  [cache addSpriteFramesWithFile:@"alice_scene_sheet.plist"];


  //Specify the sprite frame and load it into a CCSprite

  CCSprite *alice = [CCSprite spriteWithSpriteFrameName:@"alice.png"];


  //Generate Mip Maps for the sprite

  [alice.texture generateMipmap];

  ccTexParams texParams = { GL_LINEAR_MIPMAP_LINEAR, GL_LINEAR, GL_

CLAMP_TO_EDGE, GL_CLAMP_TO_EDGE };

  [alice.texture setTexParameters:&texParams];


  //Set other information.

  [alice setPosition:ccp(120,20)];

  [alice setScale:0.4f];

  alice.anchorPoint = ccp(0.5f,0);


  //Add Alice with a zOrder of 2 so she appears in front of other

sprites

  [self addChild:alice z:2 tag:TAG_ALICE_SPRITE];


  //Make Alice grow and shrink.

  [alice runAction: [CCRepeatForever actionWithAction:

   [CCSequence actions:[CCScaleTo actionWithDuration:4.0f scale

:0.7f], [CCScaleTo actionWithDuration:4.0f scale:0.1f], nil] ] ];


  /*** Draw a sprite CGImageRef ***/

  UIImage *uiImage = [UIImage imageNamed: @"cheshire_cat.png"];

  CGImageRef imageRef = [uiImage CGImage];

  CCSprite *cat = [CCSprite spriteWithCGImage:imageRef key:@

"cheshire_cat.png"];

  [cat setPosition:ccp(250,180)];

  [cat setScale:0.4f];

  [self addChild:cat z:3 tag:TAG_CAT_SPRITE];


  /*** Draw a sprite using CCTexture2D ***/

  CCTexture2D *texture = [[CCTextureCache sharedTextureCache]

addImage:@"tree.png"];

  CCSprite *tree2 = [CCSprite spriteWithTexture:texture];

  [tree2 setPosition:ccp(300,20)];

  tree2.anchorPoint = ccp(0.5f,0);

  [tree2 setScale:2.0f];

  [self addChild:tree2 z:2 tag:TAG_TREE_SPRITE_2];


  /*** Draw a sprite using CCSpriteFrameCache and CCTexture2D ***/

  CCSpriteFrame *frame = [CCSpriteFrame frameWithTexture:texture

rect:tree2.textureRect];

  [[CCSpriteFrameCache sharedSpriteFrameCache] addSpriteFrame:

frame name:@"tree.png"];

  CCSprite *tree3 = [CCSprite spriteWithSpriteFrame:[[CCSpriteFrame

Cache sharedSpriteFrameCache] spriteFrameByName:@"tree.png"]];

  [tree3 setPosition:ccp(400,20)];

  tree3.anchorPoint = ccp(0.5f,0);

  [tree3 setScale:1.25f];

  [self addChild:tree3 z:2 tag:TAG_TREE_SPRITE_3];


  /*** Draw sprites using CCBatchSpriteNode ***/


  //Clouds

  CCSpriteBatchNode *cloudBatch = [CCSpriteBatchNode

batchNodeWithFile:@"cloud_01.png" capacity:10];

  [self addChild:cloudBatch z:1 tag:TAG_CLOUD_BATCH];

  for(int x=0; x   CCSprite *s = [CCSprite spriteWithBatchNode:cloudBatch

rect:CGRectMake(0,0,64,64)];

   [s setOpacity:100];

   [cloudBatch addChild:s];

   [s setPosition:ccp(arc4random()%500-50, arc4random()%150+200)];

  }


  //Middleground Grass

  int capacity = 10;

  CCSpriteBatchNode *grassBatch1 = [CCSpriteBatchNode

batchNodeWithFile:@"grass_01.png" capacity:capacity];

  [self addChild:grassBatch1 z:1 tag:TAG_GRASS_BATCH_1];

  for(int x=0; x   CCSprite *s = [CCSprite spriteWithBatchNode:grassBatch1

rect:CGRectMake(0,0,64,64)];

   [s setOpacity:255];

   [grassBatch1 addChild:s];

   [s setPosition:ccp(arc4random()%500-50, arc4random()%20+70)];

  }


  //Foreground Grass

  CCSpriteBatchNode *grassBatch2 = [CCSpriteBatchNode

batchNodeWithFile:@"grass_01.png" capacity:10];

  [self addChild:grassBatch2 z:3 tag:TAG_GRASS_BATCH_2];

  for(int x=0; x   CCSprite *s = [CCSprite spriteWithBatchNode:grassBatch2

rect:CGRectMake(0,0,64,64)];

   [s setOpacity:255];

   [grassBatch2 addChild:s];

   [s setPosition:ccp(arc4random()%500-50, arc4random()%40-10)];

  }


  /*** Draw colored rectangles using a 1px x 1px white texture ***/


  //Draw the sky using blank.png

  [self drawColoredSpriteAt:ccp(240,190) withRect:CGRectMa

ke(0,0,480,260) withColor:ccc3(150,200,200) withZ:0];


  //Draw the ground using blank.png

  [self drawColoredSpriteAt:ccp(240,30)

withRect:CGRectMake(0,0,480,60) withColor:ccc3(80,50,25) withZ:0];


  return self;

}


-(void) drawColoredSpriteAt:(CGPoint)position withRect:(CGRect)rect

withColor:(ccColor3B)color withZ:(float)z {

  CCSprite *sprite = [CCSprite spriteWithFile:@"blank.png"];

  [sprite setPosition:position];

  [sprite setTextureRect:rect];

  [sprite setColor:color];

  [self addChild:sprite];


  //Set Z Order

  [self reorderChild:sprite z:z];

}


@end
How it works...
This recipe takes us through most of the common ways of drawing sprites:
- Creating a CCSprite from a file:
First, we have the simplest way to draw a sprite. This involves using the CCSprite class method as follows:
+(id)spriteWithFile:(NSString*)filename;
This is the most straightforward way to initialize a sprite and is adequate for many situations.
- Other ways to load a sprite from a file:
After this, we will see examples of CCSprite creation using UIImage/CGImageRef, CCTexture2D, and a CCSpriteFrame instantiated using a CCTexture2D object. CGImageRef support allows you to tie Cocos2d into other frameworks and toolsets. CCTexture2D is the underlying mechanism for texture creation.
- Loading spritesheets using CCSpriteFrameCache:
Next, we will see the most powerful way to use sprites, the CCSpriteFrameCache class. Introduced in Cocos2d-iPhone v0.99, the CCSpriteFrameCache singleton is a cache of all sprite frames. Using a spritesheet and its associated PLIST file we can load multiple sprites into the cache. From here we can create CCSprite objects with sprites from the cache:
+(id)spriteWithSpriteFrameName:(NSString*)filename;
- Mipmapping:
Mipmapping allows you to scale a texture or to zoom in or out of a scene without aliasing your sprites. When we scale Alice down to a small size, aliasing will inevitably occur. With mipmapping turned on, Cocos2d dynamically generates lower resolution textures to smooth out any pixelation at smaller scales. Go ahead and comment out the following lines:
[alice.texture generateMipmap];

  ccTexParams texParams = { GL_LINEAR_MIPMAP_LINEAR, GL_LINEAR,

GL_CLAMP_TO_EDGE, GL_CLAMP_TO_EDGE };

  [alice.texture setTexParameters:&texParams];
Now you should see this pixelation as Alice gets smaller.
- Drawing many derivative sprites with CCSpriteBatchNode:
The CCSpriteBatchNode class, added in v0.99.5, introduces an efficient way to draw and re-draw the same sprite over and over again. A batch node is created with the following method:
CCSpriteBatchNode *cloudBatch = [CCSpriteBatchNode

batchNodeWithFile:@"cloud_01.png" capacity:10];
Then, you create as many sprites as you want using the follow code:
CCSprite *s = [CCSprite spriteWithBatchNode:cloudBatch

rect:CGRectMake(0,0,64,64)];

  [cloudBatch addChild:s];
Setting the capacity to the number of sprites you plan to draw tells Cocos2d to allocate that much space. This is yet another tweak for extra efficiency, though it is not absolutely necessary that you do this. In these three examples we draw 10 randomly placed clouds and 60 randomly placed bits of grass.
- Drawing colored rectangles:
Finally, we have a fairly simple technique that has a variety of uses. By drawing a sprite with a blank 1px by 1px white texture and then coloring it and setting its textureRect property we can create very useful colored bars:
CCSprite *sprite = [CCSprite spriteWithFile:@"blank.png"];

[sprite setTextureRect:CGRectMake(0,0,480,320)];

[sprite setColor:ccc3(255,128,0)];
In this example we have used this technique to create very simple ground and sky backgrounds.
Coloring sprites
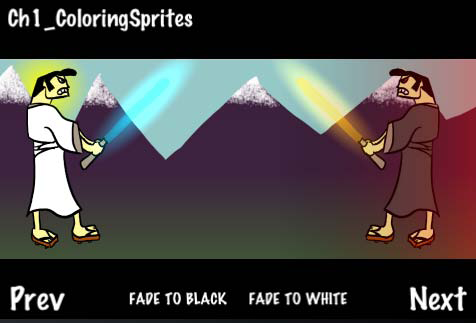
In the previous recipe we used colored rectangles to draw both the ground and the sky. The ability to set texture color and opacity are simple tools which, if used properly, can create very cool effects. In this recipe we will create a cinematic scene where two samurai face each other with glowing swords.
Getting ready
Please refer to the project RecipeCollection01 for full working code of this recipe. Also, note that some code has been omitted for brevity.
How to do it...
Execute the following code:
#import "CCGradientLayer.h


@implementation Ch1_ColoringSprites


-(CCLayer*) runRecipe {

  [self initButtons];


  //The Fade Scene Sprite

  CCSprite *fadeSprite = [CCSprite spriteWithFile:@"blank.png"];

  [fadeSprite setOpacity:0];

  [fadeSprite setPosition:ccp(240,160)];

  [fadeSprite setTextureRect:CGRectMake(0,0,480,320)];

  [self addChild:fadeSprite z:3 tag:TAG_FADE_SPRITE];


  //Add a gradient below the mountains

//CCGradientDirectionT_B is an enum provided by CCGradientLayer

  CCGradientLayer *gradientLayer = [CCGradientLayer layerWithColor:

ccc4(61,33,62,255) toColor:ccc4(65,89,54,255) withDirection:

CCGradient DirectionT_B width:480 height:100];

  [gradientLayer setPosition:ccp(0,50)];

  [self addChild:gradientLayer z:0 tag:TAG_GROUND_GRADIENT];


  //Add a sinister red glow gradient behind the evil samurai

  CCGradientLayer *redGradient = [CCGradientLayer

layerWithColor:ccc4(0,0,0,0) toColor:ccc4(255,0,0,100) withDirection

:CCGradientDirectionT_B width:200 height:200];

  [redGradient setPosition:ccp(280,60)];

  [redGradient setRotation:-90];

  [self addChild:redGradient z:2 tag:TAG_RED_GRADIENT];


  // Make the swords glow

  [self glowAt:ccp(230,280) withScale:CGSizeMake(3.0f, 11.0f)

withColor:ccc3(0,230,255) withRotation:45.0f withSprite:goodSamurai];

  [self glowAt:ccp(70,280) withScale:CGSizeMake(3.0f, 11.0f)

withColor:ccc3(255,200,2) withRotation:-45.0f withSprite:evilSamurai];


  return self;

}


-(void) initButtons {

  [CCMenuItemFont setFontSize:16];


  //'Fade To Black' button

  CCMenuItemFont* fadeToBlack = [CCMenuItemFont itemFromString:@

"FADE TO BLACK" target:self selector:@selector(fadeToBlackCallback:)];

  CCMenu *fadeToBlackMenu = [CCMenu menuWithItems:fadeToBlack, nil];

   fadeToBlackMenu.position = ccp( 180 , 20 );

   [self addChild:fadeToBlackMenu z:4 tag:TAG_FADE_TO_BLACK];

}


/* Fade the scene to black */

-(void) fadeToBlackCallback:(id)sender {

  CCSprite *fadeSprite = [self getChildByTag:TAG_FADE_SPRITE];

  [fadeSprite stopAllActions];

  [fadeSprite setColor:ccc3(0,0,0)];

  [fadeSprite setOpacity:0.0f];

  [fadeSprite runAction:

  [CCSequence actions:[CCFadeIn actionWithDuration:2.0f], [CCFadeOut

actionWithDuration:2.0f], nil] ];

}


/* Create a glow effect */

-(void) glowAt:(CGPoint)position withScale:(CGSize)size

withColor:(ccColor3B)color withRotation:(float)rotation

withSprite:(CCSprite*)sprite {

  CCSprite *glowSprite = [CCSprite spriteWithFile:@"fire.png"];

  [glowSprite setColor:color];

  [glowSprite setPosition:position];

  [glowSprite setRotation:rotation];

  [glowSprite setBlendFunc: (ccBlendFunc) { GL_ONE, GL_ONE }];

  [glowSprite runAction: [CCRepeatForever actionWithAction:

   [CCSequence actions:[CCScaleTo actionWithDuration:0.9f

scaleX:size.width scaleY:size.height], [CCScaleTo

actionWithDuration:0.9f scaleX:size.width*0.75f scaleY:size.

height*0.75f], nil] ] ];

  [glowSprite runAction: [CCRepeatForever actionWithAction:

   [CCSequence actions:[CCFadeTo actionWithDuration:0.9f

opacity:150], [CCFadeTo actionWithDuration:0.9f opacity:255], nil] ]

];

  [sprite addChild:glowSprite];

}


@end
How it works...
This recipe shows a number of color based techniques.
- Setting sprite color:
The simplest use of color involves setting the color of a sprite using the following method:
-(void) setColor:(ccColor3B)color;
Setting sprite color effectively reduces the color you can display but it allows some programmatic flexibility in drawing. In this recipe we use setColor for a number of things, including drawing a blue sky, a yellow sun, black "dramatic movie bars", and more.
ccColor3B is a C struct which contains three GLubyte variables. Use the following helper macro to create ccColor3B structures:
ccColor3B ccc3(const GLubyte r, const GLubyte g, const GLubyte

b);
Cocos2d also specifies a number of pre-defined colors as constants. These include the following:
ccWHITE, ccYELLOW, ccBLUE, ccGREEN, ccRED,

ccMAGENTA, ccBLACK, ccORANGE, ccGRAY
- Fading to a color:
To fade a scene to a specific color we use the blank.png technique we went over in the last recipe. We first draw a sprite as large as the screen, then color the sprite to the color we want to fade to, and then finally run a CCFadeIn action on the sprite to fade to that color:
[fadeSprite setColor:ccc3(255,255,255)];

[fadeSprite setOpacity:0.0f];

[fadeSprite runAction: [CCFadeIn actionWithDuration:2.0f] ];
- Using CCGradientLayer:
Using the CCGradientLayer class we can programmatically create gradients. To make the mountains in the background fade into the ground the two samurai are standing on we created a gradient using this method:
  CCGradientLayer *gradientLayer = [CCGradientLayer layerWithColor

:ccc4(61,33,62,255) toColor:ccc4(65,89,54,255) withDirection:CCGra

dientDirectionT_B width:480 height:100];

  [gradientLayer setPosition:ccp(0,50)];

  [self addChild:gradientLayer z:0 tag:TAG_GROUND_GRADIENT];
Because CCGradientLayer lets you control opacity as well as color, it has many uses. As you can see there is also a sinister red glow behind the evil samurai.
- Making a sprite glow: To make the swords in the demo glow we use subtle color manipulation, additive blending and fading and scaling actions. First we load the fire.png sprite supplied by Cocos2d. By changing its X and Y scale independently we can make it thinner or fatter. Once you have the desired scale ratio (in this demo we use x:y 3:11 because the sword is so thin) you can constantly scale and fade the sprite in and out to give some life to the effect. You also need to set the blend function to { GL_ONE, GL_ONE } for additive blending. Finally this effect sprite is added to the actual sprite to make it seem like it glows.
CCSprite *glowSprite = [CCSprite spriteWithFile:@"fire.png"];

  [glowSprite setColor:color];

  [glowSprite setPosition:position];

  [glowSprite setRotation:rotation];

  [glowSprite setBlendFunc: (ccBlendFunc) { GL_ONE, GL_ONE }];

  [glowSprite runAction: [CCRepeatForever actionWithAction:

  [CCSequence actions:[CCScaleTo actionWithDuration:0.9f

scaleX:size.width scaleY:size.height], [CCScaleTo

actionWithDuration:0.9f scaleX:size.width*0.75f scaleY:size.

height*0.75f], nil] ] ];

  [glowSprite runAction: [CCRepeatForever actionWithAction:

  [CCSequence actions:[CCFadeTo actionWithDuration:0.9f

opacity:150], [CCFadeTo actionWithDuration:0.9f opacity:255], nil]

] ];

  [sprite addChild:glowSprite];
Animating sprites
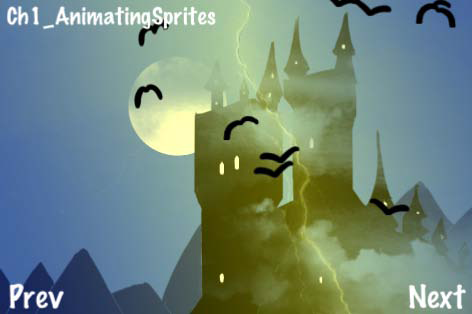
Now it is time to add some animation to our sprites. One thing that should be stressed about animation is that it is only as complicated as you make it. In this recipe we will use very simple animation to create a compelling effect. We will create a scene where bats fly around a creepy looking castle. I've also added a cool lightning effect based on the technique used to make the swords glow in the previous recipe.
Getting ready
Please refer to the project RecipeCollection01 for full working code of this recipe. Also note that some code has been omitted for brevity.
How to do it...
Execute the following code:
//SimpleAnimObject.h

@interface SimpleAnimObject : CCSprite {

  int animationType;

  CGPoint velocity;

}


@interface Ch1_AnimatingSprites {

  NSMutableArray *bats;

  CCAnimation *batFlyUp;

  CCAnimation *batGlideDown;

  CCSprite *lightningBolt;

  CCSprite *lightningGlow;

  int lightningRemoveCount;

}


-(CCLayer*) runRecipe {

  //Add our PLIST to the SpriteFrameCache

  [[CCSpriteFrameCache sharedSpriteFrameCache]

addSpriteFramesWithFile:@"simple_bat.plist"];


  //Add a lightning bolt

  lightningBolt = [CCSprite spriteWithFile:@"lightning_bolt.png"];

  [lightningBolt setPosition:ccp(240,160)];

  [lightningBolt setOpacity:64];

  [lightningBolt retain];


  //Add a sprite to make it light up other areas.

  lightningGlow = [CCSprite spriteWithFile:@"lightning_glow.png"];

  [lightningGlow setColor:ccc3(255,255,0)];

  [lightningGlow setPosition:ccp(240,160)];

  [lightningGlow setOpacity:100];

  [lightningGlow setBlendFunc: (ccBlendFunc) { GL_ONE, GL_ONE }];

  [lightningBolt addChild:lightningGlow];


  //Set a counter for lightning duration randomization

  lightningRemoveCount = 0;


  //Bats Array Initialization

  bats = [[NSMutableArray alloc] init];


  //Add bats using a batch node.

  CCSpriteBatchNode *batch1 = [CCSpriteBatchNode

batchNodeWithFile:@"simple_bat.png" capacity:10];

  [self addChild:batch1 z:2 tag:TAG_BATS];


  //Make them start flying up.

  for(int x=0; x   //Create SimpleAnimObject of bat

   SimpleAnimObject *bat = [SimpleAnimObject

spriteWithBatchNode:batch1 rect:CGRectMake(0,0,48,48)];

  [batch1 addChild:bat];

  [bat setPosition:ccp(arc4random()%400+40, arc4random()%150+150)];


  //Make the bat fly up. Get the animation delay (flappingSpeed).

  float flappingSpeed = [self makeBatFlyUp:bat];


  //Base y velocity on flappingSpeed.

  bat.velocity = ccp((arc4random()%1000)/500 + 0.2f, 0.1f/

flappingSpeed);


  //Add a pointer to this bat object to the NSMutableArray

  [bats addObject:[NSValue valueWithPointer:bat]];

  [bat retain];


  //Set the bat's direction based on x velocity.

  if(bat.velocity.x > 0){

   bat.flipX = YES;

  }

 }


  //Schedule physics updates

  [self schedule:@selector(step:)];


  return self;

}


-(float)makeBatFlyUp:(SimpleAnimObject*)bat {

  CCSpriteFrameCache * cache = [CCSpriteFrameCache

sharedSpriteFrameCache];


  //Randomize animation speed.

  float delay = (float)(arc4random()%5+5)/80;

  CCAnimation *animation = [[CCAnimation alloc] initWithName:@

"simply_bat_fly" delay:delay];


  //Randomize animation frame order.

  int num = arc4random()%4+1;

  for(int i=1; i   [animation addFrame:[cache spriteFrameByName:[NSString

stringWithFormat:@"simple_bat_0%i.png",num]]];

   num++;

   if(num > 4){ num = 1; }

  }


  //Stop any running animations and apply this one.

  [bat stopAllActions];

  [bat runAction:[CCRepeatForever actionWithAction: [CCAnimate

actionWithAnimation:animation]]];


  //Keep track of which animation is running.

  bat.animationType = BAT_FLYING_UP;


  return delay; //We return how fast the bat is flapping.

}


-(void)makeBatGlideDown:(SimpleAnimObject*)bat {

  CCSpriteFrameCache * cache = [CCSpriteFrameCache

sharedSpriteFrameCache];


  //Apply a simple single frame gliding animation.

  CCAnimation *animation = [[CCAnimation alloc] initWithName:@

"simple_bat_glide" delay:100.0f];

 [animation addFrame:[cache spriteFrameByName:@"simple_bat_01.png"]];


  //Stop any running animations and apply this one.

  [bat stopAllActions];

  [bat runAction:[CCRepeatForever actionWithAction: [CCAnimate

actionWithAnimation:animation]]];


  //Keep track of which animation is running.

  bat.animationType = BAT_GLIDING_DOWN;

}


-(void)step:(ccTime)delta {

  CGSize s = [[CCDirector sharedDirector] winSize];


for(id key in bats){

  //Get SimpleAnimObject out of NSArray of NSValue objects.

  SimpleAnimObject *bat = [key pointerValue];


  //Make sure bats don't fly off the screen

  if(bat.position.x > s.width){

   bat.velocity = ccp(-bat.velocity.x, bat.velocity.y);

   bat.flipX = NO;

  }else if(bat.position.x	bat.velocity = ccp(-bat.velocity.x, bat.velocity.y);

   bat.flipX = YES;

  }else if(bat.position.y > s.height){

   bat.velocity = ccp(bat.velocity.x, -bat.velocity.y);

   [self makeBatGlideDown:bat];

  }else if(bat.position.y	bat.velocity = ccp(bat.velocity.x, -bat.velocity.y);

   [self makeBatFlyUp:bat];

  }


  //Randomly make them fly back up

  if(arc4random()%100 == 7){

   if(bat.animationType == BAT_GLIDING_DOWN){ [self

makeBatFlyUp:bat]; bat.velocity = ccp(bat.velocity.x, -bat.

velocity.y); }

   else if(bat.animationType == BAT_FLYING_UP){ [self

makeBatGlideDown:bat]; bat.velocity = ccp(bat.velocity.x, -bat.

velocity.y); }

  }


  //Update bat position based on direction

  bat.position = ccp(bat.position.x + bat.velocity.x, bat.position.y

+ bat.velocity.y);

  }


  //Randomly make lightning strike

  if(arc4random()%70 == 7){

  if(lightningRemoveCount	[self addChild:lightningBolt z:1 tag:TAG_LIGHTNING_BOLT];

   lightningRemoveCount = arc4random()%5+5;

   }

  }


  //Count down

  lightningRemoveCount -= 1;


  //Clean up any old lightning bolts

  if(lightningRemoveCount == 0){

   [self removeChildByTag:TAG_LIGHTNING_BOLT cleanup:NO];

  }

}


@end
How it works...
This recipe shows us how to structure animation based classes through the use of SimpleAnimObject:
- Animated object class structure:
When switching from one animation to another it is often important to keep track of what state the animated object is in. In our example we use SimpleAnimObject, which keeps an arbitrary animationType variable. We also maintain a velocity variable that has a Y scalar value that is inversely proportional to the animation frame delay:
@interface SimpleAnimObject : CCSprite {

  int animationType;

  CGPoint velocity;

}
Depending on how in-depth you want your animation system to be you should maintain more information such as, for example, a pointer to the running CCAnimation instance, frame information, and physical bodies.
There's more...
As you get more involved with Cocos2d game development you will become more and more tempted to use asynchronous actions for gameplay logic and AI. Derived from the CCAction class, these actions can be used for everything from moving a CCNode using CCMoveBy to animating a CCSprite using CCAnimate. When an action is run, an asynchronous timing mechanism is maintained in the background. First time game programmers often over-rely on this feature. The extra overhead required by this technique can multiply quickly when multiple actions are being run. In the following example we have used a simple integer timer that allows us to regulate how long lightning lasts onscreen:
//Randomly make lightning strike

if(arc4random()%70 == 7){

 if(lightningRemoveCount   [self addChild:lightningBolt z:1 tag:TAG_LIGHTNING_BOLT];

  lightningRemoveCount = arc4random()%5+5;

 }

}


//Count down

lightningRemoveCount -= 1;


//Clean up any old lightning bolts

if(lightningRemoveCount == 0){

 [self removeChildByTag:TAG_LIGHTNING_BOLT cleanup:NO];

}
Synchronous timers like the one shown in the preceding code snippet are often, but not always, preferable to asynchronous actions. Keep this in mind as your games grow in size and scope.
Summary
In this article we took a look at the basic uses of sprites.