Making a small cross platform project is pretty easy, you write some code and create makefiles or IDE projects for each platform and away you go. Unfortunately as soon as the project goes from a couple files to even a dozen, maintaining different build solutions for each platform becomes difficult if you want to maintain an agile working environment. The simple act of renaming or moving a file in such an environment can be difficult and as such, something people will tend to avoid.
For this reason, there are a number of cross platform "makefile" replacement systems such as BJam/Jam, Scons and others. Unfortunately makefile replacement systems don't make a lot of people happy because they can't use a favored IDE or whatever they are used to. Catering to peoples comfort zones is something I believe is important in any development environment. I've worked with people who swear by Vi and makefiles, fine by me, just please don't make me use Vi. As such there are other tools which are makefile replacements but don't actually perform the build process, instead they output makefiles, projects and/or solutions appropriate to the given platform and targeted IDE's. Among these tools is CMake, the solution I will be covering here.
A basic understanding of CMake will be presented over a series of articles. This article will cover the very basics of getting up and running and setting up a hierarchical project. Later articles will cover per-compiler and environment options and eventually incorporate the Test Driven Development portions of the title. Additions after that point will show methods of working within the environment effectively with some very nice tricks not generally available without using something like CMake as a fundamental portion of your build environment. Parts 1 2 3 4 5
CMake
CMake is a description and generator system, it takes a description of a project and generates whatever output you desire. So, if you desire to work with a text editor and makefiles, an IDE or some other variation, CMake allows you to work that way without forcing others to follow suit. It imposes only one thing, all definition is done in the CMake description files and as such you can't rename/add/move/etc a file in the IDE, or in the makefile, you need to use the CMake definition files for that. Once you get used to this though, it's not a horrible item to deal with, especially given the alternatives of maintaining multiple build solutions.
Preparations
For this article it is expected you have at least one of the initial target platforms setup for development work and of course that you have CMake installed. It is best to see things working in two different environments as such I would suggest setting up a virtual machine of Linux or Windows depending on your primary Os. VirtualBox is a free and reasonably usable VM which can be used for this purpose, of course OsX expects real Apple hardware so it has to be a primary Os if you happen to have a Mac. Setting such things up is beyond the scope of this article though, there are plenty of tutorials you can Google for if you need help in this area. The basic expectations per platform are:
- Windows: Visual Studio 2012 and CMake installed.
- OsX: Xcode and CMake installed.
- Linux: Basic development tools and CMake installed.
Again, install as appropriate to the system. Your CMake should be version 2.8 or higher if possible.
Hello World! CMake Style
Starting with the old standby "Hello World!" project, it is time to get an idea of how CMake fits into the workflow. Create a new directory called 'HelloWorld' and add two files with the following names and content:
main.c /* Hello World program */
#include main() { printf( "Hello World" ); }
CMakeLists.txt
CMAKE_MINIMUM_REQUIRED( VERSION 2.8.3 )
PROJECT( HelloWorld )
ADD_EXECUTABLE( HelloWorld main.c )
For the first usage of CMake, I'll cover the basics of the command line but in the future I'll be using the CMake GUI since it is considerably easier to use as options and configuration items are added to the project. Additionally, you probably want to download the zip file and keep it around as we will be examining some of the workings of CMake and needing a clean version of this project for each of the variations.
Open a terminal or command prompt and change your directory to be in the new 'helloworld' directory. Type the command 'cmake' and take a look at the information it outputs. It's a pretty big wall of text but the only portion you need to look at right now is at the end; the list of 'generators' available on your platform. I will be assuming you will use the following generators on the given platforms:
- Windows : "Visual Studio 11" (AKA Visual Studio 2012)
- OsX : "Xcode"
- Linux : "Unix Makefiles"
So, in the terminal, type the following command, replacing '' with one of the above strings. cmake -G "" For Windows, you would have typed in 'cmake -G "Visual Studio 11"'. During the first run CMake can take a while to complete. It is evaluating your system looking for the compiler and making sure it functions. It is also doing some items similar to what autoconf does in determining what header files are available, location of libraries and other items you can use in making your code compile cross platform.
Don't worry though, after the initial run, CMake will only evaluate your project description since it will have saved out the detection data, as such it is very fast after the initial scan. Once CMake completes, list the content of your directory in order to see what has been done. CMake has written out some data it will use in the future and the appropriate output file for your platform. I.e. on Windows a sln/proj pair of files.
At this point load the solution into Visual Studio or Xcode as appropriate, build and run the result. For Linux, simply type make and then ./HelloWorld. Assuming everything worked correctly, head back to the terminal and list the content of the directory again. I don't know about you but I really don't like how everything has been placed in a single directory and made a mess in and around the two files. It's actually worse under Linux since the '.o' intermediate files are placed in this same directory so you have a 'main.c' and a 'main.o'. In order to fix this, we use what CMake calls "out of source builds".
Remove all the CMake and build generated files such that you are back to having only the 'main.c' and 'CMakeLists.txt' files in your directory. (Or, just delete the directory and unpack the supplied zip again.) Go back to the terminal within the 'helloworld' directory and make a directory called "build" then change directory into the build directory. This new directory is where we want CMake to do all it's work from now on such that it won't dirty up the directory with our source files.
Calling CMake is basically the same with a single additional parameter: cmake -G "'generator name'" ../ Again, on Windows, this would be: 'cmake -G "Visual Studio 11" ../'. Now, if you look at what CMake has done, it put all of it's cache files and the generator output in this new directory. This is perfect and keeps the separation between code and intermediate data.
Load up Visual Studio or Xcode and build again, or type make for Linux, and you will see that the intermediate files are also stored under the new directory and kept out of the source directory. So, this cleans up the primary directory but still leaves another problem when you start working cross platform.
Try using CMake with a different generator under your existing build directory: cmake -G "CodeBlocks - Unix Makefiles" ../ CMake should complain that you can't change from one output generator to another. This can be annoying in a cross platform environment where you may want to test multiple compilers and IDE's, even on the single platform.
This is very simple to correct, 'cd' out of the build directory and 'mkdir codeblocks', 'cd' into the new directory and type the above command again. CMake will generate the new output and leave the old one alone. In this way you can keep both IDE's open, recompile without intermediate files overwriting each other and work problem free switching back and forth as you want.
Another benefit to 'out of source' builds is that you can put the source on a shared drive, or something like Dropbox, and put the solutions/build outputs to a local drive. In this way you can have multiple machines pointing at a shared directory and you can quickly test changes on the different machines.
CMake: The Beast
CMake is a very large project and has been around for a number of years. It started out with a fairly humble beginning and has grown from there. Unfortunately, due to the organic nature of the growth it has what most people consider a pretty harsh "language" which grew from the simple beginnings. The language is a mutant blend of bash scripting and a Basic like syntax with weakness's inherited from both. For this reason a lot of people, myself included, greatly prefer Premake with the nice Lua based language.
Unfortunately Premake is often very slow to keep up with the IDE's and compiler upgrades and in general has a number of bugs which can end up producing invalid outputs on various platforms. Unfortunately, having run into the bugs and slow updates in the past, I bit the bullet and switched to CMake since I want to make games and not worry about the generator itself getting in the way. This is not to say CMake is bug free, just that the bugs are fewer and usually far between due to the much larger community of support and active usage.
Making use of CMake effectively is the goal for the remainder of this article. Learning CMake features and some things to avoid, are as important basic information as to how to use the commands and the language. Let's start by breaking down the simple 'CMakeLists.txt' for "Hello World!":
CMAKE_MINIMUM_REQUIRED( VERSION 2.8.3 )
PROJECT( HelloWorld )
ADD_EXECUTABLE( helloworld main.c )
First off, CMake is a caseless language and the commands such as "PROJECT" could be written as: "project", "Project" or even l33t style "proJeCt" and CMake won't care. As a convention, I stick to using all upper case for the commands simply to differentiate them from other text, file names and such. It doesn't matter in anyway, that's just how I first saw CMake used and I followed it.
The first line in the CMake file is a quick check to tell CMake the minimum version it should allow to build your project. You should go as far back as possible but due to changes in behavior which have been made, 2.8.3 was the first version with a couple items I tend to use and as such that is as far back as I allow. It was also a very stable release in the 2.8 series where 2.8.0-2 had a couple bugs in the new behaviors.
The second line of the code, 'PROJECT( HelloWorld )', tells CMake the name of the primary project/solution which is being built. For Visual Studio this is the name of the solution file, for Xcode this is the name of the xcodeproj and in a makefile it is a general all encompassing (and default) build target.
The third line, 'ADD_EXECUTABLE( helloworld main.c )', defines an actual build item, in this case an executable. The name of the executable is the first item passed into the command and the remaining items are the file names which are part of the build for that executable.
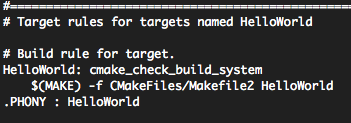
The Visual Studio generator will output a project file to be contained within the solution, the Xcode generator will add this as a target in the Xcode project and of course it is a named target within generated makefiles. Examples of the output:
- Visual Studio:
- Xcode:

- Makefiles:
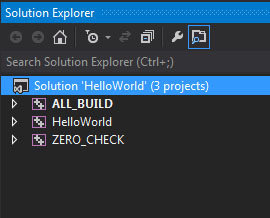
The first thing you may be asking yourself is what are the two extra projects/targets in the IDE's? CMake attempts to make things as easy as possible on the programmer and the extra projects are how it does this.
The "ALL_BUILD" target is pretty much what the name suggests, if this is the active target it builds everything within the project. It is a utility which can be useful to make sure everything still builds after making changes or when using a continuous integration backend such as Cruise Control, Hudson, Continuum etc.
The other project 'ZERO_CHECK' is a bit less obvious and unfortunately, as of Visual Studio 2012, not particularly useful for Windows development. The purpose of 'ZERO_CHECK' is to check if the developer has changed any of the CMakeLists.txt files or files which are directly referenced. If any changes are detected it automatically calls CMake to update the solution prior to recompilation.
This works pretty well with Makefiles and Xcode but unfortunately as mentioned, the recent version of Visual Studio no longer includes the macro system which the utility required. As such all 'ZERO_CHECK' ends up doing is rebuilding the solution and projects but not stopping the build, only 'after' the compilation process completes (likely with a whole slew of errors) does Visual Studio notice the solution and projects are different and ask you to reload them. This is unfortunately Microsoft's infinite wisdom that "no one really uses the macro system anyway, so we won't continue supporting it" at fault, not a problem with CMake. Hopefully CMake will be able to find an answer to make it work nicely with VC again.
Setting Up The Real Environment
At this point, it is time to break out the CMake GUI since the command line becomes unwieldy as you add more detail to the project. Starting up the CMake GUI should give you something like the following:
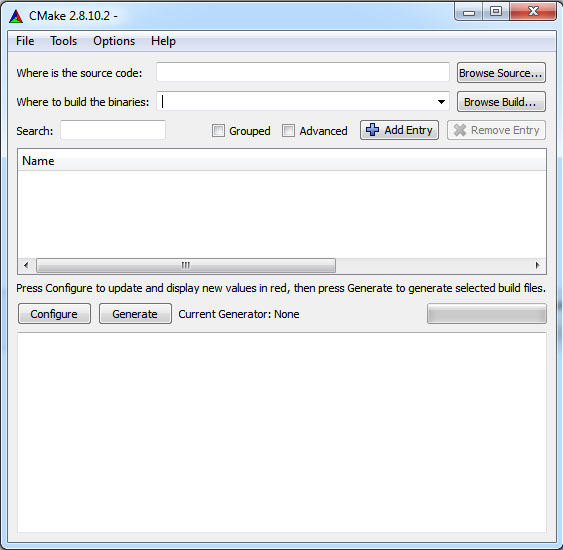
The CMake GUI is fairly bare bones and not a great upgrade over the command line in general, but when it comes understanding what CMake is doing and controlling build options, it makes life a lot easier. Even with the simple 'HelloWorld' project it can display a stunning amount of information describing how CMake is generating the outputs:
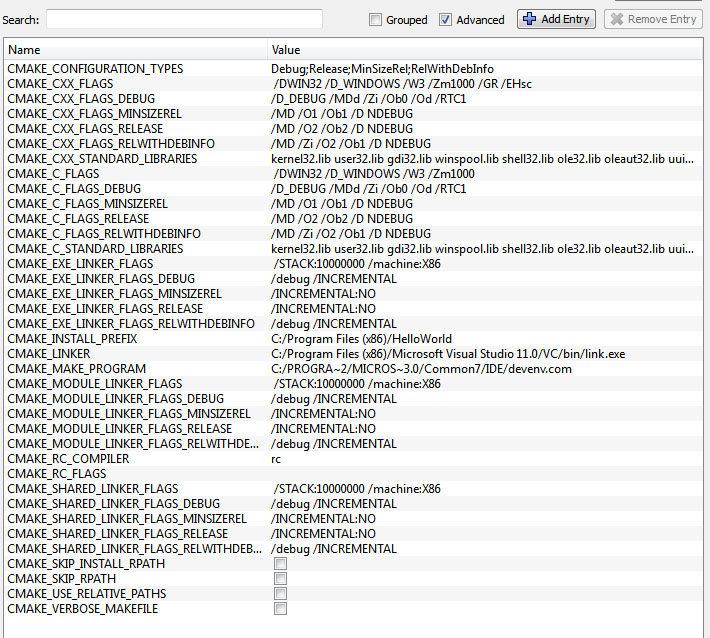
As you can see, CMake uses a lot of variables with many options. Normally these items are hidden by having the 'Advanced' option unchecked, but they are very useful in explaining what build options are being used. You can also change the values from the GUI as desired, this is the main reason to use the GUI since otherwise you have to type in a command line with a potentially large set of '-D "value=whatever"' items appended.
Editing the options in the GUI will not modify the CMakeLists.txt, if you wish to change an option permanently it must be done in CMakeLists.txt manually. Option changes are stored only in the CMake cache and will be lost if you move to another machine, change generators or otherwise delete the CMake cache.
Starting with another clean copy of the 'HelloWorld.zip' or manually cleaning out the generated items, setting up the GUI is fairly easy, there are only really two things to worry about at this time; filling in the two text boxes. Telling CMake where the root 'CMakeLists.txt" is and where you wish to output the generated project files.
In the text box labeled "Where is the source code:", you want to point this to the location of the CMakeLists.txt. So for the 'HelloWorld' test, it would be: "'full_path_to_helloworld'/". In the text box labeled "Where to build the binaries:" you want to put in: "'full_path_to_helloworld'/_vc11" for Windows as an example. At this point you can click "Configure" or "Generate" to setup the basic CMake caches.
If you select "Generate" it will also output the solutions/projects/makefiles after configuration is complete. I usually just press "Generate" myself as it is equivalent to the command line version of running CMake. If running from a clean directory CMake will ask if it should create the output directory, yes of course we want that so accept it. CMake will then pop up the following:
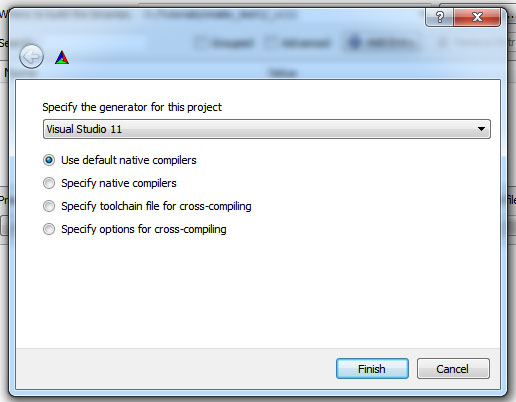
Obviously depending on platform the options will be different, select the generator appropriate to your platform and press "FINISH". After CMake builds up it's cache of information, if you didn't press "Generate", do so now. Your solution/projects or makefiles will be output and you can run through the build and run process appropriate to your platform in order to make sure it's the same as when you did things from the command line.
Introducing ADD_SUBDIRECTORY
It is time to make a new starting project for further work. This will introduce a basic directory structure and some of the advanced features of CMake which make life easier in the long run. Build the following directory stucture:
CMakeProject/build/tests/HelloWorld Copy the 'main.c' and 'CMakeLists.txt' files into the 'HelloWorld' directory under this structure. As it is, if you point CMake GUI at the 'CMakeProject' directory and the output to 'CMakeProject/build/"generator"', CMake will do nothing since there is no 'CMakeLists.txt' in the root directory.
Don't try going ahead and pointing CMake at the subfolder with the 'CMakeLists.txt' file, this is not the goal. The goal for the real environment is to support an easily maintained and flexible environment to start with. It is time to start working with C++ so rename 'main.c' to 'main.cpp'. This of course implies that 'CMakeLists.txt' needs to also be updated since it is the file which describes our project. Change the line:
ADD_EXECUTABLE( HelloWorld main.c ) to read:
ADD_EXECUTABLE( HelloWorld main.cpp ) Next, we want to start the hierarchical build description for our project so add two empty 'CMakeLists.txt' files into the directory structure, one under 'CMakeProject' and the other under 'CMakeProject/tests'. In the file 'CMakeProject/CMakeLists.txt', add the following:
CMAKE_MINIMUM_REQUIRED( VERSION 2.8.3 )
PROJECT( CMakeProject )
ADD_SUBDIRECTORY( tests )
And finally in 'CMakeProject/tests/CMakeLists.txt', add the following: ADD_SUBDIRECTORY( HelloWorld ) Now, with CMake pointed to 'CMakeProject' and 'CMakeProject/build/"generatorname"' click on "Generate". Open the result in your IDE and everything should look identical to how it did before.
Attempt to build though and it gives you errors. This is simply because we stopped using the forgiving C compiler and switched to the more explicit C++ compiler. (Or just told the compiler to be more strict in reality.) Let's fix the C++, in your IDE or favorite editor, edit the code in 'main.cpp' to be:
/* Hello World program */
#include int main( int argc, char** argv )
{
	std::cout << "Hello World!";
	return 0;
}
You do not have to update CMake for this change so just recompile via the IDE and everything should be correct. So, what does this hierarchy and 'ADD_SUBDIRECTORY' do? ADD_SUBDIRECTORY is similar to bash/shell scripting 'exec' or 'call' functions in terms that it makes a copy of the current environment and passes it to a child, which in the case of CMake, will look in the specified subdirectory for a 'CMakeLists.txt' file to be processed. So, if we change compile flags in the top level 'CMakeLists.txt' it will propagate down to the 'HelloWorld' build.
But, on the other hand, if we changed flags within 'HelloWorld' it would not propogate back up and affect other items. This behavior will become very important later on but for the moment just keep in mind that information passing is "one way" down to children by default. Later there will be cases of needing to pass data back up to parents but it will be done under very strict control.
Breaking Things While Still Safely Committing To Source Control
That's a mouthful but the intention is to show how you can accidentally break a build for one platform, quickly fix things so others don't have a problem working. Then going back to track down and correct what failed. Build breakage is a common problem and it scales from a simple oops and fixed to a major day to day time sink as more people work in the codebase.
Even the best programmer is likely to break the build at least monthly no matter how anal they are about testing and catching problems. If you have 30 developers with commit rights, that means a broken build at least once a day and this quickly gets out of hand. So, let's start with a simple build breakage. Make a copy of the "HelloWorld" directory and name it "Hello2" at the same location as the original. Add the following line to 'CMakeProject/tests/CMakeLists.txt': ADD_SUBDIRECTORY( Hello2 )
Hit generate on CMake GUI and you should see: CMake Error at tests/Hello2/CMakeLists.txt:3 (ADD_EXECUTABLE): add_executable cannot create target "HelloWorld" because another target with the same name already exists.
The existing target is an executable created in source directory "'path'/CMakeProject/tests/HelloWorld". See documentation for policy CMP0002 for more details." That's pretty descriptive, we forgot to change the executable name to something unique. Go into 'CMakeProject/tests/Hello2/CMakeLists.txt' and rename the executable to 'Hello2' to match our new directory name.
Now regenerate and all should be well. In the IDE or makefile you should now see subprojects/targets for "HelloWorld" and "Hello2". Everything is great and you can commit your code. Now let's break the build in a non-intuitive but very simple manner. Change the 'main.cpp' in 'Hello2' to the following as a C++11 test:
/* Hello World program */
#include int main( int argc, char** argv )
{
	auto helloString = []() {return "Hello World!";};
	std::cout << helloString();
	return 0;
}
If you are on Windows or Linux and rebuild, everything should be fine. So you commit the changes and if you are using an automated build or someone happens to get your code on OsX they get a failure. Why, what could be wrong? Well, for the moment we don't care what is wrong, we just want to fix the build. So, it only fails on OsX, we'll just fix it by not compiling that particular item on OsX. Change 'CMakeProject/texts/CMakeLists.txt' to the following:
ADD_SUBDIRECTORY( HelloWorld )
IF( NOT APPLE )
	ADD_SUBDIRECTORY( Hello2 )
ENDIF( NOT APPLE )
Commit that change and the build machine should stop complaining and people on OsX won't hate you. Unfortunately 'Hello2' is simply removed from the build on OsX until we can figure out what the problem is. As it turns out, the answer is simple; by default OsX uses Clang 4.2.0 (as of Xcode 4.6.1) which does not automatically enable C++11. In order to enable C++11 it is required to add some compiler and linker flags, but only for OsX. That will be covered in the next article as we take the environment further.
Conclusion
In this first part we covered a very simplistic usage of CMake and some basic description of how CMake works. The next article will show how to correct the intentional cross platform breakage of the project and start digging into the important details of the CMake language and its usage in large projects.


")

Awesome article!
Can you make sure to add a link to part 2 once it exists?