This is the second and final part of the "Getting started with Team Foundation Service" article. In
part one, we learned why using Team Foundation Service delivers benefits with agile planning, collaboration, source control and continuous integration builds.
We got hands-on by setting up an account, creating a new project and adding some tasks to work on. We finished up by committing a new Visual Studio solution to source control and completing your first task.
This time around we're going to continue working on our demo project by creating a continuous integration build, implementing our "Hello World" code and adding tests around it. We will also cover using Team Foundation Service as a system to track bugs and new feature requests, demonstrating how continuous integration can be used to ensure quality in your software.
Continuing our project
Setting up Continuous Integration
Now is a good time to start thinking about what continuous integration builds we want to implement. Team Foundation Service gives us great configurability over when builds are triggered and what gets run on each build. It also allows us to set up
gated builds; a type of build that prevents a developer from checking in broken code. TFS enforces this by shelving the changes, running a build with the changed code and only letting the commit occur if the code compiles and if your tests pass. This is a very nice feature as it prevents developers "blaming" each other for breaking the build, the responsibility lies with the person making the check in to ensure that the code works.
Alongside a gated check in, we also want to create a nightly build - this type of build runs every night and produces a code drop for consumption by others.
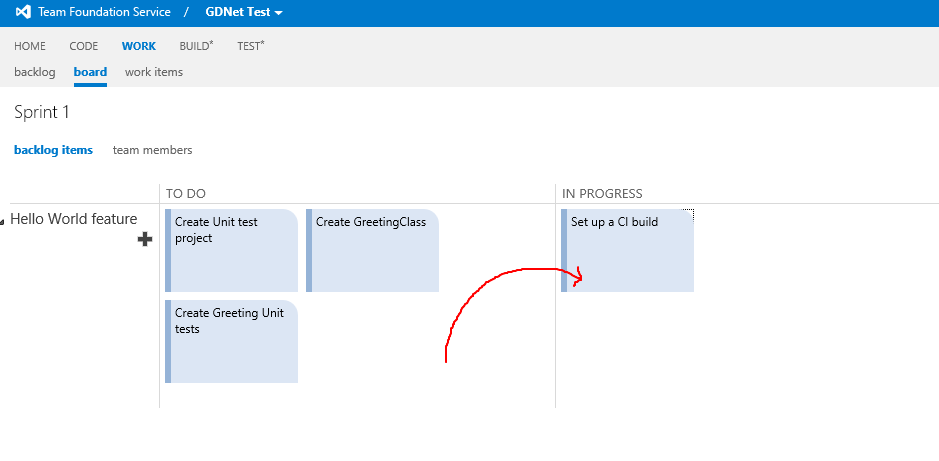
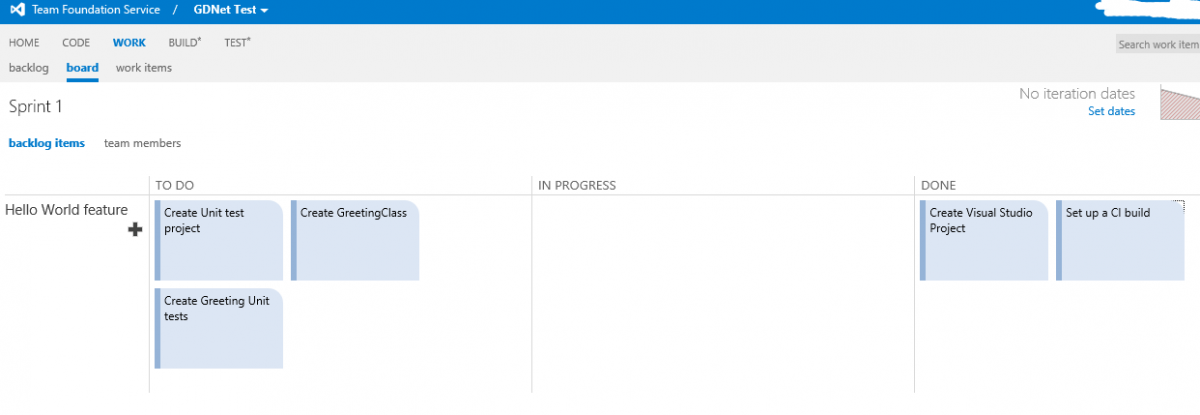
Let's start by dragging our "Set up CI build" task into "In Progress". This tells people what we're working on.
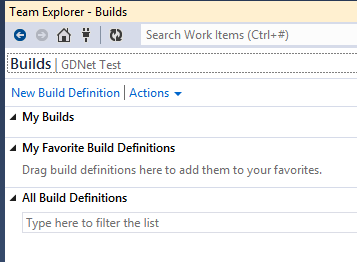
Back in visual studio, hop to the "Builds" tab in Team Explorer.
Click "New Build definition". Give it a name - something like "GDNet.Gated" and then jump to the "Trigger" tab. From here, pick "Gated Check in".
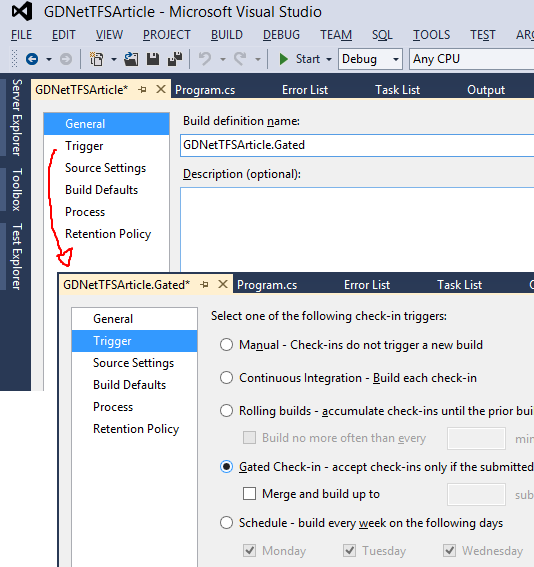
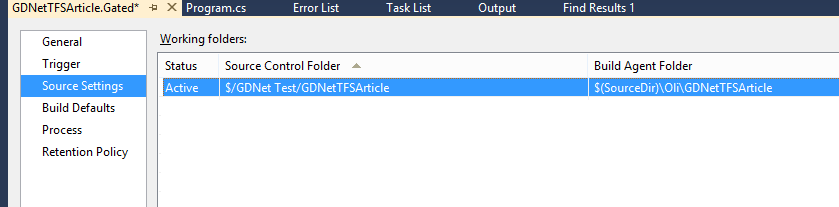
Make sure your source settings are correctly mapped. This tells TFS which location in the tree your code lives, and creates a workspace for the build to operate in.
In the "Build Defaults", we want to make sure our Staging doesn't copy files to a drop folder. We don't need it for this build - but you can change this if you want.
Next we tell TFS what to build.
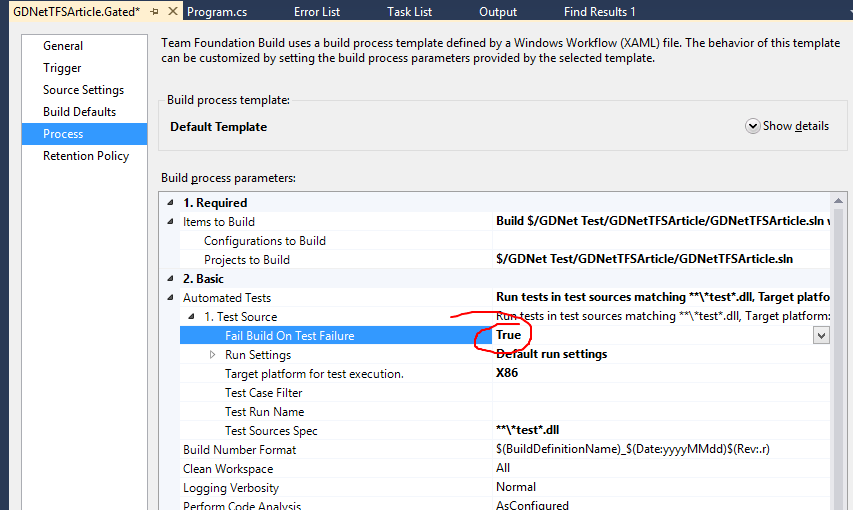
The defaults here are fine, except for the Automatic Tests. We want to go and set "Fail Build on Test Failure" to true. This forces us to ensure we have Unit Tests running and any failures cause the build to fail. This stops developers from checking in code which compiles but has broken functionality.
Great! Save the build and hop back to create a new one.
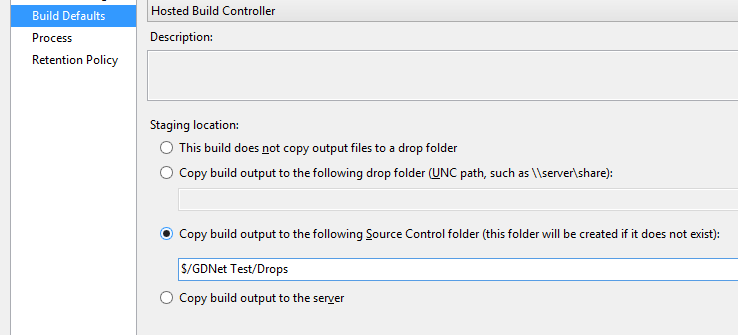
Repeat the same steps for our nightly build, except this time we want to set the Trigger to be on a Schedule and configure a "drop" location for the compiled output.
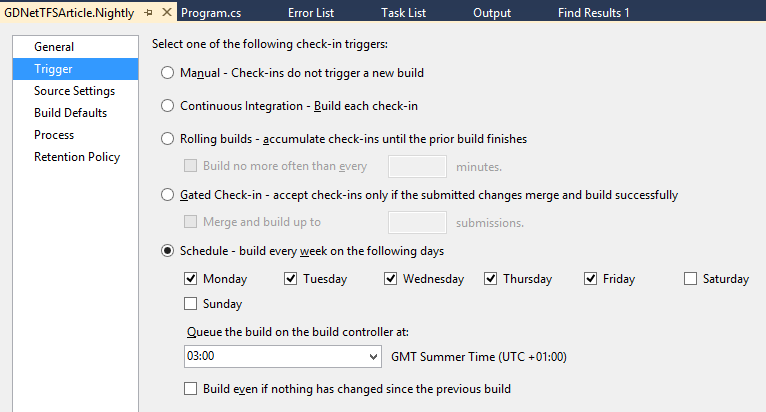
For schedules, a build at 3am every week day is usually fine - unless you work weekends too and want set Saturday and Sunday (which is likely if you're an Indie).
For drop folder, it's simple to set the drop to be checked into TFS or go to a UNC path.
Save your changes and we're all done with the build setup! Don't forget to move your task on the board!
Adding a Unit Test project
Before we start coding, we need to add a Unit Test project to the solution. We do this before we start coding because we want to have something to verify our code on first check in.
Drag your "Create Test project" task into "In Progress" and then get to work. Add a new project to your solution of type "Unit Test".
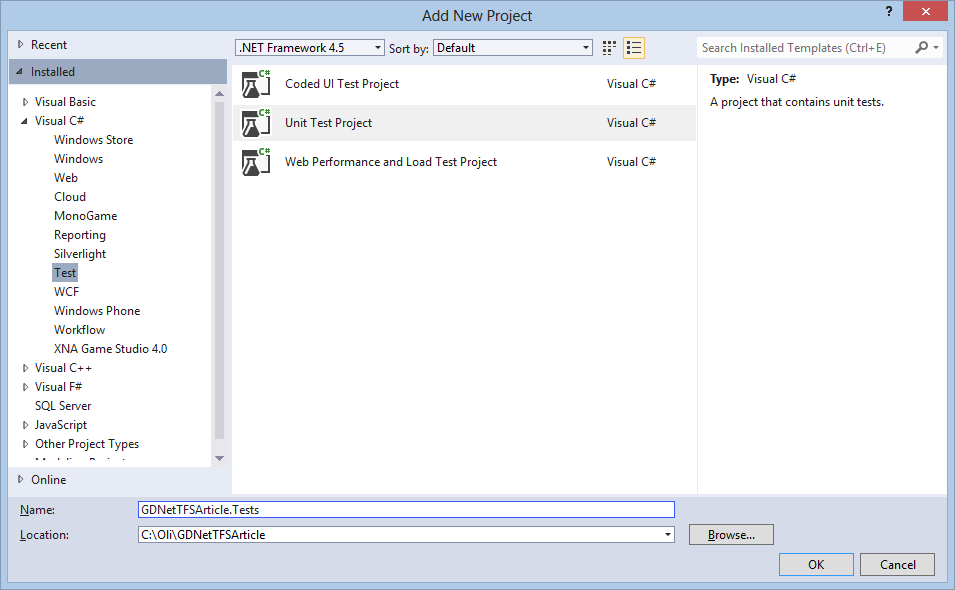
Add a Reference to your other project. At this point I like to delete the default "UnitTest1.cs" file that gets created - mostly because we don't have anything to test yet!
Make sure everything builds and then go to check in. Don't forget to associate your check in with the Task you're working on.
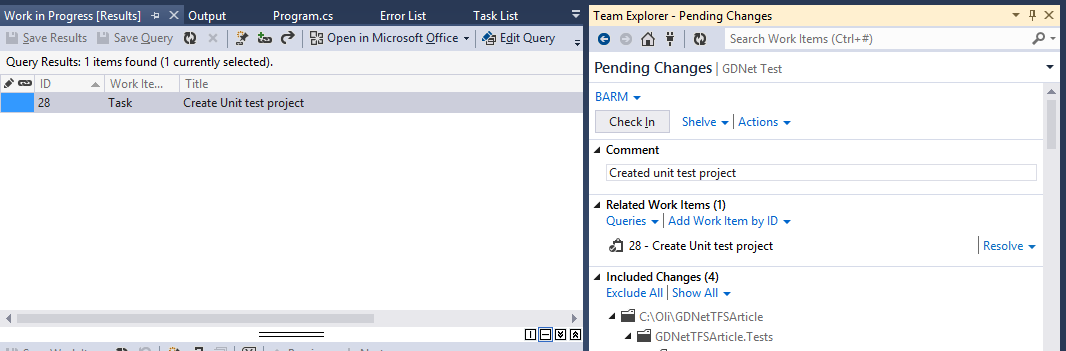
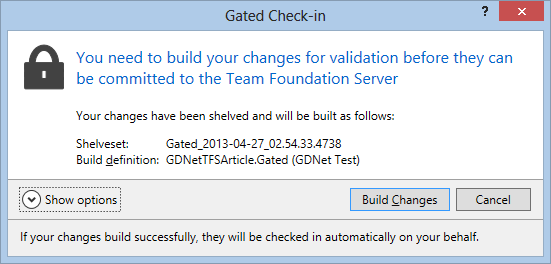
You'll immediately notice the "Gated check-in" box pop up. At this point your changes are shelved and you have to submit them to the build system before your commit is allowed.
Your build will go through the following stages:
- Queued
- In Progress
- Completion (Success/Fail)
You should see a page like this if you click on "view status":
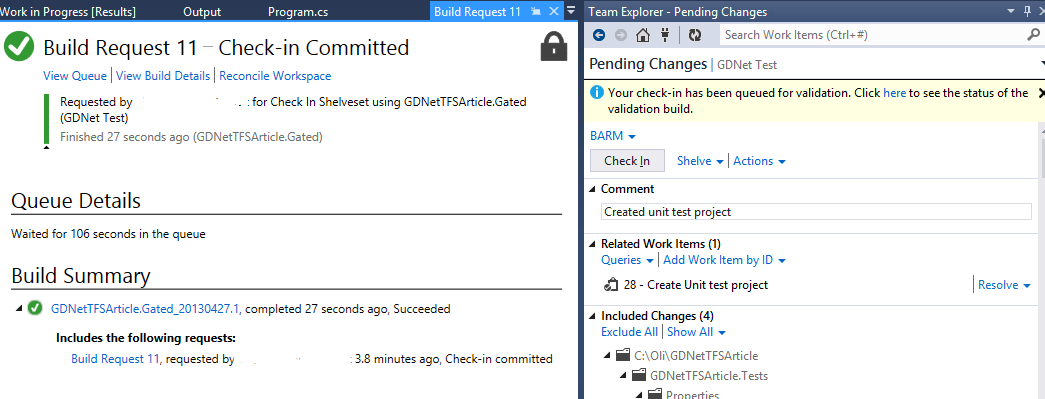
You will also get a notification from the TFS Build Notificaton agent.
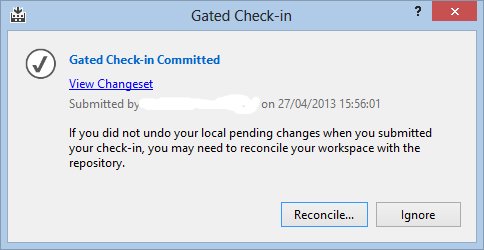
Make sure you click "Reconcile", as it will sync your local workspace with the server.
So what just happened? When you tried to check in, TFS shelved your work, kicked off a build in the cloud and when it succeeded, it commited your changes to its repository for others to see.
Well done! You just succeeded in your first gated check in and automated build!
Our first coding task
Now it's time to code. Drag your "Create Greeting Class" and "Create Greeting Unit tests" task into "In progress" and start coding. In Visual Studio create a new class called "Greeting".
We're going to create two methods. One which returns the text "Hello, world!", the other allows you to specify what to greet.
public class Greeting
{
    public string SayHello()
    {
        return "Hello, world!";
    }

    public string SayHello(string thingToGreet)
    {
        return string.Format("Hello, {0}!", thingToGreet);
    }
}
When you're happy with the code, jump over to your Unit Test project and wire up a couple of simple Unit tests. Create a new "Unit Test" in the testing project and call it something like "GreetingTests.cs".
Then code the tests. We're going for a few simple ones.
[TestMethod]
public void Greeting_Construct()
{
    var greeting = new Greeting();
}

[TestMethod]
public void Greeting_SayHello_ReturnsCorrectText()
{
    var greeting = new Greeting();
    Assert.AreEqual("Hello, world!", greeting.SayHello());
}

[TestMethod]
public void Greeting_SayHello_NamedGreet_ReturnsCorrectText()
{
    var greeting = new Greeting();
    Assert.AreEqual("Hello, GDNet!", greeting.SayHello("GDNet"));
}
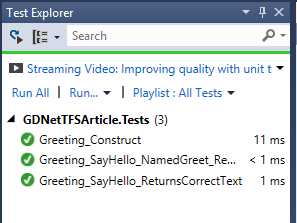
In test explorer, make sure everything is ok...
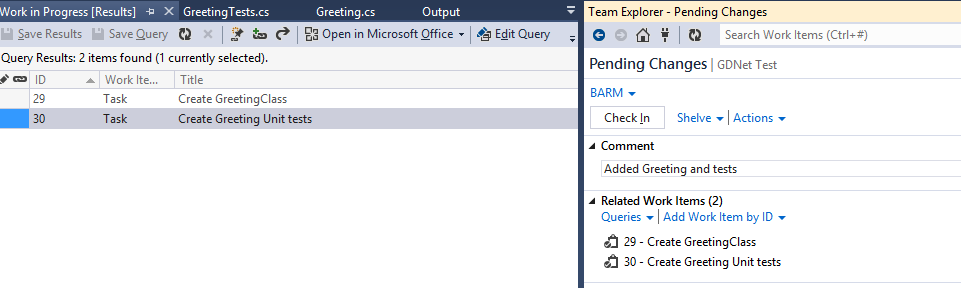
And then check in. This time we're associating both of our work items with the check in.
You'll be asked to go through the gated check in process again and wait for the build.
When you've finished, click on the details and see what happened.

You'll see that the build ran all of your tests and each one of them passed. Additionally, two work items were resolved for you.
Congratulations - you just finished your work for today!
Bug reports and further changes
Uh oh!
So apparently our Greeting class doesn't work as expected when people pass in a null or empty value. They're expecting an error, but your class returns a message.
Let's raise it as a bug. In Team Foundation Service's webpage, add a new bug.
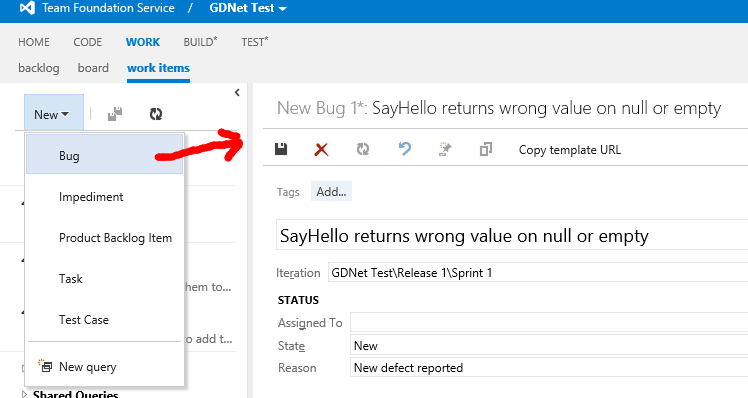
In your Work Board, it will appear as a new User Story. Assess the problem and come up with a task to test and fix it.
Looking at the code, it was apparent that the
SayHello(string thingToGreet) method didn't validate its parameters. Realistically, we want to see an
ArgumentNullException when this happens.
Drag your new "fix bug" task into "in Progress" and let's set to work proving the bug by adding in some tests.
[TestMethod]
[ExpectedException(typeof(ArgumentNullException))]
public void Greeting_SayHello_NamedGreet_DoesntAllowNull()
{
    var greeting = new Greeting();
    greeting.SayHello(null);
}

[TestMethod]
[ExpectedException(typeof(ArgumentNullException))]
public void Greeting_SayHello_NamedGreet_DoesntAllowEmpty()
{
    var greeting = new Greeting();
    greeting.SayHello(string.Empty);
}

[TestMethod]
[ExpectedException(typeof(ArgumentNullException))]
public void Greeting_SayHello_NamedGreet_DoesntAllowWhitespace()
{
    var greeting = new Greeting();
    greeting.SayHello("      ");
}
Running the tests shows some horrible red failures.
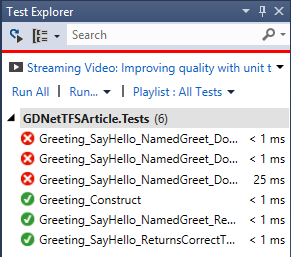
If we checked in right now, the gated build wouldn't let us in. We've added some tests which proves our code is defunct.
Let's fix that now.
public string SayHello(string thingToGreet)
{
    if (string.IsNullOrWhiteSpace(thingToGreet))
        throw new ArgumentNullException();

    return string.Format("Hello, {0}!", thingToGreet);
}
Running our tests again shows that nice green colour.
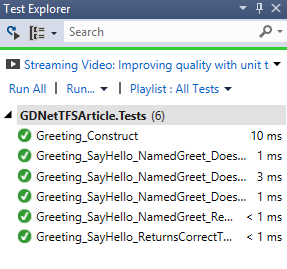
Now we've fixed the bug, we can check in. Don't forget to associate your task with the check in. Wait for the gated build to finish and feel good about having working software.
New requirement
Apparently your clients want a change to the code. Instead of saying "Hello, world!", they want the greeting to be "Hi, world!".
You add a new User story and a task to do the work, but you're too busy to do it yourself, so you pass it to your colleague who's unfamiliar with your code.
They open up Visual Studio and change the code accordingly:
public class Greeting
{
    public string SayHello()
    {
        return "Hi, world!";
    }

    public string SayHello(string thingToGreet)
    {
        if (string.IsNullOrWhiteSpace(thingToGreet))
            throw new ArgumentNullException();

        return string.Format("Hi, {0}!", thingToGreet);
    }

}
Being unfamiliar with the codebase and in a hurry, they skip over the unit tests and try to check in, but do associate their work with the change request.
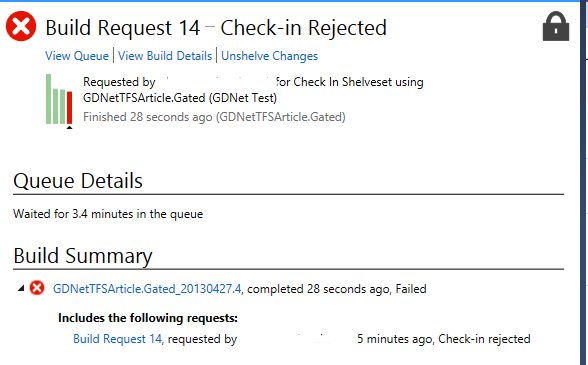
Oh no, it won't let them check in. Our Unit Tests are failing - they're expecting a certain behaviour and getting another.
Because we've specified that the builds must pass all Unit Tests to be successfully committed, the gated check in rejects the changes. Because the changes weren't allowed, the associated task stays as "in progress" and doesn't move to "resolved".
This is a powerful mechanism as it forces you to always have code that both builds and executes as you've specified in your tests. It also ensures that tasks are only flagged as "complete" when the code builds and the tests pass.

Your colleague has no choice but to fix the issue or undo their changes.
Conclusion
In this article we learned how to create Continuous Integration builds in Team Foundation Service and enable Gated Check-in, a powerful mechanism to help prevent changes being made to your code which cause problems.
We covered using Team Foundation Service as a bug tracker and new feature requests. We also covered linking code changes to check-ins by associating work items with check ins which resolve when the check in is complete.
Hopefully you've learned enough to get started and use Team Foundation Service in your own projects. I hope you and your team reap the rewards of having planning, source control and continuous integration builds integrated into your work flow.
Article Update Log
27 Apr 2013: Initial release


As a user of TFS in the workplace, I love that this series is here (and MS's free version online).
But so far I feel that the ALM (application lifecycle management) aspect is being neglected.
Not sure if that's intended for later articles or not, but it is the main reason that I would recommend usage of TFS over SVN, etc -> it ties in work items by default, and you can drive(/and derive) how people work on issues.
It is an awesome tool, I'm happy MS made it available, and also happy it's being posted here!