Introduction
In the world of web-based games, Flash is king. However, one of the biggest drawbacks (for me at least), is that it hasn't been a very programmer-friendly platform. Adobe has changed all that with the release of the Flex 2 SDK. Read on as I take you through the steps to create Flash content using nothing but free command-line tools and a text editor.
What is Flex?
Adobe Flex is a software development kit that serves as an alternative to the Flash Professional application. The end result is the same- it creates Flash (.swf) movies. But the tools are much lower-level; they'll require more technical knowledge, while giving us more control over the final product.
Flex 1 was initially released in March 2004, but was too expensive for anyone but enterprise-level clients. With the release of Flex 2 in June 2006, Adobe has made the SDK free, making it the first version appropriate for indie developers.
Flex 2 can only create content for the new Flash 9 player. As of March 2007, the Adobe site lists Flash 9 penetration at around 83% (footnote 3), but this will certainly rise.
Download the SDK
Okay, let's get started.
First, the SDK requires that you have the Java SDK 1.4 or 1.5 installed. If you don't have those, head over and install that. Also, make sure you have the Flash 9 Player installed, available here.
Next, head over to this site, read and agree to the license, and download the file flex_2_sdk.zip. Find a nice place on your hard drive, and unzip.
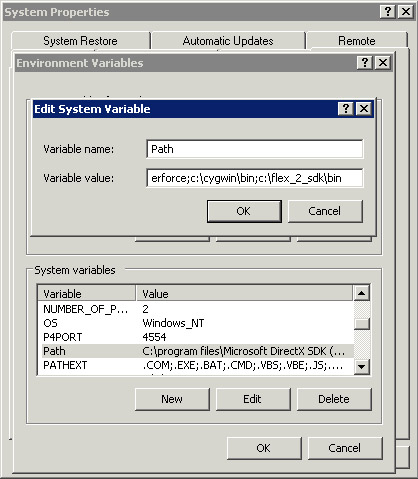
You will probably want to add the /bin folder to your PATH environment variable. On windows, right click "My Computer", click the "Advanced" tab, click "Environment Variables", under "System variables" find "Path", then click "Edit". Add a semicolon to the last value, and type the full pathname of the Flex "bin" folder. For example, if I unzipped the files into the folder C:\flex_2_sdk, my path would look like:
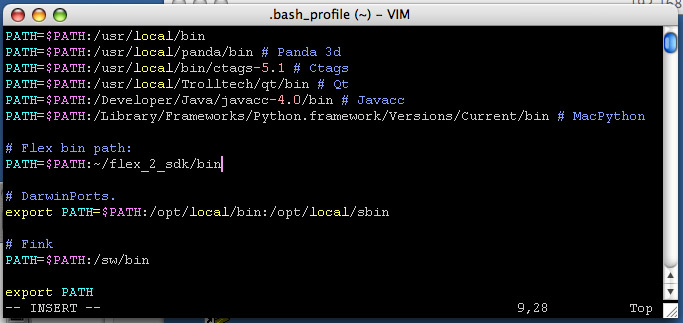
On Mac/Linux, add a line to your "~/.profile" or "~/.bash_profile" file. The file might look like this:
Files and Tools
Before we do anything, let me go over the file types and tools that you'll be working with. If you have experience with Flash, you'll already be familiar with some of these.
- .SWF files - Flash movies. These are movies encoded in a binary, proprietary format. They can be played with the Adobe Flash Player, either standalone or embedded in a web page. These are your binaries, your end product.
- .AS files - ActionScript files. These are your source code files. Flex uses the ActionScript 3 language, which is based on ECMAScript revision 4.
- .MXML files - These describe a view/layout of Flex components. Every Flex application has at least one base-level MXML, and you can nest them as well.
- mxmlc tool - This is your compiler. It turns .MXML files into .SWF files.
- fdb tool - Flash debugging tool. Very similar to gdb or jdb. This tool is difficult to use manually, I recommend using other methods for debugging.
Step 1: Create a .MXML file
Step 2: Add a custom component to your .MXML file, and make it take up the entire screen
Step 3: Define the behavior of your custom component by writing a .AS file
Step 4: Turn the whole thing into a movie with the mxmlc tool
Step 5: Play it
That doesn't sound too hard, right?
The Game Files
The MXML File
At the root of every Flex app is an MXML file. Here's a really simple MXML File:
Here's what it looks like after its compiled and run:

As you can see, the file format is really similar in form and function to HTML. MXML has a ton of GUI widgets, such as menus, buttons, controls, etc. Most of the features of MXML aren't very relevant to games, so let's just write a barebones file and get on to the coding.
Here's the MXML file we'll be using for our game:
Let me highlight the items in this file that are worth being aware of: xmlns="net.crayfishden.flexintro.*" "xmlns" means XML Namespace, and it tells the compiler where to find our source code. In this case, the compiler will look under the "net" folder, then the "crayfishden" folder, then the "flexintro" folder.
creationComplete="initApp()"> This property tells the player to call the (static) function "initApp" when the application is finished being created.
The tag allows us to include some static code into the Application tag. In this case we are calling init() on "canvas". If you're wondering where the 'canvas' object came from, it was created because we have a tag with an id of 'canvas'. < MyGameCanvas id="canvas" width="100%" height="100%" themeColor="#ffffff" /> This is a custom tag. When the compiler gets to this point, it'll look under the namespace (which we defined as the "net/crayfishden/flexintro" folder), and it'll find the file MyGameCanvas.as (which we are going to write next). Then it will make an instance of MyGameCanvas, and add it to our application.
Note also that we set the width and height to 100%, so that this tag will take up the entire space.
So, all the magic happens inside the file MyGameCanvas.as. All we need to do now is write it.
The Actionscript File
Okay, now we're ready to write some actual code.
For this tutorial we're going to write a simple Breakout clone. This game has basically 3 elements: a bunch of blocks at the top of the screen, a paddle at the bottom of the screen (that the player controls), and a ball that destroys blocks and bounces if it hits anything.
The language is Actionscript 3, which is based on ECMAScript 4. At the time of release (and this writing), ECMAScript 4 is unreleased and only exists as a preliminary edition. So, ECMAScript 4 might differ slightly from Actionscript 3 by the time it is released. If you've used JavaScript, this language will seem familiar, as JavaScript implements ECMAScript 3.
Some of the new features of ECMAScript 4 (and consequently, new features of Actionscript 3), are: sealed classes, packages/namespaces, and optional static typing. I'll talk about each of these as they appear in the code.
So, let's make a pass through the source code file. The very first thing we write is this:
package net.crayfishden.flexintro { This declares everything inside the brackets to be in the package "net.crayfishden.flexintro" (the same as the XMLNS that we defined above). This is required. Next is a good place to import the stuff we will need:
import mx.core.UIComponent; import mx.controls.Image; import flash.events.*; import flash.utils.*; import flash.display.*; Next we start declaring our class: public class MyGameCanvas extends UIComponent { Nothing too complicated here, we define a class MyGameCanvas that has UIComponent as its parent. UIComponent is the base class for all visual components in Flex, so you'll be subclassing it often. In fact, now is an excellent time to check out the documentation. If you plan on doing more Flex development, you'll probably want to bookmark that page.
Next we declare some gameplay-related constants.
var NUM_BLOCK_ROWS:int = 5; var NUM_BLOCK_COLS:int = 10; // etc... This syntax might seem weird. Why is the type written after the variable name? This is what the new "optional static typing" looks like. Actionscript is dynamically typed, which means that we don't need to specify the type if we don't want to. Here's what the above code would look like if we didn't want to declare the type: var NUM_BLOCK_ROWS = 5; var NUM_BLOCK_COLS = 10; But usually, you want to declare the type. Using static typing will:
- definitely reduce programmer error
- possibly improve runtime performance
- prevent the compiler from giving you warnings
// Sprites private var blocks:Array = new Array(0); private var ball:Sprite = new Sprite(); private var paddle:Sprite = new Sprite(); private var ball_dx:Number; private var ball_dy:Number; private var ball_speed:Number; private var lives:int = 3; "Array" is a dynamic length container, just like "Vector" from Java or C++. "Sprite" is a kind of display object. When we create a Sprite this way it starts out blank, but we'll fill it in later. "Number" is a non-integer value (Actionscript's version of a "float"). Next we include our image files.
[Embed(source="gold_block.jpg")] private var GoldBlock:Class; [Embed(source="red_block.jpg")] private var RedBlock:Class; [Embed(source="blue_block.jpg")] private var BlueBlock:Class; // Put these image classes into one array for easy access private var allBlocks:Array = new Array(GoldBlock, RedBlock, BlueBlock); The Embed statement is some compile-time magic. It tells the compiler to find the given resource file (in a path that is relative to our .AS file), and include it inside the final .SWF . You can embed all kinds of stuff: image files, MP3s, fonts, even other Flash movies. We need to declare a Class variable immediately after the Embed statement. In a second act of compile-time magic, this class variable will be attached to the image object. So now, if we want to draw "gold_block.jpg", we just create an instance of GoldBlock.
Moving on, let's declare our init() function.
public function init():void { // set up ball ball.graphics.beginFill(0xee00ee); ball.graphics.drawCircle(0, 0, BALL_RADIUS); ball.graphics.endFill(); addChild(ball); resetBall(); // places the ball in a starting location There's a couple things going on here. First, we do some vector drawing onto our ball, thanks to the built-in object "graphics". Every DisplayObject has a "graphics". In this case we are just drawing a purple circle. Next, to explain addChild(), I'm going to talk about the Flash display model. This is most likely one of the biggest differences for programmers that are coming from other platforms.
The Flash Display Model
The "traditional" strategy for drawing games is: erase the whole screen, redraw everything, repeat every frame. But in Flash, we don't do that. Flash retains a display list of all the sprites on the screen. If we want to start drawing something, we call the function addChild() to add it to the display list. If we want to erase this sprite, we call removeChild(). If we want to move it, we change the "x" and "y" properties (like the code does above).
Of course, behind the scenes, the Flash player will be constantly erasing and redrawing the screen. But we don't have to worry about that.
This model takes a little getting used to. For example, in the "traditional" model, if you want something to disappear, you just... stop drawing it. But in the display list model, you need to remember to explicitly remove it.
This introduces the possibility of a new kind of bug: a "leak" type bug, where an item remains on the screen after it should have been removed. Fortunately, display list leaks are pretty easy to spot during testing.
This model might also lead you to use different strategies for organizing your code. The "traditional" way to organize game code, is to keep the display-related code and game-logic-related code as two completely separate entities, with as little overlap as possible. However, in Flash, I find it's easiest to weave display-related code and game-logic-related code into the same place. Instead of having an "update" step and a "draw" step, we're just going to have an "update" step.
So in a nutshell, the above code draws a purple circle onto "ball", and adds "ball" to the screen. Now when we change ball.x and ball.y, our purple circle will move around the screen.
Back to the code...
// set up paddle sprite paddle.graphics.beginFill(0x000000); paddle.graphics.drawRect(-PADDLE_WIDTH/2, -PADDLE_HEIGHT/2, PADDLE_WIDTH, PADDLE_HEIGHT); paddle.graphics.endFill(); paddle.y = height - PADDLE_DIST_FROM_BOTTOM; addChild(paddle); // Figure out some metrics for placing the blocks var reference_block:DisplayObject = new GoldBlock(); var block_field_width:int = NUM_BLOCK_COLS * reference_block.width + (NUM_BLOCK_COLS-1)*BLOCK_GUTTER_X; var block_field_x:int = (width - block_field_width) / 2; var current_block_index:int = 0; // Create and position the blocks for (var x:int = 0; x < NUM_BLOCK_COLS; x++) { for (var y:int = 0; y < NUM_BLOCK_ROWS; y++) { // Create a new Block object var current_image:Class = allBlocks[current_block_index]; var sprite:DisplayObject = new current_image(); // Create sprite, position it, and add it to the display list. sprite.x = block_field_x + x * (reference_block.width + BLOCK_GUTTER_X); sprite.y = BLOCK_FIELD_Y + y * (reference_block.height + BLOCK_GUTTER_Y); addChild(sprite); // Add the Block to our list blocks.push(sprite); // This piece of code causes us to cycle through the available block images. current_block_index++; if (current_block_index >= allBlocks.length) current_block_index = 0; } } This code is more complicated, but we are essentially doing the same thing: creating sprites, adding them to the display list, and positioning them. Note that our block image objects aren't actually Sprites, they are technically Bitmaps. Bitmap is a child of DisplayObject, so I refer to them as DisplayObjects in the code.
// Create a Timer object, tell it to call our onTick method, and start it ticker = new Timer(10); ticker.addEventListener(TimerEvent.TIMER, onTick); ticker.start(); Here we declare a Timer, and tell it to call our onTick method (which we haven't defined yet) every 10 milliseconds. Pay attention to the addEventListener syntax, as this method shows up a lot. The first parameter is a constant describing which event we want to listen to, and the second is the method that we want to be called when it occurs (fortunately we're allowed to pass functions as arguments in Actionscript). You can check the documentation to learn which events are provided by which objects. There are quite a few. You can listen for when a certain sprite is clicked or mouse-overed, when objects are moved, when a display object is just about to be rendered, and more. You can also extend EventDispatcher and pass your own events. Event passing is pretty powerful and useful, so take advantage of it. public function onTick(evt:TimerEvent):void { // Place the paddle (based on mouse location) paddle.x = mouseX; Here's the onTick function. The first thing we do is update the position of the player's paddle. The variable "mouseX" is a property that's built-in to every DisplayObject. It contains the current mouse X position (relative to the position of the DisplayObject). So, making the paddle move with the mouse is absurdly easy. // Check paddle collision with ball if (ball.hitTestObject(paddle)) { // Adjust X momentum of ball based on where on the paddle we hit var new_ball_dx:Number = (ball.x - paddle.x) / (PADDLE_WIDTH/2.0) * INITIAL_BALL_SPEED; // Blend this new momentum with the old ball_dx = (ball_dx + new_ball_dx) / 2; ball_dy = -ball_dy; } Here we check if the paddle has hit the ball. "hitTestObject" is built-in, and checks if the two objects overlap. If we were going to get more serious, we would probably eschew "hitTestObject" and instead do a circle-rectangle collision check. // Check collision with every block for (var i:int = 0; i < blocks.length; i++) { var block:DisplayObject = blocks; if (block == null) continue; // Check collision if (ball.hitTestObject(block)) { // We collided, remove this sprite removeChild(block); blocks = null; // Figure out which way the ball should bounce var ball_distance_norm_x:int = (ball.x - block.x) / block.width; var ball_distance_norm_y:int = (ball.y - block.y) / block.height; // Don't bounce in a direction that the ball is already going if (ball_distance_norm_x * ball_dx > 0) ball_dy = -ball_dy; else if (ball_distance_norm_y * ball_dy > 0) ball_dx = -ball_dx; // If we get here then either bounce is valid, pick one based on ball loc else if (ball_distance_norm_x > ball_distance_norm_y) ball_dx = -ball_dx; else ball_dy = -ball_dy; // Increase ball speed by 2.5% to make things interesting! ball_dx *= 1.025; ball_dy *= 1.025; } } Here's where we check if the ball has hit any blocks. Aside from some funky math, this part is pretty straightforward. // Check collision with sides of screen if (ball.x - BALL_RADIUS < 0) ball_dx = Math.abs(ball_dx); if (ball.x + BALL_RADIUS > width) ball_dx = -Math.abs(ball_dx); if (ball.y - BALL_RADIUS < 0) ball_dy = Math.abs(ball_dy); // Check if ball was lost if (ball.y - BALL_RADIUS > height) { if (lives > 0) lives -= 1; resetBall(); // todo: check for game over } // Move ball ball.x += ball_dx; ball.y += ball_dy; } public function resetBall():void { ball.x = .25 * width; ball.y = .5 * height; ball_dx = INITIAL_BALL_SPEED * .70; ball_dy = INITIAL_BALL_SPEED * .70; } } } And that's it! Now we fire up our command line to compile this sucker.
> mxmlc tutorial.mxml
Loading configuration file /Users/andyfischer/dev/flex_2/frameworks/flex-config.xml /Users/andyfischer/tutorial/tutorial.swf (136126 bytes)
>
And here's the SWF that it produced.
Our game still needs a few features before it's a complete game (such as a win state, a game-over state, scoring, and maybe even a main menu), but I left that stuff out to make this as succinct as possible. Hopefully by now you would have an idea of how to do this.
If you'd like the source to the mini Breakout clone, it's available here
And we're done. There's of course a lot more left to learn about the Flex platform, but hopefully you enjoyed getting your feet wet.
About the Author
Andy Fischer is a software engineer living in San Francisco. He has previously worked in the game industry and is currently at a non-games job. Over the years, he has played with many different platforms for web-based games, and Flex is now his favorite. He has no affiliation with Adobe. His personal website is http://crayfishden.net

