- Learn about the features and components of the Xcode development tools.
- Lean about Xcode, Cocoa, Cocoa-Touch, and Objective-C.
- Take a look into each of the iOS Technology Layers and their Components.
- Take a look into what comprises the Xcode Developer set of Tools.
- Take a look at the new features within the iOS4 SDK.
There is a lot of fun stuff to cover, so let's get started.
Development using the Xcode Tools
If you are running Mac OSX 10.5, chances are your machine is already running Xcode. These are located within the /Developer/Applications folder. Apple also makes this freely available through the Apple Developer Connection at http://developer.apple.com/.
The iPhone SDK includes a suite of development tools to assist you with your development of your iPhone, and other iOS device applications. We describe these in the following table.
iPhone SDK Core Components
This is the main Integrated Development Environment (IDE) that enables you to manage, edit, and debug your projects. This enables you to develop web-based iPhone and iPad applications, and Dashboard widgets. The iPhone Simulator is a Cocoa-based application, which provides a software simulator to simulate an iPhone or iPad on your Mac OSX. These are the Analysis tools, which help you optimize your applications and monitor for memory leaks in real-time.[indent=1]The Xcode tools require an Intel-based Mac running Mac OS X version 10.6.4 or later in order to function correctly.
Inside Xcode, Cocoa, and Objective-C
Xcode 4 is a complete toolset for building Mac OSX (Cocoa-Based) and iOS applications. The new single-windowed development interface has been redesigned to be a lot easier and even more helpful to use than it has been in previous releases. It can now also identify mistakes in both syntax and logical errors, and will even fix your code for you.
It provides you with the tools to enable you to speed up your development process, therefore becoming more productive. It also takes care of the deployment of both your Mac OSX and iOS applications.
The Integrated Development Interface (IDE) allows you to do the following:
- Create and manage projects, including specifying platforms, target requirements, dependencies, and build configurations.
- Supports Syntax Colouring and automatic indenting of code.
- Enables you to navigate and search through the components of a project, including header files and documentation.
- Enables you to Build and Run your project.
- Enables you to debug your project locally, run within the iOS simulator, or remotely, within a graphical source-level debugger.
Xcode incorporates many new features and improvements, apart from the redesigned user interface; it features a new and improved LLVM (Low Level Virtual Machine) debugger, which has been supercharged to run 3 times faster and 2.5 times more efficient.
This new compiler is the next generation compiler technology designed for high-performance projects and completely supports C, Objective-c, and now C++. It is also incorporated into the Xcode IDE and compiles twice as fast and quickly as GCC and your applications will run faster.
The following list includes the many improvements made to this release.
- The interface has been completely redesigned and features a single-window integrated development interface.
- Interface Builder has now been fully integrated within the Xcode development IDE.
- Code Assistant opens in a second window that shows you the file that you are working on, and can automatically find and open the corresponding header file(s).
- Fix-it checks the syntax of your code and validates symbol names as you type. It will even highlight any errors that it finds and will even fix them for you.
- The new Version Editor works with GIT (Free Open-Source) version control software or Subversion. This will show you the files entire SCM (software configuration management) history and will even compare any two versions of the file.
- The new LLVM 2.0 compiler includes full support for C, Objective-C, and C++
- The LLDB debugger has now been improved to be even faster, it uses less memory than the GDB debugging engine.
- The new Xcode 4 development IDE now lets you work on several interdependent projects within the same window. It automatically determines its dependencies so that it builds the projects in the right order.
Xcode allows you to customize an unlimited number of build and debugging tools, and executable packaging. It supports several source-code management tools, namely, CVS "Version control software which is an important component of the Source Configuration Management (SCM)" and Subversion, which allows you to add files to a repository, commit changes, get updated versions and compare versions using the Version Editor tool.
The iPhone Simulator
The iPhone Simulator is a very useful tool that enables you to test your applications without using your actual device, whether this being your iPhone or any other iOS device. You do not need to launch this application manually, as this is done when you Build and run your application within the Xcode Integrated Development Environment (IDE). Xcode installs your application on the iPhone Simulator for you automatically.
The iPhone Simulator also has the capability of simulating different versions of the iPhone OS, and this can become extremely useful if your application needs to be installed on different iOS platforms, as well as testing and debugging errors reported in your application when run under different versions of the iOS.
[indent=1]While the iPhone Simulator acts as a good test bed for your applications, it is recommended to test your application on the actual device, rather than relying on the iPhone Simulator for testing. The iPhone Simulator can be found at the following location /Developer/Platforms/iPhoneSimulator.Platform/Developer/Applications.
Layers of the iOS Architecture
According to Apple, they describe the set of frameworks and technologies that are currently implemented within the iOS operating system as a series of layers. Each of these layers is made up of a variety of different frameworks that can be used and incorporated into your applications.
Layers of the iOS Architecture
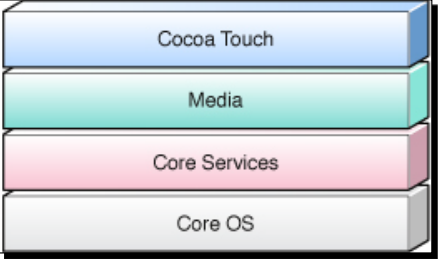
We shall now go into detail and explain each of the different layers of the iOS Architecture; this will give you a better understanding of what is covered within each of the Core layers.
The Core OS Layer
This is the bottom layer of the hierarchy and is responsible for the foundation of the Operating system, which the other layers sit on top of. This important layer is in charge of managing memory - allocating and releasing of memory once it has finished with it, taking care of file system tasks, handles networking, and other Operating System tasks. It also interacts directly with the hardware.
The Core OS Layer consists of the following components:
The Core Services Layer
The Core Services layer provides an abstraction over the services provided in the Core OS layer. It provides fundamental access to the iPhone OS services. The Core Services Layer consists of the following components:
The Media Layer
The Media Layer provides Multimedia services that you can use within your iPhone, and other iOS devices. The Media Layer is made up of the following components:
The Cocoa-Touch Layer
The Cocoa-Touch layer provides an abstraction layer to expose the various libraries for programming the iPhone, and other IOS devices. You probably can understand why Cocoa-Touch is located at the top of the hierarchy due to its support for Multi-Touch capabilities. The Cocoa-Touch Layer is made up of the following components:
Understanding Cocoa, the language of the Mac
Cocoa is defined as the development framework used for the development of most native Mac OSX applications. A good example of a Cocoa related application is Mail or Text Edit.
This framework consists of a collection of shared object code libraries known as the Cocoa frameworks. It consists of a runtime system and a development environment. These set of frameworks provide you with a consistent and optimized set of prebuilt code modules that will speed up your development process.
Cocoa provides you with a rich-layer of functionality, as well as a comprehensive object-oriented like structure and APIs on which you can build your applications. Cocoa uses the Model-View-Controller (MVC) design pattern.
What are Design Patterns?
Design Patterns represent and handle specific solutions to problems that arise when developing software within a particular context. These can be either a description or a template, on how to go about to solve a problem in a variety of different situations.
What is the difference between Cocoa and Cocoa-Touch?
Cocoa-Touch is the programming language framework that drives user interaction on iOS. It consists and uses technology derived from the cocoa framework and was redesigned to handle multi-touch capabilities. The power of the iPhone and its User Interface are available to developers throughout the Cocoa-Touch frameworks.
Cocoa-Touch is built upon the Model-View-Controller structure; it provides a solid stable foundation for creating mind blowing applications. Using the Interface builder developer tool, developers will find it both very easy and fun to use the new drag-and-drop method when designing their next great masterpiece application on iOS.
The Model-View-Controller
The Model-View-Controller (or MVC) comprises a logical way of dividing up the code that makes up the GUI (Graphical User Interface) of an application. Object-Oriented applications like Java and .Net have adopted the MVC design pattern.
The MVC model comprises three distinctive categories:Model : This part defines your application's underlying data engine. It is responsible for maintaining the integrity of that data.
- View : This part defines the user interface for your application and has no explicit knowledge of the origin of data displayed in that interface. It is made up of Windows, controls, and other elements that the user can see and interact with.
- Controller : This part acts as a bridge between the model and view and facilitates updates between them. It binds the Model and View together and the application logic decides how to handle the user's inputs.
What is Object-Oriented Programming?
Object-Oriented programming (or formally known as "OOP"), provides an abstraction layer of the data on which you operate, it provides a concrete foundation between the data and the operations you perform with the data, in effect giving the data behavior.
By using the power of Object-Oriented programming, it allows us to create classes and later extend its characteristics to incorporate additional functionality. Objects within a class can be protected to prevent those elements being exposed; this is called "Data Hiding".
[indent=1]If you are interested in learning more about Object-Oriented Programming, please consult the Apple Developer documentation or via the following link https://developer.ap...cles/ooOOP.html.
What is Objective-C?
When I first started to develop for the iPhone, I realised that I needed to learn Objective-C, as this is the development language for Mac and iOS. I found it to be one of the strangest looking languages I had ever come across. Today, I really enjoy developing and working with it, so will you too.
Objective-C is an object-oriented programming language used by Apple primarily for programming Mac OSX, iPhone, and other iOS applications. It is an extension of the C-Programming Language. If you have not done any OOP programming before, I would seriously recommend that you read the OOP document from the Apple Developer website.
On the other hand, if you have used and are familiar with C, .Net or Java, learning Objective-C should be relatively easy for you to understand.
Objective-C consists of two types of files:
- .h : These types of files are called 'Header' or 'Interface files'
- .m: These types of files are those which contain your program code logic and make use of the 'Header' files. These are also referred to as 'implementation' files.
Most Object-Oriented development environments consist of several parts:
- An Object-Oriented programming language.
- An extensive library consisting of objects.
- A development suite of developer tools.
- A runtime environment.
For example, here is a piece of code written in Objective-C
-(int)method:(int)i {

	return [self square_root: i];

}
If we were to compare this same code to how it would be written within C, it would look like this:
int function(int i) {

	return square_root(i);

}
Let's investigate the code
Now, let's examine the code line by line to understand what is happening.
-(int)method:(int)i {
We declare a function called method and a variable i, which is passed in as a parameter. We then pass the value to a function called square_root to calculate the value and the calculated result is returned.
return [self square_root: i];
Directives
In C/C++, we use directives to include any other header files that our application will need to access, this is done by using #include. In Objective-C, we use the #import directive. If you observe the content of the MyClass.h file, you will notice that at the top of the file is a #import statement.
#import

@Interface myClass : NSObject{

}

@end
The #import statement is known as a "pre-processor directive". As I mentioned previously, in C/C++, you use the #include pre-processor directive to include a files content with the current source file. In Objective-C, you use the #import statement to do the same, with the exception that the compiler ensures that the file is only included once.
To import a header file from one of the framework libraries, you would specify the header filename using the angle brackets (), within the #import statement. If you were wanting to import one of your own header files to be used within your project, you would specify and make use of the (" "), as you can see from our code file, MyClass.m.
#import "MyClass.h"

@implementation MyClass

@end
Objective-C Classes
A Class can be simply be defined as a representation of a type of object; think of it as a blueprint that describes the object. Just as a single blueprint can be used to build multiple versions of a car engine, a class can be used to create multiple copies of an object. In Objective-C, you will spend most of your time dealing with classes and class objects. An example of a class object is the NSObject class. NSObject is the root class of most of the Objective-C classes. It defines the basic interface of a class and contains methods that are common to all classes that inherit from it.
@interface
To declare a class, you use the @interface compiler directive, as follows:
@interface MyClass : NSObject {

}
@implementation
To implement a class declared within a header file, you use the @implementation compiler directive, as follows:
#import "MyClass.h"

@implementation MyClass

@end
Class Instantiation
In Objective-C, in order for us to create an instance of a class, you would typically use the alloc keyword to allocate memory for the object and then return the variable in a class type This is shown in the following example:
MyClass *myClass = [MyClass alloc];
Class Access Privileges
In OOP, when you are defining your classes, bear in mind that by default, the access privilege of all fields within a class are @protected. These fields can also be defined as @public, or @private.
The following table shows the various access privileges that a class can contain.
A class member is made visible to all classes that instantiate this class. Class members are made visible to the class that declares it as well as other classes which inherit from the base class.
[indent=1]We have only covered a small part of the Objective-C programming concepts. If you are interested in reading a bit more about this area, please refer to the following website: http:// developer.apple.com/documentation/Cocoa/Conceptual/ObjectiveC/ObjC.pdf.
Introducing the Xcode Developer set of Tools
The Xcode developer set of tools comprise the Xcode Development Environment (IDE), Interface Builder, iPhone Simulator, and Instruments for Performance Analysis. These tools have been designed to integrate and work harmoniously together.
Introducing the Core Tools
The Xcode IDE is a complete full-featured development environment, which has been redesigned and built around to allow for a better smoother workflow development environment. With the integration of the GUI designer (Interface Builder), it allows a better way to integrate the editing of source code, building, compiling and debugging.
The Interface Builder is an easy to use GUI designer, which enables you to design every aspect of your applications UI, for Mac OSX and iOS applications.
All of your form objects are stored within one or more resource files, these files contain the associated relationships to each of the objects. Any changes that you make to the form design; these are automatically synchronized back to your code.
The iPhone Simulator provides you with a means of testing your application out, and to see how it will appear on the actual phone device. The Simulator makes it a perfect choice to ensure that your user interface works and behaves they way you intended it to and makes it easier for you to debug your application. The iPhone Simulator does contain some limitations, which cannot be used to test certain features, so it is always better to deploy your app to your iOS device.
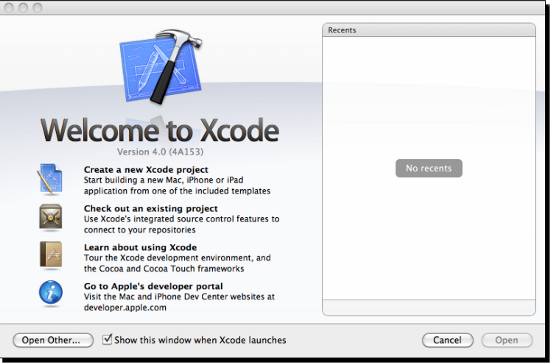
The Welcome to Xcode Screen
To launch Xcode, double-click the Xcode icon located in the /Developer/Applications folder. Alternatively, you can use Spotlight to search for this: simply type Xcode into the search box and Xcode should be displayed in the list at the top.
When Xcode is launched, you should see the Welcome to Xcode Screen as shown in the following screenshot below. From this screen, you are able to create new projects, check out existing projects from the SCM and modify those files within the Xcode integrated development environment. It also contains some information about learning Xcode as well as Apple Developer resources.
The panel to the right-hand side of the screen will display any recent projects that you have opened. These can be opened and loaded into the IDE by clicking on them.
The Xcode - Integrated Development Environment
The Xcode Integrated Development Environment is what you will be using to start to code your iPhone applications.
This consists of a single-window user interface, consisting of the Project Window, Jump and Navigation Bars, and the newly integrated Interface Builder designer.
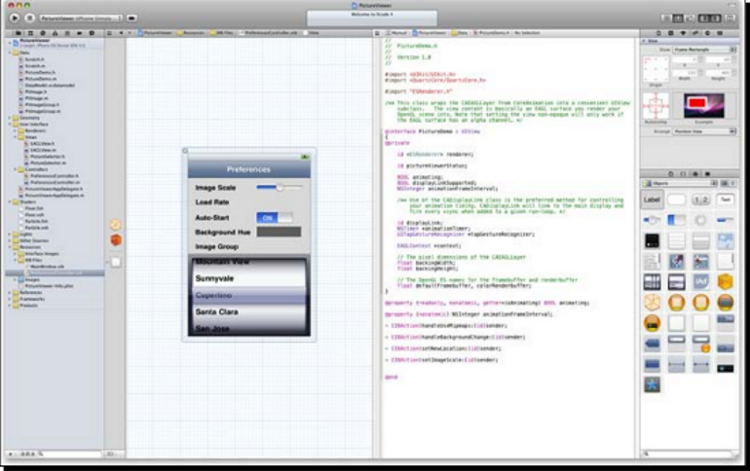
(Move the mouse over the image to enlarge.)
Features of the iPhone Simulator
The"iPhone Simulator", simulates various features of a real iOS device. Although the iPhone simulator is just a simulator to simulate certain tasks, it does come with some limitations.
Following is the list of some of the features which you are able to test using the iPhone Simulator. The following screenshot below displays the iPhone 4 simulator.
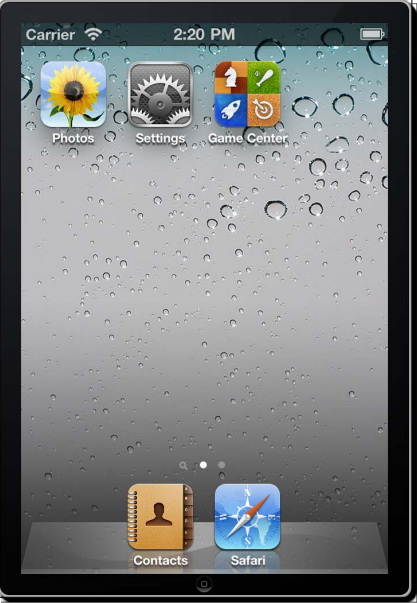
[indent=1]Please bear in mind, that being the "iPhone Simulator", it is just only a simulator. It does, however, pose some features which are impossible to handle. These have been defined as follows:
- Making Phone calls
- Accessing the Accelerometer/Gyroscope
- Sending and Receiving SMS messages
- Installing applications from the App Store
- Accessibility to the Camera
- Use of the Microphone
- Several Core OpenGL ES Features
Companion Tools and Features
These tools are classified as profiling tools which are the instruments that handle the following:
- Performance and Power Analysis Tools
- Unit testing tools
- Source Code Management (SCM) / Subversion
- Version Comparison Tool
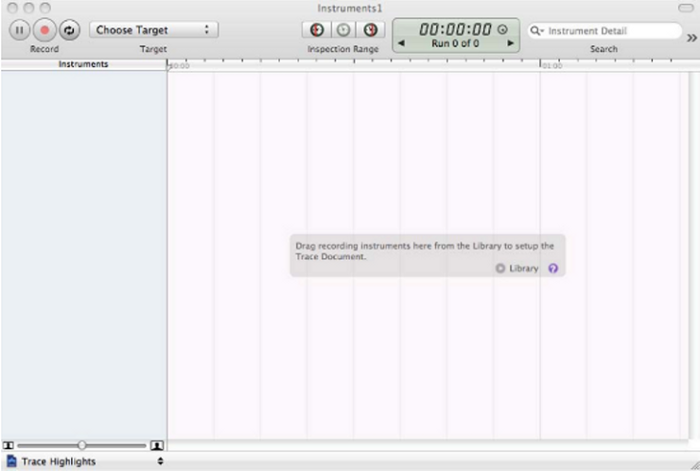
Instruments
The Xcode instruments allow you to dynamically trace and profile the performance of your Mac OSX, iPhone, and iPad applications. You can also create your own Instruments using DTrace and the Instruments custom builder.
Through the use of instruments, you can achieve the following:
- Ability to perform Stress-tests on your applications.
- Monitor your applications for memory leaks, which can cause unexpected results.
- Gain a deeper understanding of the execution behavior of your applications.
- Track down difficult to reproduce problems in your applications.
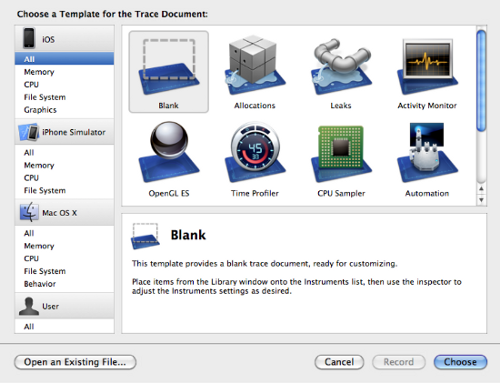
- In the following figure, we display the Instruments environment where you can start to create your robust test harness for your application to ensure that any memory leaks and resource intensive tasks are rectified to avoid problems later when your users download your app and experience issues.
[indent=1]If you are interested in learning more about the instruments that are included with Xcode and the iOS 4 SDK, please consult the Apple Developer documentation.
iPhone OS4 SDK New Features
The iOS4 SDK comes jam-packed and is loaded with as many as 1,500 APIs. It contains some high quality enhancements and improvements, which allows endless possibilities for developers to create some stunning applications.
This is perhaps the most awaited feature everyone has been waiting for. It is an assortment of seven different services: Audio, VoIP, location, local and push notifications, task completions and fast app switching that will make it possible and simple enough to use many applications at the same time. This will allow you to play the audio continuously, receive calls while your device is locked or other apps are being used, location based applications will continue to guide you, and receiving alerts will be possible without the app running and the app will finish even when the customer leaves in the middle of it. Another important feature in iOS4 is the Apps Folder, this feature allows you to drag an icon on top of another one and a new folder will be automatically created. It will be named according to the name of the category the particular icon or application comes from. This has been vastly improved to allow for an organized approach of grouping various mails into one particular folder according to the conversation thread. Added support to handle more than one exchange account, which can also be opened through many third-party applications. Game Center provides social networking services, where you can take part in leader boards and participate in other online activities with other players. iAd is a mobile advertising platform to allow developers to incorporate advertisements into their application. It is currently supported on iPhone, iPod Touch, and iPad.
[indent=1]The previous list contains some of the important new features of iOS 4. If you are interested in a more detailed listing of all of the features in each of the releases; check out the following http://en.wikipedia....Version_History.
Summary
In this article, hopefully you have gained a good understanding of the Xcode and the development tools and the new and improved Single-Windowed development IDE. We have also covered some of the basics relating to Object-Oriented Programming and Objective-C. It will soon become apparent why Objective-C was chosen as the language of choice for developing Mac OSX and iOS applications.

