Introduction
This article aims to introduce spritesheets and how to incorporate them into your game. Basic programming knowledge is assumed, however, knowledge of C++ and SFML is not required. The spritesheet concepts apply to other languages and libraries.
Spritesheets
What are spritesheets?
For a nice summary of spritesheets and why they are useful, check out the video on this page that was kindly given to me for this article by
Michael Tanczos:
What is a sprite sheet?. There is a summary of the video content on the bottom of the same page if you scroll down below the comments.
Essentially, some graphics hardware require images to be of certain dimensions, and sprite images do not always match these dimensions. The result is you either pad an image with unneeded pixel information, wasting space, or you can place multiple sprites together in an image, filling the padded space, and creating a sheet of sprites, more commonly referred to as a spritesheet.
How do I use them?
For this tutorial, let us say this is our spritesheet we wish to work with:
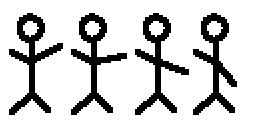
It isn't anything special, but a start. Let's call it simple programmer art we made to test the spritesheet system because that is currently our goal.
These sprite images are not all the same size, they have varying widths and, in practice, sprites can have varying heights within a sheet (some spritesheet makers will have an option to included rotated images to try to use up more of the padded space). To handle the issue of designating which part of the spritesheet contains an individual sprite, spritesheets are usually accompanied by a file that tells where each sprite is located, including its width and height, and if the image is rotated, how much the image was rotated (90, 180, or 270 degrees). These files can also include other information about a sprite, if desired, such as a group they belong to, such as "Animation 1" or "Character XYZ". This is helpful when more than one item is included in the sheet, like sprites for bushes and trees.
These green borders show the outline of our sprite area and where our accompanying file should reference our four images.
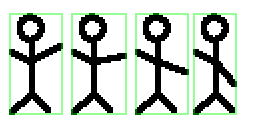
For this example, these four images are part of one sprite animation, so our accompanying file should group these images together.
Assuming we did not have a program create the spritesheet for us, we also will have to make the information file. Our file will need the following: spritesheet name, transparency color (if needed), sprite groups, and individual sprite regions -- we didn't rotate any sprites. To keep things simple, we will just write each item on it's own line, however you could use whatever format you are provided with or can imagine (XML, JSON, etc).
Our template to go by:
Spritesheet Filename
Transparency Color (3 numbers for RGB)
Item Group Name
    StartX StartY EndX EndY
    StartX StartY EndX EndY
    StartX StartY EndX EndY
    StartX StartY EndX EndY
Item Group Name
    StartX StartY EndX EndY
    StartX StartY EndX EndY
    StartX StartY EndX EndY
    StartX StartY EndX EndY
For this particular example (the image is 256px x 128px), our information file will look like this:
spritesheet.png
255 255 255
Stickman
    9 13 62 114
    71 13 126 114
    135 13 188 114
    193 13 236 114
Once we have both the spritesheet and the information file, we can start incorporating the sprites into our game.
We will need to handle reading the file data and storing the information to use later. Since we are using SFML for this example, we will load the image into an
sf::Image and the sprite region information into
structs we can easily use to assign to our
sf::Sprites.
Our item group struct will look like this:
struct SpriteItemGroup {
	std::string groupName;
    sf::Sprite groupSprite;
	std::vector spriteRegions;
	int currentSprite;
    int animationDirection;
};
The currentSprite variable will be used to keep track of which region we are using, whether it is for an animation, state, or just what image in a set. The animationDirection variable will be used to move forward and backward through our SpriteItemGroup (0, 1, 2, 1, 0, 1, 2, etc.). The
sf::IntRect is part of SFML's codebase, and is a rectangle with integer coordinates, taking a top left point (our start X and Y) and a bottom right point (our end X and Y). The
sf::Sprite has functions to set a source image, set a sub-rectangle of the source image (which is what we want to pull one sprite from our spritesheet), as well as a few other useful functions, like rotating a sprite (which can help if your sprite image in the spritesheet was rotated).
The process should follow these steps:
- Open and begin reading the file.
- Store the filename for the spritesheet.
- Store the transparency color (if being used, if not you could omit this step).
- Create a struct to store the item group.
- Add coordinates to the item group.
- Continue reading coordinates until you reach the end of the file or you reach another string (meaning another item group and you start back at creating another struct).
- Close file.
- Create/load spritesheet file.
- Set the transparency color for the spritesheet.
- Create a sprite image for each item group (this tutorial uses an sf::Sprite).
- Assign the spritesheet file to each sprite as the source image.
- For each item group's sprite, assign the first sprite region.
- Draw each sprite to the screen.
The code for the process
String Parsing
This code function is used to pull the integers from a given string (and assumes only spacing and integers are in the string). If you plan to use a different format for your information file, you may have to edit this code. A string is passed in, the first integer that it comes across is returned, and the rest of the string starting just after the integer is assigned back to the string.
int retrieveInt(std::string &stringToParse) {
	std::string legalNumbers = "0123456789";
	size_t startPosition = stringToParse.find_first_of(legalNumbers, 0);
	size_t endPosition = stringToParse.find_first_not_of(legalNumbers, startPosition);
	int returnInt = atoi(stringToParse.substr(startPosition, endPosition).c_str());
	if(endPosition >= stringToParse.length())	{
		stringToParse = "";
	}
	else {
		stringToParse = stringToParse.substr(endPosition);
	}
	return returnInt;
}
The animation function
This function will take one of our
structs and move the animation forward or backward depending on which region is current. This may not be the case for every spritesheet; our sample was made to be used forward and then backward to show a constant animation. If you have sprite animations and the final sprite should be followed by the first sprite, then simply keep the animationDirection equal to 1 and when the currentSprite is at the max for the spriteRegions, reset currentSprite to 0.
void nextAnimation(SpriteItemGroup &itemGroup) {
	if((itemGroup.currentSprite >= itemGroup.spriteRegions.size() - 1 && itemGroup.animationDirection == 1) || (itemGroup.currentSprite <= 0 && itemGroup.animationDirection == -1)) {
		itemGroup.animationDirection *= -1;
	}
	if(itemGroup.spriteRegions.size() > 1) {
		itemGroup.currentSprite += itemGroup.animationDirection;
	}
	itemGroup.groupSprite.SetSubRect(itemGroup.spriteRegions.at(itemGroup.currentSprite));
}
The main variables
To show our sprites, we need a window to display them in, as well as a few variables to store our data from the information file, and to open the file for reading.
int main() {
    sf::RenderWindow display(sf::VideoMode(800, 600, 32), "Sprite Display");

    std::string spritesheetFilename = "";
    std::string parsingString = "";
    int startX = 0, startY = 0, endX = 0, endY = 0;

    int redTransparency = 0, greenTransparency = 0, blueTransparency = 0;
    std::vector itemGroups;

    std::ifstream spritesheetDatafile;
    spritesheetDatafile.open("spritesheet.txt");
Reading the information file
We need to read in our general spritesheet information (the filename of the image and the transparency color), as well as collecting all of our groups. After we get every region for a group, we store it in our itemGroups
std::vector. Since we don't want to do anything if we can't read our file, the reading code as well as the display code will be inside this
if block.
if(spritesheetDatafile.is_open() && spritesheetDatafile.good()) {
    // Read in filename and transparency colors
    getline(spritesheetDatafile, spritesheetFilename);
    getline(spritesheetDatafile, parsingString);

    redTransparency = retrieveInt(parsingString);
    greenTransparency = retrieveInt(parsingString);
    blueTransparency = retrieveInt(parsingString);

    while(spritesheetDatafile.good()) {
        // Still can read groups
        SpriteItemGroup tempGroup;
        getline(spritesheetDatafile, tempGroup.groupName);
        tempGroup.currentSprite = 0;
        tempGroup.animationDirection = 1;
        getline(spritesheetDatafile, parsingString);
        while(parsingString.substr(0, 1) == " " || parsingString.substr(0,1) == "\t") {
            // Still have coordinates
            startX = retrieveInt(parsingString);
            startY = retrieveInt(parsingString);
            endX = retrieveInt(parsingString);
            endY = retrieveInt(parsingString);
            tempGroup.spriteRegions.push_back(sf::IntRect(startX, startY, endX, endY));
            getline(spritesheetDatafile, parsingString);
        }
        itemGroups.push_back(tempGroup);
    }

    spritesheetDatafile.close();
Preparing the image and sprites
The spritesheet image needs to be loaded and the transparency color needs to be set. Then the image needs to be assigned to each
sf::Sprite, and the first spriteRegion of the group needs to be set. Also, the position of each
sf::Sprite should be set. The position will change depending on where you wish for the
sf::Sprite to be drawn. Since I only have one
sf::Sprite, just that
sf::Sprite's position was set.
sf::Image spritesheetImage;
if(!spritesheetImage.LoadFromFile(spritesheetFilename)) {
    return EXIT_FAILURE;
}
// Setting transparency
spritesheetImage.CreateMaskFromColor(sf::Color(redTransparency, greenTransparency, blueTransparency));

for(int i = 0; i < itemGroups.size(); i++) {
    itemGroups.at(0).groupSprite.SetImage(spritesheetImage);

    if(itemGroups.at(i).spriteRegions.size() > 0) {
        itemGroups.at(i).groupSprite.SetSubRect(itemGroups.at(i).spriteRegions.at(0));
    }
}

itemGroups.at(0).groupSprite.SetPosition(250.0, 250.0);
Display the window
Finally, we clear the window, draw our
sf::Sprites, and start our loop. Events are checked and processed, then, if enough time has elapsed, we draw our
sf::Sprites again, as well as progressing our animations. If there are only certain groups that you wish to show, edit both drawing sections (they start with "display.Clear"). The maximum number of frames per second is determined just below the "// 15 FPS" line. Adjust the value in the
if check to your game's needs or add the drawing calls to your rendering section of code.
		display.Clear(sf::Color(0, 255, 255));
		for(int i = 0; i < itemGroups.size(); i++) {
			display.Draw(itemGroups.at(i).groupSprite);
			nextAnimation(itemGroups.at(i));
		}
		display.Display();

		float elapsedTime = 0.0;
		sf::Clock gameClock;

		while(display.IsOpened()) {
			sf::Event event;
			while(display.GetEvent(event)) {
				if(event.Type == sf::Event::Closed) {
					display.Close();
				}
			}

			if(display.IsOpened()) {
				elapsedTime = gameClock.GetElapsedTime();
				// 15 FPS
				if(elapsedTime >= 1.0/15.0) {
					display.Clear(sf::Color(0, 255, 255));
					for(int i = 0; i < itemGroups.size(); i++) {
						display.Draw(itemGroups.at(i).groupSprite);
						nextAnimation(itemGroups.at(i));
					}
					display.Display();
					gameClock.Reset();
				}
			}
		}
	}

	if(display.IsOpened()) {
		display.Close();
	}

	return 0;
}
Conclusion
Summary
Spritesheets are useful game resources. They cut down on wasted filesize by filling the unused padding around individual sprites with more sprites. Games need a way to find all the different sprites in a spritesheet, so the spritesheets are accompanied by an information file that specifies where each sprite is located. Once read, each sprite can be found and assigned to the proper location, referencing the sheet and the rectangle within the sheet that is needed.
Attached
In the attached .zip file, I included both the spritesheet image the program uses and the one with the borders, the required .dll files, a .exe, the information file, and the source code. Feel free to use or modify the code and images. The SFML .dlls are straight from the C++ Full SDK for Windows - MinGW (
http://www.sfml-dev.org/download.php).
Things to note
The sample information file and spritesheet does not include any rotated sprites. Adding this functionality is relatively simple. In the information file at the end of the coordinates line for that particular region, just indicate a fifth number that tells how the image was rotated (90, 180, or 270 degrees). You can use 0 degrees for images that were not rotated. Add a way to keep track of this information in the SpriteItemGroup, and then you just apply a rotation to the
sf::Sprite after you set the sub-rectangle.
The example used in this article does not use more than one sprite item group, however, the code is flexible enough to handle varying amounts of sprite item groups.
I did not take sprite position relative to other sprites into account, such as when you switch to the next sprite in a spriteItemGroup since all of my sprites' positions are unaffected when I switch. The top left point of the
sf::Sprite rectangle always is at the same point, and the sprites all have the same height. To take this into account, you can include an amount of repositioning needed at the end of the coordinates in the information file, using a change in X and Y, and then just move the
sf::Sprite by the changes needed. When you move on to the next sub-rectangle in the list, just undo the move and apply the new move for the next sprite.
The information file reading code does not do much in the way of catching errors, so use that exact code with caution.
The SFML code currently uses SFML version 1.6 since version 2.0 has not been fully released at the time of this writing. I will update the code after version 2.0 is fully released.
Article Update Log
04 Apr 2013: Initial release


Very interesting !
Just to understand, why are there large empty borders (and needed green rectangles) ? Isn'it possible to put each sprite after another without empty space ? (because it would reduce the size of the sheet and would permit to get the wanted sprite more directly (by accessing in the spritesheet as just as in a simple 2d array), woundn't it ?)
Of course, I assume here that all sprites have the same dimensions, and this is maybe what is wrong ?
Thanks for your article