Introduction
Who hasn't played that classic game before to the point where they can close their eyes and still see lines of tetrominoes? For the beginning game developer it's a nice challenge project to tackle and introduces some fundamentally important concepts for making games.
Before you get started
check out this free representation of Tetris to get an idea of gameplay mechanics we would like to imitate.
The objectives of this article are as follows:
- Utilize a multi-dimensional array to store a game board "map"
- Draw the game screen using data stored in a multi-dimensional array "map"
- React to keyboard input : Allow players to rotate tetrominoes
- Detect collisions with both the side of the game board as well as other pieces
- Detect and remove cleared lines (and possibly update a score table)
While this project utilizes C# and XNA it is certainly possible to extend the logic shown in the code sections to other platforms
Making the Game
The Pieces
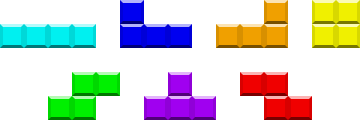
There are seven tetrominoes in the game as shown in the diagram below. For some die-hard fans the treatment of these pieces borders on religion. The colors themselves and the way they rotate all have a particular standard that they must follow.
Representing the pieces in game can be done a number of ways. One of the most obvious ways would seem to rely on having seven separate pictures of each of the pieces that we will rotate and draw on screen. However, the blocks are based on one particular square shape which can come in any one of seven colors.
I quick loaded up my
favorite paint program and created a small 32 pixel by 32 pixel beveled square that looks like this:

The shapes themselves are built up from some combination of this single block.
This..
.. can be represented like this using a multidimensional array

int[,] block = new int[3, 3] {
    {0, 1, 0},
    {1, 1, 1},
    {0, 0, 0}
};
Once you realize that you can store each of the shapes in a multidimensional array all we need to do is figure out a way to get those shapes into our game. Since the shapes themselves never change it's perfectly fine to hard code each of the basic shapes directly.
To do this we can create a list of multidimensional arrays. You'll notice that the arrays themselves can be 2x3, 3x3, and even 4x4. This makes it easy to accomodate each of the tetromino shapes and works well for performing super rotations.
List pieces;

pieces = new List();

/* I Piece */
pieces.Add(new int[4, 4] {
    {0, 0, 0, 0},
    {1, 1, 1, 1},
    {0, 0, 0, 0},
    {0, 0, 0, 0}
});

/* J Piece */
pieces.Add(new int[3, 3] {
    {0, 0, 1},
    {1, 1, 1},
    {0, 0, 0}
});

/* O Piece */
pieces.Add(new int[2, 2] {
    {1, 1},
    {1, 1}
});

/* S Piece */
pieces.Add(new int[3, 3] {
    {0, 1, 1},
    {1, 1, 0},
    {0, 0, 0}
});


/* T Piece */
pieces.Add(new int[3, 3] {
    {0, 1, 0},
    {1, 1, 1},
    {0, 0, 0}
});

/* Z Piece */
pieces.Add(new int[3, 3] {
    {1, 1, 0},
    {0, 1, 1},
    {0, 0, 0}
});
For coloring I opted to create an array of tints that would store the color data for each of the blocks:
        Color[] TetronimoColors = {
                                    Color.Transparent,  /* 0 */
                                    Color.Orange,       /* 1 */
                                    Color.Blue,         /* 2 */
                                    Color.Red,          /* 3 */
                                    Color.LightSkyBlue, /* 4 */
                                    Color.Yellow,       /* 5 */
                                    Color.Magenta,      /* 6 */
                                    Color.LimeGreen     /* 7 */
                                  };
The Game Board (aka Playing Field, Matrix, Grid)
The standard game board is 10 cells tall and 22 cells tall, where the top two cells are obstructed from view by some type of graphical frame. For the sake of simplicity we are going to chop our game down to 22 cells in height.
For part one of this tutorial we can focus on two major components that we need to keep track of. The first is the board itself which contains all the blocks that have already fallen down into a fixed position. The second is the block that is falling that we will want to potentially apply rotations to based off of user input.
Our game board can actually be stored in another multidimensional array. The beauty of storing the board in a multidimensional array is that it will allow us to "play" the game in our own miniaturized representation of what you see on screen. We can then create a small chunk of code to actually draw the game board based off of our behind-the-scenes representation.
const int BoardWidth = 10;  // Board width in blocks
const int BoardHeight = 20; // Board height in blocks
const int BlockSize = 20;   // Block size in pixels

int[,] Board;
Vector2 BoardLocation = Vector2.Zero;

Board = new int[BoardWidth, BoardHeight];  // Initialize the board

// Reset all board grid locations to empty.. technically they are initialized
// to zero but this is for demonstration purposes
for (int y = 0; y < BoardHeight; y++)
    for (int x = 0; x < BoardWidth; x++)
    {
        board[x, y] = 0;
    }
The resulting board would look something like this within our game:
0, 0, 0, 0, 0, 0, 0, 0, 0, 0
0, 0, 0, 0, 0, 0, 0, 0, 0, 0
0, 0, 0, 0, 0, 0, 0, 0, 0, 0
0, 0, 0, 0, 0, 0, 0, 0, 0, 0
0, 0, 0, 0, 0, 0, 0, 0, 0, 0
0, 0, 0, 0, 0, 0, 0, 0, 0, 0
0, 0, 0, 0, 0, 0, 0, 0, 0, 0
0, 0, 0, 0, 0, 0, 0, 0, 0, 0
0, 0, 0, 0, 0, 0, 0, 0, 0, 0
0, 0, 0, 0, 0, 0, 0, 0, 0, 0
0, 0, 0, 0, 0, 0, 0, 0, 0, 0
0, 0, 0, 0, 0, 0, 0, 0, 0, 0
0, 0, 0, 0, 0, 0, 0, 0, 0, 0
0, 0, 0, 0, 0, 0, 0, 0, 0, 0
0, 0, 0, 0, 0, 0, 0, 0, 0, 0
0, 0, 0, 0, 0, 0, 0, 0, 0, 0
0, 0, 0, 0, 0, 0, 0, 0, 0, 0
0, 0, 0, 0, 0, 0, 0, 0, 0, 0
0, 0, 0, 0, 0, 0, 0, 0, 0, 0
0, 0, 0, 0, 0, 0, 0, 0, 0, 0
0, 0, 0, 0, 0, 0, 0, 0, 0, 0
As we begin to fill in static blocks, we will update individual cell locations on the board with the color cells contained within them. After a while we'll start to see a game board that looks like this:
0, 0, 0, 0, 0, 0, 0, 0, 0, 0
0, 0, 0, 0, 0, 0, 0, 0, 0, 0
0, 0, 0, 0, 0, 0, 0, 0, 0, 0
0, 0, 0, 0, 0, 0, 0, 0, 0, 0
0, 0, 0, 0, 0, 0, 0, 0, 0, 0
0, 0, 0, 0, 0, 0, 0, 0, 0, 0
0, 0, 0, 0, 0, 0, 0, 0, 0, 0
0, 0, 0, 0, 0, 0, 0, 0, 0, 0
0, 0, 0, 0, 0, 0, 0, 0, 0, 0
0, 0, 0, 0, 0, 0, 0, 0, 0, 0
0, 0, 0, 0, 0, 0, 0, 0, 0, 0
0, 0, 0, 0, 0, 0, 0, 0, 0, 0
0, 0, 0, 0, 0, 0, 0, 0, 0, 0
0, 0, 0, 0, 0, 0, 0, 0, 0, 0
0, 0, 0, 0, 0, 0, 0, 0, 0, 0
0, 0, 0, 0, 0, 0, 0, 0, 0, 0
0, 0, 0, 0, 0, 0, 0, 0, 0, 0
1, 0, 0, 0, 0, 0, 0, 3, 3, 1
1, 0, 0, 5, 5, 5, 0, 3, 3, 1
1, 0, 3, 3, 5, 4, 4, 0, 2, 1
1, 0, 3, 3, 4, 4, 2, 2, 2, 1
Drawing Our Board
Drawing the board is actually pretty easy. The code below assumes that I have loaded the 32x32 pixel block graphic into a Texture2D structure called spriteSheet.
spriteBatch.Begin();

// Draw the board first
for (int y = 0; y < BoardHeight; y++)
    for (int x = 0; x < BoardWidth; x++)
{
    Color tintColor = TetronimoColors[Board[x, y]];

    // Since for the board itself background colors are transparent, we'll go ahead and give this one
    // a custom color.  This can be omitted if you draw a background image underneath your board
    if (Board[x, y] == 0)
        tintColor = Color.FromNonPremultiplied(50, 50, 50, 50);

    spriteBatch.Draw(spriteSheet,
                     new Rectangle((int)BoardLocation.X + x * BlockSize,
                                   (int)BoardLocation.Y + y * BlockSize,
                                   BlockSize,
                                   BlockSize),
                     new Rectangle(0, 0, 32, 32),
                     tintColor);
}

// ...  SNIP!  Removed code to draw the falling piece

spriteBatch.End();
The Falling Piece
Last, but not least, is the currently falling piece. The currently falling piece (aka Spawned Piece) needs to exist separate from the game board. While the game board represents static / non-moving blocks, the falling piece moves downward at a particular pace, can be rotated, and even dropped quickly in response to keyboard input.
To get started we can use a variable to store a randomly generated piece shape and a second to store it's location:
int[,] SpawnedPiece;
Vector2 SpawnedPieceLocation;
Then, we can create a method to quickly choose a tetromino piece from the pieces list at random and colorize it.
        // Create a new piece
        public void SpawnPiece()
        {
            int colr = rand.Next(0, pieces.Count);  // rand is initialized earlier and has the type "Random"

            SpawnedPiece = (int[,])pieces[colr].Clone();  // Make a copy of the piece

            int dim = SpawnedPiece.GetLength(0); // Get the dimension of the first row

            // Colorize the piece by multiplying it by a scalar representing the color
            // In this case, the index for the pieces List is also the same index used for the tintColors
            // array
            for (int x = 0; x < dim; x++)
                for (int y = 0; y < dim; y++)
                    SpawnedPiece[x, y] *= (colr + 1);

            SpawnedPieceLocation = Vector2.Zero; // Temporary
        }
Once we have a piece spawned we can perform some limited operations on it (rotate left/right, move left/right, and drop quickly). The first thing we need to ensure is that before we can commit to any operation it must be actually possible to perform that operation.
So to make a move we will do the following:
- Accept user input
- Determine a new block orientation and location based off of user input
- Check to see if we can perform the operation
- If yes, commit it
- If no, then do nothing
Shown below are some situations we're going to need to be able to detect and handle appropriately:
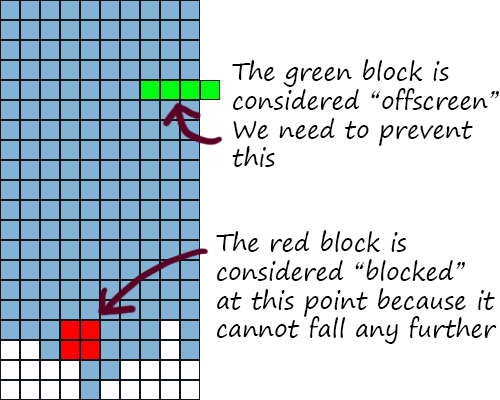
Our game will use a method called "CanPlace" that will check to see if a piece can be located at a particular board position. It can also tell us if the piece is being blocked by something else or if it is presently offscreen (technically off of the board) and out of bounds.
// Defined outside of the current class
public enum PlaceStates
{
    CAN_PLACE,
    BLOCKED,
    OFFSCREEN
}

...

// Checks to see if piece can be placed at location x,y on the board
// Returns PlaceStates.CAN_PLACE if it can exist there, otherwise reports a reason why it cannot
public PlaceStates CanPlace(int[,] board, int[,] piece, int x, int y)
{
    // First we'll need to know the dimensions of the piece
    // Since they are square it is sufficient to just get the dimension of the first row
    int dim = piece.GetLength(0);

    // All pieces are square, so let's use a nested loop to iterate through all the cells of the piece
    for (int px = 0; px < dim; px++)
        for (int py = 0; py < dim; py++)
    {
        // Calculate where on the game board this segment should be placed
        int coordx = x + px;
        int coordy = y + py;

        // Is this space empty?
        if (piece[px, py] != 0)
        {
            // If the board location would be too far to the left or right then
            // we are hitting a wall
            if (coordx < 0 || coordx >= BoardWidth)
                return PlaceStates.OFFSCREEN;

            // If even one segment can't be placed because it is being blocked then
            // we need to return the BLOCKED state
            if (coordy >= BoardHeight || board[coordx, coordy] != 0)
            {
                return PlaceStates.BLOCKED;
            }
        }
    }

    // If we get this far we can place the piece!
    return PlaceStates.CAN_PLACE;

}
When we reach a point where the block piece is "BLOCKED", then it will be necessary to permanently write it to the game board where it will no longer be moveable.
To accomodate this part of the game we are also going to need to be able to check for and remove any lines that are completed. This is typically where we also need to update some type of score counter.
// Check to see if there are any already completed lines on the board, if yes remove them
public void RemoveCompleteLines(int[,] board)
{
    // Start at the bottom of the board and work our way up
    for (int y = BoardHeight - 1; y >= 0; y--)
    {
        // Check to see if the line on row y is complete (non-zero)
        bool isComplete = true;
        for (int x = 0; x < BoardWidth; x++)
        {
            if (board[x, y] == 0)
            {
                isComplete = false;
            }
        }


        if (isComplete)
        {
            // Row y needs to go bye bye
            // Copy row y-1 to row y
            for (int yc = y; yc > 0; yc--)
            {
                for (int x = 0; x < 10; x++)
                {
                    board[x, yc] = board[x, yc - 1];
                }
            }

            // Recheck this row
            y++;

            // Score += 100;
        }
    }
}


// Permanently write piece to the game board
// Note that this method assumes that the piece can actually be placed already and does not recheck
// to make sure the piece can be placed
public void Place(int[,] board, int[,] piece, int x, int y)
{
    int dim = piece.GetLength(0);

    for (int px = 0; px < dim; px++)
        for (int py = 0; py < dim; py++)
    {
        int coordx = x + px;
        int coordy = y + py;

        if (piece[px, py] != 0)
        {
            board[coordx, coordy] = piece[px, py];
        }

    }

    RemoveCompleteLines(board);

}
Lastly, we need a way to rotate a particular piece. The way that this Rotate method works is to perform the actual rotation and give us a new array based off of the rotated block. Since the blocks are all square it is pretty straightforward to swap some of the cell values to perform the rotations.
// Rotate the piece (this style of rotation for Tetris is called a super rotation as it doesn't follow the conventional
// style of piece rotations)
public int[,] Rotate(int[,] piece, bool left)
{
    int dim = piece.GetLength(0);
    int[,] npiece = new int[dim, dim];

    for (int i = 0; i < dim; i++)
        for (int j = 0; j < dim; j++)
    {
        if (left)
            npiece[j, i] = piece[i, dim - 1 - j];
        else
            npiece[j, i] = piece[dim - 1 - i, j];
    }

    return npiece;
}
Some sample rotations:
{1, 1, 0}     {0, 0, 1}     {0, 0, 0}     {0, 1, 0}
{0, 1, 1}     {0, 1, 1}     {1, 1, 0}     {1, 1, 0}
{0, 0, 0}     {0, 1, 0}     {0, 1, 1}     {1, 0, 0}
Let the Blocks Fall!
In this game the blocks move one space down for every given time interval. We're going to need to keep track of how much time has elapsed since the last update.
We will add the following variables to the beginning of your game class:
        int StepTime = 300;  // Time step between updates in ms
        int ElapsedTime = 0;  // Total elapsed time since the last update
        int KeyBoardElapsedTime = 0;  // Total elapsed time since handling the last keypress
From there we just need to add some code in our Update method to adjust the block location based off of time:
        protected override void Update(GameTime gameTime)
        {
            // Allows the game to exit
            if (GamePad.GetState(PlayerIndex.One).Buttons.Back == ButtonState.Pressed)
                this.Exit();

            ElapsedTime += gameTime.ElapsedGameTime.Milliseconds;
            KeyBoardElapsedTime += gameTime.ElapsedGameTime.Milliseconds;

            /* SNIP! Keyboard handling code removed */

            // If the accumulated time over the last couple Update() method calls exceeds our StepTime variable
            if (ElapsedTime > StepTime)
            {
                // Create a new location for this spawned piece to go to on the next update
                Vector2 NewSpawnedPieceLocation = SpawnedPieceLocation + new Vector2(0, 1);

                // Now check to see if we can place the piece at that new location
                PlaceStates ps = CanPlace(Board, SpawnedPiece, (int)NewSpawnedPieceLocation.X, (int)NewSpawnedPieceLocation.Y);
                if (ps != PlaceStates.CAN_PLACE)
                {
                    // We can't move down any further, so place the piece where it is currently
                    Place(Board, SpawnedPiece, (int)SpawnedPieceLocation.X, (int)SpawnedPieceLocation.Y);
                    SpawnPiece();

                    // This is just a check to see if the newly spawned piece is already blocked, in which case the
                    // game is over
                    ps = CanPlace(Board, SpawnedPiece, (int)SpawnedPieceLocation.X, (int)SpawnedPieceLocation.Y);
                    if (ps == PlaceStates.BLOCKED)
                    {
                        // Game over.. normally we would change a game state variable but for this tutorial we're just
                        // going to exit the app
                        this.Exit();
                    }
                }
                else
                {
                    // We can move our piece into the new location, so update the existing piece location
                    SpawnedPieceLocation = NewSpawnedPieceLocation;
                }

                ElapsedTime = 0;
            }

            base.Update(gameTime);
        }
Simple enough? Now let's insert some additional code to deal with user keypresses:
			KeyboardState ks = Keyboard.GetState();

            if (KeyBoardElapsedTime > 200)
            {
                if (ks.IsKeyDown(Keys.Left) || ks.IsKeyDown(Keys.Right))
                {
                    // Create a new location that contains where we WANT to move the piece
                    Vector2 NewSpawnedPieceLocation = SpawnedPieceLocation + new Vector2(ks.IsKeyDown(Keys.Left) ? -1 : 1, 0);

                    // Next, check to see if we can actually place the piece there
                    PlaceStates ps = CanPlace(Board, SpawnedPiece, (int)NewSpawnedPieceLocation.X, (int)NewSpawnedPieceLocation.Y);
                    if (ps == PlaceStates.CAN_PLACE)
                    {
                        SpawnedPieceLocation = NewSpawnedPieceLocation;
                    }

                    KeyBoardElapsedTime = 0;
                }

                if (ks.IsKeyDown(Keys.Up))
                {
                    int[,] newSpawnedPiece = Rotate(SpawnedPiece, true);

                    PlaceStates ps = CanPlace(Board, newSpawnedPiece, (int)SpawnedPieceLocation.X, (int)SpawnedPieceLocation.Y);
                    if (ps == PlaceStates.CAN_PLACE)
                    {
                        SpawnedPiece = newSpawnedPiece;
                    }

                    KeyBoardElapsedTime = 0;
                }


                if (ks.IsKeyDown(Keys.Down))
                {
                    ElapsedTime = StepTime + 1;
                    KeyBoardElapsedTime = 175;
                }
            }
Putting it all Together
Drawing the Board and Falling Piece
spriteBatch.Begin();

// Draw the board first
for (int y = 0; y < BoardHeight; y++)
    for (int x = 0; x < BoardWidth; x++)
{
    Color tintColor = TetronimoColors[Board[x, y]];

    // Since for the board itself background colors are transparent, we'll go ahead and give this one
    // a custom color.  This can be omitted if you draw a background image underneath your board
    if (Board[x, y] == 0)
        tintColor = Color.FromNonPremultiplied(50, 50, 50, 50);

    spriteBatch.Draw(spriteSheet,
                     new Rectangle((int)BoardLocation.X + x * BlockSize,
                                   (int)BoardLocation.Y + y * BlockSize,
                                   BlockSize,
                                   BlockSize),
                     new Rectangle(0, 0, 32, 32),
                     tintColor);
}

            // Next draw the spawned piece
            int dim = SpawnedPiece.GetLength(0);

            for (int y = 0; y < dim; y++)
                for (int x = 0; x < dim; x++)
                {
                    if (SpawnedPiece[x, y] != 0)
                    {
                        Color tintColor = TetronimoColors[SpawnedPiece[x, y]];

                        spriteBatch.Draw(spriteSheet,
                                         new Rectangle((int)BoardLocation.X + ((int)SpawnedPieceLocation.X + x) * BlockSize,
                                                       (int)BoardLocation.Y + ((int)SpawnedPieceLocation.Y + y) * BlockSize,
                                                       BlockSize,
                                                       BlockSize),
                                         new Rectangle(0, 0, 32, 32),
                                         tintColor);
                    }
                }

spriteBatch.End();
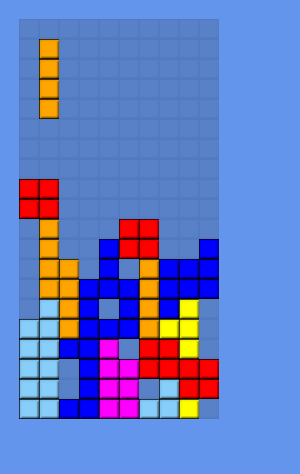
The finished product (for now)!
Conclusion
This concludes part 1 of "Retro Games: How to Make a Tetromino Game". If you run the attached game sample you will notice that we only have the basic gameplay for the game working. The purpose of omitting these items was to keep the game relatively compact for part 1. What is missing is some type of score counter, showing of the "on deck" or next piece that will be dropped, and adding any type of special effects for removing lines.
In part 2 we will look to tackle polishing up the game a bit more. I hope you enjoyed this tutorial and if you manage to jump ahead of me and complete a full tetromino game, please post a link to your game in the comments section for this article.
Article Update Log
12 Mar 2013: Initial release


Interesting, this is exactly the same method I used when I created the board for my XNA tetris.
+1 :)