Source code can be found here: StateMachineTutorialsV5.zip
Introduction
Many of the beginners on the site are pre-college students. Often beginners will learn by reading tutorials on the Internet, copying code from books, and trying out things that they find interesting. Sometimes the basic computer science theory topics are ignored or viewed lightly.
This article will cover one frequently overlooked topic and hopefully underscore its importance to beginners. This article is based on a series of entries from my developer journal. tl;dr -- This used to be a bunch of small pieces. It starts out with boring theory. Keep reading because it ends up with something fun.
The Computer Science Aspect
Finite state machines, also called finite state automata, FSMs, or simply state machines, are important in computer theory. Computer theory covers several types of abstract machines, including FSMs. The most famous is probably the Turing Machine, which can represent the logic of any computer algorithm. The FSM is a 'weak' abstract machine. It can only solve a few types of problems and it is easy to make problems that it cannot solve. Even though it is weak we still see them in our daily lives all the time. They exist in everything from elevators to traffic lights; from vending machines to combination locks; from credit card number validation to complex artificial intelligence systems.
There are several categories of FSMs that game programmers use all the time. These include Acceptors, Transducers, and Sequencers.
Acceptor machines are useful in creating simple grammars. If you can build an FSM to represent a grammar it is called a regular language. A single acceptor statement in a regular language is called a regular expression. There are many books devoted to using regular expressions to handle user input. You might have noticed that many programmer tools for search and replace contain options to search and replace using regular expressions.
Transducer machines are often found in game tools. They read some input file and generate a corresponding output file. A tool that consolidates all your files into a single large data file is a transducer. A tool that converts from generic data into a game's final memory format for faster loading time is a transducer.
Sequencer machines are often found in code and data. They control a sequence of events or actions. This is the type of FSM I'll be covering.
What does a State Machine Look Like?
A finite state machine really only has two key components. First, it contains states, which can also be called a node or a vertex. Second, it contains transitions, which are also called edges. One of the states is marked as the starting state. States may also be marked as an exit state. When run, the FSM begins at a starting state. There is an event or trigger or condition that causes it to transition to the next state. There are many ways to picture it. Here is a state machine in table format:

This machine has four states. (Two entries are for state 2.)
The same state machine in a graphical format:
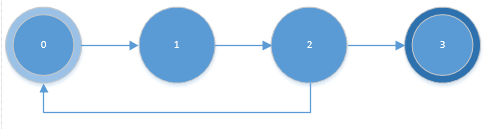
Pretty simple. We don't need to stick with numbers for state names, just like we don't need to stick with i and j or x and y for variable names.
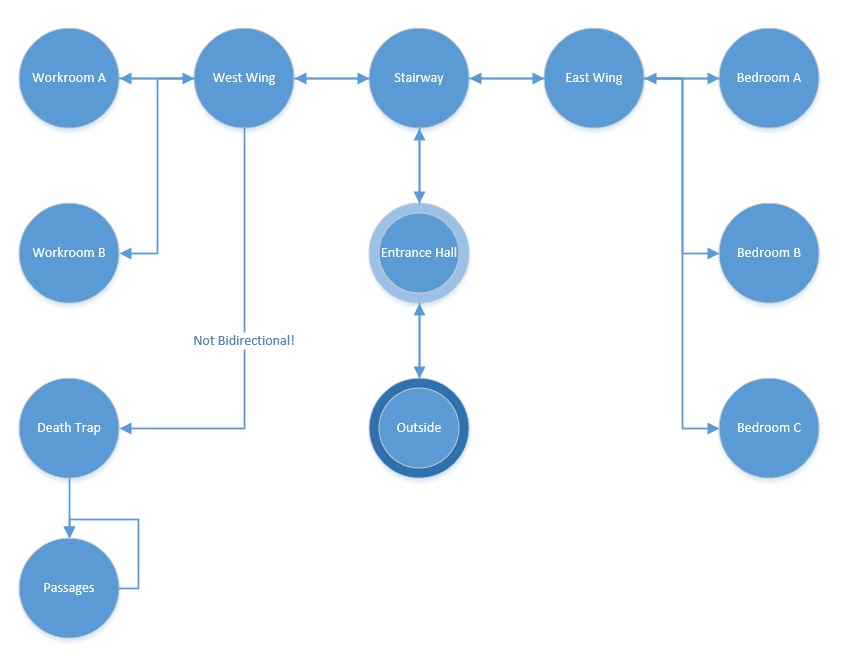
Here is the same graph with better names:

Suddenly this state machine looks less like a boring theory topic and much more like a game topic. This type of simple state machine is frequently used for simple NPC game logic.
Implementing a Simple State Machine
For a quick-and-dirty simple state machine that will never change, programmers will often just hard code something simple. The most common way to implement that kind of state machine is with a simple switch statement. The full code (including the state machine runner) is attached at the bottom of the article. In this code we have the four different states from the example above.
public class StateMachine
{
  public enum State
  {
    Routing,
    Sentrying,
    Attacking,
    Ending
  }

  State mState = State.Routing;
  Random rng = new Random();

  public string GetStateName()
  {
    return mState.ToString();
  }

  public string UpdateState()
  {
    return "Running state " + GetStateName() +". Your game logic goes here.";
  }

  public void NextState()
  {
    switch (mState)
    {
      case State.Routing:
        mState = State.Sentrying;
        break;
      case State.Sentrying:
        mState = State.Attacking;
        break;
      case State.Attacking: // TODO: Make this based on game logic instead of random number generator
        if(rng.NextDouble() < 0.75)
        {
          Console.WriteLine("Random generator says NPC has survived.");
          mState = State.Routing;
        }
        else
        {
          Console.WriteLine("Random generator says NPC did not survive.");
          mState = State.Ending;
        }
        break;
      case State.Ending: // Nothing to do.
        break;
    }
  }

  public bool IsDone()
  {
    return mState == State.Ending;
  }
}
This isn't the same as a fancy graph, but it does implement the same logic. Remember that a state machine is just a concept --- the actual implementation details can vary greatly.
A State Machine Interface
When building large programs it is a good practice to program against an interface or an abstract base class. This is often called the Dependency Inversion Principle. It allows us to write generic code that can be applied to many different concrete classes.
For the next few examples, I'm going to use a simple interface for the states and for the state machines.
Here is the interface:
public abstract class IStateMachine
{
  // Accessor to look at the current state.
  public abstract IState CurrentState
  {
    get;
  }

  // List of all possible transitions we can make from this current state.
  public abstract string[] PossibleTransitions();

  // Advance to a named state, returning true on success.
  public abstract bool Advance(string nextState);

  // Is this state a "completion" state. Are we there yet?
  public abstract bool IsComplete();
}

public abstract class IState
{
  // Utility function to help us display useful things
  public abstract string GetName();

  // Do something
  public abstract void Run();

  // This isn't really needed, but it helps in debugging and other tasks.
  // It allows hover-tips and debug info to show me the name of the state
  // rather than the default of the type of the object

  public override string ToString()
  {
    return GetName();
  }
}
To go along with that interface we need a simple state machine runner that uses it. Here's the state machine runner I need for these examples:
static void Main(string[] args)
{
  // First we need to create the state machine.
  // Note that I'm using the abstract IStateMachine instead of a concrete class.
  IStateMachine machine = GetMachine();

  // We have a machine, now run it.
  while(!machine.IsComplete())
  {
    // Print out our current state
    Console.WriteLine("Currently in " + machine.CurrentState);
    machine.CurrentState.Run();

    // Print out our possible transitions
    Console.WriteLine("\nAvailable choices are:");
    string[] transitions = machine.PossibleTransitions();
    foreach (string item in transitions)
    {
      Console.WriteLine(" " + item);
    }

    // Request a transition from the user
    Console.WriteLine("\nWhat do you want to do?");
    string nextState = Console.ReadLine();
    machine.Advance(nextState);
  }
  // And we're done!

  // Run our final node as a special case since the above loop won't do it.
  Console.WriteLine("Currently in " + machine.CurrentState);
  machine.CurrentState.Run();

  // Finish off.
  Console.WriteLine("\n\nPress any key to continue.");
  Console.ReadKey(true);
}
That is all we need, and we've got the framework for a text-based dungeon explorer game.
A Boring State Machine
Just to prove out the above code I created a simple machine. Because it doesn't do anything fun or exciting I called it the BoringMachine.
QuoteRemember that a state machine is a CONCEPT. There are many ways to implement it. You can have a machine that points to a collection of objects. You can have a single variable that changes to represent the state. You can use a series of conditional statements. You can use an inheritance tree. The implementation details are up to you.
In this machine, I chose to make a single state and then caused the state to modify itself as the machine moves around it. This state machine implements the interface I described above, but that interface requires you to state the transition name. In this case, I just ignore the name of the state and advance along a fixed route. Remember that this is just a proof of concept of the state machine runner, it doesn't do anything fancy. It is like the state machine above with states labelled 0, 1, 2, and 3 --- it doesn't look like much yet.
class BoringMachine : IStateMachine
{
  BoringMachineState mState = new BoringMachineState();
  public override IState CurrentState
  {
    get
    {
      return mState;
    }
  }

  public override string[] PossibleTransitions()
  {
    // For this simple example, forward it on to the state
    return mState.ListTransitions();
  }

  public override bool Advance(string nextState)
  { Console.WriteLine("I'm a boring state machine. I don't care what you entered. Advancing state.");
   return mState.Advance();
  }

  public override bool IsComplete()
  {
    // For the simple example, forward it on to the state
    return mState.IsComplete();
  }
}

class BoringMachineState : IState
{
  #region Members
    internal enum SameOldStates
    {
      Enter,
      DoStuff,
      Exiting,
      Done
    }

  SameOldStates mState = SameOldStates.Enter;
  #endregion

  #region IState
    overrides public override string GetName()
      {
        return mState.ToString();
      }

      public override void Run()
      {
        // Do nothing. This is the game logic.
      }
  #endregion

  #region Helper functions
    public bool IsComplete()
    {
      return mState == SameOldStates.Done;
    }

    public string[] ListTransitions()
    {
      List result = new List();
      switch (mState)
      {
        case SameOldStates.Enter:
          result.Add("DoStuff");
          break;
        case SameOldStates.DoStuff:
          result.Add("Exiting");
          break;
        case SameOldStates.Exiting:
          result.Add("Done");
          break;
        case SameOldStates.Done:
          result.Add("Done");
          break;
      }

      return result.ToArray();
    }

    public bool Advance()
    {
      switch (mState)
      {
        case SameOldStates.Enter:
          mState = SameOldStates.DoStuff;
          break;
        case SameOldStates.DoStuff:
          mState = SameOldStates.Exiting;
          break;
        case SameOldStates.Exiting:
          mState = SameOldStates.Done;
          break;
        case SameOldStates.Done: // Do nothing.
          break;
      }

      return true;
    }
  #endregion
}
At this point, I can feed that machine into the runner and it works. Sometimes that is the biggest accomplishment.
Let's Make a Game
Now that I have proved that the state machine runner is up to the task, I create another state machine implementation. This is one of the nice things about writing to an interface: I can create many variations easily. I'll call this one FunMachine. It derives from IState and implements that simple interface. The state machine will represent a map to explore. Each state will represent the room. Here's that code:
class FunMachineState : IState
{
  string mName;
  string mDescription;
  List mNeighbors = new List();
  public List Neighbors
  {
    get
    {
      return mNeighbors;
    }
  }

  ///
  /// Initializes a new instance of the FunnerState class.
  ///
  ///Name to display for this state
  ///Text to display for this
  state public FunMachineState(string mName, string mDescription)
  {
    this.mName = mName;
    this.mDescription = mDescription;
  }

  #region IState Overrides
    public override string GetName()
    {
      return mName;
    }

    public override void Run()
    {
      // We don't do any fancy stuff, just print out where we are
      Console.WriteLine();
      Console.WriteLine(mDescription);
    }
  #endregion
}
Most of the State Machine
Remember that we can implement a state machine in many ways.
In this example, the machine will point to the current state, and during transitions will move to the next state. This source listing is going to include everything EXCEPT the state machine constructor. I'll go over that in more detail in the next section. The machine implements the same IStateMachine interface.
It also adds three machine-specific values: A list of states, a link to the current state, and a link to the exit state (which we will eventually remove). Two things to note are how it gets the list of possible transitions and how it advances. We look at the names of the current node's neighbors --- in this case, the name of a room on the map. We advance by making sure we can only travel to neighboring rooms. That avoids the exploit of typing "move Exit" and winning the game in the first step.
class FunMachine : IStateMachine
{
  List mStates;
  FunMachineState mCurrent;
  FunMachineState mExit;

  /// CONSTRUCTOR NOT SHOWN
  #region IStateMachine Overrides
    public override IState CurrentState
    {
      get
      {
        return mCurrent;
      }
    }

    public override string[] PossibleTransitions()
    {
      List result = new List();
      foreach (FunMachineState state in mCurrent.Neighbors)
      {
        result.Add(state.GetName());
      }

      return result.ToArray();
    }

    public override bool Advance(string nextState)
    {
      foreach (FunMachineState state in mCurrent.Neighbors)
      {
        if (nextState == state.GetName())
        {
          mCurrent = state;
          return true;
        }
      }

      System.Console.WriteLine("Invalid state.");

      return false;
    }

    public override bool IsComplete()
    {
      return mCurrent == mExit;
    }
  #endregion
}
Again, this should seem straightforward if you've been following along. We've got the state machine in just a few lines of code.
On to the Constructor
This state machine is still hard-coded. In order to generate the maze, we need to manually construct each room (aka FSM state, or vertex, or node). We also need to construct each transition (aka edge) of the state machine.
public FunMachine()
{
  // Create all the fun states in our mini-world
  FunMachineState entryHall = new FunMachineState("Grand Entrance", "You are standing in a grand entrance of a castle.\nThere are tables and chairs, but nothing you can interact with.");
  FunMachineState staircase = new FunMachineState("Grand Staircase", "The staircase is made from beautiful granite.");
  FunMachineState eastWing = new FunMachineState("East Wing", "This wing is devoted to bedrooms.");
  FunMachineState westWing = new FunMachineState("West Wing", "This wing is devoted to business.");
  FunMachineState bedroomA = new FunMachineState("Master Suite", "This is the master suite. What a fancy room.");
  FunMachineState bedroomB = new FunMachineState("Prince Bob's Room", "The prince has an extensive library on his wall.\nHe also has more clothes than most males know what to do with.");
  FunMachineState bedroomC = new FunMachineState("Princess Alice's Room", "The princess has filled her room with a small compur lab.\nShe spends her days playing games and writing code.");
  FunMachineState workroomA = new FunMachineState("Study", "This is the study. It has many books.");
  FunMachineState workroomB = new FunMachineState("Bathroom", "Every home needs one");
  FunMachineState workroomC = new FunMachineState("Do Not Enter", "I warned you not to enter.\nYou are in a maze of twisty little passages, all alike.");
  FunMachineState passage = new FunMachineState("Twisty Passage", "You are in a maze of twisty little passages, all alike");
  mExit = new FunMachineState("Outside", "You have successfully exited the castle.");

  // Hook up doors.
  entryHall.Neighbors.Add(staircase);
  entryHall.Neighbors.Add(mExit);
  staircase.Neighbors.Add(eastWing);
  staircase.Neighbors.Add(westWing);
  staircase.Neighbors.Add(entryHall);
  eastWing.Neighbors.Add(bedroomA);
  eastWing.Neighbors.Add(bedroomB);
  eastWing.Neighbors.Add(bedroomC);
  eastWing.Neighbors.Add(staircase);
  bedroomA.Neighbors.Add(eastWing);
  bedroomB.Neighbors.Add(eastWing);
  bedroomC.Neighbors.Add(eastWing);
  westWing.Neighbors.Add(workroomA);
  westWing.Neighbors.Add(workroomB);
  westWing.Neighbors.Add(workroomC);
  workroomA.Neighbors.Add(westWing);
  workroomB.Neighbors.Add(westWing);
  // Trap of doom.
  workroomC.Neighbors.Add(passage);
  passage.Neighbors.Add(passage);

  // Add them to the collection
  mStates = new List();
  mStates.Add(entryHall);
  mStates.Add(staircase);
  mStates.Add(eastWing);
  mStates.Add(westWing);
  mStates.Add(bedroomA);
  mStates.Add(bedroomB);
  mStates.Add(bedroomC);
  mStates.Add(workroomA);
  mStates.Add(workroomB);
  mStates.Add(workroomC);
  mStates.Add(passage);
  mStates.Add(mExit);

  // Finally set my starting point
  mCurrent = entryHall;
}
This creates a fun little graph. In case you're having trouble visualizing it, the picture version looks like this:
It has rooms. It has a text adventure with a death trap room and a route to victory. It is starting to look like a real game.
Run the Example Code
If you haven't gone through the executable yet, now would be a great time to do it. You can explore this little text-based world. It doesn't have a plot, it doesn't have inventory items or any action other than moving, but it demonstrates a part of the game.
Making it Data Driven
That term shows up a lot in games: Data Driven.
What does it mean? So far if I wanted to make changes I needed to modify the source code, recompile, and test the app. For a small castle map and a single developer, this is not a hard thing. But what happens when the app grows?
Let's imagine I hire someone to design my levels. That person is not a programmer. I don't want them touching my C# files, and I don't want to teach them to read and write C#. So what should I do?
Simple: I create a save file that contains all the information describing the level. I can allow non-programmers to work on my game by loading data at runtime. Data-driven means level designers can modify rooms, put different things in different locations, and otherwise improve the game without touching the code. It means another programmer can implement game objects like ropes and bottles and water without touching the game code. It means that if we were making a graphical game, artists could create new art, modellers could create new models, and animators could modify animations, all without touching the code. Data-driven means that only programmers need to touch the code. Everyone else uses data to modify the game. Fancy engines will implement ways to reload data while the game is running. Designers and artists and animators and modellers can iterate on their work much faster, potentially saving months of development time.
Making My Dungeon Data Driven
The states are only slightly modified from last time. Last time I stored the state's name, description, and neighbors.
This time I add a unique name key and a set of flags. The flags indicate if the node is the Enter node (there is only one) or if the node is an exit node. Next I added the functions ReadXml and WriteXml. These two functions save and load my five elements (unique name, flags, visible name, description, and neighbors) into an XML file. Because it is basically free I chose to implement them using the IXmlSerializable interface. Someday when I'm feeling ambitious I can extend future components to also use the C# serialization routines to automatically handle my data. Since the state machine will need to create these objects from XML, I create a second constructor that takes an XmlReader and pass that on to the ReadXml function.
Finally, I added some accessors and mutators (get and set functions) to help out the state machine.
public class SavedMachineState : IState, IXmlSerializable
{
  #region Members [Flags]
    public enum StateFlags
    {
      None = 0,
      Enter = 1,
      Exit = 2,
    }

    public string mKey;
    StateFlags mFlags;
    string mName;
    string mDescription;
    List mNeighbors = new List();
    public List Neighbors
    {
      get
      {
        return mNeighbors;
      }
    }
  #endregion

  #region Constructors
    ///
    /// Manual constructor for default maze
    ///
    ///unique name for the stateFlags
    ///flags to indicate enter nodes and exit nodes
    ///name to show to the user
    ///text to show for the description
    ///unique keys for neighboring rooms, seperated by commas and not spaces
    public SavedMachineState(string uniqueKey, StateFlags flags, string name, string description, string neighbors)
    {
      mKey = uniqueKey;
      mFlags = flags;
      mName = name;
      mDescription = description;
      mNeighbors.AddRange(neighbors.Split(','));
    }

    ///
    /// Constructor to create an object from a save file
    ///
    ///xml stream to read from
    public SavedMachineState(XmlReader reader)
    {
      ReadXml(reader);
    }
  #endregion

  #region Helper Functions
    public bool IsStartState
    {
      get
      {
        return (mFlags & StateFlags.Enter) != StateFlags.None;
      }
    }

    public bool IsExitState
    {
      get
      {
        return (mFlags & StateFlags.Exit) != StateFlags.None;
      }
    }

    public string Key
    {
      get
      {
        return mKey;
      }
    }

    public bool IsMyName(string nameToTest)
    {
      //TODO: Add shortcuts to names. For example, allow "Great Hall", "Hall", etc.
      if (nameToTest.ToLower() == mName.ToLower()) return true;
      if (nameToTest.ToLower() == mKey.ToLower()) return true;
      return false;
    }
  #endregion

  #region IState Overrides
    public override string GetName()
    {
      return mName;
    }

    public override void Run()
    {
      // We don't do any fancy stuff, just print out where we are
      Console.WriteLine();
      Console.WriteLine(mDescription);
    }
  #endregion

  #region IXmlSerializable Members
    public System.Xml.Schema.XmlSchema GetSchema()
    {
      return null;
    }

    public void ReadXml(System.Xml.XmlReader reader)
    {
      reader.ReadStartElement(); mKey = reader.ReadElementContentAsString("UniqueName","");
      string flagString = reader.ReadElementContentAsString("Flags","");
      mFlags = (StateFlags)Enum.Parse(typeof(StateFlags), flagString);
      mName = reader.ReadElementContentAsString("VisibleName", "");
      mDescription = reader.ReadElementContentAsString("Description", "");
      string neighborsString = reader.ReadElementContentAsString("Neighbors", "");
      mNeighbors.AddRange(neighborsString.Split(','));
      reader.ReadEndElement();
    }

    public void WriteXml(System.Xml.XmlWriter writer)
    {
      writer.WriteElementString("UniqueName", mKey);
      writer.WriteElementString("Flags", mFlags.ToString());
      writer.WriteElementString("VisibleName", mName);
      writer.WriteElementString("Description", mDescription);
      string neighbors = String.Join(",",Neighbors.ToArray());
      writer.WriteElementString("Neighbors",neighbors);
    }
  #endregion
}
If that was the first exposure to the code it might be a little intimidating. But since we've been slowly adding to it over time, you should see that it is only a minor incremental change.
State Machine Changes
Changes to the state machine were a little more dramatic. The exit node information is now contained in the data, so I can drop the mExit state I mentioned earlier. For convenience, I moved the map construction code from a constructor to its own function: GenerateDefaultMap(). It allows us to generate and save a map when bootstrapping the toolchain. The constructor calls ImportFromXml() instead. If that fails we generate the default map, save a copy with ExportToXML(), and then reload our newly created map. ExportToXML() creates an XML writer, loops through the states, and writes each state out using the WriteXml() function. ImportFromXML() creates an XML reader and reads the file in through the corresponding ReadXml() function.
Here's the modified code:
public class SavedMachine : IStateMachine, IXmlSerializable
{
  #region Members List
    mStates = new List();
    SavedMachineState mCurrent;
  #endregion

  #region Constructor
    ///
    /// Initializes a new instance of the FunnerMachine class.
    ///
    public SavedMachine()
    {
      try
      {
        ImportFromXML();
      }
      catch (Exception ex)
      {
        mStates.Clear();
      }

      if (mStates.Count == 0)
      {
        GenerateDefaultMap();
        ImportFromXML();
      }

      // Find the entry state
      for (int i = 0; i < mStates.Count; i++)
      {
        if (mStates.IsStartState)
        {
          mCurrent = mStates;
          break;
        }
      }
      if (mCurrent == null)
      {
        Console.WriteLine("\n\nERROR! NO ENTRY STATE DEFINED.");
        throw new Exception("No entry state defined in this state machine. Cannot continue.");
      }
    }
  #endregion

  #region Helper Functions
    private void GenerateDefaultMap()
    {
      mStates.Clear();

      // Create all the fun states in our mini-world
      mStates.Add(new SavedMachineState("entryHall", SavedMachineState.StateFlags.Enter, "Grand Entrance", "You are standing in a grand enterance of a castle.\nThere are tables and chairs, but nothing you can interact with.", "staircase,outside"));
      mStates.Add(new SavedMachineState("staircase", SavedMachineState.StateFlags.None, "Grand Staircase", "The staircase is made from beautiful granite.", "eastWing,westWing,entryHall"));
      mStates.Add(new SavedMachineState("eastWing", SavedMachineState.StateFlags.None, "East Wing", "This wing is devoted to bedrooms.", "bedroomA,bedroomB,bedroomC,staircase"));
      mStates.Add(new SavedMachineState("westWing", SavedMachineState.StateFlags.None, "West Wing", "This wing is devoted to business.", "workroomA,workroomB,workroomC"));
      mStates.Add(new SavedMachineState("bedroomA", SavedMachineState.StateFlags.None, "Master Suite", "This is the master suite. What a fancy room.", "eastWing"));
      mStates.Add(new SavedMachineState("bedroomB", SavedMachineState.StateFlags.None, "Prince Bob's Room", "The prince has an extensive library on his wall.\nHe also has more clothes than most males know what to do with.", "eastWing"));
      mStates.Add(new SavedMachineState("bedroomC", SavedMachineState.StateFlags.None, "Princess Alice's Room", "The princess has filled her room with a small compur lab.\nShe spends her days playing games and writing code.", "eastWing"));
      mStates.Add(new SavedMachineState("workroomA", SavedMachineState.StateFlags.None, "Study", "This is the study. It has many books.", "westWing"));
      mStates.Add(new SavedMachineState("workroomB", SavedMachineState.StateFlags.None, "Bathroom", "Every home needs one", "westWing"));
      mStates.Add(new SavedMachineState("workroomC", SavedMachineState.StateFlags.None, "Do Not Enter", "I warned you not to enter.\nYou are in a maze of twisty little passages, all alike.", "passage"));
      mStates.Add(new SavedMachineState("passage", SavedMachineState.StateFlags.None, "Twisty Passage", "You are in a maze of twisty little passages, all alike", "passage"));
      mStates.Add(new SavedMachineState("outside", SavedMachineState.StateFlags.Exit, "Outside", "You have successfully exited the castle.", ""));

      ExportToXML();
    }

    public void ExportToXML()
    {
      XmlWriterSettings settings = new XmlWriterSettings();
      settings.Indent = true;
      settings.OmitXmlDeclaration = true;
      settings.NewLineHandling = NewLineHandling.Entitize;
      using (XmlWriter writer = XmlWriter.Create("GameRooms.xml",settings))
      {
        writer.WriteStartDocument();
        writer.WriteStartElement("SavedMachine");
        WriteXml(writer);
        writer.WriteEndElement();
        writer.WriteEndDocument();
      }
    }

    public void ImportFromXML()
    {
      XmlReaderSettings settings = new XmlReaderSettings();
      settings.IgnoreWhitespace = true;
      XmlReader reader = XmlReader.Create("GameRooms.xml", settings);
      ReadXml(reader);
    }

  #endregion

  #region IStateMachine Overrides
    public override IState CurrentState
    {
      get
      {
        return mCurrent;
      }
    }

    public override string[] PossibleTransitions()
    {
      List result = new List();
      foreach (string state in mCurrent.Neighbors)
      {
        result.Add(state);
      }

      return result.ToArray();
    }

    public override bool Advance(string nextState)
      {
        foreach (SavedMachineState state in mStates)
        {
          if(state.IsMyName(nextState) && mCurrent.Neighbors.Contains(state.Key))
          {
            mCurrent = state;
            return true;
          }
        }

        System.Console.WriteLine("Cannot do that.");
        return false;
    }

    public override bool IsComplete()
    {
      return mCurrent.IsExitState;
    }
  #endregion

  #region IXmlSerializable Members
    public System.Xml.Schema.XmlSchema GetSchema()
    {
      return null;
    }

    public void ReadXml(XmlReader reader)
    {
      bool isEmpty = reader.IsEmptyElement;
      reader.ReadStartElement();
      if (isEmpty) return;
      while (reader.NodeType == XmlNodeType.Element)
      {
        if (reader.Name == "Room")
        {
          mStates.Add(new SavedMachineState(reader));
        }
        else
          throw new XmlException("Unexpected node: " + reader.Name);
        }

      reader.ReadEndElement();
    }

    public void WriteXml(XmlWriter writer)
    {
      foreach (SavedMachineState state in mStates)
      {
        writer.WriteStartElement("Room");
        state.WriteXml(writer);
        writer.WriteEndElement();
      }
    }
  #endregion
}
Not too bad for an incremental change.
Run the Game and Generate Bootstrap Data
Now when I run the game it attempts to load the save file. It cannot find one so it generates a new GameRooms.xml data file. Then it plays the same dungeon explorer code as before. Since I am bootstrapping my tools, I need to jump straight into the generated xml:
entryHall
  Enter
  Grand Entrance
  You are standing in a grand enterance of a castle.
  There are tables and chairs, but nothing you can interact with.
  staircase,outside

staircase
  None
  Grand
  Staircase
  The staircase is made from beautiful granite.
  eastWing,westWing,entryHall

eastWing
  None
  East Wing
  This wing is devoted to bedrooms.
  bedroomA,bedroomB,bedroomC,staircase

westWing
  None
  West Wing
  This wing is devoted to business.
  workroomA,workroomB,workroomC

bedroomA
  None
  Master Suite
  This is the master suite. What a fancy room.
  eastWing

bedroomB
  None
  Prince Bob's Room
  The prince has an extensive library on his wall. He also has more clothes than most males know what to do with.
  eastWing

bedroomC
  None
  Princess Alice's Room
  The princess has filled her room with a small compur lab. She spends her days playing games and writing code.
  eastWing

workroomA
  None
  Study
  This is the study. It has many books.
  westWing

workroomB
  None
  Bathroom
  Every home needs one
  westWing

workroomC
  None
  Do Not Enter
  I warned you not to enter. You are in a maze of twisty little passages, all alike.
  passage

passage
  None
  Twisty Passage
  You are in a maze of twisty little passages, all alike
  passage

outside
  Exit
  Outside
  You have successfully exited the castle.
I can look it over and verify that it is our original map, saved out in XML format. To prove that the system actually works, we can make some minor modifications to the map: 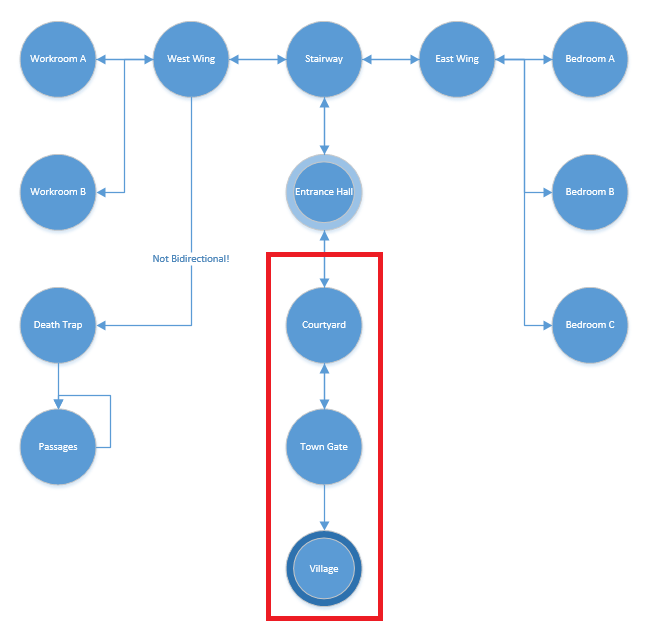
This requires a tiny modification to the entrance hall (pointing the neighbor to 'courtyard') and making three new rooms. A few seconds in a text editor, copy/paste, a little wordsmithing, and I get this addition to the save file:
courtyard
  None
  Courtyard
  The courtyard is decorated with many large trees and several marble benches.
  entryHall,townGate

townGate
  None
  Town Gate
  You arrive at the gate of the town. Ahh, to be home again.\n\nNOTICE: The guards will not let you return to the castle if you leave.
  courtyard,village

village
  Exit
  Quaint Village
  You return to your village. You won't soon forget your experiences in the castle.
I fire up the game, and can quickly verify that I have altered the map just by changing data. Someone could now write a simple tool that allows a map designer to visualize dungeons. Or they could just let the map designer work with the raw XML files. Either way, the map is now data driven --- it can be modified entirely by data without any work from the programmer.
Always Room for Improvement
There are many more things we could do with this simple example. The first thing I would do is create objects that can be placed in rooms. These are simple state machines in themselves. For example, I could have a bucket object that has several states: Empty, Water, WaterAndFish. Events could be added (again with a simple state machine) that tracks your progress through a quest and grants points as you complete objectives. Those are nice things to have in a game, but in this case, they don't add anything beyond what was just demonstrated. That can be left as an exercise for the reader.
A More Complex Set of Machines
Let's move on to a more complex topic. Every game I've worked on has used an AI system of some form. There are actors and objects, and the actors do something. Often the actors use objects. For this demo, I created the following structure:
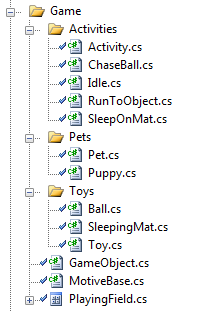
The game container is a playing field. It contains a collection of GameObject instances. The playing field gets regular updates at about 30 frames per second, and each update gets passed along to the individual objects. There are two types of game objects: Pets and Toys. These to objects work together using activities. Now to go over each of these in detail.
The Base GameObject Class
A game object fits in with the state machines. They serve as both state machines AND as state nodes. Remember from earlier that a state machine is a concept. The implementation details don't matter when the concept is intact. It has an Update(), which means to run the current state, and also to advance the current state if necessary. We'll expand on this a little later. The GameObject represents any object we can place on our game board. They have an owner (in this case, the playing field). They have a location. They have an image. For convenience they have a ToString() override that makes things look nicer when I view them in a property grid. Also during development, they have evolved to have a PushToward() and a MaxSpeed() method. These would probably be integrated into a physics system or a collision system, but for now, this is their best natural fit.
public abstract class GameObject { public PlayingField Owner { get; set; } ///

 /// Initializes a new instance of the GameObject class. ///
 public GameObject(PlayingField owner) { Owner = owner; } ///

 /// Update the object ///
 ///seconds since last update. /// seconds is the easiest scale for the individual settings public abstract void Update(float seconds); ///

 /// Location on the playing field to draw the actor
 ///
 public PointF Location { get; set; }

 ///
 /// What to draw on the playing field
 ///
 public abstract Image Image { get; }

 ///
 /// Push the game object toward a location. Default behavior is to not move.
 ///
 ///Location to push toward
 ///Seconds that have passed in this movement
 public virtual void PushToward(PointF destination, float seconds) { return; }

 ///
 /// Get the maximim speed of this game object. Default behavior is not to move.
 ///
 ///
 public virtual float MaxSpeed() { return 0; }

 ///
 /// Simplified name for the object to display in the property browser
 ///
 /// Shorter name
 public override string ToString()
 {
   string classname = base.ToString();
   int index = classname.LastIndexOf('.');
   string shortname = classname.Substring(index+1);

   return shortname;
 }
}
All game objects need to implement the interface.
Pets and Motives
The basic pet class is pretty simple. A pet is a game object (so it gets everything above), plus it also gets an activity and a collection of motives. The motives are nothing more than a wrapper for the pet's status. In this case, we are only tracking fun and energy. (Note for comparison in The Sims3 there are 8 visible motives - hunger, social, bladder, hygiene, energy, and fun.) When a pet is created we default them to the Idle activity and initialize their Motives. We have a default update behavior to run whatever activity we are currently doing, or if we aren't doing anything to create a new idle activity and do that instead. We'll also implement what it means to push a pet.
public class MotiveBase
{
  public float Fun
  {
    get;
    set;
  }

  public float Energy
  {
    get;
    set;
  }
}

public abstract class Pet : GameObject
{
  public MotiveBase Motives
  {
    get;
    set;
  }

  public Activities.Activity Activity
  {
    get;
    set;
  }

  ///
  /// Initializes a new instance of the Pet class.
  ///
  public Pet(PlayingField owner) : base(owner)
  {
    Activity = new Activities.Idle(this, null);
    Motives = new MotiveBase();
  }

  ///
  /// Allow a pet to do something custom on their update
  ///
  ///
  protected virtual void OnUpdate(float seconds)
  {
    return;
  }

  public override void Update(float seconds)
  {
    if (Activity == null)
    {
      Activity = new Activities.Idle(this, null);
    }

    Activity.Update(seconds);
  }

  public override void PushToward(System.Drawing.PointF destination, float seconds)
  {
    base.PushToward(destination, seconds);
    // TODO: Someday accumulate force and make a physics system. Just bump it the correct direction.
    // TODO: Create a vector class someday
    float xDiff = destination.X - Location.X;
    float yDiff = destination.Y - Location.Y;
    float magnitude = (float)Math.Sqrt(xDiff * xDiff) + (float)Math.Sqrt(yDiff * yDiff);

    if (magnitude > (MaxSpeed() * seconds))
    {
      float scale = (MaxSpeed() * seconds) / magnitude; xDiff *= scale;
      yDiff *= scale;
    }

    Location = new PointF(xDiff + Location.X, yDiff + Location.Y);
  }
}
There are a few TODO: markers in the code, but the interface work. Remember the Dependency Inversion Principle mentioned before: Program against an interface or abstract base class, don't program against the individual concrete classes.
Puppies!
Finally, we get to create a concrete class. A puppy. Note that we're just pulling the values from saved resources so a designer and artist can modify them later.
class Puppy : Pet
{
  ///
  /// Initializes a new instance of the GameObject class.
  ///
  public Puppy(PlayingField owner) : base(owner)
  {
  }

  public override System.Drawing.Image Image
  {
    get
    {
      return FSM_Puppies.Properties.Resources.Puppy;
    }
  }

  public override float MaxSpeed()
  {
    return FSM_Puppies.Properties.Settings.Default.Pet_Puppy_MaxSpeed;
  }
}
Yup, all that work and we only get a tiny little concrete class. That is actually a very good thing. It means that when we want to extend it later for different kinds of puppies, kitties, horses, and other pets, we only need to add a tiny bit of code to hook up the new actors with their new data.
Toys
A toy is also a game object, so it can behave as a state machine and as a state node, as appropriate. A toy has a default activity associated with it. When a pet attempts to use a toy they will get this default activity (aka behavior tree) and start running it. A toy is also responsible for computing the interest level in the object. For now, these will just be hard-coded formulas inside each toy object. Later on, these could be a more complex series of interactions but for this system it is adequate. Here's the Toy abstract class:
public abstract class Toy : GameObject
{
  ///
  /// Initializes a new instance of the Toy class.
  ///
  public Toy(PlayingField owner) : base(owner)
  {
  }

  public abstract Activities.Activity DefaultActivity(Pets.Pet actor, GameObject target);
  public abstract float Interest(Pets.Pet pet);

  public override void Update(float seconds)
  {
    // Note that most toys do nothing of themselves. They are driven by their activities.
    return;
  }
}
Two Toys
Now we'll create two concrete classes for toys. First, a sleeping mat. The interest of the sleeping mat is only based on energy. It has an image to draw. The default activity is to sleep on the mat.
class SleepingMat : Toy
{
  ///
  /// Initializes a new instance of the SleepingMat class.
  ///
  public SleepingMat(PlayingField owner) : base(owner)
  {
  }

  public override FSM_Puppies.Game.Activities.Activity DefaultActivity(Pets.Pet actor, GameObject target)
  {
    return new Activities.SleepOnMat(actor, this);
  }

  public override System.Drawing.Image Image
  {
    get
    {
      return FSM_Puppies.Properties.Resources.SleepingMat;
    }
  }

  public override float Interest(FSM_Puppies.Game.Pets.Pet pet)
  {
    return MaxEnergy() - pet.Motives.Energy;
  }
}
Second, a ball to kick around. The interest is only based on fun, although it probably should include an energy component. It has an image to draw, and the default activity is to chase the ball.
class Ball : Toy
{
  ///
  /// Initializes a new instance of the Ball class.
  ///
  public Ball(PlayingField owner) : base(owner)
  {
  }

  public override Image Image
  {
    get
    {
      return FSM_Puppies.Properties.Resources.Ball;
    }
  }

  public override Activities.Activity DefaultActivity(Pets.Pet actor, GameObject target)
  {
    return new Activities.ChaseBall(actor, target);
  }

  public override float Interest(FSM_Puppies.Game.Pets.Pet pet)
  {
    return MaxFun() - pet.Motives.Fun;
  }
}
Now we move on to the activities that drive the system.
Activities Are Both Glue and Oil
Activities serve as glue to the system. They are the interactions between actors and objects. Without them there wouldn't be much of a connection between the two. Activities also serve as the oil that keeps the parts moving smoothly. They are constantly moving. They change themselves, and they change the actors they work with, and they can change the objects they work with. A more complex example of a food bowl could change the actor by modifying hunger, and also change the target by reducing the amount of food in the bowl.
So here is our activity base class. An activity has an Actor and a Target. I intentionally limited Actors to be pets. I could have allowed any object to interact with any object, but that doesn't quite make sense in practice. We don't really want a food bowl to interact with a chew toy, or a ball to interact with a sleeping mat. We DO want to allow a pet to be a target allowing default activities to play social events. For example, pets could dance together or sniff each other or do whatever groups of pets do together. We allow an Update event on the activity base. This update is run by the pet earlier. We pass that on through the OnUpdate callback in each activity. If the activity returns true then we know it is complete and the pet needs to find something new to do.
Finally, we have a magical function, FindBestActivity() that needs to live somewhere in the code. I could have created another class for it, but for now, this is the best spot. This FindBestActivity is the magic that makes the AI do fun things. In this example, it is only 35 lines. We loop over all the toys in the game world and see how interesting they are. Then we take the best interaction and return a new instance of it. If we fail we just return the idle activity. For a game like The Sims, there are potentially tens of thousands of objects to choose from, and each object can have many activities associated with it. Finding the best activity among them all is a complex job. The theory behind it is no different: Find the best activity, and create an instance of it.
public abstract class Activity
{
  public Pets.Pet Actor
  {
    get;
    set;
  }

  public GameObject Target
  {
    get;
    set;
  }

  ///
  /// Initializes a new instance of the Activity class.
  ///
  public Activity(Pets.Pet actor, GameObject target)
  {
    Actor = actor;
    Target = target;
  }

  ///
  /// Update this activity state
  ///
  /// elapsed time
  /// true if the activity is complete
  public abstract bool OnUpdate( float seconds );

  ///
  /// Update this activity state
  ///
  /// elapsed time
  public void Update(float seconds)
  {
    if(OnUpdate(seconds))
    {
      Actor.Activity = new Idle(Actor, null);
    }
  }

  ///
  /// Utility function to locate the best next activity for the actor.
  ///
  ///
  public static Activity FindBestActivity(Pets.Pet actor)
  {
    // Look for a toy to play with...
    if (actor.Owner != null && actor.Owner.GameObjects != null)
    {
      List candidates = new List();
      foreach (GameObject obj in actor.Owner.GameObjects)
      {
        Toys.Toy t = obj as Toys.Toy;
        if (t != null)
        {
          candidates.Add(t);
        }
      }
      if (candidates.Count > 0)
      {
        float bestScore = float.MinValue;
        Toys.Toy bestToy = null;
        foreach (Toys.Toy t in candidates)
        {
          float myscore = t.Interest(actor);
          if(myscore>bestScore)
          {
            bestScore = myscore;
            bestToy = t;
          }
        }

        return bestToy.DefaultActivity(actor, bestToy);
      }
    }

    return new Idle(actor, null);
  }

  public override string ToString()
  {
    string classname = base.ToString();
    int index = classname.LastIndexOf('.');
    string shortname = classname.Substring(index + 1);
    return shortname;
  }
}
Now we know what an activity is. Basically just another state machine.
Idle Activity
We'll start with the idle activity. It has an idle time. After enough time has passed we look for something new to do. This new activity will replace our current idle activity. If we don't find anything interesting to do we can just sit there, slowly dropping our fun and our energy. Since this is C# we don't need to schedule cleanup and deletion of our own idle activity which simplifies our code quite a lot.
class Idle : Activity
{
  float mTimeInIdle = 0;
  public Idle(Pets.Pet actor, GameObject target) : base(actor, target)
  {
  }

  public override bool OnUpdate(float seconds)
  {
    mTimeInIdle += seconds;
    if (mTimeInIdle >= FSM_Puppies.Properties.Settings.Default.Activity_Idle_WaitingTime)
    {
      Actor.Activity = FindBestActivity(Actor);
    }

    // Sitting there idle isn't much fun and slowly decays energy. This encourages us to pick up other activiites.
    Actor.Motives.Fun += FSM_Puppies.Properties.Settings.Default.Activity_Idle_Fun * seconds;
    Actor.Motives.Energy += FSM_Puppies.Properties.Settings.Default.Activity_Idle_Energy * seconds;
    // Always return false because idle is never finished. It auto-replaces if it can find something.
    return false;
  }
}
ChaseBall Activity
This is actually TWO activities. It is a miniature state machine within itself. Chasing a ball has one component "RunToObject", and then a second component where they actually kick the ball. It isn't a difficult state machine, just two states, and can be represented directly with a simple if statement. That is a good time for this reminder:
QuoteREMINDER: A state machine is a CONCEPT. It can be implemented many different ways. Even a simple if statement can implement the concept of a state machine.
So every update we attempt to run to the ball object. If we succeeded in running to the object, we kick the ball a random distance. We also bump fun a little bit whenever they kick the ball. An activity's return result indicates when it is complete. We'll return true only when our fun is maxed out. We might want to have a second exit condition when energy runs low, but that is for later.
class ChaseBall : Activity
{
  RunToObject mRto;

  ///
  /// Initializes a new instance of the ChaseBall class.
  ///
  public ChaseBall(Pets.Pet actor, GameObject target) : base(actor, target)
  {
    mRto = new RunToObject(actor, target);
  }

  public override bool OnUpdate(float seconds)
  {
    // When they kick the ball, move it to a new location and continue our activity.
    if( mRto.OnUpdate(seconds))
    {
      float kickDistance = FSM_Puppies.Properties.Settings.Default.Activity_ChaseBall_KickDistance;
      // Get a random number with +/- kick distance
      float newX = Target.Location.X + (((float)Target.Owner.Rng.NextDouble()*(2*kickDistance))-kickDistance);
      float newY = Target.Location.Y + (((float)Target.Owner.Rng.NextDouble()*(2*kickDistance))-kickDistance);
      PointF randomLocation = new PointF(newX,newY);
      Target.Location = randomLocation;
      Actor.Motives.Fun += FSM_Puppies.Properties.Settings.Default.Toy_Ball_Fun;
      if(Actor.Motives.Fun > 100) return true;
    }
    return false;
  }
}
RunToObject Activity
Next, we'll look at how they run to an object. It is pretty simple. If we are close enough (another designer-adjustable value) then they have made it to the object and we return true. If they are not there yet we push them toward the object, drop their energy, and return false (we aren't done with the activity yet).
class RunToObject : Activity
{
  ///
  /// Initializes a new instance of the RunToObject class.
  ///
  public RunToObject(Pets.Pet actor, GameObject target) : base(actor, target)
  {
  }

  public override bool OnUpdate(float seconds)
  {
    // Are we there yet?
    // And why didn't PointF implement operator-() ?
    PointF offset = new PointF( Target.Location.X - Actor.Location.X, Target.Location.Y - Actor.Location.Y);
    float distanceSquared = offset.X * offset.X + offset.Y * offset.Y; float closeEnough = FSM_Puppies.Properties.Settings.Default.Activity_RunToObject_CloseEnough;
    float closeEnoughSquared = closeEnough * closeEnough;
    if (distanceSquared < closeEnoughSquared) return true;
    Actor.PushToward(Target.Location, seconds);
    Actor.Motives.Energy += FSM_Puppies.Properties.Settings.Default.Activity_RunToObject_Energy * seconds;
    return false;
  }
}
Sleeping On the Mat
Just like chasing a ball, we start out by running to the object. So first we call RunToObject. If it succeeds (meaning we finally got there), then we start resting. We bump the motives, return true or false based on our energy status.
class SleepOnMat : Activity
{
  RunToObject mRto;
  ///
  /// Initializes a new instance of the SleepOnMat class.
  ///
  public SleepOnMat(Pets.Pet actor, GameObject target) : base(actor, target)
  {
    mRto = new RunToObject(actor, target);
  }

  public override bool OnUpdate(float seconds)
  {
    // Route to the sleeping mat
    if(mRto.OnUpdate(seconds))
    {
      // Now that we are on the mat, just sit here and increase our motives.
      Actor.Motives.Energy += FSM_Puppies.Properties.Settings.Default.Toy_SleepingMat_Energy;
      Actor.Motives.Fun += FSM_Puppies.Properties.Settings.Default.Toy_SleepingMat_Fun;
      if (Actor.Motives.Energy > 100) return true;
    }
    return false;
  }
}
Proof of Concept is Complete
And... we're done. Go ahead and play with the sample now. Drop multiple play mats, multiple balls, and multiple puppies. Watch them run around chasing balls, and when they get tired watch them run over and sleep on the mat. Pick them from the list on the left-hand pane to view details in the little property grid. It is not much, but it is enough to see a sandbox game starting to grow. I showed my children and they immediately made a list of new objects to add. Add a kitty! Add a teeter-totter! Add a tetherball! (Really?) Repeat this around thirty times with new objects, add a few motives, and you can have your own self-running simulated pet world. Focus on a few of them to create minigames, and drop some spawn points in the world. Repeat until the game is complete.
But I Wanted a First Person Shooter
That is solved very easily: Rename "Pets" to "Monsters", and "Puppy" to "Grunt". Rename "Toys" to "WayPoint", "Ball" to "Flamethrower", and "SleepingMat" to "SpawnPoint". Finally, rename activities as appropriate.
Wrapping It Up
So we learned that state machines are the least powerful of the automata in computer science. We also learned that they are used everywhere in our daily lives, and can do incredible things for games. We can use state machines to run different code based on state. We can use state machines to represent arbitrary meshes. These meshes can include things like maps and connectivity grids. We don't need to hard code the state machines. When you load them from data you can get substantially more use out of them. Designers and artists and modellers and animators and producers can all modify the game without touching the code. We can build complex systems such as AI behavior trees out of a nested tree of very simple state machines.
How Else Can I Apply This
Most games apply these concepts all over the place. One of the most common jobs in the industry is Gameplay Engineer, or GPE. All they do is create the exact types of items we have made in this series of tutorials.
For example, in Littlest PetShop I spent months adding new behaviors and actions. They ranged from 'in the world' behaviors like those above to minigames such as hide and seek where pets would run behind bushes to hide, then run up to the camera and celebrate with the player when they were found. In The Sims every one of the tens of thousands of objects in the game required scripting. You need a pile of clothes, then you need some of these scripts: Behaviors and interactions to create the piles of clothes; interactions to drop the piles of clothes and pick them up again; interactions for a washing machine; interactions for a dryer; interactions for the maid to come clean up; and on and on and on. Or if you are into faced paced games, you need behaviors and actions for your main characters to know to attack or run away, or decide if they should attack towers or players or minions. You need to create objects to pick up, weapons, inventories, and more. All of these behave the same way that we demonstrated above. It uses a common interface for objects, and the programmer fills out the details. These little activities and behaviors grow into complex ecosystems powering most games.
So there you go. A text-based dungeon crawler prototype and a sandbox world prototype, both filled with state machines and written in just a few hours. Creating objects and behaviors like this describes the daily life of a gameplay engineer. Chances are good that if you get a programming career in the industry you will spend a few years of your life writing code much like that above. Remembering that it is a simple state machine can help avoid many nasty bugs and can simplify your life greatly.
Thanks for reading.
Source code can be found here: StateMachineTutorialsV5.zip
Updates: 2013-03-26 Fix a typo in the map images.