In this article by Lesley Harrison, author of TortoiseSVN 1.7, we shall:
- Learn the benefits of using a working copy
- Learn how to check out a working copy and how to check in after making changes
- See some of the more common commit log messages and learn what they mean
- Explore the repository browser
Our case study
Shiny Moose Software is a software house with a small team of developers. They have just started working on their first project--a Hiragana Learning Game written in Python. The lead developer, Quinn, has created a skeleton for the project. He has written the code for the games "splash screen".
One of the other developers, Mowbray, downloaded a compressed archive containing Quinn's code and found that on his older computer, the CPU usage spiked massively when the code was run. He looked at the code and noticed that Quinn had made a poor choice when deciding how to detect mouse events. The problem is simple to fix, but Mowbray knows that communicating the changes to Quinn could be problematic.
Mowbray could make the required changes and then e-mail the updated code to Quinn, but what if Quinn returns to his computer and resumes his work on the application before he checks his e-mail? What if one of the other developers at Shiny Moose Software has also decided to make some changes to the code? Keeping track of changes submitted by several different developers would be confusing enough even with this relatively small application. Imagine how difficult it would become when the code is measured in hundreds, or thousands of lines, rather than just a few dozen!
This is where Subversion saves the day. Instead of copying the code from a normal shared folder, or downloading it from the company's intranet site, Mowbray can use TortoiseSVN to check out a working copy of the code, inform the Subversion server that is currently working on that file, make the changes, and check it back in.
[indent=1]A word about our examples
The code snippets used in this article are incredibly simplistic. Please don't use them as examples for how to write a Python application! Also, don't worry too much about the language or IDE used in these examples. TortoiseSVN can be used with any language and any development environment. Even team members working on other areas, such as documentation or translation work, can take advantage of TortoiseSVN. The most important thing is to understand the version control principles which are being applied.
Working copies explained
The first thing Mowbray needs to do is check out a working copy. He can make changes to this copy and then submit the changes once he is done.
Time for action - checking out a working copy
Checking out a working copy takes just a few simple steps.
- Create a folder which you will use to store your working copies. For example, C:\Projects\MooseHiragana.
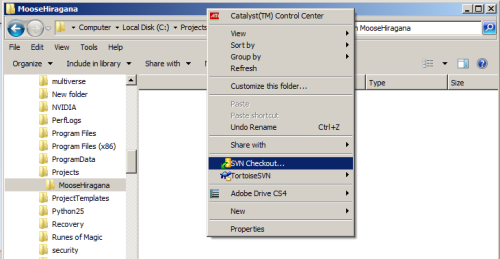
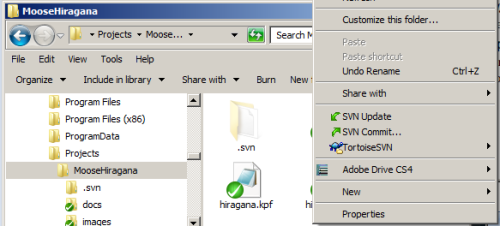
- Right-click inside that folder and select SVN Checkout... from the menu that appears.
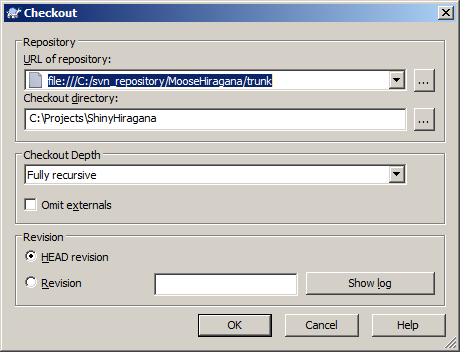
- Browse to your project's repository (or enter the correct network path) and click OK.
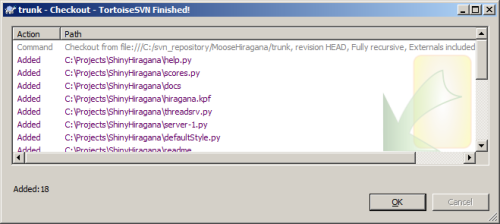
- A window containing a list of the files which have been checked out will appear.
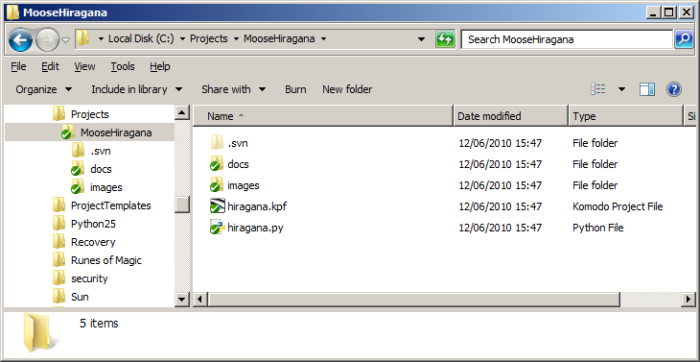
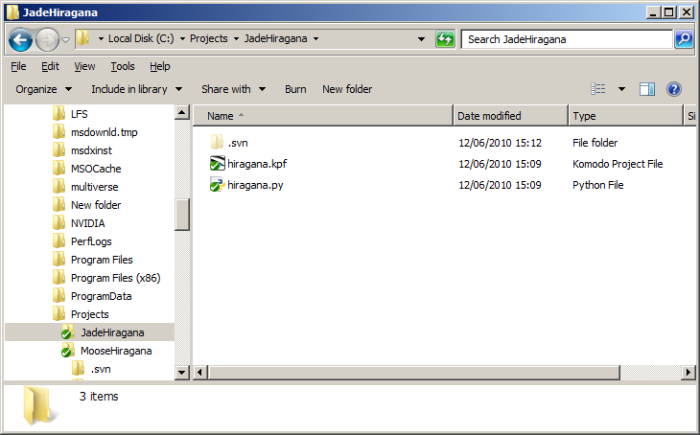
- If the checkout was successful, you should see a list of files in your chosen directory, with a green tick on the icon of each file.
(Move the mouse over the image to enlarge.)
What just happened?
You have just checked out a working copy of the files which are stored on the repository. This is useful because it allows you to safely test, change, and experiment with the code without the risk of breaking the original code.
Once you are happy with the changes you have made, you can check them in to the repository, so that your fellow developers can synchronize their copies to see your changes.
[indent=1]Local repositories vs. remote repositories
We will use remote repositories in most of our examples. It is likely that you will, at some point, need to work with a remote repository--either one which is accessed via the internet, or one which is part of your company's network. In that case, all you need to do is enter the full network/ internet address of the repository in the place of the file:/// reference in the URL of Repository box.
Checkout depth
The MooseHiragana project is quite small, so there is no issue with checking out the entire repository. If you were working on a much larger project, which had thousands of files, then you may prefer to save time, bandwidth and storage space by checking out only the folders that relate to the part of the project you are working on.
Time for action - using checkout depth
- Using a different folder for this working copy, right-click inside the folder, and select SVN Checkout....
- This time, in the Checkout window that appears, as well as selecting the correct repository, choose Only file children from the Checkout Depth dropdown.
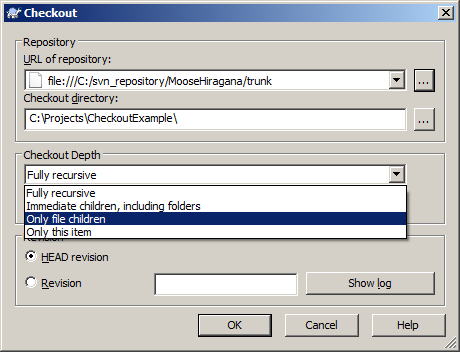
- You should see that when the checkout process completes, all the files that are part of the root folder appear in your working copy, but none of the folders have been checked out.
What just happened?
You have just checked out only the files that are in the root folder of the project on the Subversion server. That may not seem like a particularly useful feature when the project consists of just a few files, but imagine if there were thousands of files.
The checkout depth feature becomes useful when projects increase greatly in size. It is also useful if your team has members that work only on specific parts of the application. For example, an artist could check out only the images folder, or a translator could check out only the folder containing the localization files for the language he is working in. If the artist then needs to expand his checkout to include deeper folders, he can use the repository browser to select the extra folders that he needs.
There are a number of different checkout depth options. The following table explains what each option means.
Checks out the entire tree, including all child folders and sub-folders. Checks out the specified directory, including all files and child folders, but does not populate the child folders. Checks out the specified directory, including all files, but does not check out any child folders. Checks out the selected directory only. Does not populate it with files or child folders. This option is not shown on the checkout dialog, but it is the default for all other dialogs which have a depth setting. This option tells TortoiseSVN to adhere to the depth specified in the working copy. This option is not shown on the checkout dialog. It is used to reduce the depth of the working copy after a folder has already been populated.
Have a go hero - working with checkout depth
Imagine that you are an artist. You have been hired by Shiny Moose Software and asked to redesign the logo used on the splash screen and also to create a smaller one for use in the theme of the game.
The directory structure chosen by the developers looks like this:
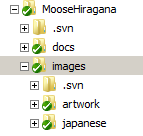
The images that you will be working on are stored in the /images folder. You will not need to work on anything inside the /images/artwork or /images/japanese folders.
You need to set up your working copy. Rather than cluttering your filesystem with files that you will never need to use, you have decided to checkout only the folder you need for your work--the /images folder.
Using another user account (or another PC on your network), try checking out just the contents of that folder from the repository. If you prefer, you could simply create a new working directory using the same user. However, if you do this, you should note that any changes made in that folder will be marked with your own user name. That may be fine for testing TortoiseSVN's features, but is not good practice in a production environment.
Committing changes to a repository
Now that Mowbray has checked out a working copy of the MooseHiragana source code, he can change the source code to fix the speed issue he noticed and then commit the changes to the repository.
Time for action - committing changes to a repository
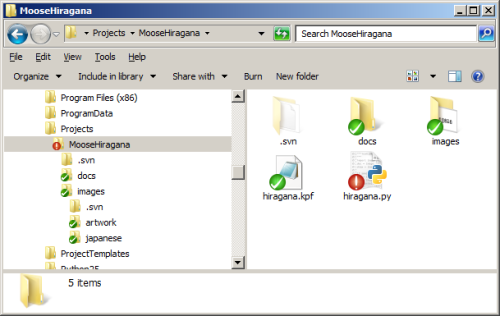
- After you have finished editing the files that you want to change in the project, save the files and open the project folder. You should see a red exclamation mark on the icon of any files that have been changed.
- Right-click inside the folder and choose SVN Commit... (you can also right-click on a specific file, if that is the only file you wish to commit).
- When the Commit dialog box appears, enter a note in the Message: text box explaining the changes you have made to the file.
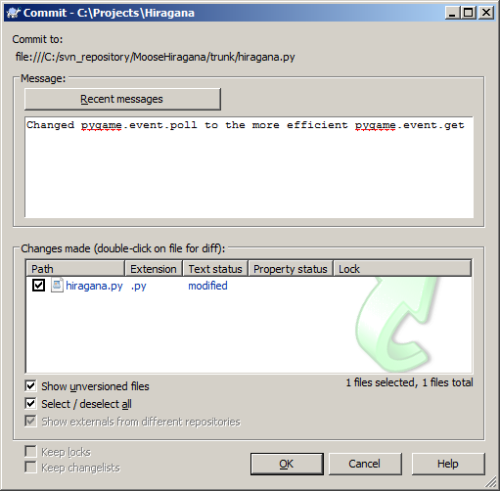
- Notice that the Commit box offers a spell-checking feature. Words that the spellchecker does not recognize are highlighted with a dashed red line under them. The words shown in this example are spelled correctly (pygame is the name of a Python library which is used in the application). The spell-check feature works just like the spell-checking feature in Microsoft Word--to see suggestions for alternative spellings, right-click on a highlighted word.
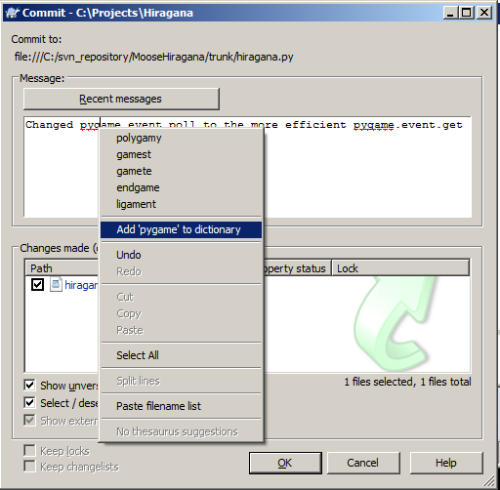
- Since pygame is spelled correctly, instead of choosing an alternative spelling, click Add 'pygame' to dictionary. Pygame will no longer be flagged as being spelled incorrectly.
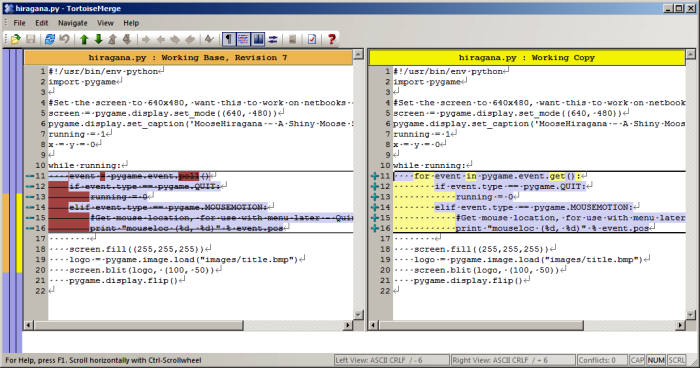
- To see the differences between the original file and the modified one, double-click on the filename in the Changes made section of the dialog.
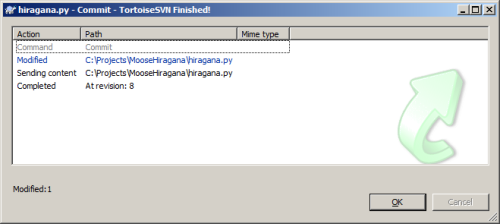
- Click OK to commit the changes.
- A dialog will appear showing which files have been modified and the status of the commit process.
What just happened?
You have successfully changed some files and committed the changes to the repository. Now other developers will be able to download your changes and add to the work that you have done.
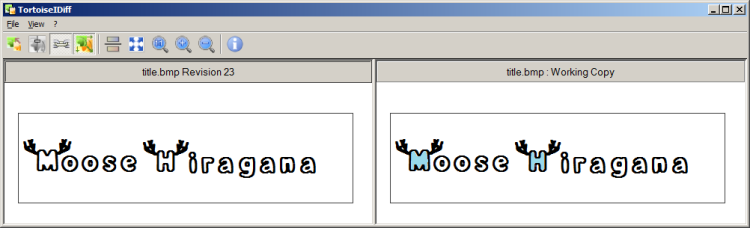
You can view differences between text files or images. Images can be viewed in TortoiseIDif, which shows a side-by-side comparison between different versions of a file, and also allows you to layer the different versions for a more detailed comparison:
You may be wondering what would happen if two people both decided to modify the same file at the same time. The good news is that Subversion is equipped to handle such events for most file types.
If the file being edited is a text file or some source code, then Subversion can cope with two or more people editing the same file at the same time. When the users submit their changes, Subversion will allow them to merge their changes into the new version of the file. If the changes cannot be merged for any reason, then Subversion will flag a conflict, alerting you to the problem so that you can resolve it and decide which changes to keep or discard.
To prevent conflicts while you are working on files--be they images, documentation, or source code, it is possible to lock the file that you want to work on, preventing anyone else from committing changes until you release the lock.
The importance of commit log messages
Commit log messages give you a chance to describe the changes that you are committing. It is good practice to provide a descriptive commit log message with each change that you commit--not just to explain to other developers what your changes do, but also to provide a record of the work that you have done.
Commit log messages could be used as the basis for patch notes which will be released to your end users, or could be used by your manager to see how much work you have put into a project. It's likely that your manager will be more impressed with:
Fixed "Bug #123 - client crashes when player submits high score" by

correcting the variable name to hiScore (matching naming convention).
than they would be with a blank commit, or a message such as following:
Change hiscore to hiScore.
Of course, you should comment your source code too, but a good commit log message should explain what you changed and why you changed it.
It is possible to add some basic formatting to a commit log message using the following formatting conventions:
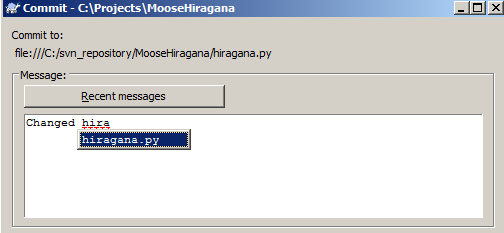
In addition to the spell-checking feature already discussed, the commit log message box also supports filename and function auto-completion. The auto-completion box will appear automatically after you have typed the first three characters of the name of a file or a function included in your commit.
You can also bring up the auto-complete box by typing one or two characters from a file or function's name, and then pressing Control + Space:
Have a go hero - committing some changes
In the previous Have a go hero section you checked out some image files. Change the images, and then commit the changes to the repository. Leave a clear commit log message to explain what you have done.
Excluding items from a commit
There are a couple of reasons why you may want to exclude an item from a commit. The two main reasons are as follows:
- Your IDE creates files which contain personal settings and data--the content of these files may differ from developer to developer. These files do not need to be synched, so can be excluded from the commit process permanently.
- Your IDE has changed the timestamp on a project file--but the rest of the file has not changed. There is no need to commit the file every time the timestamp is changed. It makes sense to exclude the file temporarily.
In the first instance, you can set up template files which are subject to version control and contain the basic IDE settings most people like to use for their project. The template file can be renamed to indicate that it is a template, and individual developers can copy the template file and give it the correct file extension.
To ensure that the actual project settings files are excluded from versioning, let's create a rule which tells TortoiseSVN to ignore those files when performing a commit. This can be done by creating a special setting--the svn:ignore property for the file in question.
To add a file which is not currently versioned to the ignore list, simply right-click on it and select TortoiseSVN | Add, to ignore list | File Name. Or, if you want to ignore all files of that type--for example, all Komodo .kpf files, select TortoiseSVN | Add to ignore list | *.kpf.
Time for action - excluding files that are already versioned
You may be wondering how to exclude a file from versioning if you have already accidentally committed it. Fortunately, this mistake is easy to rectify.
- Hold down the Shift key and right-click on the file you want to remove from versioning. This will bring up the extended context menu.
- Select TortoiseSVN | Delete (Keep Local).
- A red X icon should appear on the icon of the file you do not want to be versioned.
- Now right-click on the file and select SVN Commit....
- Once the commit has completed, right-click on the file and select TortoiseSVN | Add to Ignore List | filename
- You should see the ignored file get a new overlay icon (similar to the following one shown below), indicating that it has been ignored.

What just happened?
You have just removed a file from versioning without removing the local copy. After you removed the file, you committed the changes to the Subversion server, and then told TortoiseSVN to ignore any changes to that file in the future.
This works well for files which change frequently and are not an integral part of the project, but what if you need to submit one or two changes to the server, but are not ready to submit all your changes? In this case, you can choose to temporarily exclude certain files from the check in.
Time for action - temporarily excluding files from committing
- Imagine that you have been making some changes to hiragana.py, and you have also decided to create a small Help feature, which is contained in a file called help.py. You are ready to commit your work on the Help feature, so you right-click on the file and select Add... to add it to the server, but you are not ready to commit hiragana.py.
- Right-click inside the Working Copy folder and select SVN Commit...
- In the window that appears, ensure that help.py is ticked and hiragana.py is un-ticked in the Changes made list.
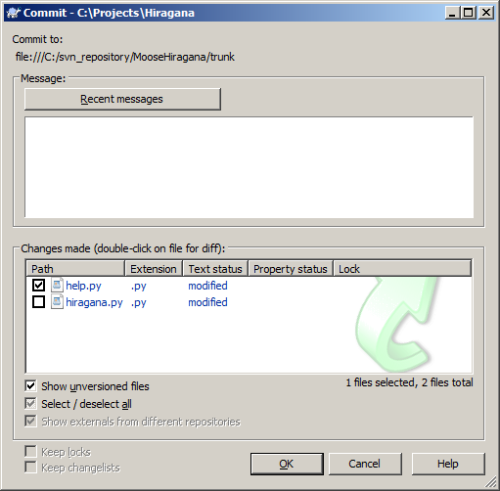
- Now, when you click OK, only the changes to help.py will be submitted
What just happened?
You have successfully submitted the changes you have made to one file without updating other files that you have changed. This is a temporary measure and next time you go to make a commit, the files that you ignored this time will again appear in the commit list. If you want to ignore a certain file on every commit (for example, a file relating to your own IDE settings), then you could move that file to the ignore-on-commit change list, so that you don't have to worry about it in the future.
[indent=1]Committing one file at a time
Instead of right-clicking inside the working directory folder and selecting the files you do not wish to commit, you could simply right-click on the file that you wish to commit, and open a commit dialogue for only that file (or the files that you have selected--if you have selected several files by using the Shift or Control keys and clicking on the files you want to commit). This can save you a lot of time if you wish to commit only one or two files. This approach should be used sparingly, however, because you run the risk of missing warnings about unversioned files that you would otherwise see if you committed from the root of your working copy folder.
If you want to ensure that a file type is ignored on a long term basis, then you can either use the ignore list detailed in the previous Time for Action, or, to ignore a file type across all Subversion projects accessed via this particular client, then you should add the file to the client's Global Ignore list:
Time for action - using the global ignore list
- Bring up the TortoiseSVN context menu and select Settings.
- In the General section of the Settings - TortoiseSVN window which appears, add the file type or filename that you wish to ignore to the end of the list in the Global ignore patterns box (patterns are separated with a space):
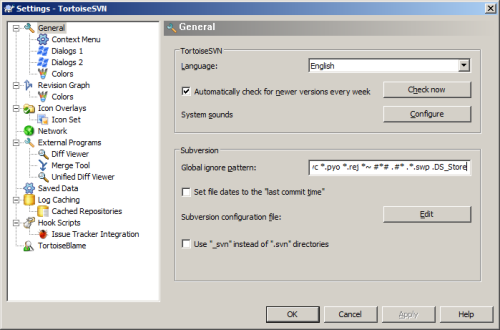
- Click OK.
What just happened?
You have just added a file to the global ignore list--this list is used by the copy of TortoiseSVN on your machine. Any files included in the list will be ignored when you make a commit to any Subversion project. The global ignore list is specific to your client (TortoiseSVN is not the only client that has a global ignore list, other clients use it too, but it is not something that is sent to the server or shared with other members of your team), so other developers using other computers may have different settings and may ignore different files to you.
The ignore list uses Unix-style wildcards to match filenames:
- * : This wildcard matches any string of characters--including empty strings and spaces
- ? : It matches any single character
- [...] : This matches any one of the characters contained within the brackets--for example [A-Dprz] would match the upper case characters A, B, C, or D, and the lower case characters p, r, and z
Keeping your working copy up-to-date
You should periodically update your working copy to make sure that you have the latest version of any files that you are working on. This ensures that you are working with the latest version of the source code, and are not wasting your time working on code that has been altered or fixing bugs that have already been fixed.
If you have been following all of the Have a go hero sections, your main working copy is most likely out-of-date right now, because your artist has changed some artwork and committed the new art files to the server.
Time for action - updating your working copy
- To update your entire working copy, right-click inside the folder, and select SVN Update (You can update only specific files or folders by selecting them, then right-clicking on them. Developers probably wouldn't want to do this, but it is still a useful feature. An artist working remotely may choose to update only specific assets to save bandwidth.):
- An update window will appear, listing files which were added, removed, merged, or updated:
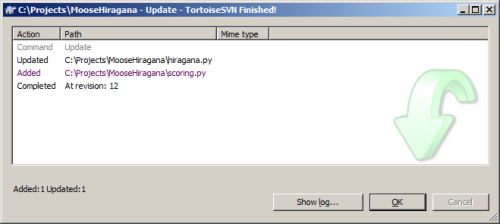
What just happened?
You have just updated your local working copy with any changes that have been made recently and submitted to the Subversion server. This is useful because it allows you to stay up-to-date with the work being done by your colleagues.
Using the repository browser
There may be some cases where you do not want to check out a working copy, but would prefer to perform actions directly on the repository. This is not advisable for routine development work, but can be useful in some instances. The Repository Browser allows you to explore a large project's file structure without checking out the entre project's directory structure. It also allows you to view revision logs and blame, and download unversioned copies of files quickly and easily.
The repository browser is intuitive and easy to use.
Time for action - using the repository browser
- To access the repository browser, simply right-click anywhere in an Explorer window and select TortoiseSVN | Repo Browser.
- The Repository Browser window will appear, as shown:
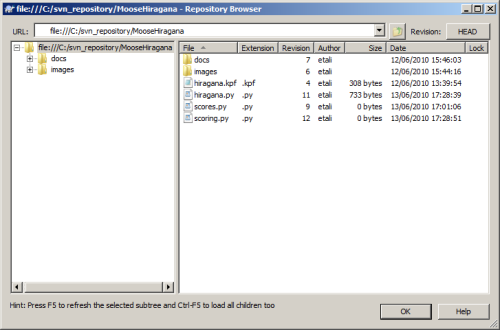
- The Repository Browser works in the same way as Windows Explorer--you can double-click on a folder to expand it. To get more information about a file, right-click on the file you are interested in--you will see several options:
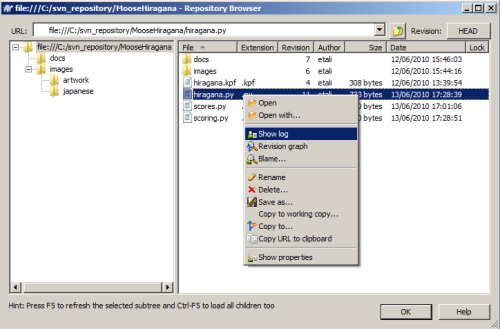
- The Open and Open with... options allow you to open the file to view or edit its contents. The Show log, Revision graph, and Blame... options allow you to view information about the changes that have been made to the file.
What just happened?
You have just interacted directly with the repository. Remember that the Repository Browser allows you to work with the files stored on the repository--not your working copy. So, if you delete or rename a file using the Repository Browser, it will be removed from the current version on the repository and therefore be removed from other people's working copies next time they update them.
The Repository Browser is a useful tool for viewing the directory structure of a project and looking at revision histories. However, you should not make a habit of altering files by accessing the Subversion server directly. In most cases, it would be better to make the changes on your local copy, and then check them in.
Summary
In this article, you used TortoiseSVN to perform some of the more common day-to-day version control tasks--checking out a working copy, making changes, and checking those changes in.
Specifically, we covered:
- Checking out a working copy
- Using the checkout depth feature to check out only the parts of the repository that you need to work on
- Checking in your changes
- Excluding items from a commit
We also touched base on some of TortoiseSVN's other features, including file locking, commit log messages, and the repository browser.


