Welcome to this article on using XML technologies for, what you might consider as, a relatively trivial part of a software library. Whilst this is a game development book, the content discussed herein should be of general use to any substantial software program and/or library - be it a game engine, a rolling demo, an API or just a helper library.
Taking a step back, this all started when I
made a post in the Gamedev.net Web Development forum wondering if there were ways that I could improve the existing event logging system in a recent commercial game project. At the time I was exporting HTML directly from my logging system which resulted in files that were nice to view, but impossible to search or sort in any way. The project team each focused on a specific development area so the ability to filter log files is important since the logs themselves can often be several megabytes in size and contain many thousand entries. With help from Gamedev.net forum members I was able to take my existing knowledge of XML and apply it directly to this problem domain. Drawing the original inspiration from a simple example provided by Oli, I was able to research this topic further and discovered a relatively simple yet powerful solution to my problem using XML with XSLT technologies. The resulting system was not only a very powerful system for the other developers, our testers, and me, but the most surprising thing was that the system came almost for free. The solution I am about to present requires no expensive technologies, no excessively steep learning curve and is relatively easy to deploy to the rest of the development team.
This article is a discussion of the original thread that serves as a demonstration in how you can use these technologies in your own projects. I personally had a big grin on my face when I realized the power these simple technologies yielded, so I am confident that you will be able to utilize them to enhance the logging system in your projects, whether it is an educational/learning project, an Indie game or even a full-scale commercial venture.
This article was originally published to GameDev.net back in 2005. It was revised by the original authors in 2008 and published in the book Beginning Game Programming: A GameDev.net Collection, which is one of 4 books collecting both popular GameDev.net articles and new original content in print format.
Why bother?
By "logging" I don't mean cutting trees down and making them into supplies for B&Q - I mean a common feature in software engineering that helps you diagnose problems (or lack thereof) in your application.
Log files typically consist of a long list of events in chronological order - indicating the status of variables, the results of decisions, warnings of potential problems and error messages when things go well and truly wrong. For any substantially complicated system, a log file can be invaluable in analyzing various aspects of your applications runtime characteristics. Also, as a physical file written to disk (as opposed to writing to a console output) it can easily be attached to an email bug report or stored in an archive for later comparison.
So,
why invest in this? Depending on your programming language of choice it's very simple to open up a text file and stream out a line of information each time something noteworthy happens. What is the point in spending valuable development time in making something more complex?
This method is okay for basic debugging - but as a piece of software becomes bigger and more complex, sifting through thousands (or millions) of lines of trivial output not only takes time, but is tedious and prone to user error. Conversely, a structured and well-understood format that contains as much information as possible can become a lot more powerful. If you think about it, given a suitably large set of data it's often easier to work out which elements are
not useful and remove them, than to work out which elements
are useful. By using a structured data storage method this becomes simple by tagging all the elements with filterable values/properties.
There are three main ways that you could implement a rich logging strategy:
- Use proprietary file formats, algorithms and technologies
For example, running the output of your program to a relational database on a web server. This is exceptionally powerful if you combine it with SQL queries and a web-based front end. Unfortunately, this isn't easy to set up or maintain.
- Use your own file formats, tools and algorithms
Design your own text file format that includes/formats all the information you could ever need. Then write some tools that take a given file and generate a report accordingly. This is about as powerful as you choose to make it - but that's the drawback, you have to write and maintain it.
- Use open standard file formats and the readily available tools
With an open file format, and standardized tools you aren't necessarily linked to a given platform, software vendor or particular set of tools. Not only have other people done a lot of the work for you, you will often have the choice as to whose tools (and how) you use them.
Why use XML?
eXtensible Mark up Language is the latest in a long line of similar technologies (e.g. GML and SGML) spanning several decades of modern computing, and is considered as an open standard (ratified by the ISO) governed by the W3 Consortium.
It does run the risk of being the current "in thing", but so far it's reasonably well supported across the majority of platforms available - both new and old. Also, the key consideration in its support across platforms is that lots of the tools are free!
Basic requirements and background
Before I get stuck in with explaining the finer points of how to apply XML technologies to software logging there is some background and foundation work to get through.
It is out of the scope of this article to explain all of the technologies from scratch - everything is pretty easy to learn, and I'd say it's even possible for any moderately intelligent individual to pick up everything they need from this article alone.
In order to generate a powerful logging tool it is not necessary to understand all of the technologies fully - there are some parts that just aren't that important. For example, one assumption (that may be frowned upon by some!) is that we will be completely skipping validation with DTDs or schema. This assumption is based on the idea that a computer program will be writing the source XML, and provided the code is written correctly the output should also be correct. However, if you desire this extra validation or wish to do further work on the XML, it is advised that you look into creating your own DTD for your log files.
As a quick summary, competency in the following 4 areas is necessary:
- XML
- HTML
- XSLT
- JavaScript
If you feel you're fairly proficient on all of these, you can skip to the next section, otherwise I suggest you read the recommended links and have a go at this article later.
Now that I've mentioned all of the core technologies that will be used in this article, it's necessary to mention a few of the necessary tools.
As previously stated, the
required tools are all free and readily available. All you really need is a text editor and a web browser. Given that we're going to be integrating this directly with the software,
I assume you already have that set up and working, it may well be that you can use your development tool suite.
Using Microsoft's Visual Studio 2002 (and later) it is possible to have your HTML page to be viewed in the browser component (where MSDN usually pops up), then another tab with the HTML source code, another tab with the XML source (for reference) and a final tab with the XSLT code. Changing something in one of these tabs, saving changes and then refreshing the original browser pane worked extremely well for me.
A simpler set of tools would be to use
Notepad (or equivalent under Unix/Linux) and a browser such as
Firefox.
During the course of developing this technology, I came across a variety of problems with cross browser compatibility (a.k.a. making it run on Mozilla and Internet Explorer) and it is quite easy to write a very clever logging system and have it fail to operate on a different browser. This article has been tested with Firefox and Internet Explorer and appears to work fine. One small caveat is that under XP SP2, Internet Explorer can get quite picky (
with respect to security considerations) about what it will and won't allow - so you can end up having the browser refusing to view your own files!
Writing the data to an XML file
Right, background aside, we can get onto the "meat" of this article - writing the XML based log files.
My personal implementation of this technology is done in C++ using a singleton class representing my log. C++ also offers some extremely powerful features via the C Pre-Processor directives that make coding log file output a breeze.
However, it is important to note that you can write XML data from pretty much any computer language currently in use - for the simple reason that it is just text data. It can get a little hairy when messing with Unicode/ASCII output, but this'll probably only bite you if you're working on internationalization and/or your software logs its output in a language that doesn't fit into the ASCII table.
There are a variety of additional libraries that can be used within your language of choice to aid in reading/writing XML. Most Java distributions have implementations of SAX/DOM parsers and writers, and the
TinyXML library (
sourceforge.net/projects/tinyxml) comes well recommended for C++ developers. For this article, using one of these libraries may well be useful - but not required at all. Streams (C++) and Writers (Java) are perfectly sufficient to output the necessary information to an ".xml" text file.
Before I get into describing a C++ mechanism for writing the output to a file, an output format needs to be formed. The following is the general structure used by my log system:
    ...


    ...
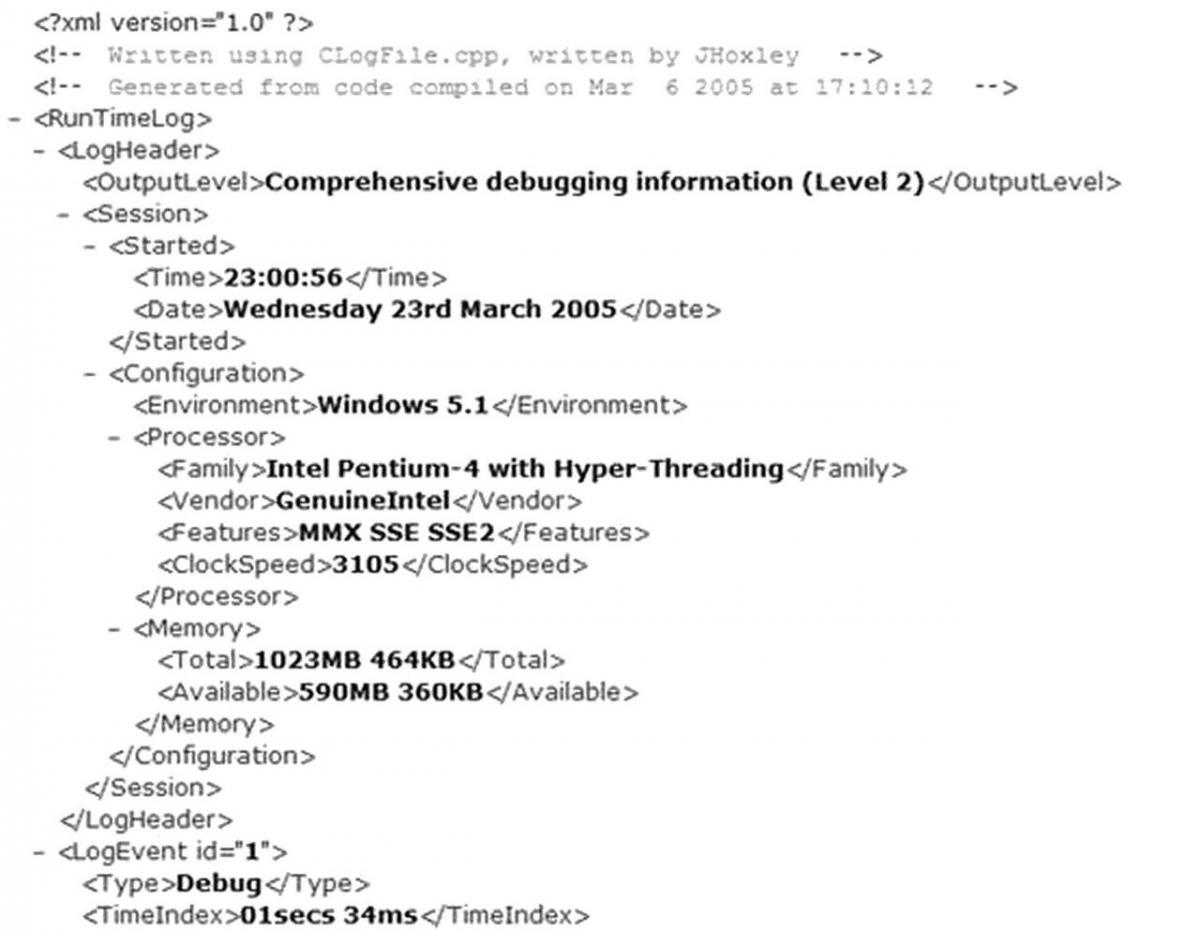
That is, we wrap everything up in a single top-level
RunTimeLog node, and then we have a header element,
LogHeader, that describes general session and configuration information. The real log information is contained in a long list of
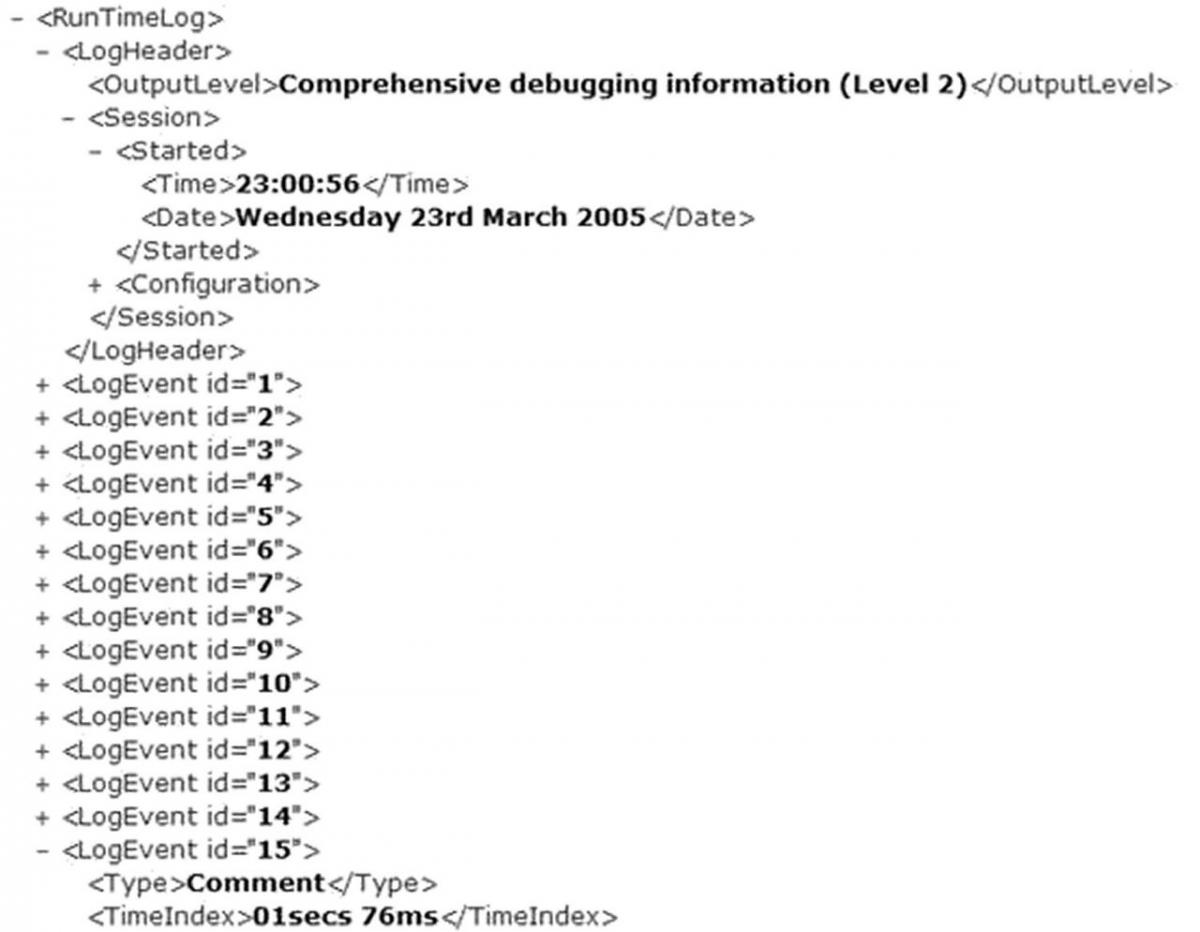
LogEvent elements. For a short "test run" of my program I get around 1000
LogEvents recorded - a proper test session can generate a 1000 times this number!
The
LogHeader element is included in the design to cover general-purpose information that can be used to identify the log file as well as general session/configuration information so that the environment under which the test was run can be recorded.
 ...


 ...
 ...


 ...

 ...
 ...
 ...
 ...


 ...
 ...
As you can see from the above listing, a substantial amount of information is recorded that will later be used in the HTML output/representation of the log file. Actually gathering the information that fills in the fields is somewhat platform specific - if you're a windows (
Win32) developer then there are a substantial number of functions listed in the MSDN libraries.
The information proves to be particularly interesting - the
Memory/Available field helped me find a problem with our platform when it was running on a (somewhat ancient) 128mb windows laptop. The log file was full of warnings/errors that didn't appear on near-identical systems, but the inclusion of information about the environment pointed it out quite quickly.
The next element in the output XML structure is that which contains information each time a log-worthy event occurs:
 ...
 ...
 ...
 ...
 ...
 ...
 ...
The design of this particular element is going to be specific to your application - but the above outline should cover most people's needs. It's also dependent on what information is available to you at runtime.
It is worth noting that the information provided within the tags in these structures will later appear directly injected into the HTML representation. XSLT has some ability for mathematical formatting/processing, but it is much more limited than you might be used to. One particular area that I noticed this was in the
TimeIndex field. Internally my engine runs on a millisecond accurate clock - such that "
1min 13secs 228ms" is actually "
73228" internally. This doesn't work too well when you want a human-readable log file format so it's worth making sure that you convert any internal values to ones that are easily read by a human.
In order to write this data to a text file, you can get away with having a simple function definition along the lines of:
void WriteLogEntry(int iEntryType,
                   std::string strNameSpace,
                   std::string strSourceFile,
                   std::string strFunction,
                   int iSourceLine,
                   std::string strMessage );
And then use some very straightforward std::ofstream output:
ofsXMLDatabase << ""
               << strNameSpace
               << ""
               << std::endl;
ofsXMLDatabase << ""
               << strSourceFile
               << ""
               << std::endl;
ofsXMLDatabase.flush( );
Note the
flush() command at the end - this is quite important (equivalents also exist in other languages, such as Java). If you
flush() the recently written output then it's committed to disk and no longer buffered somewhere in the runtime/OS. If your program manages to squeeze out a vital error message just before a massive crash but hasn't actually been committed to disk you can end up staring at a log file with no apparent errors. Simply because your process' memory has been reclaimed by the OS and the buffer that you "wrote" the log entry to has been eliminated before it made its way to the actual disk.
This next part is going to be quite specific to C/C++ programmers - some of the "magic" can be found in other languages, but it's particularly prevalent in C/C++. That is, making use of the
Pre Processor Directives offered by the C language. Usually these are frowned upon as a brilliant way to complicate code and introduce some very obscure bugs. In this instance, it can be used to both control the amount of log file output as well as simplify the work a programmer has to do in order to commit valuable information to the log.
In our software library we have a
MasterInclude.h header file that includes the log-file related macros and a few other useful utility macros and definitions. This particular header file finds it's way into the top of every translation unit that makes up the final product. Thus a few timesaving devices exist here...
//configure some basic precompilation defines
  //0 - no debugging wanted
  //1 - very basic debug output
  //2 - comprehensive debug output
  //3 - all output, and a transcript of all messages
#ifdef _DEBUG
  //Set the output level for 'DEBUG' builds
  #define SYSTEM_DEBUG_LEVEL 2
#else
  //Set the output level for 'RELEASE' builds
  #define SYSTEM_DEBUG_LEVEL 1
#endif
With those in place, anywhere in the project that someone wants to add additional debug output it can be wrapped up like this:
#if SYSTEM_DEBUG_LEVEL >= 2
  //Perform some extra debug verification here
#endif
The bonus of this is that for a normal run, where we believe things to be mostly "in order" we can reduce the level to '1' and look at a log file with about 150 entries detailing the key events and statistics (as well as major errors). If we're testing a new component, or a problem has been identified we can ramp up the output to '2' or '3' and look at absolutely everything the software did prior to the error/bug.
Granted it does require a recompile for that particular component, but for our team this doesn't prove to be a substantial problem.
The next trick that I made use of with the C macro language was to use some of the system-defined macro values that the compiler exposes. In particular,
__LINE__ and
__FILE__. Microsoft's compilers also expose the
__FUNCTION__ macro that is very useful; I also defined a
__NAMESPACE__ value for each of the translation units.
If you notice, these macro defined values correspond with various fields in the XML's
LogEvent element, as well as several of the parameters of the
WriteLogEntry( ) function prototype. If we can get the compiler to generate this information for us, then all the better! So I define the following macro:
#define Log_Write_L1( linetype, linetext ) \
  CLogFile::GetSingletonPtr()->WriteLogEntry( \
      (linetype), \
      __NAMESPACE__, \
      __FILE__, \
      __FUNCTION__, \
      __LINE__, \
      (linetext) )
To further aid development, the valid linetypes were included as constant members of CLogFile. The final trick with the pre processor is as so:
#if SYSTEM_DEBUG_LEVEL == 3
  //enable all macros
  #define Log_Write_L1( linetype, linetext ) ...
  #define Log_Write_L2( linetype, linetext ) ...
  #define Log_Write_L3( linetype, linetext ) ...
#elif SYSTEM_DEBUG_LEVEL == 2
  //enable levels 1..2 macros
  #define Log_Write_L1( linetype, linetext ) ...
  #define Log_Write_L2( linetype, linetext ) ...
  #define Log_Write_L3( linetype, linetext )
#elif SYSTEM_DEBUG_LEVEL == 1
  //enable level 1 macros
  #define Log_Write_L1( linetype, linetext ) ...
  #define Log_Write_L2( linetype, linetext )
  #define Log_Write_L3( linetype, linetext )
#else
  //disable macros
  #define Log_Write_L1( linetype, linetext )
  #define Log_Write_L2( linetype, linetext )
  #define Log_Write_L3( linetype, linetext )
#endif
Where, in the above bit of code, "..." is the full expansion mentioned above (but with a slightly different suffix). To save space I omitted it from the above listing. Note that under varying
SYSTEM_DEBUG_LEVELs some of the macros actually expand to nothing - that is, no code will be inserted in their place. This is by intention - throwing a number of strings and writing to files can be a slow process (our platform, at level 3, runs at about 40% of the speed it does at level 0) so when the log entries aren't actually wanted they,
quite literally, don't even exist in the build.
When actually developing the code, the programmer can now write something like:
Log_Write_L3( CLogFile::DEBUG, "Function entered" );
The compiler will fill in all the details about the functions name and location for us. Less work for the programmer often means that there is even less of an excuse to document the flow/state of your software at runtime...
If you're developing in a different language then there are various tricks along similar lines that you can employ. Defining constant/static Boolean's will often see compilers removing them as "dead code" where appropriate.
Prettifying XML using XSLT
At this point you should be able to output an XML listing for a given test-run of your application. Chances are you'll have a suitably large .xml file; which, if you look at it under Microsoft's Internet Explorer (
Firefox looks similar):
MSIE does a reasonable job of color coding the different types of syntax that make up the document. The most useful thing it does is represent the document in its true hierarchical form, one that you can collapse and expand using the "+" and "-" symbols next to parent elements:
You might also have noticed straight away that the structure I described previously in this article is now filled in with information about my development system. This is the information that I mentioned is readily available via the Win32 API.
The above, hierarchical (and read-only) output is fairly useful - you can navigate around it quite easily, albeit slowly.
However, using the wonders of XSLT, a much better output can be crafted. Using an XSLT file to accompany the XML document we can format any given (well formed) XML log file into a pre-determined HTML output.
As you may be aware, it is possible to use XSLT to transform XML into a variety of different formats and file types. This can be particularly useful if you run all of your output to XML now, but in a few years time wish to transform it into a bigger/better format.
XSLT is a very powerful formatting language, and can be used to create very complex representations from a relatively simple script. In this particular article we will be using it to generate a tabulated output that is color coded to the contents of a given
LogEvent.
Using XSLT template matching, the browser will iterate over any number of
LogEvents contained within the document - the style sheet need only specify the formatting for a single instance.
The XML format discussed previously in this article was broken down into two main components - the
LogHeader and then all subsequent
LogEvents. The XSLT can also generate a formatted version of the header by extracting the parameters stored in relevant tags and inserting them into a readable context.
The following image shows how Internet Explorer renders this:

The light grey italic text is that read from the raw XML outputted by the software. The only exception is that the last line ("
Total logged events: 100") is generated by the XSLT counting how many
LogEvent constructs it finds in the file.
The following fragment of code is the XSLT that process a
LogHeader construct:
      Log file header information:


     Output level:


     Session started at


     on


     Operating environment:


     System processor:


     running at approximately


     Mhz


     Memory on start-up:


     available from


     installed


     Total logged events:
There isn't anything in the above XSLT that is particularly groundbreaking, rather a simple case of formatting the incoming values accordingly. I mentioned before that the last line is run-time generated - and that can be seen in the form of a "
count(../LogEvent)" statement towards the bottom. Note that this will actually execute the template match that I am about to describe - so any filter that guarantees no output from a
LogEvent template match will not contribute to the
count( ).
The next interesting part is formatting each
LogEvent. In the initial root template match a table outline is configured using plain HTML:
#


Time


File


Function


Line
That is, a table with 5 columns: event number, time index, source code file, enclosing function, originating line number. Once the first row of the table is created, the processing of
LogEvents begins via the
xsl:apply-templates call. It is designed such that each of the
LogEvent template matches will add an additional two rows (
why two? - wait and see!) to the table. Obviously, if there are no events in the log file or, as we'll see later on, none match the current filter we will be left with just the header for a table and no entries.
The XSLT code for formatting the
LogEvent elements is quite a lengthy and repetitive piece of code - so I'll only highlight the important parts here. Later on you will be able to explore the code for yourself if you're particularly interested.
The
LogEvent template essentially outputs two rows to the table - the first row with the actual details of the event, the second with the message. After some experimentation I found this to provide the most usable output for the simple reason that the "statistical" data attached is of a fairly consistent size, whereas the log message can be anything from a couple of words to a long sentence. HTML tables are a bit tricky to guesstimate the correct dimensions when you know that the data contained in a given cell can substantially vary in size.
The basic structure of the
LogEvent template is as follows:
Basically, we have an
xsl:choose construct that varies the colour of a given row according to the
LogEvent/Type classification. This colouration of the different categories works brilliantly when you are displaying a large subset (or all) of the log file.
An example of the XSLT/HTML code used within a given element (
"comment" in the following example) is as follows:
Outputs of the individual elements of a
LogEvent are the same, so I've made use of template matching for each of them - this feature of XSLT is useful as it allows you to reduce repetition and make single changes that affect the whole template. The first row contains the 5 elements specified by the headers in the default template match, with a colour specific to the type of message. The second row spans the entire table and is of a slightly lighter shade of the same colour.
The specific template matches for the individual fields all appear to be the same, and follow this example:
Quite simply there is no special XSLT in the above fragment. The only reason for doing so is, as previously mentioned, to avoid repeating the same fragment of code for each of the
xsl:choose statements above. As you should immediately see, if you were to modularize these pieces of output, you can easily change the formatting of a given field and have it instantly reflected across the whole document.
The above-demonstrated XSLT filtering of the log file generates the following output:
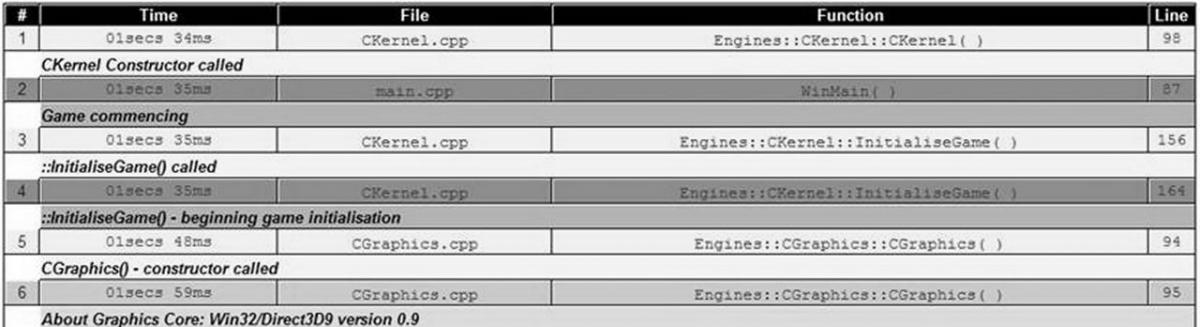
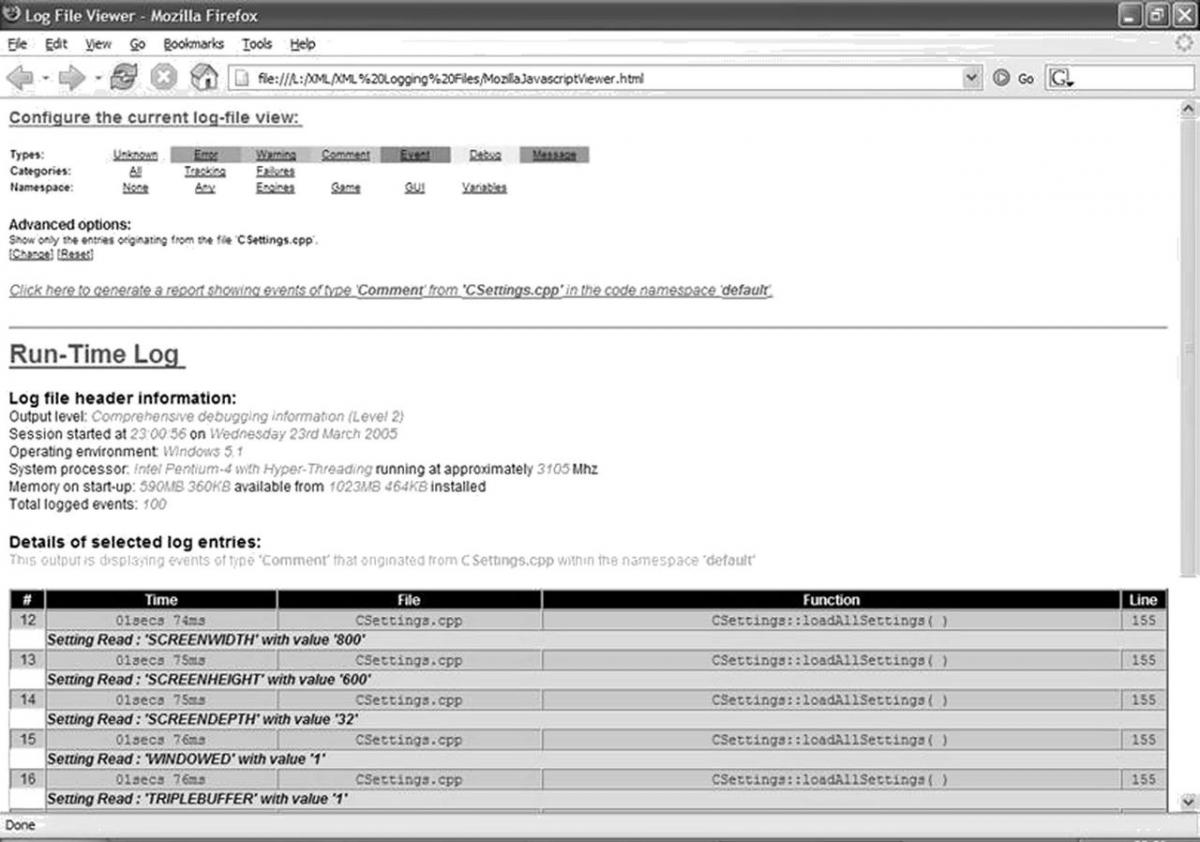
In the above image, you can see the first six entries of a basic log file. The top of the table, the header, is indicated in a black background with white text. The actual log events are indicated by the two-rows-per-event design detailed previously in this document. The coloring displayed in this document shows the output types.
Enhancing XSLT using JavaScript
In the preceding section you have seen the power of some relatively simple XSLT for prettifying a log file. However, it is possible to provide even more possibilities by using some basic JavaScript.
The problem arises when you have a run-time log consisting of several thousand events and you are trying to find specific information about one or more unit(s), or are particularly interested in a specific type of message. In its current form, this technology would require you, the analyst, to examine all of the entries at the same time and read only those that concerned you. This works okay for relatively small log files, but quickly gets both difficult and tedious - not to mention error prone.
XSLT provides a useful set of constructs for conditional processing of elements, and it also provides the ability to declare parameters. Combining these two features we can filter the
LogEvents from the log file and solve the aforementioned problem with browsing huge documents. Using parameters to describe which event types (e.g. "Debug" and "Event" mentioned previously), which namespace groups and allowing filtering of the specific files that a message originated from.
The above listing is from the next revision of the XSLT document - the bulk of it is a comment describing the acceptable values for the actual parameter declaration. The value assigned to this particular parameter can be used later on in the document to provide conditional selection of elements. The
nameSpace parameter is used in the following context for conditional selection:
If the contents of the
LogEvent/NameSpace field matches that specified by the
nameSpace parameter or there is the special '
any' value set, the contents of the
xsl:if block is considered. The contents of the
xsl:if block are exactly the same as the XSLT used in the previous section. With a number of parameters and suitable conditionals, the XSLT can get very difficult to follow - it is worth bearing this in mind when designing a similar system.
There is one minor problem with
xsl:params that I have just introduced - they are written into the actual XSLT file. As it stands, you can use them to filter the output, but if you want to change the way that the filtering works, you have to manually edit the parameters and refresh the rendered output and as such it's not the easiest or most convenient method. However, help is at hand - using, as previously mentioned, JavaScript we can control both the rendering of the XML (via XSLT) and dynamically select the values for the parameters. All without actually changing the text stored in the XSLT!
In order to facilitate the use of JavaScript it is necessary to change the general structure of how the log file is constructed. Up until now we've used two files - the source data in the form of an
.xml file and a transform stored as an
.xsl file. Neither of these formats directly allows the use of embedded JavaScript code, so we'll need to wrap everything up in an HTML file. HTML has a
script tag that can be used to embed JavaScript code, and it's via this entry point that we can start to add dynamic filtering of the generated log file.
The following listing shows the basic structure of the new wrapping document:
      Log File Viewer


          Configure the current log-file view:


    ????????????
The
script block exists in the head of the HTML, and the standard body of the HTML describes the various custom filters (more on this later). The final part is the
div tags that are recipients for JavaScript generated content. JavaScript can be easily invoked via standard HTML hyperlinks (also note the usage of the "
onload" attribute in the opening
body tag), and as such provides a relatively simple means by which the viewer can select the configuration they desire. The JavaScript can then use the requested properties to set the
xsl:params discussed earlier and load the document into the
div targets.
The general design of the JavaScript, and consequently the HTML that interfaces with it, is to allow for multiple filters to operate on the generated XML output. The simplest implementation is to have a single JavaScript method that, when executed via a hyperlink, will generate the XML output in the div target(s). However this doesn't really provide for much customisability. If the JavaScript methods invoked from hyperlinks initially configured the parameters for filtering we could (in theory at least) configure any number of filters.
var g_eventType    = 'all';  //The 'eventType' xsl:param
var g_nameSpace    = 'any';  //The 'nameSpace' xsl:param
var g_specificFile = '';     //The 'specificFile' xsl:param
function setEventType( eventType )
{
  g_eventType = eventType;
  generateLink( );
}
function setNameSpace( nameSpace )
{
  g_nameSpace = nameSpace;
  generateLink( );
}
function setSpecificFile( fileName )
{
  g_specificFile = fileName;
  if( g_specificFile == '' )
  {
    currentAdvFilter.innerHTML = "Not filtering entries based on a specific filename.";
  }
  else
  {
    currentAdvFilter.innerHTML = "Show only the entries originating from the file '" + g_specificFile + "'."
  }
  generateLink( );
}
The above fragment from the body of the script tag shows this concept of multiple filters. The script globally defines three variables (
g_eventType,
g_nameSpace and
g_specificFile) which can be configured through the corresponding
set*( ) method calls.
You can see, in the
setSpecificFile, that HTML formatted text is assigned to
currentAdvFilter.innerHTML. Whilst not shown in the original outline,
currentAdvFilter is the
id property of one of the
div tags in the body. Using this mechanism, we can effectively inject our own HTML code into the rendered output as the position of the
div tag. A more complex example of this is the
generateLink( ) method you can also see referenced in the above fragment. In order to aid the user, when a filter property is changed the display (via a
div tag) updates accordingly so that they can see what the current combination is:
function generateLink( )
{
  var linkText = "
";
  linkText = linkText + "";
  linkText = linkText + "";
  linkText = linkText + "";
  linkText = linkText + "Click here to generate a report showing events of type '" + g_eventType + "' ";
  if( g_specificFile == '' )
  {
    linkText = linkText + "from all files in the code namespace '" + g_nameSpace + "'.";
  }
  else
  {
    linkText = linkText + "from '";
    linkText = linkText + g_specificFile;
    linkText = linkText + "' in the code namespace '" + g_nameSpace + "'.";
  }
  linkText = linkText + "";
  linkText = linkText + "";
  linkText = linkText + "";
  linkText = linkText + "
";
  linkText = linkText + "
";
  //Commit the compiled string to the display
  eventTypeLabel.innerHTML = linkText;
}
The above method takes all three of the parameters, in their current states, and injects an HTML hyperlink into the main display. The key to this all is that the actual text summary of what the filter will do is also the hyperlink you click on in order to process (or re-process) the XML. For example:
Click here to generate a report showing events of type 'Warning' from all files in the code namespace 'Engines'.
Because the actual "back end" of the JavaScript/XML is extremely simple (basically just setting up variables, and outputting their current values) you can interface by whatever means you see fit. It would be perfectly reasonable to draw up a set of icons/images for the various event types so that the user gets a more graphical/friendly display. However, the more powerful possibility is to use the HTML
form tag (and its associated elements).
Using a
form you can have complex GUI-style widgets for the user to work with - provided you can arrange the necessary JavaScript to store the results, you can achieve some very clever filtering combinations. I experimented with these, but in the end chose not to use them in order to keep simple the design of this demonstration. The actual rendering (and the control you have over this) can to vary substantially between browsers and operating systems - and trying to create an aesthetically pleasing filter for the log files became more problematic than it was worth. This does limit the filtering possibilities, but you can salvage some of it - for example, I still managed to incorporate specific file searching. These issues can be worked around using various JavaScript detection routines and CSS tweaks, but again it was decided to keep this demonstration as simple as possible; however you are encouraged to explore other such solutions on your own.
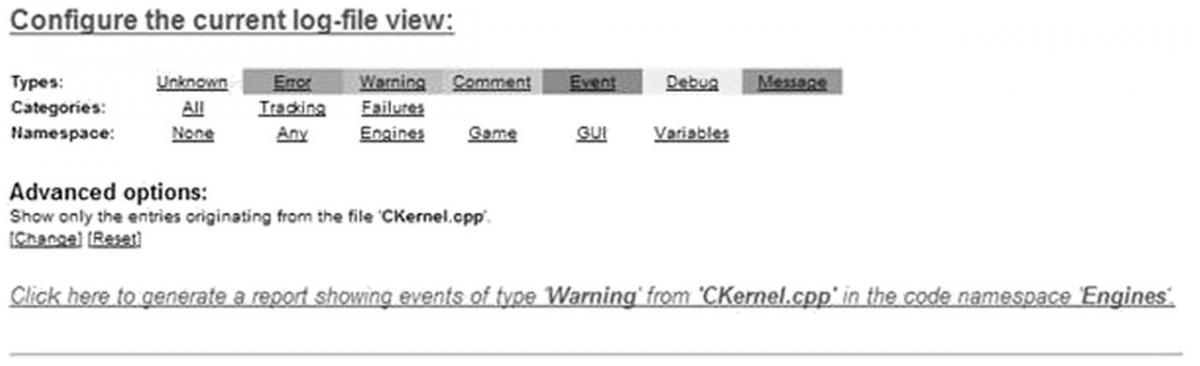
In the above image, taken from Internet Explorer, you can see the HTML header defined by the example code for this article. I have gone to quite some lengths to get an aesthetically pleasing set of controls. The above display always appears at the top of the rendered page, and the horizontal rule visible at the bottom of the image provides a border between the generated output (below) and the controls (above). The colors used as backgrounds for the first row ("Types") of the table are exactly the same as those used in the background of the corresponding entries if, and when, displayed at the bottom of the page. Not only does this make it easier for the user to see which type that may want, it also acts as a simple key should they not be able to identify any entries in the resultant table.
So far I have described the basic process of interfacing the HTML (via hyperlinks) with the JavaScript defined in a
script tags body, but I've missed out the absolutely crucial part - displaying the filtered XML!
As previously explained, the XSLT can be customized using the
xsl:param notation (along with suitable conditionals) - but in raw XSLT these values were fixed in the actual file. Using JavaScript it is possible to instantiate the various XML parser/rendering components for a given browser and to configure them accordingly - including setting any internal
xsl:param fields. Put the pieces together and you have the connecting piece. If we use the HTML and JavaScript to generate a set of controls, with the actual filters stored as variables, we can then use JavaScript to load the XML and XSLT and replace whatever is stored in the corresponding
xsl:params with whatever the user has selected via the HTML interface.
Unfortunately, there is a complication (
just to make things fun!) - the actual code for manipulating HTML is browser dependent (which,
in all honesty, can be a complete minefield at times). It can be categorised as either being
Internet Explorer or
Mozilla - one of the two covers pretty much all browser/platform combinations that are popular at the moment. The amount of code required for either platform is relatively small and can easily be switched at run-time, so it isn't a huge problem.
function onViewLog( )
{
  var moz = (typeof document.implementation != 'undefined') &&
    (typeof document.implementation.createDocument != 'undefined');
  if (moz)
  {
    onViewLog_Mozilla();
  }
  else
  {
    onViewLog_IE();
  }
}
The above fragment demonstrates the way that a Mozilla/MSIE split can be achieved at runtime. A generic entry point,
onViewLog( ), is provided that then delegates the actual hard work to the respective platform-specific function. If you use an exotic platform/browser combination it is possible that you might either have to customize this code or add an additional case to the branched execution.
For both platforms, the subsequent code effectively boils down to a simple four-step scenario:
- Load in the raw XML data
- Load in the XSLT transform script
- Overwrite the xsl:params with runtime selected values
- Output the XML (as processed by the XSLT) to the div target.
The following fragment does this for Internet Explorer based browsers:
function onViewLog_IE()
{
  xmlDoc = new ActiveXObject( "MSXML2.DOMDocument.3.0" );
  xslDoc = new ActiveXObject( "MSXML2.FreeThreadedDOMDocument.3.0" );
  var xslTemplate = new ActiveXObject( "MSXML2.XSLTemplate.3.0" );

  //1. Load in the raw XML data:
  xmlDoc.async = "false";
  xmlDoc.load( 'XMLOutputWithComplexXSLT.xml' );

  //2. Load in the XSLT transform script:
  xslDoc.async = "false";
  xslDoc.load( 'ComplexXSLT.xsl' );
  xslTemplate.stylesheet = xslDoc;
  xslProcessor = xslTemplate.createProcessor( );
  xslProcessor.input = xmlDoc;

  //3. Overwrite the xsl:params with runtime selected values:
  xslProcessor.addParameter( "eventType",         g_eventType );
  xslProcessor.addParameter( "nameSpace",         g_nameSpace );
  xslProcessor.addParameter( "specificFile",      g_specificFile );
  //4. Output the XML (as processed by the XSLT) to the div target
  xslProcessor.transform();
  logview.innerHTML = xslProcessor.output;
}
The above is a relatively simple single-function implementation of all four steps. The code for the Mozilla based browsers is a little more involved, as it uses a callback mechanism to pass on execution to different methods:
function onViewLog_Mozilla()
{
  //1. Load in the raw XML data:
  xmlDoc = document.implementation.createDocument("", "", null);
  xmlDoc.load( 'XMLOutputWithComplexXSLT.xml' );
  xmlDoc.onload = readXML;
}
function readXML()
{
  xslDoc = document.implementation.createDocument("", "test", null);
  xslProcessor = new XSLTProcessor();
  //2. Load in the XSLT transform script:
  xslDoc.addEventListener("load", xslLoad, false);
  xslDoc.load( 'ComplexXSLT.xsl' );
}
function xslLoad()
{
  xslProcessor.importStylesheet( xslDoc );
  //3. Overwrite the xsl:params with runtime selected values:
  xslProcessor.setParameter( "", "eventType",     g_eventType );
  xslProcessor.setParameter( "", "nameSpace",     g_nameSpace );
  xslProcessor.setParameter( "", "specificFile",  g_specificFile );
  //4. Output the XML (as processed by the XSLT) to the div target
  xmlOutput = xslProcessor.transformToDocument( xmlDoc );
  var xmlSerializer = new XMLSerializer();
  logview.innerHTML = xmlSerializer.serializeToString( xmlOutput );
}
The code itself is essentially the same as the preceding MSIE code, but with different syntax. Note that in both of the methods the JavaScript has to explicitly state which
.xml and which
.xslt file to use - it just so happens that they match up to those values specified in the physical files. If you wanted to, it would be possible to determine which style sheet you wanted to use at runtime - this alone opens up as many combinations as you can think of (
or spend time writing!) and is an exceptionally powerful concept.
That is about all there is to discuss along the lines of the general concepts and technology. I have explained the basic concept behind the individual pieces used - so you should be able to add and/or customize the example code provided with this article in order to fit your own team (or personal) requirements. I strongly urge you to examine all of the included files - I have cherry-picked the interesting fragments of code/script for the actual text of this article, but it is by no means been an exhaustive explanation of every single line of code in this solution.
The final output, when viewed, should look something like this:
Conclusion
You now have a very powerful new way of using log files in your software - and one that was achieved using relatively simple technologies that are both easily and freely available. You also have a lot of flexibility to customize it to your own personal (or team's) needs, making it as complicated and dynamic as you see fit.
This article has touched on four main technologies - XML, XSLT, HTML and JavaScript - but none of them have been used to their full potential, or to an overly advanced level. It is interesting to note how a relatively simple use of multiple technologies combines together to generate one powerful solution - something that is very prevalent in commercial software these days.
As mentioned, there is scope to take this material further - a line was drawn for this article so as to stop it from becoming too complex, but there are a few extensions worth pointing out that you may well wish to take a closer look at.
The most obvious would be to add more
xsl:params to the XSLT transform file - such as limiting the range of outputted
LogEvents to within a range of ID numbers or time indices. If you customize the format of the XML output then it's quite likely that you'll want to add extra
xsl:params to handle filtering of these properties. Just be careful,
ideally at the design stage, of combinatorial explosion - with only three parameters the current XSLT implementation can appear quite cluttered.
It would be very possible to dynamically allow the user to specify both the source XML and XSLT files - meaning that the JavaScript/HTML could become a tool that rarely need be left by the user; one where a number of log files could be viewed without having to load up distinctly different HTML files. The ability to specify different XSLT files allows the output to be customized according to whatever form the current user wishes - both on an aesthetic front and on a functional tone (e.g. A high-contrast/large-font output for those with visual impairments).
Another possibility is to package everything up as a dedicated tool - most browsers have re-usable components (e.g. the MSIE ActiveX control) that can be embedded into applications. This can go some way to avoiding any support/configuration issues by making sure that the necessary components are all packaged together in a self contained distributable form.
The other direction could be to make this technology appear in a more "web like" context - having the log files stored on (or written to) a web server, and the viewer being just another web page that can be loaded up on the client machine. 'Cookies' could be incorporated into this so as to remember preferences such as default search or preferred XSLT transform. This possibility could help alleviate many of the browser issues encountered as the server can be used to process and transform the XML file to be displayed.
In closing, I hope you found this article interesting - and hopefully you can actually make some use of the ideas presented here. If you have any questions/comments regarding this article you can contact us via the GameDev.net forums by sending a '
Private Message' to Jack ("
jollyjeffers") or Oli ("
evolutional"). Even if you don't have any questions, we'd always be interested in hearing if people have used the technology in their own projects
You can also download all of the relevant files from the attached resource
Credits
The credits for this article are as follows. I, Jack, am the author of this article, with Oli providing the technical knowledge and information that led to the conception of this idea. Thanks are also due to
Degra,
Agony and
Etnu for their contribution to the original thread.


Thanks for this article; it's great. I'm going to file this away for future projects.