In this article by Lesley Harrison, author of TortoiseSVN 1.7, we shall learn about differences and changelists in TortoiseSVN 1.7
Differences in detail
Differences are useful to allow you to see what has changed between recent revisions of a file. There are several different ways that you can view differences between files, or between a file and a previous version of the file.
Viewing differences between versions of a specific file in your working copy
You can view differences using the change log. There is another way to view differences from within your working copy folder, using the right-click menu.
Time for action - viewing differences in a working copy
To view the differences between a file in your working copy and a previous version, follow these steps:
- Navigate to your working copy folder.
- Select the file that you want to compare version history for.
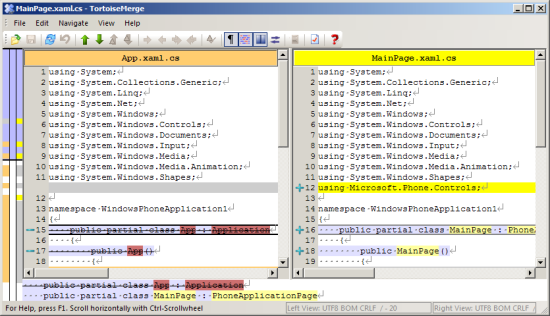
- Right-click the file, and select TortoiseSVN | Diff with previous version.
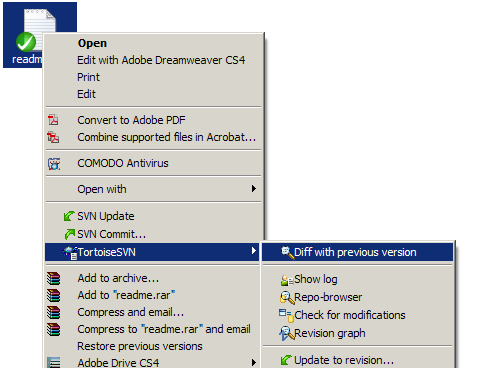
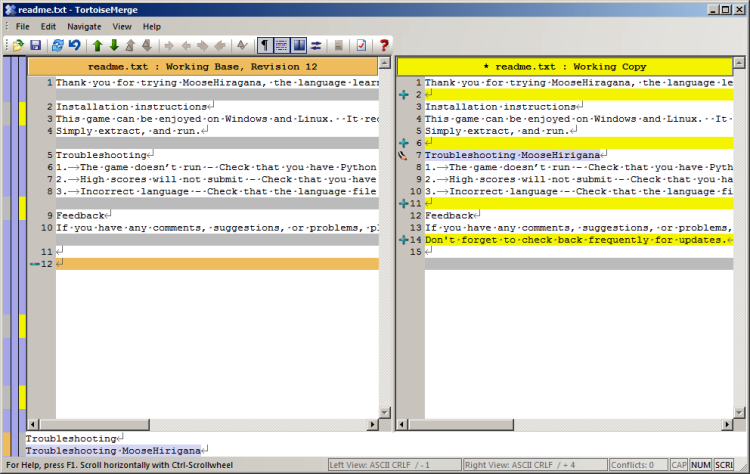
- A TortoiseMerge window will appear, showing the differences between the current version of the file and the previous version.
(Move the mouse over the image to enlarge.)
What just happened?
You have viewed the differences between a current version of a file and the previously checked in one. If you have made changes to a file, but not yet checked in those changes, you can view the difference between the BASE revision (the version that was in the repository when you last updated), and the working copy by selecting TortoiseSVN | Diff, instead of TortoiseSVN | Diff with previous version.
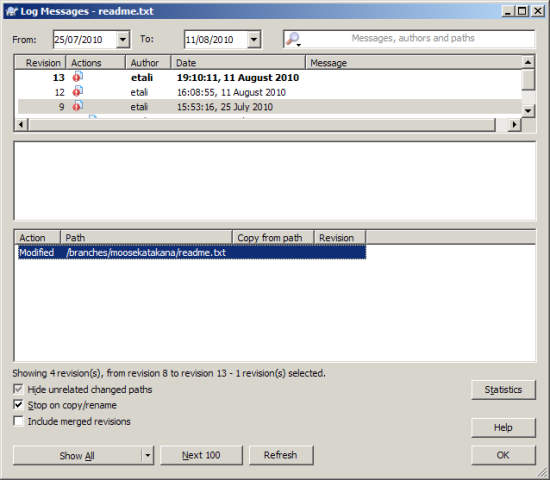
In addition to using this method, you can view specific differences by going to TortoiseSVN | Show Log and selecting the revision you are interested in from the list at the top of the window. Double-click on the relevant file in the list at the bottom of the window--this will bring up a TortoiseMerge window showing the difference list for the revisions in question.
Viewing differences between files outside your working copy
You don't have to be inside your working copy to view differences. In fact, you can view differences between files that aren't under version control.
Time for action - viewing differences in files outside your working copy
To view the differences between files that aren't within your working copy:
- Navigate to the folder where the files are stored.
- Click on the older version of the file.
- Hold down the Ctrl key and then click on the newer version of the file.
- Right-click on the file, and select TortoiseSVN | Diff.
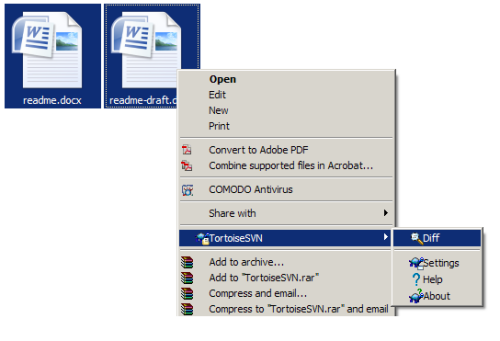
- The next window will show the differences between the two files (depending on what applications you have installed, and the file type of the file you view the differences for, your screen may differ from the following screenshot):
What just happened?
You have just viewed the differences between two files which are not under version control. You could use this to compare submitted patches, documents or source code. When you use this method to compare differences, the differences may be displayed in the editor or IDE that supports the file (as shown in the previous screenshot), or using the TortoiseMerge window:
TortoiseSVN 1.7 Beginner's Guide
Perform version control in the easiest way with the best SVN client - TortoiseSVN
Comparing folders in the repository browser
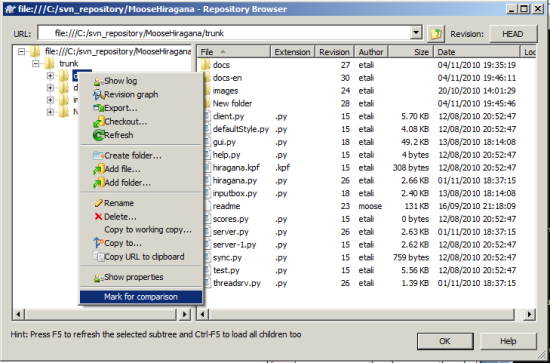
If you want to make a bigger comparison, for example between two folders, you can use the repository browser to achieve this. Simply open the repository browser, right-click on one of the folders that you want to include in the comparison, and select Mark for comparison, then right-click on the second, and select Show differences as a unified diff:
Comparing two folders is useful if you want to view the differences between several files that are in different folders. You get an at-a-glance comparison of each file.
Working with changelists
The best-case scenario for software development would be to work on one thing at a time, committing each change as you go. In the real world, however, things don't always work like that.
Quinn discovered that while attempting to make some network code changes, the current UI setup didn't have anywhere to display the network status. Being easily distracted, he decided to quickly create a status bar, and ended up tweaking some other parts of the UI too, before getting back to his network coding task. Before he even realized he'd gotten distracted, he had edited half the files in the project! Or so it felt when he saw the huge list in the commit window. Which file affects which task?
If Quinn was working on tasks which affected separate files, then he could group the files into changelists, separating those changelists according to task. This makes it easy for him to see what he is doing. He can commit the files related to UI changes by selecting the files in that changelist, and then later commit the network changes by selecting that changelist.
Sadly, this works well only if each task affects a different set of files. If one file is touched by more than one task, then you can't add that file to more than one changelist. Of course, that's a strong case for keeping your code as organized as possible!
Another important thing to remember is that changelists are stored on your local computer, rather than on the Subversion server. They're really a convenience tool for you, rather than a part of the version tracking. This means that you should still make sure to provide clear commit log messages so that other developers understand what is happening with each commit. Even small changes should be documented--your fellow developers will thank you for it, and you'll probably be glad of your log messages yourself a few months down the line!
[indent=1]Changelists are not available for Windows 2000.
If you're a user of Windows 2000, then you won't be able to take advantage of the Changelists feature in TortoiseSVN. Unfortunately, this feature is only available for Windows XP and above. If you're still using Windows 2000 after all these years, then it's likely that you will have encountered other applications that also have problems with the operating system. Perhaps now is a good time to ask your boss for an upgrade!
The first thing you need to learn is how to create a new changelist and add some files to it.
Time for action - working with changelists
To work with changelists, you will need to have worked on several different files before a commit. So before you proceed with this Time for action, modify several files within your working copy.
- Navigate to your working copy.
- Right-click inside the working copy folder and select TortoiseSVN | Check for Modifications.
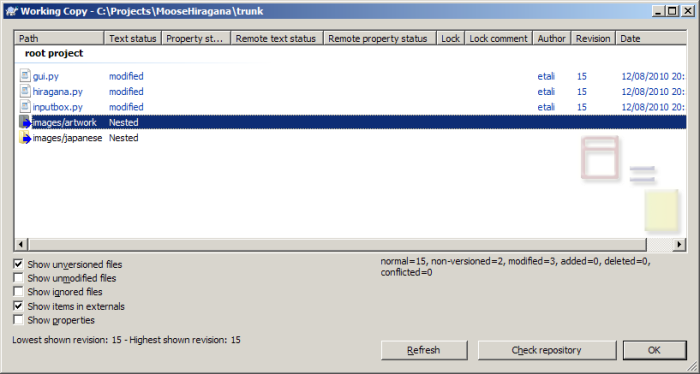
- You will see that all of the modified files appear in the status list. This might be OK for relatively small commits, but could be confusing for bigger commits. To group the files into changelists, select the files in question, right-click on them, and then select Move to changelist | .
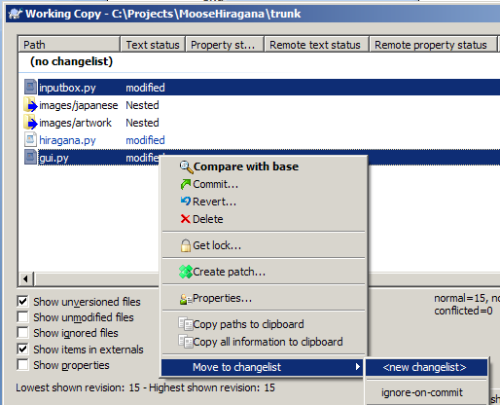
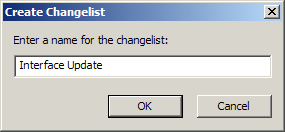
- The Create Changelist window will appear. Enter a suitable name for your changelist.
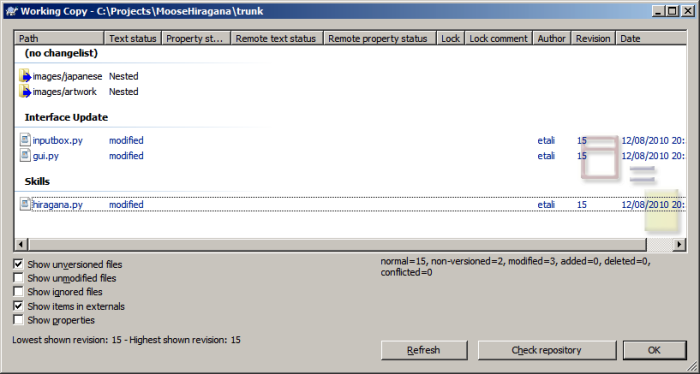
- The files you have moved to the changelist will appear listed under that category. You can create as many changelists as you wish. The following screenshot shows two changelists for this particular commit:
- If you want to add a file to an already created changelist, simply right-click the file and select Move to Changelist, then click the name of the changelist in question.
What just happened?
You have learned how to create changelists. You can create more than one changelist, and you can add multiple files to each changelist. Once you have created a changelist, it will show in the right-click menu so that you can easily add files to it in the future.
Removing a file from a changelist
Just as you can add a file to a change list, it's possible to remove them too. Simply right-click on the file in question, and select Remove from changelist.
Ignoring files on commit
As mentioned previously, it's possible to tell TortoiseSVN to ignore files unless it is told otherwise. TortoiseSVN uses a special changelist for this called ignore-on-commit. If you add files to this changelist, then TortoiseSVN will ignore them in the future, even if the files have been modified locally.
This feature is useful for IDE project files - all developers probably have their own settings which they like to use, and there's no point synching their settings to the repository, as that would annoy the other developers on the team.
Summary
In this article you learned ways to view differences and to add files to change lists.
In the next article, TortoiseSVN: Revision Graphs, you will see:
- How to view a revision graph
- How to manipulate the view to your tastes
- How to prune trees in the graph to make your view clearer
