Global illumination (GI) is a term used in computer graphics to refer to all lighting phenomena caused by interaction between surfaces (light rebounding off them, refracting, or getting blocked), for example: color bleeding, caustics, and shadows. Many times the term GI is used to refer only to color bleeding and realistic ambient lighting.
Direct illumination - light that comes directly from a light source - is easily computed in real-time with today's hardware, but we can't say the same about GI because we need to gather information about nearby surfaces for every surface in the scene and the complexity of this quickly gets out of control. However, there are some approximations to GI that are easier to manage.
When light travels through a scene, rebounding off surfaces, there are some places that have a smaller chance of getting hit with light: corners, tight gaps between objects, creases, etc. This results in those areas being darker than their surroundings. This effect is called ambient occlusion (AO), and the usual method to simulate this darkening of certain areas of the scene involves testing, for each surface, how much it is "occluded" or "blocked from light" by other surfaces.
Calculating this is faster than trying to account for all global lighting effects, but most existing AO algorithms still can't run in real-time. Real-time AO was out of the reach until Screen Space Ambient Occlusion (SSAO) appeared. SSAO is a method to approximate ambient occlusion in screen space. It was first used in games by Crytek, in their "Crysis" franchise and has been used in many other games since. In this article I will explain a simple and concise SSAO method that achieves better quality than the traditional implementation.
The SSAO in Crysis
Prerequisites
The original implementation by Crytek had a depth buffer as input and worked roughly like this: for each pixel in the depth buffer, sample a few points in 3D around it, project them back to screen space and compare the depth of the sample and the depth at that position in the depth buffer to determine if the sample is in front (no occlusion) or behind a surface (it hits an occluding object).
An occlusion buffer is generated by averaging the distances of occluded samples to the depth buffer. However this approach has some problems (such as self occlusion, haloing) that I will illustrate later. The algorithm I describe here does all calculations in 2D, no projection is needed. It uses per-pixel position and normal buffers, so if you're using a deferred renderer you have half of the work done already.
If you're not, you can try to reconstruct position from depth or you can store per-pixel position directly in a floating point buffer. I recommend the later if this is your first time implementing SSAO as I will not discuss position reconstruction from depth here. Either way, for the rest of the article I'll assume you have both buffers available. Positions and normals need to be in view space. What we are going to do in this article is exactly this: take the position and normal buffer, and generate a one-component-per-pixel occlusion buffer.
How to use this occlusion information is up to you; the usual way is to subtract it from the ambient lighting in your scene, but you can also use it in more convoluted or strange ways for NPR (non-photorealistic) rendering if you wish.
Algorithm
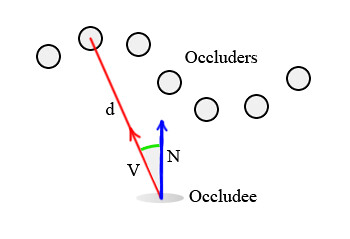
Given any pixel in the scene, it is possible to calculate its ambient occlusion by treating all neighboring pixels as small spheres, and adding together their contributions. To simplify things, we will work with points instead of spheres: occluders will be just points with no orientation and the occludee (the pixel which receives occlusion) will be a pair. Then, the occlusion contribution of each occluder depends on two factors:
- Distance "d" to the occludee.
- Angle between the occludee?s normal "N" and the vector between occluder and occludee "V". With these two factors in mind, a simple formula to calculate occlusion is: Occlusion = max( 0.0, dot( N, V) ) * ( 1.0 / ( 1.0 + d ) )
The first term, max( 0.0, dot( N,V ) ), works based on the intuitive idea that points directly above the occludee contribute more than points near it but not quite right on top. The purpose of the second term ( 1.0 / ( 1.0 + d ) ) is to attenuate the effect linearly with distance. You could choose to use quadratic attenuation or any other function, it?s just a matter of taste.
The algorithm is very easy: sample a few neighbors around the current pixel and accumulate their occlusion contribution using the formula above.
To gather occlusion, I use 4 samples (<1,0>,<-1,0>,<0,1>,<0,-1>) rotated at 45* and 90*, and reflected using a random normal texture. Some tricks can be applied to accelerate the calculations: you can use half-sized position and normal buffers, or you can also apply a bilateral blur to the resulting SSAO buffer to hide sampling artifacts if you wish. Note that these two techniques can be applied to any SSAO algorithm. This is the HLSL pixel shader code for the effect that has to be applied to a full screen quad:
sampler g_buffer_norm;
sampler g_buffer_pos;
sampler g_random;
float random_size;
float g_sample_rad;
float g_intensity;
float g_scale;
float g_bias;

struct PS_INPUT { float2 uv : TEXCOORD0; };
struct PS_OUTPUT { float4 color : COLOR0; };

float3 getPosition(in float2 uv)
{return tex2D(g_buffer_pos,uv).xyz;
}

float3 getNormal(in float2 uv)
{return normalize(tex2D(g_buffer_norm, uv).xyz * 2.0f - 1.0f);
}

float2 getRandom(in float2 uv)
{return normalize(tex2D(g_random, g_screen_size * uv / random_size).xy * 2.0f - 1.0f);
}

float doAmbientOcclusion(in float2 tcoord,in float2 uv, in float3 p, in float3 cnorm)
{float3 diff = getPosition(tcoord + uv) - p;
  const float3 v = normalize(diff);
  const float d = length(diff)*g_scale;
  return max(0.0,dot(cnorm,v)-g_bias)*(1.0/(1.0+d))*g_intensity;
}

PS_OUTPUT main(PS_INPUT i)
{
  PS_OUTPUT o = (PS_OUTPUT)0;
  o.color.rgb = 1.0f;
  const float2 vec[4] = {float2(1,0),float2(-1,0), float2(0,1),float2(0,-1)};float3 p = getPosition(i.uv);
  float3 n = getNormal(i.uv);
  float2 rand = getRandom(i.uv);
  float ao = 0.0f;
  float rad = g_sample_rad/p.z;

  //**SSAO Calculation**// int iterations = 4; for (int j = 0; j < iterations; ++j)
  {float2 coord1 = reflect(vec[j],rand)*rad;
    float2 coord2 = float2(coord1.x*0.707 - coord1.y*0.707, coord1.x*0.707 + coord1.y*0.707);

    ao += doAmbientOcclusion(i.uv,coord1*0.25, p, n);
    ao += doAmbientOcclusion(i.uv,coord2*0.5, p, n);
    ao += doAmbientOcclusion(i.uv,coord1*0.75, p, n);
    ao += doAmbientOcclusion(i.uv,coord2, p, n);
  }

  ao/=(float)iterations*4.0;

  //**END**// //Do stuff here with your occlusion value ao modulate ambient lighting, write it to a buffer for later //use, etc. return o;
}
The concept is very similar to the image space approach presented in "Hardware Accelerated Ambient Occlusion Techniques on GPUs" [1] the main differences being the sampling pattern and the AO function. It can also be understood as an image-space version of "Dynamic Ambient Occlusion and Indirect Lighting" [2] Some details worth mentioning about the code:
- The radius is divided by p.z, to scale it depending on the distance to the camera. If you bypass this division, all pixels on screen will use the same sampling radius, and the output will lose the perspective illusion.
- During the for loop, coord1 are the original sampling coordinates, at 90?. coord2 are the same coordinates, rotated 45?.
- The random texture contains randomized normal vectors, so it is your average normal map. This is the random normal texture I use:

It is tiled across the screen and then sampled for each pixel, using these texture coordinates:
g_screen_size * uv / random_size
- Where "g_screen_size" contains the width and height of the screen in pixels and "random_size" is the size of the random texture (the one I use is 64x64). The normal you obtain by sampling the texture is then used to reflect the sampling vector inside the for loop, thus getting a different sampling pattern for each pixel on the screen. (check out "interleaved sampling" in the references section) At the end, the shader reduces to iterating through some occluders, invoking our AO function for each of them and accumulating the results. There are four artist variables in it:
- g_scale: scales distance between occluders and occludee.
- g_bias: controls the width of the occlusion cone considered by the occludee.
- g_sample_rad: the sampling radius.
- g_intensity: the ao intensity. Once you tweak the values a bit and see how the AO reacts to them, it becomes very intuitive to achieve the effect you want.
Results
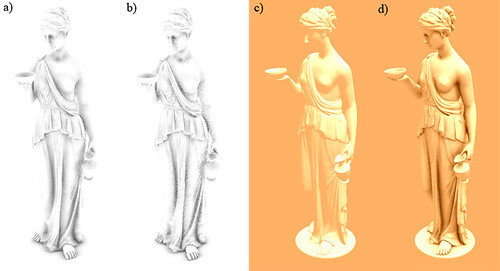
a) raw output, 1 pass 16 samples b] raw output, 1 pass 8 samples c) directional light only d) directional light - ao, 2 passes 16 samples each.
As you can see, the code is short and simple, and the results show no self occlusion and very little to no haloing. These are the two main problems of all the SSAO algorithms that use only the depth buffer as input, you can see them in these images:
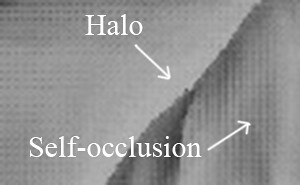
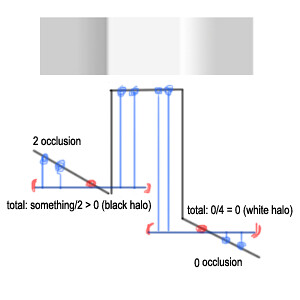
The self-occlusion appears because the traditional algorithm samples inside a sphere around each pixel, so in non-occluded planar surfaces at least half of the samples are marked as 'occluded'. This yields a grayish color to the overall occlusion. Haloing causes soft white edges around objects, because in these areas self-occlusion does not take place.
So getting rid of self-occlusion actually helps a lot hiding the halos. The resulting occlusion from this method is also surprisingly consistent when moving the camera around. If you go for quality instead of speed, it is possible to use two or more passes of the algorithm (duplicate the for loop in the code) with different radiuses, one for capturing more global AO and other to bring out small crevices. With lighting and/or textures applied, the sampling artifacts are less apparent and because of this, usually you should not need an extra blurring pass.
Taking it further
I have described a down-to-earth, simple SSAO implementation that suits games very well. However, it is easy to extend it to take into account hidden surfaces that face away from the camera, obtaining better quality. Usually this would require three buffers: two position/depth buffers (front/back faces) and one normal buffer. But you can do it with only two buffers: store depth of front faces and back faces in red and green channels of a buffer respectively, then reconstruct position from each one. This way you have one buffer for positions and a second buffer for normal. These are the results when taking 16 samples for each position buffer:
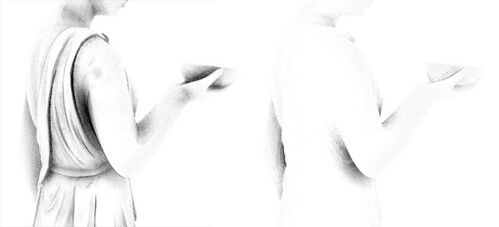
left: front faces occlusion, right: back faces occlusion
To implement it just and extra calls to "doAmbientOcclusion()" inside the sampling loop that sample the back faces position buffer when searching for occluders. As you can see, the back faces contribute very little and they require doubling the number of samples, almost doubling the render time. You could of course take fewer samples for back faces, but it is still not very practical. This is the extra code that needs to be added: inside the for loop, add these calls:
ao += doAmbientOcclusionBack(i.uv,coord1*(0.25+0.125), p, n);
ao += doAmbientOcclusionBack(i.uv,coord2*(0.5+0.125), p, n);
ao += doAmbientOcclusionBack(i.uv,coord1*(0.75+0.125), p, n);
ao += doAmbientOcclusionBack(i.uv,coord2*1.125, p, n);
Add these two functions to the shader:
float3 getPositionBack(in float2 uv) { return tex2D(g_buffer_posb,uv).xyz; }

float doAmbientOcclusionBack(in float2 tcoord,in float2 uv, in float3 p, in float3 cnorm)
{float3 diff = getPositionBack(tcoord + uv) - p;
  const float3 v = normalize(diff);
  const float d = length(diff)*g_scale;
  return max(0.0,dot(cnorm,v)-g_bias)*(1.0/(1.0+d));
}
Add a sampler named "g_buffer_posb" containing the position of back faces. (draw the scene with front face culling enabled to generate it) Another small change that can be made, this time to improve speed instead of quality, is adding a simple LOD (level of detail) system to our shader. Change the fixed amount of iterations with this:
int iterations = lerp(6.0,2.0,p.z/g_far_clip);
The variable "g_far_clip" is the distance of the far clipping plane, which must be passed to the shader. Now the amount of iterations applied to each pixel depends on distance to the camera. Thus, distant pixels perform a coarser sampling, improving performance with no noticeable quality loss. I've not used this in the performance measurements (below), however.
Conclusion and Performance Measurements
As I said at the beginning of the article, this method is very well suited for games using deferred lighting pipelines because it requires two buffers that are usually already available. It is straightforward to implement, and the quality is very good. It solves the self-occlusion issue and reduces haloing, but apart from that it has the same limitations as other screen-space ambient occlusion techniques: Disadvantages:
- Does not take into account hidden geometry (especially geometry outside the frustum).
- The performance is very dependent on sampling radius and distance to the camera, since objects near the front plane of the frustum will use bigger radiuses than those far away.
- The output is noisy. Speed wise, it is roughly equal to a 4x4 Gaussian blur for a 16 sample implementation, since it samples only 1 texture per sample and the AO function is really simple, but in practice it is a bit slower. Here?s a table showing the measured speed in a scene with the Hebe model at 900x650 with no blur applied on a Nvidia 8800GT:
Settings
FPS SSAO time (ms) High (32 samples front/back) 150 3.3 Medium (16 samples front) 290 0.27 Low (8 samples front) 310 0.08
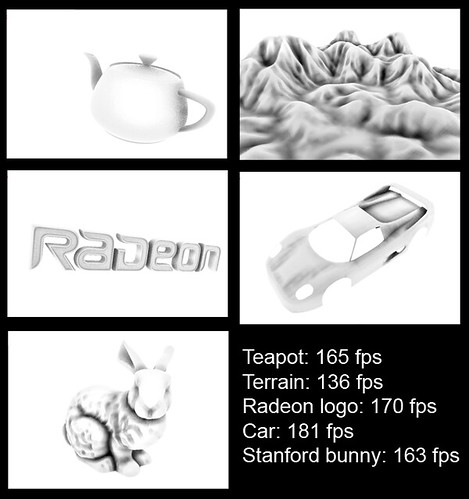
In these last screenshots you can see how this algorithm looks when applied to different models. At highest quality (32 samples front and back faces, very big radius, 3x3 bilateral blur):
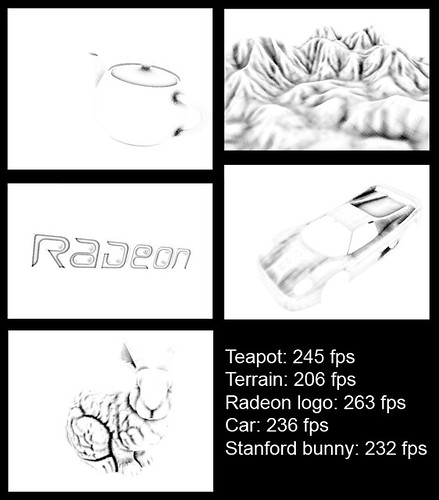
At lowest quality (8 samples front faces only, no blur, small radius):
It is also useful to consider how this technique compares to ray-traced AO. The purpose of this comparison is to see if the method would converge to real AO when using enough samples.
Left: the SSAO presented here, 48 samples per pixel (32 for front faces and 16 for back faces), no blur. Right: Ray traced AO in Mental Ray. 32 samples, spread = 2.0, maxdistance = 1.0; falloff = 1.0.
One last word of advice: don't expect to plug the shader into your pipeline and get a realistic look automatically. Despite this implementation having a good performance/quality ratio, SSAO is a time consuming effect and you should tweak it carefully to suit your needs and obtain the best performance possible. Add or remove samples, add a bilateral blur on top, change intensity, etc.
You should also consider if SSAO is the way to go for you. Unless you have lots of dynamic objects in your scene, you should not need SSAO at all; maybe light maps are enough for your purpose as they can provide better quality for static scenes. I hope you will benefit in some way from this method. All code included in this article is made available under the MIT license
References
[1] Hardware Accelerated Ambient Occlusion Techniques on GPUs (Perumaal Shanmugam) [2] Dynamic Ambient Occlusion and Indirect Lighting (Michael Bunnell) [3] Image-Based Proxy Accumulation for Real-Time Soft Global Illumination (Peter-Pike Sloan, Naga K. Govindaraju, Derek Nowrouzezahrai, John Snyder) [4] Interleaved Sampling (Alexander Keller, Wolfgang Heidrich)
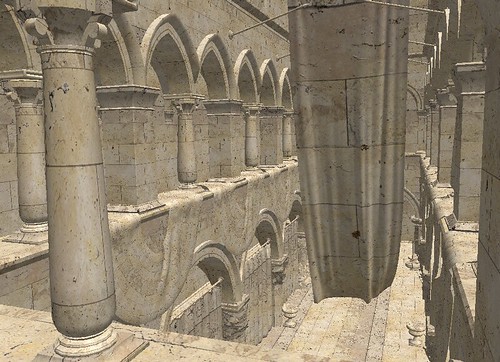
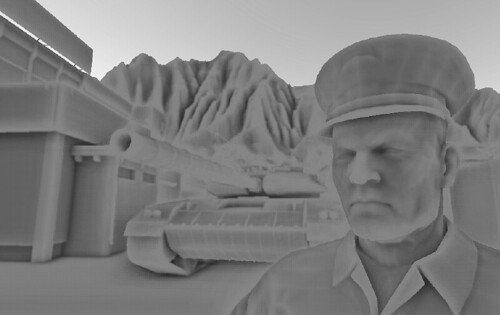
Crytek's Sponza rendered at 1024x768, 175 fps with a directional light.
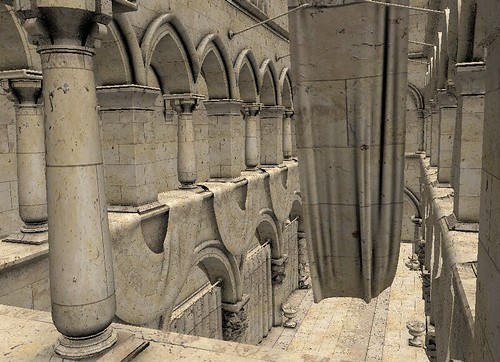
The same scene rendered at 1024x768, 110 fps using SSAO medium settings: 16 samples, front faces, no blur. Ambient lighting has been multiplied by (1.0-AO).
The Sponza model was downloaded from Crytek's website.

 . They can be in both, world space or view space. It does not matter. You probably meant that they are *probably* in view space, since these buffer usually comes from a deferred shading buffer, and here these buffers are usually in view space (again, they don't have to, but it is useful to have them that way).


p_mvp = mul(mvp, p_world);
p_mvp/=p_mvp.w;
and
n_mvp = mul(mvp, n_world)
n_mvp/=mpv.w;
Does anyone help me since I can't exactly produce the SSAO effect mentioned in above.