This article is a design article about implementing deferred rendering. The motive behind it is that while there have been many articles and presentations about the concepts behind deferred rendering (for example, the article about deferred rendering in Killzone 2), there is very little information about how to approach it from a design standpoint. This article aims to do just that. The article is accompanied by code that implements a deferred rendering framework, and is somewhat a development journal of that framework. You can get the code from the SVN repository of the open source 3D rendering engine, Ogre. The code is in the sample called DeferredShading.
Deferred Rendering In A Nutshell
Deferred rendering is an alternative approach to rendering 3d scenes. The classic rendering approach involves rendering each object and applying lighting passes to it. So, if an object is affected by 6 lights, it will be rendered 6 times, once for each light, in order to accumulate the effect of each light. This approach is often called "forward rendering". Deferred rendering takes another approach: first of all of the objects render their "lighting related infomation" to a texture, called the G-Buffer. This includes their colours, normals, depths and any other info that might be relevant to calculating their final colour.
Afterwards, the lights in the scene are rendered as geometry (sphere for point light, cone for spotlight and full screen quad for directional light), and they use the G-buffer to calculate the colour contribution of that light to that pixel. The motive for using deferred rendering is mainly performance related - instead of having a worst case batch count of num_objects * num_lights (if all objects are affected by all lights), you have a fixed cost of num_objects + num_lights. There are other pros and cons of the system, but the purpose of this article is not to help decide whether deferred rendering should be used, but how to do it if selected.
The Problem
The main difficulty with implementing deferred rendering is that you have to do everything on your own. The regular rendering approach involves rendering each object directly to the output buffer (called 'forward rendering'). This means that all of the transform & lighting calculations for a single object happen in a single stage of the process. The graphics API that you are working with (DirectX, OpenGL etc) exposes many options for rendering objects with lights. This is often called the 'fixed function pipeline', where you have API calls that control the fashion in which an object is rendered. Since we are splitting up the rendering to two parts, we can not use these faculties at all, and have to re-implement the basic (and advanced) lighting models ourselves in shaders. Even shaders written for the forward pipeline won't be usable, since we use an intermediate layer (the G-Buffer). They will also need to be modified to write to the G-Buffer / read from the G-buffer (usually the first). In addition to that, the architecture of the rendering pipeline changes - objects are rendered regardless of lights, and then geometric representations of the light's affected area have to be rendered, lighting the scene. This is very different from the classic way - since when do we render lights?
The Goal
We would like to create a deferred rendering pipeline that is as unobtrusive as possible - we do not want the users of the engine to have to use it differently because of the way that its rendered, and we really don't want the artists to change the way they work just because we use a deferred renderer. So, we want an engine that can:
- Interact with the game engine in the same way that the forward renderer does.
- Use the same art and assets as the forward renderer and generate the same results
- Be extended by users of the framework to still be as flexible as forward rendering.
Starting Point
This is not an article about starting a graphics engine from scratch. It assumes that you already have a somewhat high-level engine set up. The code that will be presented here is based on the open source Ogre 3D engine, but can be treated as semi-pseudo-code that can be re-implemented for other engines with similar concepts - materials, render order grouping and render-to-texture (including multiple render targets, referred to as MRT) pipeline control. Here is a short rundown of what would be required from a 3d rendering engine to build a deferred renderer on:
Material System: The system that stores all of the information that is required to render a single object type besides the geometry. Links to textures, alpha settings, shaders etc. are stored in an object's material. The common material hierarchy includes two levels:
- Technique - When an object will be rendered, it will use exactly one of the techniques specified in the material. Multiple techniques exist to handle different hardware specs (If the hardware has shader support use technique A, if not fall back to technique B), different levels of detail (If object is close to camera use technique 'High', otherwise use 'Low'). In our case, we will create a new technique for objects that will get rendered into the G-buffer.
- Pass - An actual render call. A technique is usually not more than a collection of passes. When an object is rendered with a technique, all of its passes are rendered. This is the scope at which the rendering related information is actually stored. Common objects have one pass, but more sophisticated objects (for example detail layers on the terrain or graffiti on top of the object) can have more.
Examples of material systems outside of Ogre are Nvidia's CGFX and Microsoft's HLSL FX.
Render Queues / Ordering System: When a scene full of objects is about to be rendered, who gets rendered when? That is the responsibility of this system. All engines need some control over render order since semi-transparent objects have to be rendered after the opaque ones in order to get the right output. Most engines will give you some control over this, as choosing the correct order can have visual and performance implications (less overdraw = less pixel shader stress = better performance, for example).
Full Scene / Post Processing Framework: This is probably the most sophisticated and least common of the three, but is still common. Some rendering effects, such as blur and ambient occlusion, require the entire scene to be rendered differently. We need the framework to support directives such as "Render a part of the scene to a texture", "Render a full screen quad", allowing us to control the rendering process from a high perspective. In the Unreal Development Kit, this is called the "Unreal Post Process Manager". When working directly with OpenGL/ DirectX, you will have to write a layer like this on your own, or hardcode the pipeline (less recommended if creating an engine that is supposed to suit more than one game). Having a strong framework will also open up other possibilities like inferred lighting.
Generating the G-Buffer
So we know what we want to do, we can now start creating a deferred rendering framework on top of the engine. The problem of deferred rendering can be split up into two problems - creating the G-Buffer and lighting the scene using the G-Buffer. We will tackle both of them individually.
Deciding on a Texture Format
The first stage of the deferred rendering process is filling up a texture with intermediate data that allows us to light the scene later. So, the first question is, what data do we want? This is an important question - it is the anchor that ties both stages together, so they both have to synchronized with it. The choice has performance (memory requirements), visual quality (accuracy) and flexibility (what doesn't get into the G-Buffer is lost forever) implications. We chose two FLOAT16_RGBA textures, essentially giving us eight 16 bit floating point data members. It's possible to use integer formats as well. The first one will contain the colour in RGB, specular intensity in A. The second one will contain the view-space-normal in RGB (we keep all 3 coordinates) and the (linear) depth in A. Choosing a texture format is not a trivial decision, and has quite a big impact. The factors that come into play when choosing a texture format are:
- GPU Memory consumption - This buffer will need to be created at the size of the viewport, for each viewport. For example, if the viewport is 1024x1024, you are paying one megabyte per byte of information per pixel. So, in our case, we have eight two-byte channels. That's 16 bytes per pixel, so the G-buffer will require 16 megabytes of texture memory!
- Flexibility - The G-Buffer is the ONLY link between the objects and the lighting process. Data that does not get into the G-buffer is lost forever. For example, we save enough information to light the scene using the standard model, but we do not know what object each pixel came from. Object-specific lighting options (for example, highlight the selected character) need an 'object ID' saved to the G-buffer as well.
- Accuracy - More bits per data = more accuracy. Are 16 bits enough accuracy for depth? Maybe 8 bits per color channel would have been enough? This is usually a direct tradeoff with the memory factor.
- Speed - Also a tradeoff with memory consumption. Some math tricks can be used to save memory. For example, the normal's Z coordinate can be recalculated from the X and Y coordinates if its sign is stored in a single bit (since X^2 + Y^2 + Z^2 = 1 => |Z| = Sqrt(1 - Y^2 - X^2) ), but those kind of calculations takes time.
In this case we chose the FLOAT16_RGBA pixel format mostly for simplicity. The information for the basic lighting model is there, and its easy to access. This can be changed later of course.
Preparing the objects for G-Buffer rendering
We assume that the material system has a scheming/profiling feature. This means that materials can specify multiple techniques that will be used in different scenarios (see 'Starting point' for futher explanation). We will use this system and define a new scheme - the G-Buffer scheme that will output the intermediate contents to the texture. Since we didn't want the artists to change the materials that they generate, the techniques for this scheme should be generated programatically (this can happen offline or at runtime) We will create this technique in all of the materials in our app. There are two ways to do this - either offline (load all the materials, add the GBuffer technique, save them back to disk) or online (when a material is loaded or about to be used, add the technique to its list). The lazy online approach was used in the Ogre sample, but all methods are possible. How do we create the G-Buffer technique? A) Inspect the classic technique For each material (described in 'Starting Point'), we look at the technique that would have been used normally. For each pass in this technique, we check its properties and see what it does - does this pass have a texture? A normal map? Is it skinned? Transparent? Etc. The resulting classification should contain all the information required to build a GBuffer technique for an object. In some cases (like semi-transparent objects), it should also be able to flag that a certain object can not be deferred rendered, and it will be rendered normally later. In the Ogre sample, the function that does this is GBufferSchemeHandler::inspectPass, which returns a structure called PassProperties, which contains the fields needed to generate a g-buffer writing technique. B) Generate the G-Buffer technique After a pass has been inspected and understood, the next stage is to generate the G-Buffer-writing technique. Since the classification has all the information needed, it is possible to derive the material properties and create the matching shader to write to the MRT. A question that arises here is how should the shader be generated? There are two common approaches for this - the ubershader approach and the shader generation approach. The first one involves writing a big shader beforehand with lots of preprocessor directives and compiling the right version of the shader during runtime, and the latter means generating shader code on the fly. For this task, I chose code generation as the option for two reasons:
- There are quite a few options that affect G-Buffer rendering - diffuse textures, normal / specular / parallax maps, vertex colours, skinning etc. Writing a single ubershader for this will be very hard, because of the many preprocessor definitions. For example : how do you assign texture coordinate indices?
- Debugging is comfortable because you see a simple shader that does exactly what a certain object needs. Here is an example of a shader pair generated (in this case, a normal map, a texture and a single predefined specularity level)
For example:
void ToGBufferVP( float4 iPosition : POSITION, float3 iNormal : NORMAL, float2 iUV0 : TEXCOORD0, float3 iTangent : TANGENT0, out float4 oPosition : POSITION, out float3 oViewPos : TEXCOORD0, out float3 oNormal : TEXCOORD1, out float3 oTangent : TEXCOORD2, out float3 oBiNormal : TEXCOORD3, out float2 oUV0 : TEXCOORD4, uniform float4x4 cWorldViewProj, uniform float4x4 cWorldView )
{
	oPosition = mul(cWorldViewProj, iPosition);
	oNormal = mul(cWorldView, float4(iNormal,0)).xyz;
	oTangent = mul(cWorldView, float4(iTangent,0)).xyz;
	oBiNormal = cross(oNormal, oTangent);
	oViewPos = mul(cWorldView, iPosition).xyz; oUV0 = iUV0;
}

void ToGBufferFP( float3 iViewPos : TEXCOORD0, float3 iNormal : TEXCOORD1, float3 iTangent : TEXCOORD2, float3 iBiNormal : TEXCOORD3, float2 iUV0 : TEXCOORD4, out float4 oColor0 : COLOR0, out float4 oColor1 : COLOR1, uniform sampler sNormalMap : register(s0), uniform sampler sTex0 : register(s1), uniform float4 cDiffuseColour, uniform float cFarDistance, uniform float cSpecularity )
{
	oColor0.rgb = tex2D(sTex0, iUV0);
	oColor0.rgb *= cDiffuseColour.rgb;
	oColor0.a = cSpecularity;
	float3 texNormal = (tex2D(sNormalMap, iUV0)-0.5)*2;
	float3x3 normalRotation = float3x3(iTangent, iBiNormal, iNormal);
	oColor1.rgb = normalize(mul(texNormal, normalRotation));
	oColor1.a = length(iViewPos) / cFarDistance;
}
Remember to keep the shaders (uber or generated) synchronized with the G-Buffer format you decided on. Here is a screenshot from NVIDIA's PerfHUD tool showing the G-Buffer being built:
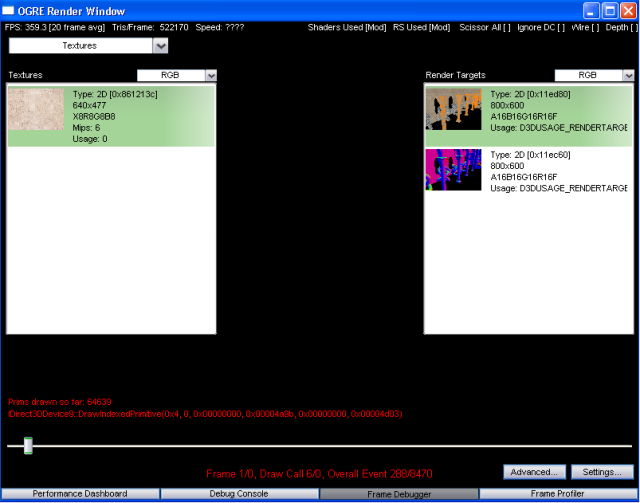
You can see the G-buffer textures (two of them) on the right side of the picture. Notice that nothing has been written to the back-buffer yet. In the Ogre sample, the GBufferMaterialGenerator class takes care of this. C) Postpone transparent / other none-deferred objects The pass inspection tells us if a pass can be deferred or not. If not, we want to make sure we can render the none-deferred objects later. Again, material techniques come into play, and a NoGBuffer technique is introduced. When a none-deferred pass is detected, it is copied as-is to the NoGBuffer technique, allowing us to tell the framework to render all none-deferred objects once the deferred composition part is over. We will get to that later.
Allow overriding the automatic process
The shader generation makes it easier to manage assets in a deferred rendering environment since it generates the shaders from the fixed function parameters, but this is not always possible. You might have objects with specialized shaders that don't fit in any generic scheme, but still want to defer them as well. It is worthwhile to keep this option open, for better flexibility. The proposed framework does this already, as the programmatic material/shader generation only happens when an object without a technique for the GBuffer scheme defined. This means that if an object has a technique predefined, it will override the automatic process. This makes upkeep harder (you need to synchronize all manual shaders with the MRT format if you change it, for example) but is unavoidable in certain scenarios.
G-Buffer Generation Summary
Using these four stages, we added a hook in the system that when the GBuffer scheme is enabled, existing objects will be inspected, classified and have matching writing materials and shaders generated for them, allowing the existing pipeline to render itself to the G Buffer without asset modification. Some objects will be postponed and forward rendered later, some objects will be rendered using custom shaders - flexibility and compatibility remains, and the G-Buffer is created!
Lighting the Scene
We now have a prepared G-buffer with all the intermediate data we need to light the scene. Our next job is to render each light to the scene, calculating its contribution to the final image. This stage differs from the standard approach in a big way - we render lights! There is a question of who triggers the actual rendering. For that, we use the full scene / post processing framework (See description in 'Starting point'). In Ogre, it is called the compositor framework.
Compositing Scenes (a general idea)
The classic forward rendering pseudo code is: for each visible object: for each light that affects object: render object with light contribution to main window However, this is not always the case, even before deferred rendering. Many post-processing effects such as blurring the scene require rendering the scene to a texture, and then rendering the texture to the final output image using a pixel shader with a full screen quad.
A simple motion blur pseudo code might be: for each visible object: for each light that affects object: render object with light contribution to a texture blend texture with 'previous frame' texture to screen copy texture to 'previous frame' texture A good scene composition framework will allow these kind of pipelines to be defined.
Ogre does this with the compositor framework, which allows these kind of pipelines to be defined in scripts. For example, this is the GBuffer generating compositor:
 compositor DeferredShading/GBuffer {
 	technique {
 		texture GBufferTex
 		target_width target_height PF_FLOAT16_RGBA PF_FLOAT16_RGBA chain_scope
 		target GBufferTex {
 			input none pass clear { }
 			shadows off
 			 material_scheme GBuffer
 			 pass render_scene { //These values are synchronized with the code first_render_queue 10 last_render_queue 79 }
 		}
 	}
 }
Even if you never heard of Ogre, this script should be self explanatory. The multi render texture is defined as two FLOAT16_RGBA textures, it is cleared and the scene is rendered to with the GBuffer material scheme every frame. Back to our case... This is exactly the time of custom control we need. We will now define a custom composition pass that will render light as geometry.
compositor DeferredShading/CompositeScene {
	technique { //Reference the main Gbuffer
		texture texture_ref GBuffer
		DeferredShading/GBuffer GBufferTex
		target_output {
			input none //We will dispatch the shadow texture rendering ourselves shadows off

			// render skies and other pre-gbuffer objects
			pass render_scene { first_render_queue 1 last_render_queue 9 }

			//Render the lights and their meshes
			pass render_custom DeferredLight { input 0 GBuffer 0 input 1 GBuffer 1 }
			pass render_scene { material_scheme NoGBuffer first_render_queue 10 last_render_queue 79 }
		}
	}
}
Once a proper full scene composition framework is in place, this task becomes pretty simple to design. This compositor uses the result of the GBuffer compositor (see the texture_ref declaration), renders the skies (early render groups), then the light's geometry, then the objects that we skipped earlier (this is where the NoGBuffer scheme comes into place). The only thing left to do is to implement the deferred light composition pass. The main challenge is the fact that in deferred rendering, all the lighting calculations are your responsibility - including basic diffuse/specular lighting. Once again, the question of shader management comes into play.
This time around I actually chose to use the uber-shader approach, because the inputs don't change frequently, and there are less combinations to manage. Light type, and a shadow casting flag are enough for almost everything, so it doesn't create a mess. There are many papers on how the calculations are made, and the demo code is also a reference, although a basic one. The basic rule of thumb is that the G-buffer gives you view-space position and normal, which should be enough. Creating the geometry representing the light is not a difficult task, creating a quad / sphere / cone programmatically is basic 3d geometry stuff. The attached demo contains code that does that. (See the GeomUtils class).
There are other minor issues - depending on your framework, you might need to reconstruct the depth buffer for the future objects to be able to depth test against the scene. Since the G-Buffer contains the depth as well, it is possible to rebuild the depth buffer from it, by rendering a quad with a pixel shader that reconstructs view space position, multiplies by the projection matrix and outputs the depth (remember - pixel shaders can output depth). In the framework, this is done by the ambient light, which is a 'fake light' that fills the scene with the ambient color and rebuilds depth, and is also rendered during the light composition pass. (Solutions to this problem are also already explained to good detail on the internet). Here are some screenshots illustrating lighting of the scene using the G-Buffer :
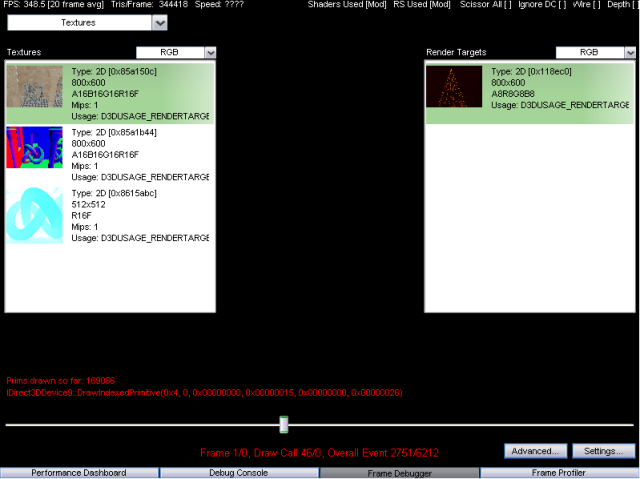
As you can see, this time around the G-Buffer textures are used as input to the light geometry rendering, with the 3rd texture being the shadow map built for the light (it is built during the scene lighting stage to re-use the same shadow texture for all lights). Here is a visualization of the scene after one light has rendered itself to the main buffer :
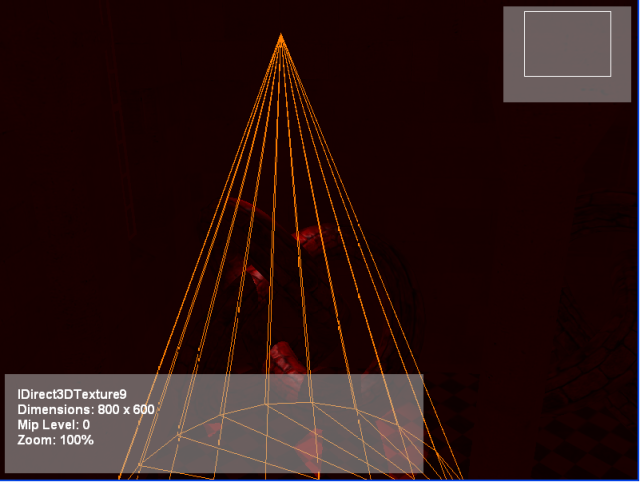
This light is a spotlight that casts shadows. Once all the lights render themselves in this fashion, the scene is fully lit! Undeferred objects will be rendered normally afterwards - a render scene directive will be issued in the full scene rendering framework after the lighting takes place. This is a drawback since you will have to implement forward rendering techniques for them (which might lead to code duplication), but objects that can't be deferred are usually different from normal objects, so they would require special treatment anyways.
Additional post processing effects
Another advantage of deferred rendering, is that some advanced post-filters (like SSAO) require full-scene renders to get intermediate information about the scene and use it. If the G-Buffer contains this information, you can apply these effects without another full scene render; just make sure that your framework makes it easy to pass information (such as textures) from different render sequences to each other, and you are practically done. In the case of OGRE, the texture_ref directive (also used in the final scene composition) is all that is needed. The deferred rendering demo that accompanies this paper contains an SSAO postfilter, so you can switch it on and off and see the visual/performance impact.
Summary
My goal in this article was to get into some of the less intuitive details of deferred rendering implementations. I hope that this article will help anyone trying to implement a deferred rendering framework get to their target. Remember that there is full source code of a sample implementation as part of the Ogre SDK, so you can see it in action for full reference. For people with direct ogre experience, there is also an article that explains the Ogre usage in the demo. Good luck!