Though the immediate mode provides access to the underlying hardware, it does so in a device independent manner and provides a device independent way to communicate with the acceleration hardware at the lower level.
A very important aspect about the immediate mode is that it does not provide a built-in geometry engine. The limitation due to this, is that the developer has to provide the implementation for the different modules of the rendering pipeline. A big advantage is that the developer can use her own rendering and scene management algorithms, which might be more efficient and faster than the geometry engine provided by the retained mode.
[size="5"]Execute Buffers
As we mentioned before, the immediate mode does not provide a built-in geometry engine. All the rendering of the data has to be done by the application, using the concept of execute buffers. An execute buffer is nothing but the vertex data and a set of instructions to manipulate the vertex data. Execute buffers are used directly by immediate mode and indirectly by the retained mode.
Each execute buffer is a complete packet of information. Each execute buffer contains a vertex list and an instruction stream. The instruction stream consists of an operation code (opcode), followed by the data required for the operation. The instructions in the execute buffer define how the vertex list is to be organized, lit and rendered.
Figure 1 shows a diagrammatic representation of an execute buffer. In this figure, even though we have shown three data elements following the first opcode, it is not necessary that all opcodes will require three data elements. Different opcodes require may different number of data elements.
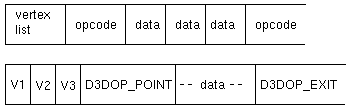
Figure 1: Execute Buffer
Execute Buffer Opcodes
Before proceeding any further, let us cover some of the execute buffer opcodes we will be using. Each opcode by convention, has the D3DOP_ prefix. The opcode name follows this prefix. Some of the opcodes are:
D3DOP_POINT
- used to send one or more points to the renderer. The points to be sent should be in a D3DPOINT structure. For this opcode, we have to specify the starting index of the point(s) in the vertex list and the number of points to be rendered
D3DOP_LINE
- used to send a line to the renderer. The line to be rendered has to be sent in the D3DLINE structure. For the opcode, we have to specify two vertices of the line, as indices into the vertex list
D3DOP_TRIANGLE
- used to send a triangle to the renderer. The triangle to be rendered has to be sent in the D3DTRIANGLE structure. For the opcode, we have to specify three vertices which make up the triangle, which are indices into the vertex list. Alongside the points, a flag indicating the edges of the triangle to be rendered, is also specified. The flag describes which edges of the triangle are enabled and is only useful while displaying wireframe models. Some of the value of the flag are
- D3DTRIFLAG_EDGEENABLE1 - draw an edge only between the first and second point
- D3DTRIFLAG_EDGEENABLETRIANGLE - draws all edges of the triangle, namely between p1-p2, p2-p3 and p3-p1
D3DOP_MATRIXMULTIPLY - used to multiply two matrices, into a third matrix. This operation takes two source matrices and multiplies them into a third matrix. The three matrices have to be specified in the D3DMATRIXMULTIPLY structure, with each matrix specified in the D3DMATRIX structure
D3DOP_PROCESSVERTICES - used to set the lighting and transformations for the specified vertices. The vertices to be processed have to be specified in the
D3DPROCESSVERTICES structure. In this structure, the indices of the start vertex in the source and destination buffers have to be specified, alongwith the number of vertices and a processing flag. The flag indicates the processing to be done on the specified vertices. Some of the values of this flag are:
- D3DPROCESSVERTICES_COPY
- D3DPROCESSVERTICES_TRANSFORMLIGHT
- D3DPROCESSVERTICES_TRANSFORM
- used to set the value of the internal variables in the rendering engine. For setting values of the different modules, the are different state opcodes, one to set each variable. Here, the X represents the variable to be used. The different opcodes used are D3DOP_STATETRANSFORM, D3DOP_STATELIGHT and D3DOP_STATERENDER. For each of these opcode, we have to use the D3DSTATE structure. In this structure, we specify the state type to be set and the state information to be set. The different states are:
[bquote]D3D_STATETRANSFORM - used to set the internal values for the transformation module. Using this state stransformation, we can set the values of the state registers of the transformation module. The state types used to set the different matrices are:
- D3DTRANSFOR_WORLD
- D3DTRANSFORMSATE_VIEW
- D3DTRANSFORM_PROJECTION
- D3DLIGHTSTATE_MATERIAL
- D3DLIGHTSTATE_AMBIENT
- D3DLIGHTSTATE_COLORMODEL
D3D_STATERENDER - used to set the internal values for the rasterization module of the rendering engine. Using this state, we can specify the different textures to be used, the texture mapping parameters, and other things. Some of the state types used are:
- D3DRENDERSTATE_TEXTUREHANDLE
- D3DRENDERSTATE_ANTIALIAS
- D3DRENDERSTATE_WRAPU
- D3DRENDERSTATE_WRAPV
- D3DRENDERSTATE_FILLMODE
- used to load a specified texture, to be used for texture mapping. The texture to be loaded is specified in the D3DTEXTURE structure. This structure specifies two texture handles, each in the D3DTEXTUREHANDLE structure. The source texture is copied into the destination texture. A restriction of this opcode is that that the textures have to be of the same size
D3DOP_EXIT - used to indicate the end of the execute buffer. Immediate mode executes the contents of the execute buffer till it encounters the end of the buffer. Hence, it is important to terminate each execute buffer with this opcode
Execute Buffer Sample Code
After covering some of the opcodes used in execute buffers, let us consider a sample source code, to illustrate the use of the opcodes, to create an execute buffer.
The execute buffer shown in Source Listing 1 stores the data for one point.
LPBYTE lpBuf, lpStart;

D3DEXECUTEBUFFERDESC ebDesc;

LPD3DPOINT lpPt; LPD3DINSTRUCTION lpIns;

LPD3DSTATE lpSt;


lpBuf = (LPBYTE)ebDesc.lpData;

lpV = (LPD3DVERTEX)lpBuf;

lpV[0].x = D3DVAL(0.0); lpV[0].y = D3DVAL(10.0); lpV[0].z = D3DVAL(0.0);

lpV[0].nx = D3DVAL(0.0); lpV[0].ny = D3DVAL(1.0); lpV[0].nz = D3DVAL(0.0);

lpV[0].tu = D3DVAL(0.0); lpV[0].tv = D3DVAL(0.0);


lpStart = lpBuf + (sizeof(D3DVERTEX));

lpIns = (LPD3DINSTRUCTION)lpStart;

lpIns->bOpcode = D3DOP_POINT;

lpIns->bSize = sizeof(D3DPOINT);

lpIns->wCount = 1;

lpPt = (LPD3DPOINT) &lpIns[1];

lpPt->wFirst = 0;[size="5"]Steps to Create an Application
After the introduction to immediate mode and the concept of execute buffers, let us look at the steps needed to create an application using the immediate mode.
To create an immediate mode application, we need to create the DirectDraw and Direct3D objects required for rendering. After creating the objects, we need to set the render state. After setting the render state, we need to create the execute buffers and fill them with the appropriate data and instructions. To render the data, we need to execute the execute buffers. On executing the execute buffers, the data is taken by the rendering engine and processed, the results of which are displayed.
The steps, required to be followed to create an immediate mode application are shown below:
- Declare the variables required to store the different values and objects of the application. The variables typically store pointers to a DirectDraw object, a Direct3D object, the execute buffers, etc
- Initialize Windows, to create the Window on which the data is to be rendered
- Create the DirectDraw and the Direct3D objects, required for rendering
- Select an appropriate device
- After selecting the device, create and initialize the viewport and its parameters
- Set the render state of the application
- Setup the execute buffers. Prepare the execute buffers and fill them with the appropriate data
- After initializing the execute buffers, display the window and then go into an infinite loop, waiting for events to happen. When events are received, they are processed by the window event handler if they are Windows events. If there are no events to be processed, we need to render the next frame. This is done by executing the execute buffers created in a previous step
[size="5"]Scene Management
The concept of a scene and scene management in immediate mode is very different than that in the retained mode. In retained mode, we have the concept that the scene to be rendered, is a hierarchic organization of frames and the frames are used to position and manipulate the objects and the lights.
In immediate mode, a scene is nothing but a collection of all the vertices and the drawing primitives like points, lines and triangles. A scene exists only in the execute buffer instructions and nowhere else. There is no concept of frames, objects and explicit lights.
An important point to be kept in mind while rendering the scene at hand, is that rendering of a scene uses the famous sandwich mechanism used in Windows, for painting a window. Before rendering, the application has to call the BeginScene method of the IDirect3DDevice object. After the rendering is done, the application has to call the EndScene method of the IDirect3DDevice object. Rendering is done between tese two method calls.
Due to BeginScene, the system locks the execute buffer, so that no other thread can modify its contents. On calling EndScene, the lock is released. The application has to take care, not to use multiple BeginScene and EndScene calls in a single frame, as it may affect the performance of the application. If multiple execute buffers have to be used, all the execute buffers can be executed in one single BeginScene, EndScene sequence.
Ownership
A few points concerned with ownership, that should be kept in mind are listed below:
- Each execute buffer and viewport are owned exactly by one device
- Each light is owned exactly by one viewport
- Material and texture object can be associated with more than one device
[size="5"]Sample Application
Let us now consider a sample application and go through its source code, to understand the steps required to create an immdiate mode application.
In this application, we will be going through the standard procedure to initialize a Direct3D immediate mode application. The scene to be rendered consists of three vertices making up a triangle. These points are used to setup the execute buffer, which is then rendered onto the screen.
Source Listing 2 shows a sample screen image of the running application.

Figure 3: Sample Application
Step 1: Define Global Variables
#define    SCREEN_WIDTH 640

#define    SCREEN_HEIGHT 480

#define    WINDOW_WIDTH 640

#define    WINDOW_HEIGHT 480

#define    BIT_DEPTH 16

typedef struct t_glob {

	HWND hWnd; HINSTANCE hInstance;

	D3DRMRENDERQUALITY RenderQuality;

	LPDIRECTDRAWSURFACE lpDDSFront, lpDDSBack;

	LPDIRECT3DDEVICE dev; LPDIRECT3DVIEWPORT view;

	LPDIRECT3DEXECUTEBUFFER lpD3DExBuf;

	GUID DriverGUID[MAX_DRIVERS];

	char DriverName[MAX_DRIVERS][50];

	int  NumDrivers, curDriver , BPP, binitDone, bquit;

} glob;

LPDIRECTDRAW lpDD; D3DEXECUTEDATA d3dExData;

LPDIRECT3DEXECUTEBUFFER lpD3DExBuf;

D3DMATRIXHANDLE hViewPos, hView, hViewRot;

D3DMATRIX viewpos = {

	D3DVAL(1.0), D3DVAL(0.0), D3DVAL(0.0), D3DVAL(0.0),

	D3DVAL(0.0), D3DVAL(1.0), D3DVAL(0.0), D3DVAL(0.0),

	D3DVAL(0.0), D3DVAL(0.0), D3DVAL(1.0), D3DVAL(0.0),

	D3DVAL(0.0), D3DVAL(0.0), D3DVAL(10.0), D3DVAL(1.0) };

D3DMATRIX viewrot, view, dviewrot, dworld;

D3DMATRIX identity = {

	D3DVAL(1.0), D3DVAL(0.0), D3DVAL(0.0), D3DVAL(0.0),

	D3DVAL(0.0), D3DVAL(1.0), D3DVAL(0.0), D3DVAL(0.0),

	D3DVAL(0.0), D3DVAL(0.0), D3DVAL(1.0), D3DVAL(0.0),

	D3DVAL(0.0), D3DVAL(0.0), D3DVAL(0.0), D3DVAL(1.0) };
Figure 4: Step 1: Defining global variables
In this step, we have put together all the required variables into one structure, for a matter of convenience, during initialization. Some of the variables used are:
- dev - pointer to the Direc3DDevice object
- view -pointer to the Direct3DViewport object
- DriverGUID - this array stores pointers to the selected devices. From this list of devices, one device which best suits our needs will be selected
- BPP - represents the number of bits-per-pixel and decides the colour depth. This information is used to decide the colour model used
- CurrDriver - indicates the driver to be used from the list of drivers available
- DDSFront, DDSBack - two DirectDraw surfaces, used for drawing and flipping contents
- d3dEXData - buffer for storing execute buffer data
- lpD3DExBuf - pointer to execute buffer
- viewpos - view matrix
RegisterClass(&wc);


hWnd = CreateWindow("Immediate", "D3D Immediate Mode",

    	WS_OVERLAPPEDWINDOW,

    	0, 0, WINDOW_WIDTH, WINDOW_HEIGHT,

    	NULL, NULL, hInstance, NULL);


globals.hWnd = hWnd;

globals.hInstance = hInstance;
Figure 5: Step2 : Setup Windows
Step 3: Setup Direct3D
hdc = GetDC(globals.hWnd);

globals.BPP = GetDeviceCaps(hdc, BITSPIXEL);

ReleaseDC(hWnd, hdc);
Figure 6: Step 3: Setup Direct3D
Then we initialize DirectDraw, as shown in figure 7 using the DirectDrawCreate function.
DirectDrawCreate(NULL, &lpDD, NULL); Figure 7: Initialize DirectDraw
lpDD->SetCooperativeLevel(hWnd, DDSCL_EXCLUSIVE | DDSCL_FULLSCREEN);Figure 8: Setting the Cooperative Level
lpDD->SetDisplayMode(SCREEN_WIDTH, SCREEN_HEIGHT, BIT_DEPTH); Figure 9: Set the Display Mode
Step 4: Create Front and Back Buffers
LPDIRECTDRAWSURFACE lpDDSFront, lpDDSZ;

DDSURFACEDESC ddsd; DDSCAPS ddscaps; HRESULT ret_val;


// obtain the primary surface

memset(&ddsd, 0, sizeof(DDSURFACEDESC));

ddsd.dwSize = sizeof(DDSURFACEDESC);

ddsd.dwFlags = DDSD_CAPS | DDSD_BACKBUFFERCOUNT;

ddsd.ddsCaps.dwCaps = DDSCAPS_PRIMARYSURFACE | DDSCAPS_FLIP

	| DDSCAPS_COMPLEX | DDSCAPS_3DDEVICE;

ddsd.dwBackBufferCount = 1;


// create Primary surface

lpDD->CreateSurface(&ddsd, &lpDDSFront, NULL);

globals.lpDDSFront = lpDDSFront;


// Get the back buffer

ddscaps.dwCaps = DDSCAPS_BACKBUFFER;

lpDDSFront->GetAttachedSurface(&ddscaps, &(globals.lpDDSBack));
Figure 10: Step 4: Creating front and back buffers
In this step, as shown in figure 10, we create two buffers, namely the front buffer and the back buffer, for rendering. As direct rendering to the screen is a slow, we first render to one of the buffers, which is then transferred to the screen. To create these buffers, we have to first obtain the primary surface using the CreateSurface method. After creating the primary surface, we can get the back buffer from it, using the GetAttachedSurface method.
Step 5: Create Z-Buffer
memset(&ddsd, 0, sizeof(DDSURFACEDESC));

ddsd.dwSize = sizeof(DDSURFACEDESC);

ddsd.dwFlags = DDSD_WIDTH | DDSD_HEIGHT

	| DDSD_CAPS | DDSD_ZBUFFERBITDEPTH;

ddsd.dwWidth = SCREEN_WIDTH;

ddsd.dwHeight = SCREEN_HEIGHT;

ddsd.ddsCaps.dwCaps = DDSCAPS_ZBUFFER;

ddsd.dwZBufferBitDepth = BIT_DEPTH;

lpDD->CreateSurface(&ddsd, &lpDDSZ, NULL);


// attach to back buffer

globals.lpDDSBack->AddAttachedSurface(lpDDSZ);
Figure 11: Step 5: Creating the z-buffer
In this step, as shown in figure 11, we create a surface for the Z buffer. If Z buffer is supported by the hardware, this buffer will be used to compute the Z values. The Z buffer is created using the CreateSurface method. After creating the Z buffer, it is attached to the back buffer using the AddAttachedSurface method.
Step 6: Initialize Direct3D
LPDIRECT3D lpD3D;

LPGUID curDriver;

LPDIRECT3DDEVICE lpD3DDev;

D3DVIEWPORT viewData = { 0, 0, 0, WINDOW_WIDTH, WINDOW_HEIGHT,

	1, 1, 300, 300, 300 };


viewData.dwSize = sizeof(D3DVIEWPORT);

// get Direct3D interface

lpDD->QueryInterface(IID_IDirect3D, (void**)&lpD3D);

// get the current driver

lpD3D->EnumDevices(enumDeviceFunc, &globals.curDriver);

// create device

globals.lpDDSBack->QueryInterface(globals.DriverGUID[0],

	(void**)&lpD3DDev);

globals.dev = lpD3DDev;


// attach to back buffer

globals.lpDDSBack->AddAttachedSurface(lpDDSZ);
Figure 12: Step 6: Initialize Direct3D
In this step, as shown in figure 12, after creating and attaching the buffers, we setup the viewport parameters and inittialize Direct3D. In this step, we get the Direct3D interface using the QueryInterface method and enumerate the device using the EnumDevices function. The EnumDevices method is the same as the one discussed during the coverage of retained mode in [10].
Step 7: Create Viewport
lpD3D->CreateViewport(&globals.view, NULL);


globals.dev->AddViewport(globals.view);

globals.view->SetViewport(&viewData);
Figure 13: Step 7: Create Viewport
As shown in figure 13, after creating the Direct3D object, we create and initialize the viewport using the CreateViewport, AddViewport and SetViewport methods.
Step 8: Create Lights
LPDIRECT3DLIGHT lpD3DLight; D3DLIGHT dlLight;

lpD3D->CreateLight(&lpD3DLight, NULL);

memset(&dlLight, 0, sizeof(D3DLIGHT));

dlLight.dwSize = sizeof(D3DLIGHT);

dlLight.dltType = D3DLIGHT_DIRECTIONAL;

dlLight.dcvColor.r = dlLight.dcvColor.g = dlLight.dcvColor.b = D3DVAL(0.0);

dlLight.dvPosition.x = dlLight.dvPosition.y = D3DVAL(0.0);

dlLight.dvPosition.z = D3DVAL(-100.0);

dlLight.dvDirection.x = dlLight.dvDirection.y = D3DVAL(0.0);

dlLight.dvDirection.z = D3DVAL(1.0);

lpD3DLight->SetLight(&dlLight);

globals.view->AddLight(lpD3DLight);
Figure 14: Step 8: Create Lights
As shown in figure 14, after creating the viewport, we create the lights using the CreateLight method and add the lights to the viewport using the AddLight method.
Step 9: Create Execute Buffer
D3DEXECUTEBUFFERDESC debDesc; DWORD dwSize;

LPD3DINSTRUCTION lpIns; LPBYTE lpBuf, lpStart;

LPD3DVERTEX lpV; LPD3DTRIANGLE lpTri; LPD3DSTATE lpSt;


dwSize =  sizeof(D3DVERTEX) * 3; dwSize += sizeof(D3DINSTRUCTION) * 2;

dwSize += sizeof(D3DTRIANGLE);

memset(&debDesc, 0, sizeof(D3DEXECUTEBUFFERDESC));

debDesc.dwSize = sizeof(D3DEXECUTEBUFFERDESC);

debDesc.dwFlags = D3DDEB_BUFSIZE; debDesc.dwBufferSize = dwSize;

globals.dev->CreateExecuteBuffer(&debDesc, &lpD3DExBuf, NULL);

lpD3DExBuf->Lock(&debDesc);

lpBuf = (LPBYTE)debDesc.lpData;

memset(lpBuf, 0, dwSize);
Figure 15: Step 9: Create Execute Buffer
As shown in figure 15, after creating the lights, we create the execute buffer to hold the data to be rendered. The size of the buffer is calculated using the sizes of the data to be stored, which in this example, is three vertices, two instructions and one triangle information. An execute buffer is created using the CreateExecuteBuffer method. After creating the buffer, we lock it using the Lock method, till we finish adding data to it, at which point, we release the lock.
Step 10: Add Data
// set up all vertices

lpV = (LPD3DVERTEX)lpBuf;

//  Vertex 1

lpV[0].x = D3DVAL(0.0); lpV[0].y = D3DVAL(1.0); lpV[0].z = D3DVAL(0.0);

lpV[0].nx = D3DVAL(0.0); lpV[0].ny = D3DVAL(1.0); lpV[0].nz = D3DVAL(0.0);

lpV[0].tu = D3DVAL(0.0); lpV[0].tv = D3DVAL(0.0);

//  Vertex 2

lpV[1].x = D3DVAL(1.0); lpV[1].y = D3DVAL(1.0); lpV[1].z = D3DVAL(0.0);

lpV[1].nx = D3DVAL(1.0); lpV[1].ny = D3DVAL(1.0); lpV[1].nz = D3DVAL(0.0);

lpV[1].tu = D3DVAL(0.0); lpV[1].tv = D3DVAL(0.0);

//  Vertex 3

lpV[2].x = D3DVAL(1.0); lpV[2].y = D3DVAL(0.0); lpV[2].z = D3DVAL(0.0);

lpV[2].nx = D3DVAL(1.0); lpV[2].ny = D3DVAL(0.0); lpV[2].nz = D3DVAL(0.0);

lpV[2].tu = D3DVAL(0.0); lpV[2].tv = D3DVAL(0.0);
Figure 16: Step 10: Add Data
As shown in figure 16, after creating the execute buffer, we add data into the buffer in the proper order. To the buffer, we first add the three vertices that make up the triangle, then we add the D3DOP_TRIANGLE instruction, followed by the triangle information. In the triangle information, we set the flag to draw all three edges. After the triangle information, we add the D3DOP_EXIT instruction, to indicate end of the execute buffer, as shown in figure 17.
lpStart = lpBuf + (sizeof(D3DVERTEX) * 3);

lpIns = (LPD3DINSTRUCTION)lpStart;

lpIns->bOpcode = D3DOP_TRIANGLE;

lpIns->bSize = sizeof(D3DTRIANGLE);

lpIns->wCount = 1;


lpTri = (LPD3DTRIANGLE) &lpIns[1];

lpTri->v1 = 0; lpTri->v2 = 1; lpTri->v3 = 2;

lpTri->wFlags = D3DTRIFLAG_EDGEENABLETRIANGLE;


LPD3DINSTRUCTION lpExit;

lpExit = (LPD3DINSTRUCTION)&lpTri[1];

lpExit->bOpcode = D3DOP_EXIT;

lpExit->bSize = 0; lpExit->wCount = 0;

lpD3DExBuf->Unlock();
Figure 17
After filling the data into the execute buffer, we unlock it using the Unlock method. After unlocking the buffer, we set the other parameters of the execute buffer and make it ready for execution.
To render the buffer, we call BeginScene on the device, after which, we execute the buffer using the Execute method. After executing the buffer, we call EndScene on the device, as shown in figure 18.
memset(&d3dExData, 0, sizeof(D3DEXECUTEDATA));

d3dExData.dwSize = sizeof(D3DEXECUTEDATA);

d3dExData.dwInstructionOffset = (ULONG) 0;

d3dExData.dwInstructionLength = (ULONG)((char*)(&(lpExit[1]))-(char*)lpBuf);

lpD3DExBuf->SetExecuteData(&d3dExData);


// render by executing execute buffer

globals.dev->BeginScene();

globals.dev->Execute(lpD3DExBuf, globals.view, D3DEXECUTE_UNCLIPPED);

globals.dev->EndScene();
Figure 18
Step 11: Render Loop
D3DRECT rect = {0, 0, 400, 400};


// clear the viewport


globals.view->Clear(1, &rect, D3DCLEAR_TARGET | D3DCLEAR_ZBUFFER);


// render scene to viewport

globals.dev->BeginScene();

globals.dev->Execute(lpD3DExBuf, globals.view, D3DEXECUTE_UNCLIPPED);

globals.dev->EndScene();


lpD3DExBuf->GetExecuteData(&d3dExData);


// flip image onto front buffer

globals.lpDDSFront->Flip(globals.lpDDSBack, DDFLIP_WAIT);
Figure 19: Step 11: Render Loop
As shown in figure 19, after adding the data to the execute buffer and executing it once, we display the window using the ShowWindow function and go into an infinite loop, waiting for events. If there are any events, they are processed by the event handler. If there are no events, the application can do idle processing. Usually, in this state, the application renders the next frame. In our application, we keep rendering the same frame, by executing the same execute buffer over and over.
[size="5"]Immediate Mode Objects
As compared to the object in the retained mode, the number of objects provided by the immediate mode, are not many. A large number of object provided by the retained mode are convenience objects, which help in the management of the 3D data at hand. In the immediate mode, all the functionality provided by the retained mode object has to be provided by the application, using the execute buffers. The objects provided by immediate mode are sufficient to manage 3D data, but some additional amount of work will have to be done by the application.
Some of the objects provided by immediate mode are described in the following subsections.
IDirect3DDevice
Used to interface to a DirectDrawSurface object. A device object, has its own list of execute buffers, viewports, textures and materials. As we have mentioned before, only textures and materials can be shared across devices. An execute buffer is owned by only one viewport and a viewport is owned by only one device at a time.
This object provides methods to report the hardware capabilities of the system. It also provides methods to manage the textures and execute buffers, like maintaining the list of texture, manipulating the matrix objects and executing the execute buffers.
IDirect3DTexture
Used to interface to the DirectDrawSurface object. This object is used to provide a texture handle, which is used in materials and the execute and z buffer for a viewport. This object is also used to load an unload textures and handle changes in palettes.
The different aspects that can be changed using this object are:
Texture Wrapping - used to decide the type of texture wrapping used, namely flat, cylindrical, spherical, or chrome. This is done using the D3DRENDERSTATE_WRAPU and D3DRENDERSTATE_WRAPV render states
Texture Filtering - used to decide the type of filtering applied to the texture. This is done by using the D3DRENDERSTATE_TEXTUREMAG and D3DRENDERSTATE_MIN render states
Texture Blending - used to decide how the colours of the texture and the surface are combined. This is done using the D3DRENDERSTATE_TEXTUREMAPBLEND render state
Transparency and Translucency - used to decide the transparent or translucent appearance of the texture. This is done using the D3DRENDERSTATE_BLENDENABLE render state
IDirect3DMaterial
Used to control the material properties of an object. It contains the colour and possibly a texture handle. The material handle can be used inside the execute buffers or can be used to set the background of a viewport.
IDirect3DLight
Used to create and manipulate light sources and their properties.
IDirect3DViewport
Used to represent the region on which the scene is rendered.
IDirect3DExecuteBuffer
Used to store the execute buffer information, namely the data and the instructions for the execute buffer. The execute buffer is filled with two arrays, one being the vertex list and the other being the opcodes and their data elements. The opcode array follows the vertex array.
Sample Images
In this section, we present some sample screens, of a few immediate mode applications, in figure 20.
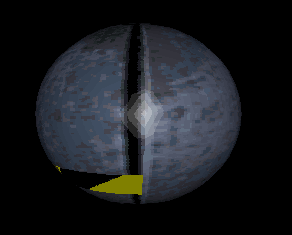
Figure 20: Sample Image
[size="5"]DrawPrimitive
Motivation
As we have seen in the sample application, managing data in immediate mode is not an easy task. Keeping track of the data using offsets into an array is very difficult. Additionally, changes occuring in the data storage can be very disastrous on the code which accesses this data.
To ease the situation, the concept of DrawPrimitive was introduced in Direct3D, in ver 5.0 of DirectX. An interesting point about ver 5.0 is that it is MMX enabled.
Goals
The goals of DrawPrimitive are:
- Ease of use
- DirectX compatibility
- Scaleable performance
DrawPrimitive is still for immediate mode programming. The features it provides are very similar to those provided by execute buffers. DrawPrimitive provides a cleaner syntax than that provided by execute buffers.
The DrawPrimitive concept does not provide wrappers for execute buffers. DrawPrimitve completely sidesteps execute buffers, without sacrificing performance. DrawPrimitive provides its own path to the rendering facilities of the hardware, different that the path provided by execute buffers. It still provides direct access to the 3D accelerate hardware and provides emunaltion if the hardware does not support a certain feature.
Drawing Primitives
DrawPrimitive provides support for drawing primitves, like points, lines and triangles. The application can also pass its own data structures to DrawPrimitive.
Data using DrawPrimitve is rendered on a DirectDrawSurface object, using the DrawPrimitve or DrawIndexedPrimitive functions. The data to be rendered can be drawing primitives directly or an array of vertices with the rendering information.
DrawPrimitive Sample
After giving an introduction to DrawPrimitive, let us consider a small piece of code, to illustrate the concept and its ease of use over the execute buffers. The sample source is shown in figure 21.
// Render a triangle

D3DTLVERTEX v[3];


v[0] = D3DTLVERTEX(D3DVECTOR(160, 50,0), 1,

	D3DRGB(1,0,0), D3DRGB(0,0,0), 0, 0);

v[1] = D3DTLVERTEX(D3DVECTOR(240,200,0), 1,

	D3DRGB(0,1,0), D3DRGB(0,0,0), 0, 0);

v[2] = D3DTLVERTEX(D3DVECTOR( 80,200,0), 1,

	D3DRGB(0,0,1), D3DRGB(0,0,0), 0, 0);


m_pDevice->DrawPrimitive(D3DPT_TRIANGLELIST,

	D3DVT_TLVERTEX, (LPVOID)v, 3, NULL);
Figure 21: DrawPrimitive Sample
For the DrawPrimitve Specification and White Paper, refer [4] and [5]. For a tutorial, refer [6].
For details about 3D graphics, the rendering pipeline and various algorithms, refer [7], [16], [17], [14], [15] and [8].
[size="5"]Comparing Modes
After covering the immediate mode in some detail, let us compare its feature with the feature provide by the retained mode.
We make a comparison using the following points:
Level - Retained mode is a higher-level interface for 3D programming and provides many objects for managing the 3D data. Immediate mode is lower-level interface and does not provide a large number of objects.
Scene Concept - Retained mode has the concept of a scene, which is a hierarchy of frames, with each frame containing frames, objects or lights. Retained mode also provides objects to support this concept. In immediate mode, a scene is just a set of vertices and the corresponding operations. There is no well defined organization as in the retained mode, for the objects and the lights.
Relationship - In retained mode, the relationships between the frames, objects and lights is very clear and explicit. In immediate mode, there is no apparent relationship between the scene objects, faces and vertices.
Object Access - Retained mode supports object identification and manipulation after the object has been rendered, which is not possible in immediate mode.
Ease of Use - Retained mode is much easier to program in, than immediate mode.
Geometry Engine - Retained mode provides a built-in geometry engine, which is abscent in the immediate mode. Due to this, the application can use custom algorithms, which are not possible in retained mode. A requirement for coding these algorithms is sound knowledge of 3D graphics concepts.
Addition - Adding 3D capabilities to a Windows application is much easier using retained mode, than using immediate mode.
Performance - Performance of immediate mode applications can be better that retained mode applications.
Notes on Programming
To create immediate mode applications, knowledge of either Windows SDK or MFC is necessary. For more details on programming using SDK, refer [12]. Refer [13] for details on programming using MFC.
[size="5"]Summary
To summarise, we can say that immediate mode is a lower-level interface to providing 3D capabilities in an application. Even though it is a low-level interface, its support is well defined. An advantage of using the immediate mode is that even though it does not provide a built-in geometry engine, we can use custom algorithms, to make the application perform better. The only possible limitation of writing a custom application is that the application may have a performance hit in case the engine is not written properly and efficiently.
After covering the different features of the immediate mode, followed by a sample application, we covered some of the objects provided by the immediate mode, which can be used by an application.
[size="3"]References
1 Mehmat Adalier. Direct3D Immediate Mode Part I. Intel, Developers Relations Group, July 1997. XDC, July 97, Session 124.
2 Microsoft Corporation. DirectX SDK (ver 3.0, 5.0) Reference. Microsoft Corporation, 1996-97.
3 Microsoft Corporation. Direct3D Reference Manual. Microsoft Corporation, 1997. Visual Studio Help.
4 Microsoft Corporation. Direct3D Specification : DrawPrimitive API Extensions, ver 0.7. Microsoft Corporation Web Page (www.microsoft.com/directx), 1 Feb 1997.
5 DrawPrimitive White Paper. DirectX Developer Pages (www.geocities.com/SiliconValley/Way/8390/draprim.html), 1997.
6 Mark Feldman. DirectX 5.0 DrawPrimitive Tutorial. DirectX Developer Pages (www.geocities.com/SiliconValley/Way/8390/drawprim.html), 1997.
7 Foley and Van Damm. Introduction to Computer Graphics. Addison Wesley, 1994.
8 Donald Hearn and Pauline Baker. Computer Graphics. Prentice Hall of India, 2nd edition, 1994.
9 Hillarie Klempner. Direct3D Immediate Mode Part II. Intel, Developers Relations Group, July 1997. XDC, July 97, Session 224.
10 Bipin Patwardhan. Direct3D Retained Mode. National Centre for Software Technology, Mumbai, India, Aug-Sep 1997. Intel Developers Conference, Aug-Sep 97.
11 Bipin Patwardhan. Overview of Direct3D. National Centre for Software Technology, Mumbai, India, Aug-Sep 1997. Intel Developers Conference, Aug-Sep 97.
12 Charles Petzold. Windows 95 Programming. Microsoft Press, 1st edition, 1996.
13 Jeff Prosise. Windows 95 Programming Using MFC. Microsoft Press, 1st edition, 1997.
14 David Rogers. Procedural Elements for Computer Graphics. McGraw-Hill Book Company, 1st edition, 1985.
15 David Rogers. Mathematical Elements for Computer Graphics. McGraw-Hill Book Company, 2nd edition, 1990.
16 Alan Watt. Fundamentals of Three Dimensional Computer Graphics. Addison Wesley, 1989.
17 Alan Watt. 3D Computer Graphics. Addison Wesley, 2nd edition, 1993.
[hr]
Bipin Patwardhan
Fri Jan 2 14:54:08 GMT 1998


