Overview
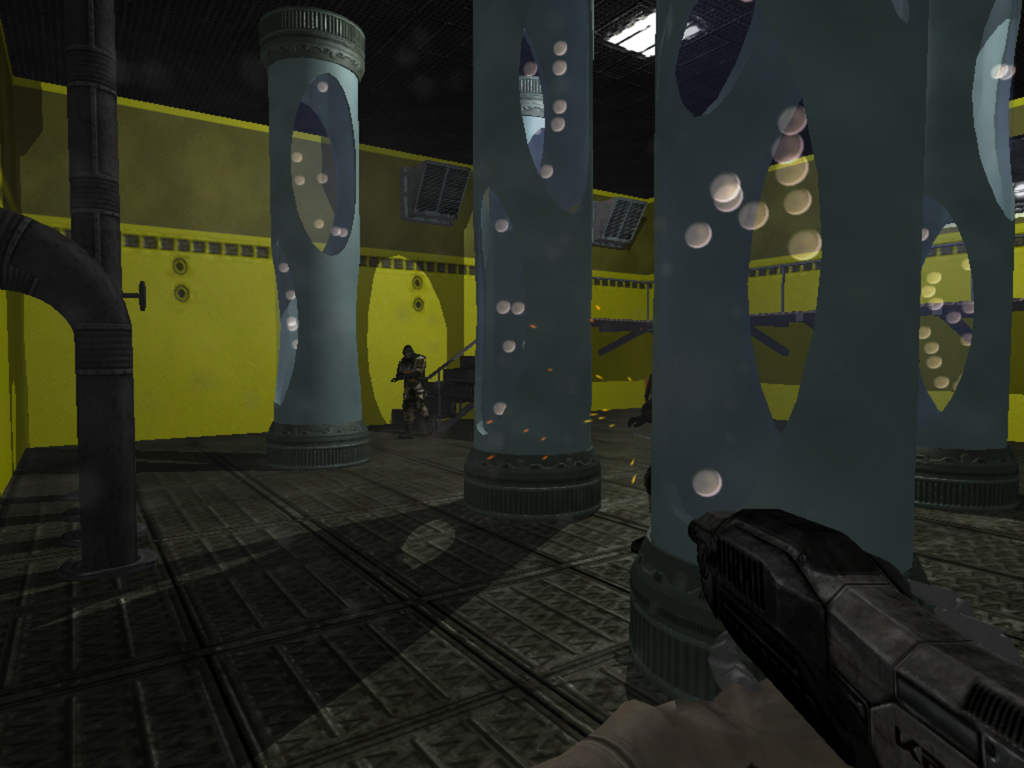
As many of you know lighting a wide environment on a mobile game can be quite a challenge. Static appraches, like lightmaps, require far too much memory and dynamic tecniques too much cpu and gpu power. I will try to describe how I approached the problem In my game kepler 22 (http://www.nuoxygen.com/public/kepler22-fps.html) Kepler22 is an open world game with indoor / outdoor environment and poses some unique challenges that are seldom faced in mobile game development:- A wide environment (16 square km), impossible to light-map with a reasonable resolution.
- Day/Night cycles requiring dynamic lighting/shadows.
- Shadows varying from ultra-big objects, like buildings, to very small ones, like a gun barrel.
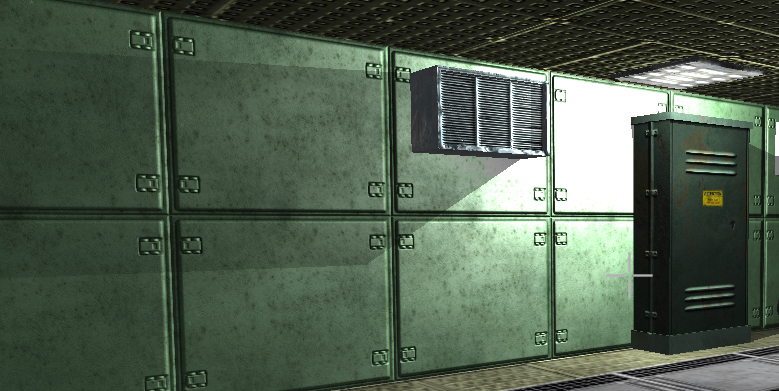
- In-door omnidirectional lights. (You can see up to 7 in the same scene)
- A first person shooter camera that can get very near to every object and potentially reveal the pixel grain of shadow maps.
 All of this is usually solved in any high end pc game with a cascade of high resolution shadow maps for the outdoor and shadow-cube-maps for the indoor lights, all seasoned by PCF or some other method to smooth the pixels.
Unfortunately, in this case, I had further constrains dictated by the platform.
All of this is usually solved in any high end pc game with a cascade of high resolution shadow maps for the outdoor and shadow-cube-maps for the indoor lights, all seasoned by PCF or some other method to smooth the pixels.
Unfortunately, in this case, I had further constrains dictated by the platform.
The Constrains
- avoid multiple render targets
- saving shaders cycles
- drawing all the solid geometry first and try to avoid blend modes (i.e. avoid multipass tecniques).
- draw all the opaque stuff first. Here you can use even a quite complex shaders (read: you can use per pixel lighting)
- then draw all the alpha tested stuff (part of the shader runs to determine the test result).
- draw your alpha blended geometry last. As you start doing that, all the shaders are evaluated once per pixel and following that the gpu operates in a standard way, i.e. after this point then you start trading pixel shader clocks for the depth complexity. (this suggests to keep simple shaders on the particles and translucents !)
- avoid as much as possible render target switches (expensive !!)
I decided to go with shadow volumes
because:- unlike light maps they can get the same quality on static and dynamic objects and pose no additional memory requirements (at least not in direct connection with the world size).
- Unlike shadow maps they handle nicely near and far away objects at any possible size scale.
- Omnidirectional and directional lights cost the same (shadow maps would require cube maps and multiple depth targets)
- Ignore light coming from other rooms: in this implementation light doesn't propagate through the door to the neighboring rooms.
- Just one per-pixel shadow-casting light per room. (The strongest one). Other lights evaluated per vertex.
- Draw scene ambient light (this also initializes the depth buffer)
- Enable alpha blend (additive mode)
- For every light in the scene
- clear the stencil
- compute and draw the shadow volumes of the light
- render the lighting contribution from the light (using stencil test to leave shadowed parts dark)
- Render translucent surfaces enabling the appropriate alpha blending mode.
- Apply post processing stuff
- draw all the opaque geometry. For every object use the appropriate lights set. In a single pass the shader takes care of ambient lighting, direct lighting and fog.
- draw all the shadow volumes. Every object casts ONE shadow from the light which is lighting it. Shadow volumes of walls are not drawn - they would need by far too much filling rate.
- Draw a translucent mask to darken the parts of the screen where the shadows are marked in the stencil.
- draw alpha tested/blended stuff sorted far to near using a cheap shader.
- post process.
New Challenges
Preventing shadow volumes from a first light from leaking in the nearby rooms and interfering with the other lights' shadow volumes.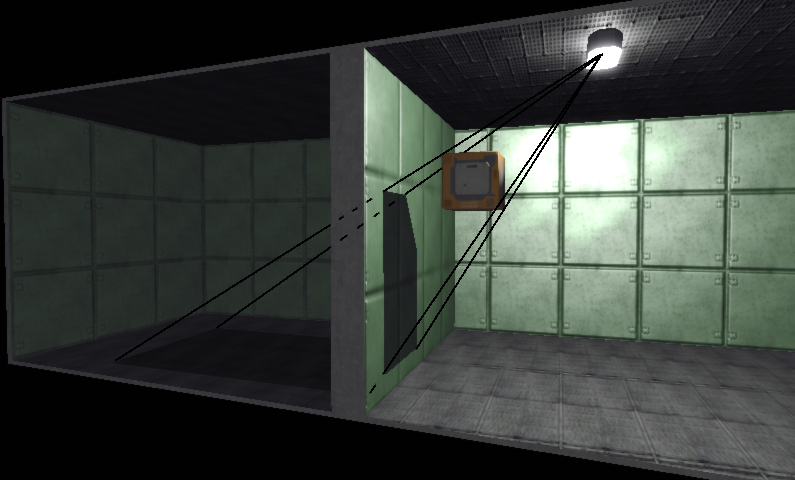 The cause of this artifact is that we don't compute a stencil mask for every single light but we use a single stencil mask for marking all the shadows from all the lights at once. The problem could be theoretically solved clipping the shadow volumes in the room volume but this would be pretty expensive, especially for shader computed shadow volumes.
Adding the shadows of the walls would be even worst: all the world would be shadowed because, while the traditional algorithm lights an object with the sum of all the not-occluded lights, the simplified one shadows the pixel if at least one shadow (from any light) drops on the pixel.
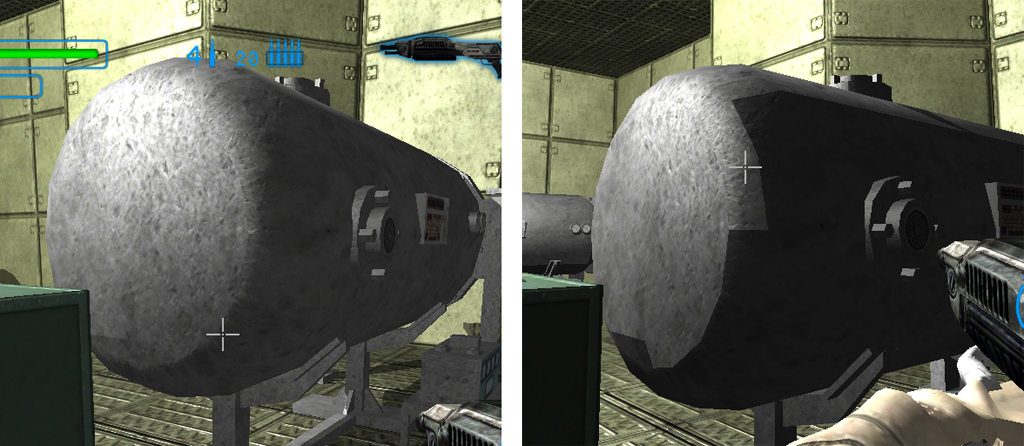
Another challenge: Modulating the shadows so that they are more faint if the receiver is far from the light (it receives less direct and more ambient light). When the receiver is so distant from the light that the direct contribution into the shader is null and only the ambient light is left, the object should cast no shadow at all.
The cause of this artifact is that we don't compute a stencil mask for every single light but we use a single stencil mask for marking all the shadows from all the lights at once. The problem could be theoretically solved clipping the shadow volumes in the room volume but this would be pretty expensive, especially for shader computed shadow volumes.
Adding the shadows of the walls would be even worst: all the world would be shadowed because, while the traditional algorithm lights an object with the sum of all the not-occluded lights, the simplified one shadows the pixel if at least one shadow (from any light) drops on the pixel.
Another challenge: Modulating the shadows so that they are more faint if the receiver is far from the light (it receives less direct and more ambient light). When the receiver is so distant from the light that the direct contribution into the shader is null and only the ambient light is left, the object should cast no shadow at all.
 In the presence of fog, modulating the shadows so that they are more faint if the receiver is far from the observer and when an object fades out in the fog its shadows fades out with him.
 Preventing the shadows from highlighting the objects' smoothed edges with self-shadowing.
 Handle objects across the rooms (especially the doors themselves).
I figured out these solutions
The Light ID Map
- Is a screen space map.
- Tells which light is affecting the pixel.
- Solves: shadow volumes interfering with other rooms' shadow volumes
- Stored into 3 of the 8 bits of the stencil buffer.
- Extremely cheap: Drawn simultaneously with solid geometry, don't requires extra vertex or pixel shader executions.
The shadow Intensity Map
- Is a screen space map
- Tells how much a pixel is affected by the shadow. (0 = fully affected, 255 = unaffected)
- Solves: modulating the shadow, preventing the shadow from revealing the casters' edges.
- Stored into the alpha channel of the color buffer.
- Extremely cheap: Drawn simultaneously with solid geometry, don't requires extra vertex or pixel shader executions.
How the Light ID Map is implemented
Step1 - To be done During the first pass (solid geometry drawing) Before drawing an object. The CPU must configure the light ID of the light which is lighting the object to be drawn. Remember: every object is lit only by a single per-pixel shadow-casting light so there is a 1 by 1 relation between objects and (per pixel) lights. The following code forces the GPU to mark the upper stencil bits of the pixels of the object with the light-id.
  void GLESAdapter::WriteLightId(int light_id)
  {
      glEnable(GL_STENCIL_TEST);

      // always passes, refrence has 3 msbits bits set as the light id, 5 lsbits set at a midway value
      // (note you can't allow the counter to wrap else it would corrupt the ID.
      // so _stecil_offset must be half the counter range).
      glStencilFunc(GL_ALWAYS, (light_id << lightid_shift) + stencil_offset, 0xff);

      // affects the stencil if and only if the color buffer is affected (both stencil and zeta tests pass)
      glStencilOp(GL_KEEP, GL_KEEP, GL_REPLACE);
  }
If you reserve 3 bits for the light ID, lightid_shift must the 5 and stencil_offset must be 0x10 (middle of the range of the 5 bits shadow counter).
With 3 bits there are only 8 possible id values and one is reserved for 'not directly lit' so id values are assigned to lights as needed and on a per frame basis. This means that in a single scene you can't have more than 7 lights but you can have as many as you want in the level.
Step2 - To be done before an object shadow volume is drawn.
Again the CPU must tell the GPU the light id. This time this is done for the purpose of preventing the gpu from writing those fragments which don't belong to the selected light.
  void GLESAdapter::FilterLightId(int light_id)
  {
      glEnable(GL_STENCIL_TEST);

      // lightid_mask keeps only the 3 msbits so the func just tests that the pixel actually match the
      // light_id. - if the id doesn't match the stencil test fails.
      glStencilFunc(GL_EQUAL, light_id << lightid_shift, lightid_mask);
  }
   // NOTE: stencil Op set by drawing functions (depends on z-pass/z-fail method)
   // IN ANY CASE: if the stencil func fails must not alter the stencil value.
    if (zfail_mode) {
        glStencilOpSeparate(GL_FRONT, GL_KEEP, GL_DECR, GL_KEEP);
        glStencilOpSeparate(GL_BACK,  GL_KEEP, GL_INCR, GL_KEEP);
    } else {
        glStencilOpSeparate(GL_FRONT, GL_KEEP, GL_KEEP, GL_INCR);
        glStencilOpSeparate(GL_BACK,  GL_KEEP, GL_KEEP, GL_DECR);
    }
This actually culls away the shadow volume on the objects whose ID doesn't match the light from which the shadow volume is cast.
Note that this is a quite intensive use of the stencil buffer. It is read, partially compared to the ref value, if all is right, based on z test and winding incremented or decremented and finally written back.
How the Shadow Intensity Map is implemented.
While drawing solid geometry the shader computes the alpha value taking into account:- The light distance. If the pixel is further from the direct light, the ambient contribution rises and the shadow faints.
- The distance from the viewer. To attenuate the shadow effect with the fog.
- The angle between the lit surface and the light direction. So that surfaces about 90 degrees from the light direction, which are supposed to not receive direct light, don't receive shadows. This actually prevents the self-shadowing artefacts.
    glEnable(GL_STENCIL_TEST);

    // write the shadow where the stencil counter is different than the reference
    // (you would test different from 0 in a traditional environment)
    // note that you also must mask out the light_id so it doesn?t interfer
    glStencilFunc(GL_NOTEQUAL, stencil_ref, ~lightid_mask);

    // you dont want to alter the stencil now
    glStencilOp(GL_KEEP, GL_KEEP, GL_KEEP);

    // ignore the source color, blend the destination color with the destination alpha
    glEnable(GL_BLEND);
    glBlendFunc(GL_ZERO, GL_DST_ALPHA);

    // draw full screen quad
    draw_quad(...)
Crossing the doors.
When crossing a door the light from the new room switches to pixel-level quality and the light from the previous room (which still lights the model) switches to per-vertex mode. The process is abrupt but hardly noticeable because all the objects that cross a door are soldiers (tipically engaged in combat, and running) or thrown objects and both move quite fast. Beside direct lighting the game uses a per-room ambient light level which is computed by the cpu and propagates from room to room based on the state of the doors ([partially]open/close) and the volume of the rooms. This makes possible for a completely unlit room to be fully dark when the door is closed but be dimly lit if the door opens. The ambient light of two neighboring rooms is interpolated for the purpose of lighting bodies that cross doors. This is done taking into account the bodies position with respect to the door. Doors don't' receive direct light (there would be two when the door is open) but compute ambient light per vertex to have a different light level on the two sides.Shadow volumes extraction
Here are some of the trickiest parts - skinned characters. I have a good vertex shader that I use in DX9 to automatically extract shadow volumes from skinned characters but unfortunately it requires 9 vertex attributes and really a lot of operations so I had to extract the shadow volumes with the cpu. This is one of the slowest operations in the render process because it is cpu intensive and uses dynamic geometry - which is slow. - capping the building holes. To draw the shadows of the building is even worst. Not wanting to take into account the intricacies of the internal geometry, the building shadow volumes are built just from the external surfaces of the building. This surface is extracted automatically by the software and then automatically capped to make it a closed mesh. (to avoid holes where windows and doors are positioned). The cap is conditionally created and extruded based on the cap facing with respect to the light and the camera (quite complex here - So much I wouldn't be able to explain it better myself without reading the code). Other shadow volumes are easier and are automatically extracted by the vertex shader using classic algorithms.Other effects in Kepler22
Exposition control (faking the eye adaptation process). The target Exposition level is set by the cpu based on the time of day and based on the portion of screen which is filled with indoor or outdoor scene. This is a forward computation (uses the open portal of the nearest door) which doesn't use any information from the actually rendered scene, saving expensive render buffer reads. The target exposition is then low-passed to simulate a slow adaptation of the eye. Visibility culling indoor is based on classic bsp/portals/sectors algorithms. bsp nodes belonging to a same room are coalesced into a sector and their portals ignored. The bsp is accordingly pruned. Visibility culling outdoor is distance based (the objects are arranged into a regular grid so that only the ones near enough are tested for distance) and artifacts are hidden by the fog (which is applied in the same single pass with light ids, shadow intensity, color). And ok, I could go on forever, because there are many more details, so let's stop here.Conclusion
Hope I have given a clear enough overview of the lighting system of Kepler22. In special way I hope you got enough detail of the Light ID maps and Shadow Intensity maps to be able, if you need, to use them in your projects.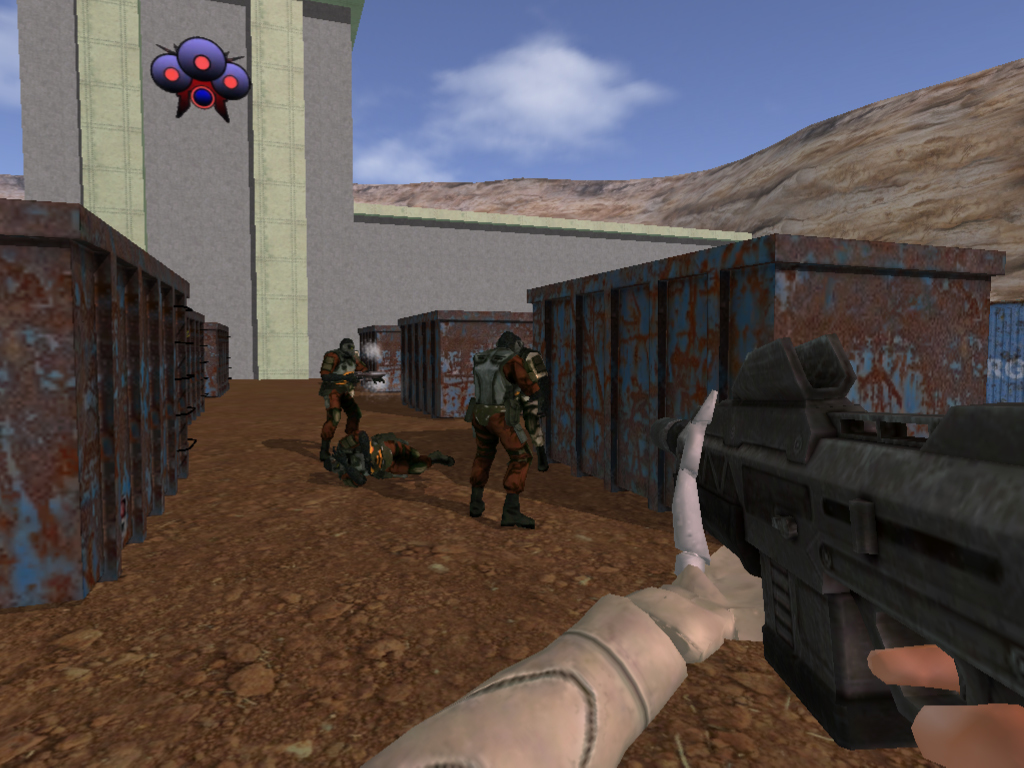
Article Update Log
22 September 2016: Initial release


Very interesting read. Thank you for sharing your solution to this issue.