Presented by Amazon GameLift.
It was the explosion of 3D games in the early 2000s that first made the concept of middleware a staple of game development. As gamers demanded more physically robust worlds to explore, developers looked for ways to streamline the development of those worlds, turning to ready-made solutions for rendering visuals and integrating physics so that the creative team could concentrate on the aspects that would make their title unique, rather than slogging away on the stuff under the hood that would ultimately be the same.
We’re now in the midst of another seismic shift in terms of how people play, only this time the terrain to be conquered is online. Players expect multiplayer options, but implementing those with a small indie team can be an enormous challenge. There’s not just the core functionality of connecting players together to consider, but a whole raft of connectivity and scalability problems that can quickly devour valuable development resources.
That’s where Amazon’s GameLift Realtime Servers come in. It’s a solution designed specifically for smaller studios and mobile developers who need to add multiplayer features without investing in expensive first party online infrastructure. Best of all, it’s incredibly simple to implement. At its most basic level, GameLift requires only some simple JavaScript callbacks for the functions you require and a C# SDK to integrate into your game client. Provided you’re developing the client in a C# environment, you can use GameLift to add multiplayer.
Setup Your GameLift Fleet
The first step is to set up the “fleet” of virtual servers on GameLift that you’ll be using. A fleet is a collection of Amazon EC2 virtual machines that will run your game servers. You'll have several options for server fleets, depending on how much traffic you're anticipating, but a simple on-demand configuration will work for any game.
You then upload your game server's JavaScript files to GameLift as a zip and tell it which script to run first when starting a new server. Here is a very simple example from this article's complementary blog post:
// Example Realtime Server Script
'use strict';

// Example override configuration
const configuration = {
    pingIntervalTime: 30000
};

// Timing mechanism used to trigger end of game session. Defines how long, in milliseconds, between each tick in the example tick loop
const tickTime = 1000;

// Defines how to long to wait in Seconds before beginning early termination check in the example tick loop
const minimumElapsedTime = 120;

var session;                        // The Realtime server session object
var logger;                         // Log at appropriate level via .info(), .warn(), .error(), .debug()
var startTime;                      // Records the time the process started
var activePlayers = 0;              // Records the number of connected players
var onProcessStartedCalled = false; // Record if onProcessStarted has been called

// Example custom op codes for user-defined messages
// Any positive op code number can be defined here. These should match your client code.
const OP_CODE_CUSTOM_OP1 = 111;
const OP_CODE_CUSTOM_OP1_REPLY = 112;
const OP_CODE_PLAYER_ACCEPTED = 113;
const OP_CODE_DISCONNECT_NOTIFICATION = 114;

// Example groups for user defined groups
// Any positive group number can be defined here. These should match your client code.
const RED_TEAM_GROUP = 1;
const BLUE_TEAM_GROUP = 2;

// Called when game server is initialized, passed server's object of current session
function init(rtSession) {
    session = rtSession;
    logger = session.getLogger();
}

// On Process Started is called when the process has begun and we need to perform any
// bootstrapping.  This is where the developer should insert any code to prepare
// the process to be able to host a game session, for example load some settings or set state
//
// Return true if the process has been appropriately prepared and it is okay to invoke the
// GameLift ProcessReady() call.
function onProcessStarted(args) {
    onProcessStartedCalled = true;
    logger.info("Starting process with args: " + args);
    logger.info("Ready to host games...");

    return true;
}

// Called when a new game session is started on the process
function onStartGameSession(gameSession) {
    // Complete any game session set-up

    // Set up an example tick loop to perform server initiated actions
    startTime = getTimeInS();
    tickLoop();
}

// Handle process termination if the process is being terminated by GameLift
// You do not need to call ProcessEnding here
function onProcessTerminate() {
    // Perform any clean up
}

// Return true if the process is healthy
function onHealthCheck() {
    return true;
}

// On Player Connect is called when a player has passed initial validation
// Return true if player should connect, false to reject
function onPlayerConnect(connectMsg) {
    // Perform any validation needed for connectMsg.payload, connectMsg.peerId
    return true;
}

// Called when a Player is accepted into the game
function onPlayerAccepted(player) {
    // This player was accepted -- let's send them a message
    const msg = session.newTextGameMessage(OP_CODE_PLAYER_ACCEPTED, player.peerId,
                                             "Peer " + player.peerId + " accepted");
    session.sendReliableMessage(msg, player.peerId);
    activePlayers++;
}

// On Player Disconnect is called when a player has left or been forcibly terminated
// Is only called for players that actually connected to the server and not those rejected by validation
// This is called before the player is removed from the player list
function onPlayerDisconnect(peerId) {
    // send a message to each remaining player letting them know about the disconnect
    const outMessage = session.newTextGameMessage(OP_CODE_DISCONNECT_NOTIFICATION,
                                                session.getServerId(),
                                                "Peer " + peerId + " disconnected");
    session.getPlayers().forEach((player, playerId) => {
        if (playerId != peerId) {
            session.sendReliableMessage(outMessage, peerId);
        }
    });
    activePlayers--;
}

// Handle a message to the server
function onMessage(gameMessage) {
    switch (gameMessage.opCode) {
      case OP_CODE_CUSTOM_OP1: {
        // do operation 1 with gameMessage.payload for example sendToGroup
        const outMessage = session.newTextGameMessage(OP_CODE_CUSTOM_OP1_REPLY, session.getServerId(), gameMessage.payload);
        session.sendGroupMessage(outMessage, RED_TEAM_GROUP);
        break;
      }
    }
}

// Return true if the send should be allowed
function onSendToPlayer(gameMessage) {
    // This example rejects any payloads containing "Reject"
    return (!gameMessage.getPayloadAsText().includes("Reject"));
}

// Return true if the send to group should be allowed
// Use gameMessage.getPayloadAsText() to get the message contents
function onSendToGroup(gameMessage) {
    return true;
}

// Return true if the player is allowed to join the group
function onPlayerJoinGroup(groupId, peerId) {
    return true;
}

// Return true if the player is allowed to leave the group
function onPlayerLeaveGroup(groupId, peerId) {
    return true;
}

// A simple tick loop example
// Checks to see if a minimum amount of time has passed before seeing if the game has ended
async function tickLoop() {
    const elapsedTime = getTimeInS() - startTime;
    logger.info("Tick... " + elapsedTime + " activePlayers: " + activePlayers);

    // In Tick loop - see if all players have left early after a minimum period of time has passed
    // Call processEnding() to terminate the process and quit
    if ( (activePlayers == 0) && (elapsedTime > minimumElapsedTime)) {
        logger.info("All players disconnected. Ending game");
        const outcome = await session.processEnding();
        logger.info("Completed process ending with: " + outcome);
        process.exit(0);
    }
    else {
        setTimeout(tickLoop, tickTime);
    }
}

// Calculates the current time in seconds
function getTimeInS() {
    return Math.round(new Date().getTime()/1000);
}

exports.ssExports = {
    configuration: configuration,
    init: init,
    onProcessStarted: onProcessStarted,
    onMessage: onMessage,
    onPlayerConnect: onPlayerConnect,
    onPlayerAccepted: onPlayerAccepted,
    onPlayerDisconnect: onPlayerDisconnect,
    onSendToPlayer: onSendToPlayer,
    onSendToGroup: onSendToGroup,
    onPlayerJoinGroup: onPlayerJoinGroup,
    onPlayerLeaveGroup: onPlayerLeaveGroup,
    onStartGameSession: onStartGameSession,
    onProcessTerminate: onProcessTerminate,
    onHealthCheck: onHealthCheck
};
As you can see, the key implementation detail for the GameLift server is implementation of server-side events to manage the game session and player state. GameLift provides objects and methods to manage sessions, but otherwise you can use standard JavaScript.
Connect Your Game to GameLift
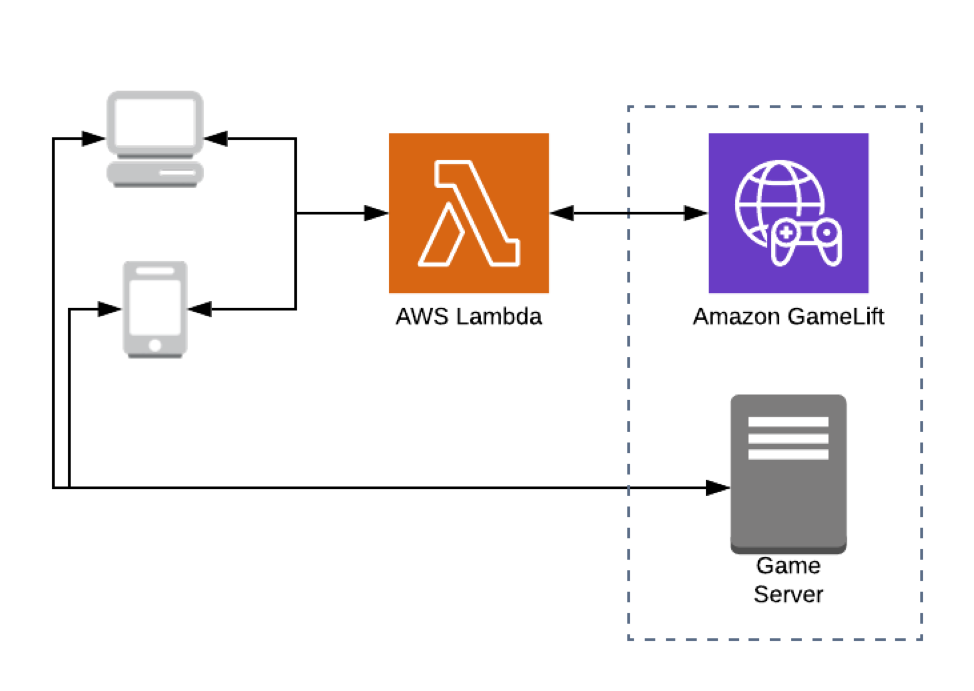
Now you lay the groundwork that will allow your game to talk to the GameLift servers. The AWS Lambda service and Amazon Cognito provide the vital security layer here. We'll use AWS Lambda to run code without provisioning servers, and Amazon Cognito to handle authentication between your game and the GameLift servers.
Using Cognito to communicate with Lambda also means you can easily add additional services between your game client and GameLift. For instance, you can add matchmaking, or update the algorithm that connects players - without forcing a client update every time.
The AWS Lambda service can be created through the Lambda Console. Once the service is created and assigned the appropriate GameLift service permissions, you can add your Lambda code. Here is an example of a Lambda function to manage a player connecting to game sessions:
const uuid = require('uuid');
const AWS = require('aws-sdk');
const GameLift = new AWS.GameLift({region: 'ap-south-1'});

const MegaFrogRaceFleetID = "fleet-00aaaa00-a000-00a0-00a0-aa00a000aa0a";

exports.handler = async (event) => {
    let response;
    let gameSessions;

    // find any sessions that have available players
    await GameLift.searchGameSessions({
        FleetId: MegaFrogRaceFleetID,
        FilterExpression: "hasAvailablePlayerSessions=true"
    }).promise().then(data => {
        gameSessions = data.GameSessions;
    }).catch(err => {
        response = err;
    });

    // if the response object has any value at any point before the end of
    // the function that indicates a failure condition so return the response
    if(response != null)
    {
        return response;
    }

    // if there are no sessions, then we need to create a game session
    let selectedGameSession;
    if(gameSessions.length == 0)
    {
        console.log("No game session detected, creating a new one");
        await GameLift.createGameSession({
            MaximumPlayerSessionCount: 2,   // only two players allowed per game
            FleetId: MegaFrogRaceFleetID
        }).promise().then(data => {
            selectedGameSession = data.GameSession;
        }).catch(err => {
           response = err;
        });

        if(response != null)
        {
            return response;
        }
    }
    else
    {
        // we grab the first session we find and join it
        selectedGameSession = gameSessions[0];
        console.log("Game session exists, will join session ", selectedGameSession.GameSessionId);
    }

    // there isn't a logical way selectedGameSession could be null at this point
    // but it's worth checking for in case other logic is added
    if(selectedGameSession != null)
    {
        // now we have a game session one way or the other, create a session for this player
        await GameLift.createPlayerSession({
            GameSessionId : selectedGameSession.GameSessionId ,
            PlayerId: uuid.v4()
        }).promise().then(data => {
            console.log("Created player session ID: ", data.PlayerSession.PlayerSessionId);
            response = data.PlayerSession;
        }).catch(err => {
           response = err;
        });

    }
    else
    {
        response = {
          statusCode: 500,
          body: JSON.stringify({
              message: "Unable to find game session, check GameLift API status"
          })
        };
    }

    return response;
};
With this intermediate client service in place, now you just need to integrate the GameLift Realtime Client SDK for C# into your game client. Change a few configuration details in your JavaScript to match the client service and your game is now multiplayer enabled.

The system is scalable so that a basic multiplayer system which connects players at random can, in theory, be implemented in less than a day. For games that require more options, such as allowing players to choose who they play with and other lobby functions, can easily be bolted on with the minimum of coding. All the while, GameLift handles the heavy lifting behind the scenes, enabling you to get back to making your game as awesome as possible.
If you’re interested in using Amazon GameLift in your project, check out the detailed blog post here that walks you through the process for setting up basic multiplayer functions in greater detail.