
With the introduction of 3D capabilities starting in CS3, concept artists had the potential to introduce 3D models into their concept scene. It was best at that stage of development to texture the 3D model in its native program and allow Photoshop to simply read what was already created. Then CS4 came along which made some great improvements in how well it handled 3D geometry. Its ability to use its painting tools directly on the 3D object was a feature that artists greatly appreciated, but even then there were limitations.
Now we are going to explore what are, in my humble opinion, some great improvements in CS5's 3D texturing engine.
Texturing infuses character into the 3D object to bring out the personality needed to tell a story. Without this your object is naked and lifeless. Texturing is an art within itself and some artists will specialize in just that. A great amount of time can be invested into this e days or weeks depending on the demands of the creative director.
Real-life objects absorb light to some degree and what we see is the results after absorption. If you look at objects around you, whether they are fabric, water, leaves or even a mountainous landscape, it is important to break down what we are seeing into their surface types. Basically, 3D programs identify and manipulate objects as several surface types by breaking them up into materials. For more information on materials, see Chapters 1 and 4.
Keep in mind that this chapter is written for the artist who has little or no knowledge of 3D creation; however there is the desire to add 3D content to their workflows, to introduce eye-catching effects as well as greater flexibility with their designs. We will accomplish this through the use of an online database that will provide quite a bit of the 3D content that we can use for our personal projects. Although we will provide a few companies for you to consider, we will focus on one online company that has created a plugin for CS5 that will import 3D objects directly into the 3D layers. The company is 3DVIA (www.3dvia.com).
We are going to illustrate a common compositing concept in this chapter. We will import a concept car from 3DVIA to use as the main character in our scene. We will illustrate it by showing it speeding through the wet streets of a downtown area of a city block that we will also download through 3DVIA database.
Note: This tutorial requires some basic knowledge of Photoshop tools such as the Clone Stamp, Transform, Various Shape Tools, Gradients and more. If you are not familiar with these tools, you should first learn these before proceeding.
Ok, let's start creating!
[heading]10.1. Importing 3D Using 3DVIA[/heading]
We are now going to look at some possible online databases where you can download the 3D object that you require and import and texture it to your needs. There are a few companies for you to consider that use 3D content. Most have online databases where you would download the 3D object in your required format through their websites. Some of these include: 3D Via (www.3dvia.com), Artists 3D (http://artist-3d.com/), Quality 3D Models (www.quality3dmodels.com/), 3D Content Central (www.3dcontentcentral.com/) DAZ 3D (www.daz3d.com) and Content Paradise (www.contentparadise.com/) to mention a few.
The one that we will focus on for this tutorial is 3DVIA. 3DVIA is owned by Dassault Systems (www.3ds.com) which specializes in CAD based products. Seeing the need for an extensive 3D database similar to what Corbis & Getty Images has done for photography, Dassaut Sytems created 3DVIA. We will use their 3D importer plugin for Photoshop to import the models for this tutorial. You can find their plugin on 3DVIA's website at http://www.3dvia.com...adobe-photoshop or on my personal website at http://www.chromeall.../tutorials.html. Please download the plugin and install it. The plugins are designed to function on versions CS3 through CS5 so download and install the one that matches your version of Photoshop and let's begin the importing process.
We are going to create a scene with a concept car speeding through the wet streets of a downtown city.
Note: You can follow along with this tutorial by downloading the content files from http://www.chromeall.../tutorials.html so look for the section titled "3D IN PHOTOSHOP EXTENDED". Download and expand the zipped files into a folder titled "downloads" and we will refer to this for any content files that you will need for this tutorial. By the way, the 3D files used in this tutorial are included in the content files as well. So, let's download a 3D city and a sporty car through 3DVIA.
Step 1: Access the Import command (File > Import) and select "search 3DVIA" (Figure 10.1).

Fig 10.1
Step 2: The "search 3DVIA" importer will open the model search dialog box that will allow you to search by model type as well as by the name of the model. You will also be given options to search through the store where you will usually find some of the better models; however, I have found that the Community models are quite detailed. In this example the UCI Concept car is chosen (Figure 10.2).
Notice that the format of this model is 3D XML. This is a proprietary format by Dassault System's designed for a seamless transfer from their web based system (3DVIA) into Photoshop's 3D layers. After you have imported the concept car, browse through the database to acquire your city titled "City Block." We have provided both files for you in a PSD format so, if you like, access your downloads folder and open "skyscaper. psd" and "UCI Concept car Materials_AllCATPart 3D XML File.psd" (Figures 10.3 and 10.4).
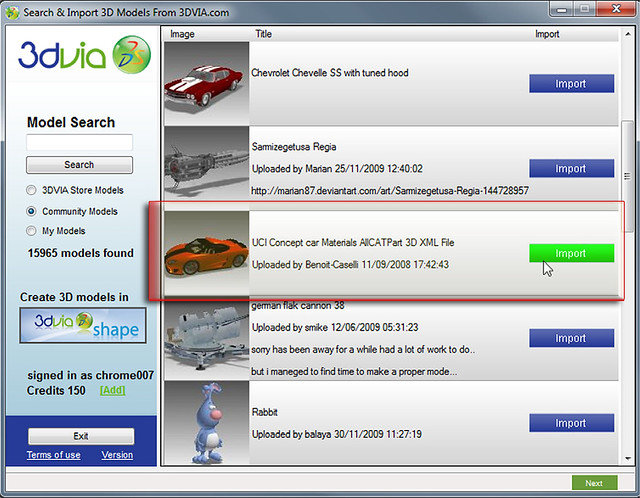
Fig 10.2
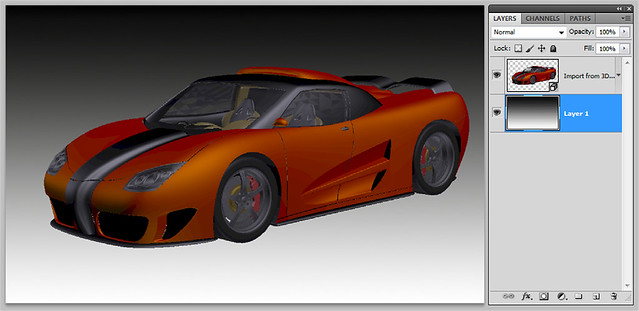
Fig 10.3
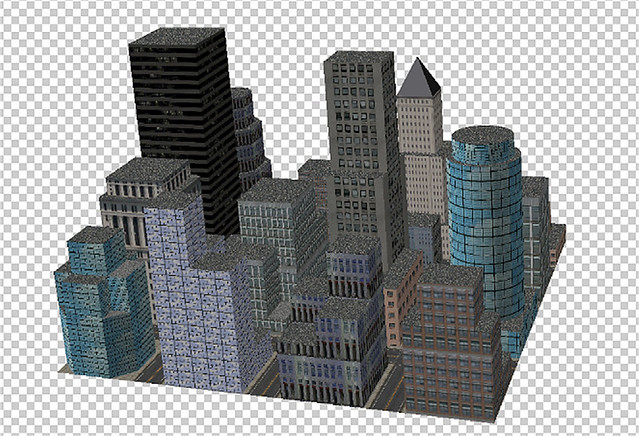
Fig 10.4 Open "skyscraper.psd."
[heading]10.2. Creating the Layout[/heading]
Now we are going to position the 3D models to be in line with the concept of the car speeding through wet streets.
Step 1: Create a new document with the dimensions of 8" x6" with 150 ppi resolution. This resolution is just for tutorial purposes so that we can work quickly together.
Step 2: Place both the car and the skyscraper objects in the new document. Each 3D object will occupy its own layer as shown in Figure 10.5 .
Step 3: Access the 3D Mesh panel (Window > 3D) (Figure 10.6). Along the top of the panel click the first icon on the left to display the 3D Mesh options. On the bottom right of the panel click and hold on the icon on the far left to see the visibility options for the varied 3D components. Select "Show All" and instantly you can see outlines that represent 3D Axis, 3D Ground Plane, 3D lights and 3D Selection. This will help you to keep track of where things are as we navigate our scene to compose and texture it.

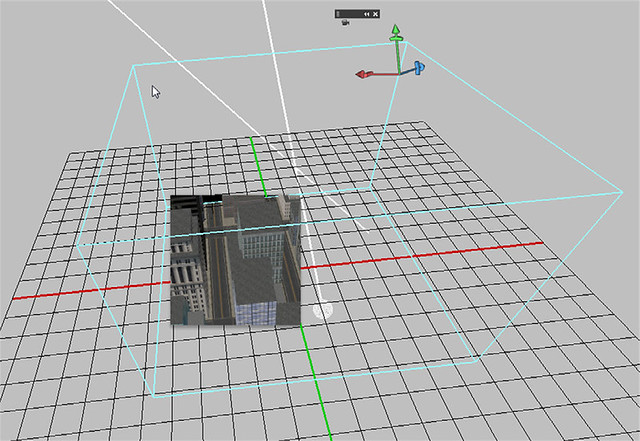
Fig 10.7
Zoom out of the document just to observe the changes to how we view our 3D space. CS5 will keep all 3D elements visual even beyond the borders of the document (Figure 10.7).
Now zoom in a little closer to get a better view of the streets. We will set up the scene for the car to be placed on one of the roads surrounded by the buildings (Figure 10.8).
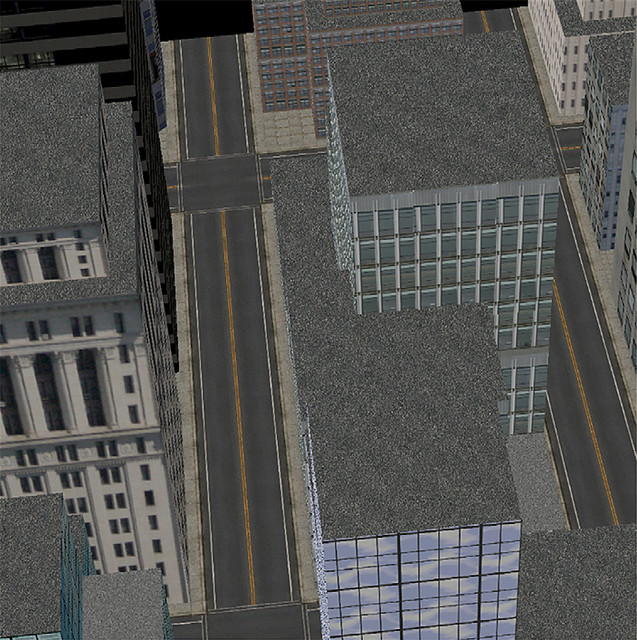
Fig 10.8
Note: CS5 has the ability to merge both objects into a single layer using the Merge 3D Layers command so that both can be lit with the same light source, with the shadows and reflections affecting one another. However, third party models created by a community of artists are not always reliable. This could be due to how well the mesh of a 3D object was constructed, so to keep matters simple let's keep each object on its own 3D layer.
Make sure that the skyscraper layer is selected and navigate the Camera (N) so that it is close to street level with the front of the buildings in the background, as shown in Figure 10.9 . Select the Camera Zoom option on the options bar. This is where we will set the focal length of the camera. To consolidate the field of view for both you will need to adjust the focal length of the camera toward a unified focal length so set the Focal Length to 100 for both objects. Now select the car layer and access the 3D navigation tools (K) and navigate the 3D object itself to be positioned over the street. Try to get something close to what you see in Figure 10.9 .
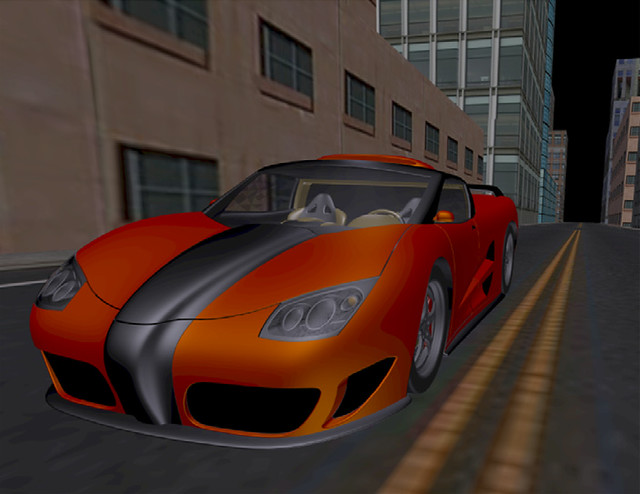
Fig 10.9
Note: As with many Photoshop tools, the Shift key can be used to limit interaction to one axis at a time. This will help you better control the interaction when getting used to the 3D tools.
Step 4: CS5 generally allows for the shadow of the 3D object to appear on the ground plane of the 3D model. But keep in mind that this is not always the case with third party 3D objects like the ones that we have just downloaded from 3DVIA. These models have been created by individuals and submitted to the website so, depending on the settings as well as the 3D application that created the objects, CS5 may or may not recognize the ground plane as in this particular case. So, to give our concept car a sense of placement on the ground plane, add a shadow on a separate layer beneath the car as shown in Figure 10.10 . Change the layer's blend mode to Multiply and reduce the opacity a bit and let's continue on.
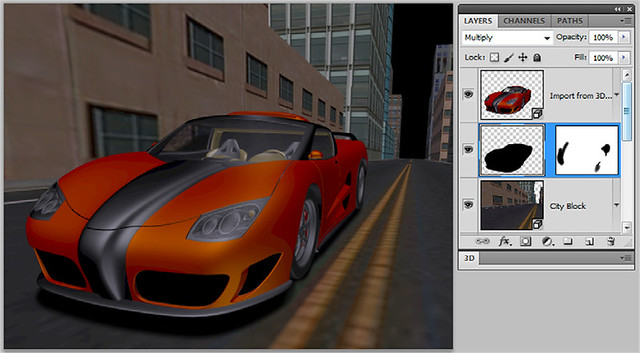
Fig 10.10
Step 5: Now let's add the sky to the background. This is done with gradients situated on their own layers; and initial light to darker blue is established on one layer. On top of that create a reddish gradient that falls off to 0% Opacity toward the top of the composition. Create another layer on top of the red gradient and create a dark blue to 0% Transparency toward the lower 3/4 portion of the image. Use Figure 10.11 as a guide.
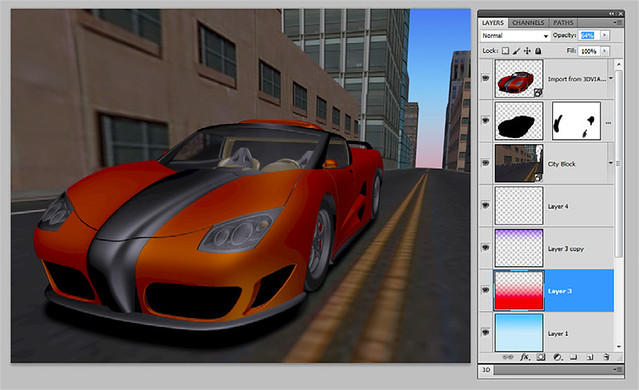
Fig 10.11
Step 6: Next, let's add some clouds to add some interest in the sky. Access the downloads folder and open the clouds.jpg and place it above the blue gradient. Resize and place them into the sky behind the skyscrapers and reduce the opacity to allow some of the sky colors to come through. In this example a duplicate is also applied and resized larger to imply depth (Figure 10.12).
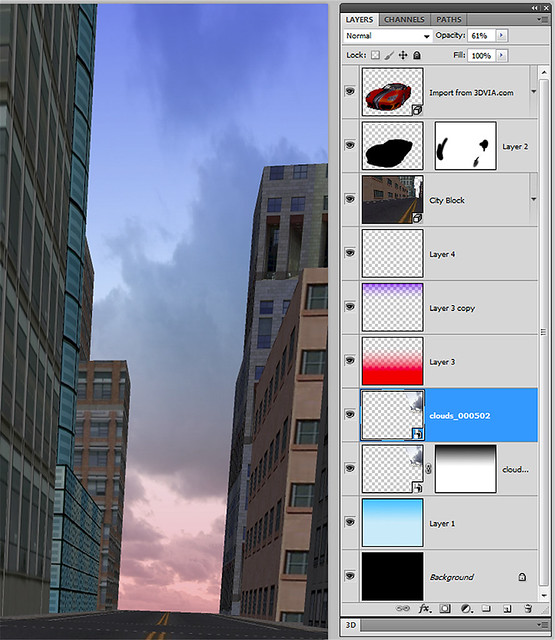
Fig 10.12
Step 7: Now, focus on the layer titled "City Block" and take notice of the textures associated with it. If you place your cursor over the second one down, with "road straight" in the title, you will get a thumbnail view of the texture (Figure 10.13). Double-click this texture to edit it.
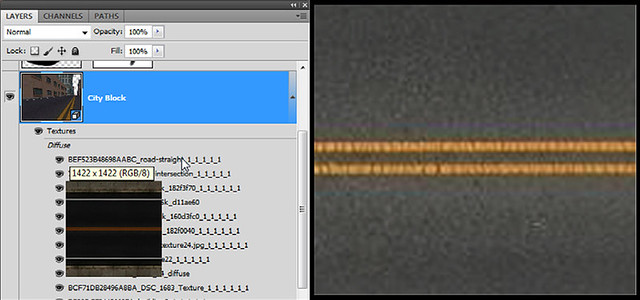
Fig 10.13
Step 8: By default, many of these textures will have a resolution of 72 ppi. To get more details we should redefine the texture to be a higher resolution. Change the Resolution in the Image Size properties (Image > Image Size) to 200 ppi instead and save the document (File > Save) (Figure 10.14).
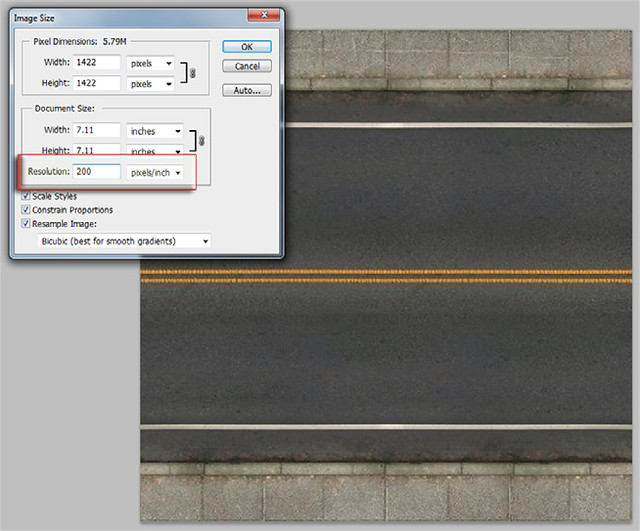
Fig 10.14
Step 9: When we resized the texture in Step 8, we have essentially interpolated the image giving it a low resolution look. This is okay because we are now going to customize this texture at the higher resolution, starting with vector shapes.
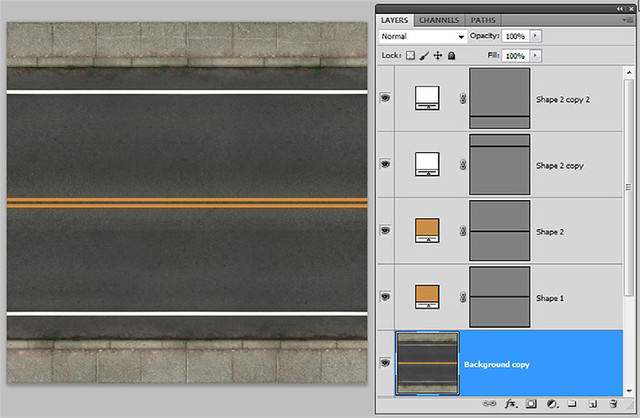
Fig 10.15 Place "concrete.jpg" into a new layer.
Recreate the orange and yellow paint guides using the rectangular vector tools (U) (Figure 10.16). Simply match the original lines colors. In this example, each vector shape is on its own layer. Select File > Save to see the 3D model update.
Fig 10.16
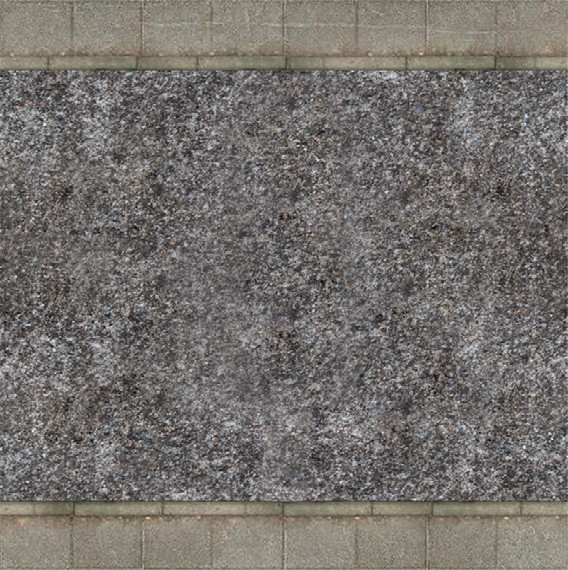
Fig 10.17
Step 11: Use the Stamp Tool and the Patch Tool to get an even consistent texture (Figure 10.17). Select File > Save to see the 3D model update.
Step 12: The goal is to use the new texture to match the size of the texture information in the base image. So, use Free Transform (Ctrl-T/Cmd-T) and resize it, and then select it and create a new pattern as shown in Figure 10.18 . Select File > Save to see the 3D model update.
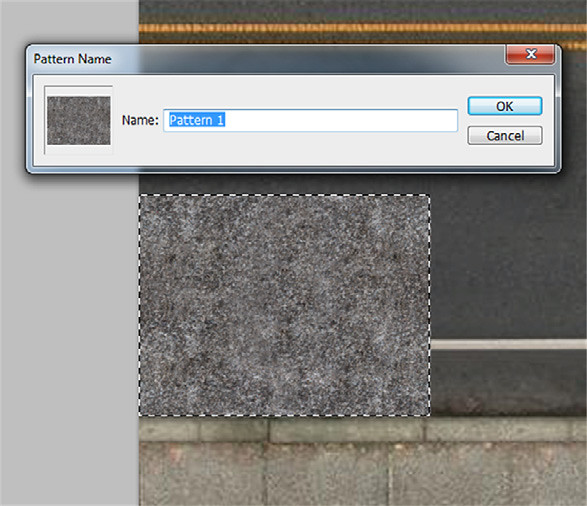
Fig 10.18
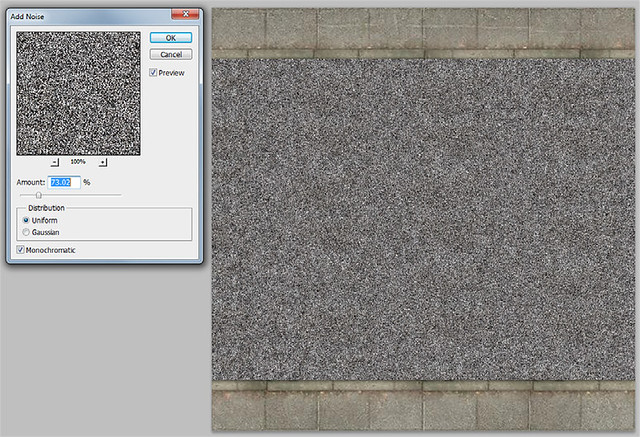
Fig 10.19
Step 13: Fill the layer with the newly defined pattern and add some noise (Figure 10.19). Select File > Save to see the 3D model update.

Fig 10.20 Change the blend modes of the vector shapes to Overlay.
Fig 10.21 Apply dirt to the road.
Step 16: We are going to use another texture to add more detail to the street. Open "wall texture 002.jpg" (Figure 10.22).
Use the Patch Tool to make a seamless texture similar to what was done in Figure 10.17 (Figure 10.23). Select File > Save to see the 3D model update.

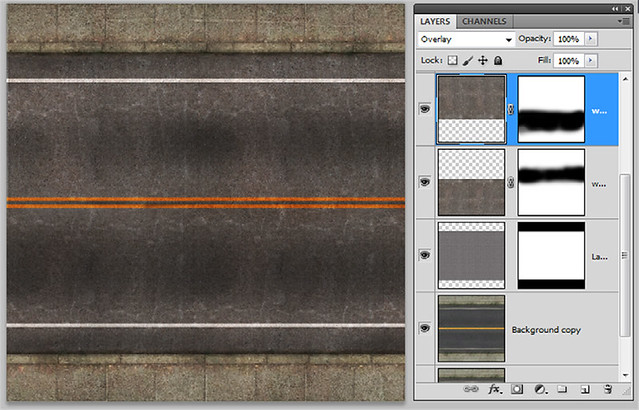
Fig 10.24
Change the blend mode to Overlay to increase the contrast so that the texture integrates with the road harmoniously underneath it (Figure 10.24). Place the texture to one side of the composition and duplicate it to cover the other side. Use layer masks to seamlessly blend the two. Select File > Save to see the 3D model update.
Step 17: The car will be driving along a rundown part of town and the roads will be in need of repair so let's further illustrate this. Select a portion of the "wall texture 002.jpg" that represents the long crack and place it in a new layer of the street texture. Change its blend mode to Hard Light and place it along the double yellow line (Figure 10.25). Select File > Save to see the 3D model update.
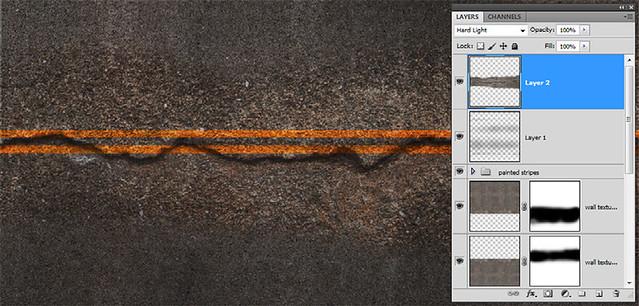
Fig 10.25
Use the layer mask to soften the edges to blend into the scene (Figure 10.26).
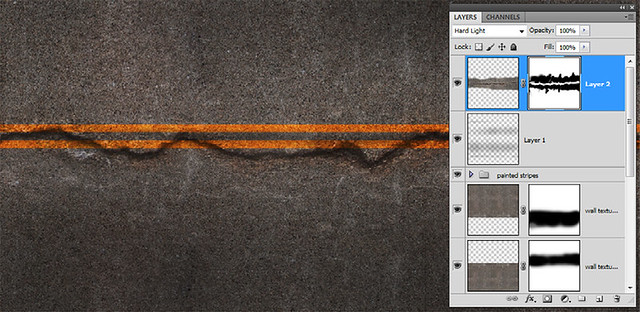
Fig 10.26
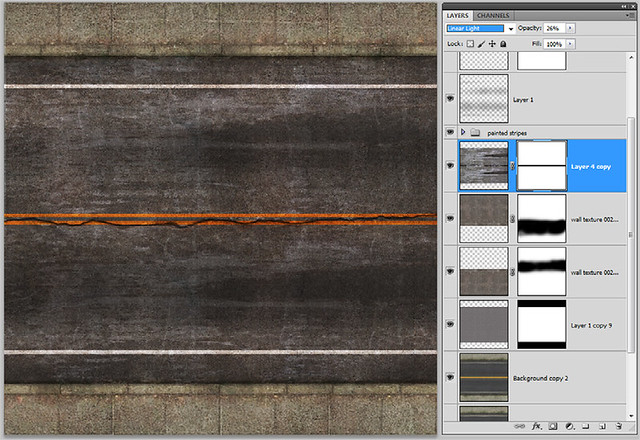
Fig 10.27 Apply additional texture to road.
Now, click Ctrl-S/Cmd-S to save the texture (Figure 10.28) and take a look at the 3D object to see the result.
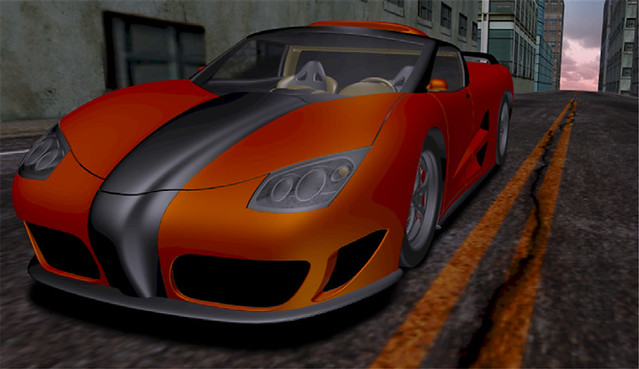
Fig 10.28
[heading]10.3. Texturing the Walls of the Buildings[/heading]
In this exercise we will add a little more character to the building.
Step 1: Select the City Block layer and access the sixth texture from the bottom that has the title of "texture 21" in it. You will see what is displayed in Figure 10.29 .
Fig 10.29
Note: You can also use the Material Select Tool
and click on the canvas where this texture is. You will see the bounding box drawn around this material if you have the overlay turned on and the material should now be selected in your 3D Scene panel.
Step 2: Open the "wall texture 001.jpg" and place it above the background layer of the building. Use a layer mask to show through the windows from the base layer. To enhance the shadow details on the window sills use another layer with a Multiply blend mode and paint with black into the shaded areas (Figure 10.30). Select File > Save to see the 3D model update.
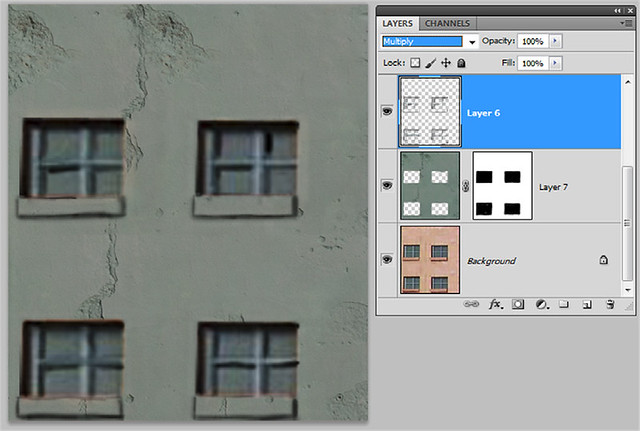
Fig 10.30
Fig 10.31 Add "wall texture 004. jpg" to enhance image.
Step 4: Let's add two more texture details to bring the wall to life. First, we will add some grunge detail to the wall. Open "wall texture 005.jpg" and set its blend mode to Darken. This dirties up the wall a bit giving a sense of age and neglect (Figure 10.32). Next, open and add the "wall texture 004.jpg" again as another layer and increase its contract using Curves. Change the blend mode to Overlay (Figure 10.33). Save the texture and let's go make changes to the lighting.
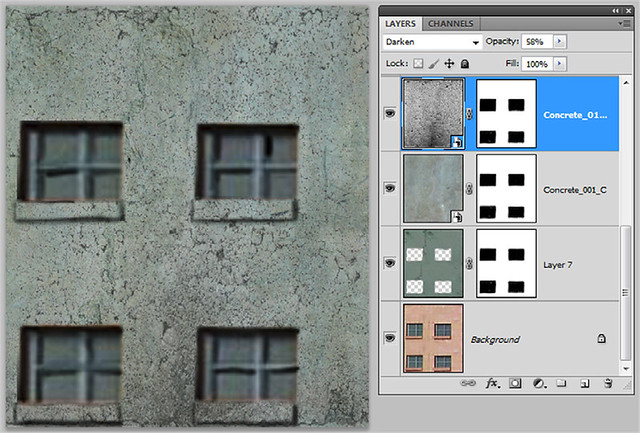
Fig 10.32
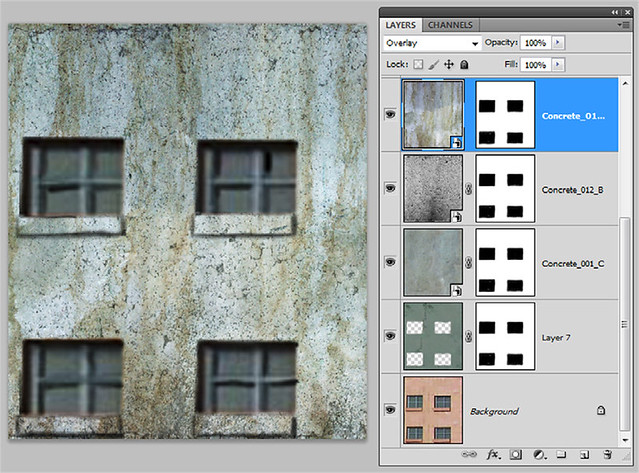
Fig 10.33
[heading]10.4. Lighting the 3D model[/heading]
One of the significant additions to the CS5 3D engine is the ability to use IBL (image based lighting). That means that you can take any photographic image and utilize its Color and Luminance properties to light the scene so that your models will actually look as if they were photographed within the same environment. For more information on image based lights, see Chapters 1 and 5. Let's start with lighting the car.
Step 1: Click on the "add new light" icon and select "New Image Based Lights". Now that the light has been added to the scene, all we need to do is select the image that it will use to light the model. If you select any light tool, take note that a 3D navigational sphere for the IBL light will be displayed for you to facilitate navigating the light.
Note: Although it is customary to add 360 degree panoramic HDR images, it is important to know that you can use any bitmap image; that is what we will do in this situation.
Inside the 3D Lighting panel click on the add image icon that is next to the "Image" title located below the color swatch. Navigate to your downloads folder and select "ibl lightsource.jpg." This is the merged imagery of the background scene as shown in (Figure 10.34).

Fig 10.34
Step 2: It is a good idea to match the ambient light in the scene. If you like, select any color so that you can see how this feature will affect the car; however the reddish bluish horizon was chosen in this example (Figure 10.35).

Fig 10.35
Step 3: Let's take a look at the actual surface properties on the concept car. The 3D Materials panel will display all of the separate 3D surfaces that are attached to this model. As you can see there are quite a few (Figure 10.36). Through the 3D Materials panel you can select each 3D mesh and view its surface. In this example "mesh643-geometry" is chosen and below is its surface titled "Gris_argent_Rendering."
Note: These titles were the originals given when the car was created in its native 3D program. However, you can change them by double-clicking on their titles and typing in the new name.
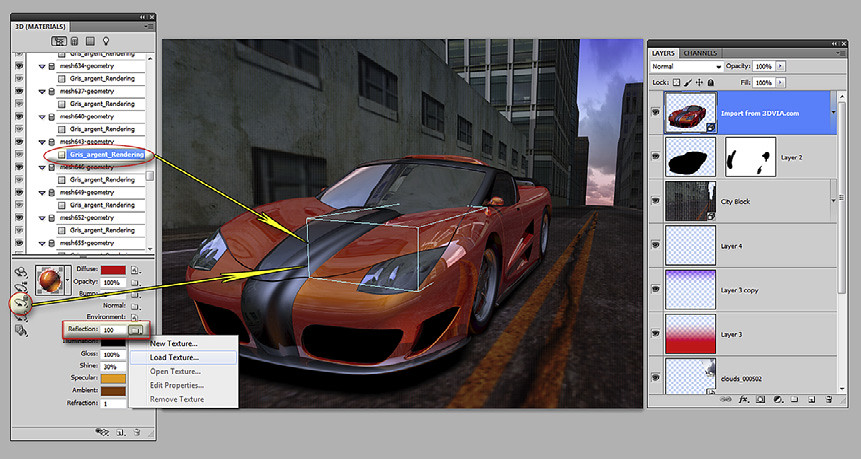
Fig 10.36
Step 4: Now we are going to add some ambient lighting to the City Block so select that layer and this time choose a more bluish color within the clouds (Figure 10.37). Since this portion of the buildings is mostly in shadow we will allow it to be dominated by the bluish temperature that often dominates shadow regions of a photographic image.
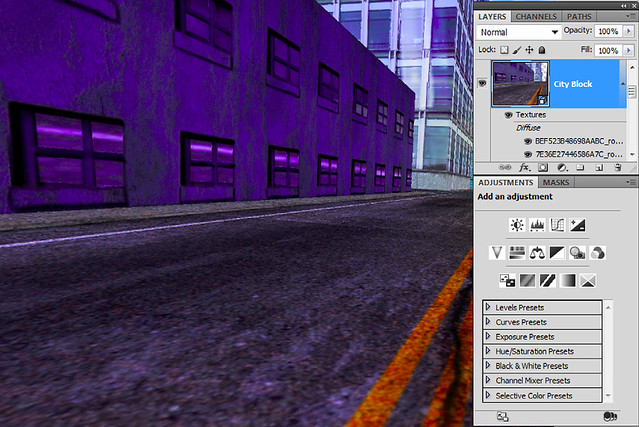
Fig 10.37
Next we will add a wet looking surface to the street.
[page]
[heading]10.5. Adding the Wet Look to the Street[/heading]
The car will kick up water as it is speeding through the streets. But first let's give the road a wet look. Essentially we are going to affect the Reflection properties of the street. Let's get started.
Step 1: Make sure that the City Block layer is chosen. With the 3D Materials panel open select the material for the street which is "GraphicMaterial-32."
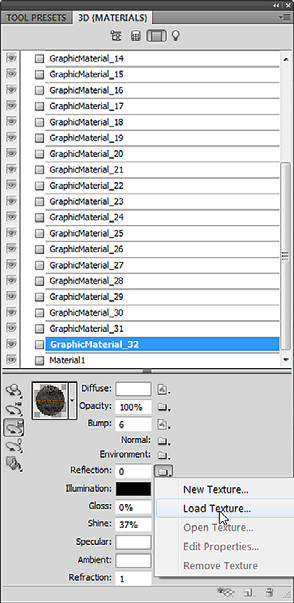
Fig 10.38
Note: Materials can also be selected using the Select Material Tool found in the Material Tools slot on the 3D panel . From the Reflection texture popup menu, choose Load In A New Texture as shown in Figure 10.38 .
Fig 10.39
Next, navigate to your downloads folder and select "ground reflection. jpg." We are using a B&W image to define the reflective characteristics of the model. The brighter the tones the more reflective the object will be and the darker the tones the less reflective it will be (Figure 10.39).
Adjust the Reflection intensity to 80% so that you can get a feel to what this texture is doing to the surface of the street (Figure 10.40).
Next, adjust the Reflection intensity to 30%. This is more of what we are looking for (Figure 10.41).

Fig 10.40
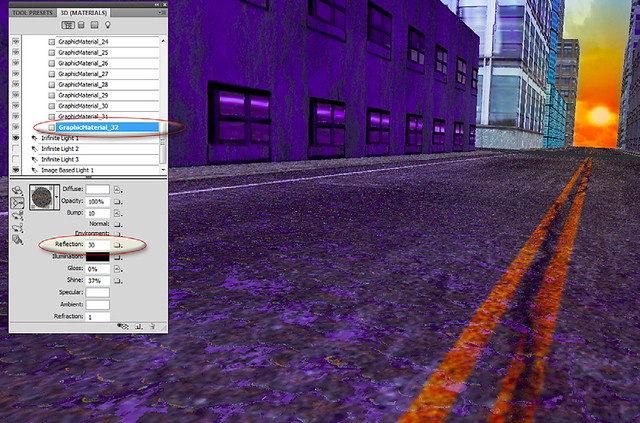
Fig 10.41
[heading]10.6. Adding Localized Bump and Reflective Characteristics[/heading]
Now we are going to finish up a few details to the cityscape behind the car. We will add localized bump and reflective details to the buildings as well as the setting between the buildings.
Step 1: Turn off the visual aspect of the car temporarily to have less distraction on the city (Figure 10.42).
Step 2: Just as you did in Figure 10.38 you are going to find the surface in the 3D Materials panel for the tallest building in the rear (GraphicMaterial_10). Again, you can use the Select Material Tool to select it directly on canvas; once selected, load the file "build reflective map.jpg" into its Reflection map (Figure 10.43).
This image is the B&W version of the original color image. The window regions were selected with the Polygonal Selections Tool and filled with white on a separate layer. The background layer was then filled with black. This ensures that only the windows will have reflective properties.

Step 3: We will create the bump map in a similar way. Figure 10.44 is a B&W version of the color map. Just like the reflective map, the white areas will rise to display peaks and the black areas have no effect. Now, load "building 2 bump map.jpg" into the Bump map of GraphicMaterial_10.

Fig 10.44
In our 3D Scene panel (Window > 3D) access the Quality drop-down menu and select Ray Traced Final to see the results. You will initially see a square grid pattern moving across our image. This is simply making several passes to improve the render by minimizing noise. You should now see the reflections from the surfaces of the neighboring building only within the glass windows as a result of the reflection map. Also, the white colored supports appear to rise forward, which is the white colors in that region of the bump map (Figure 10.45).
Step 4: Now do the exactly same thing to the building in the foreground for "GraphicMaterial_8" and use "building_reflect 1.jpg" for the reflection map and "building 1 bump map.jpg" for the bump. Adjust the intensity sliders to your liking. You should have something similar to Figure 10.46. Finally, to add some last minute feature that will hold our interest between the foreground and the background, place the "sunset.jpg" below the City layer and position it so that the sun is positioned between the buildings (Figure 10.46).
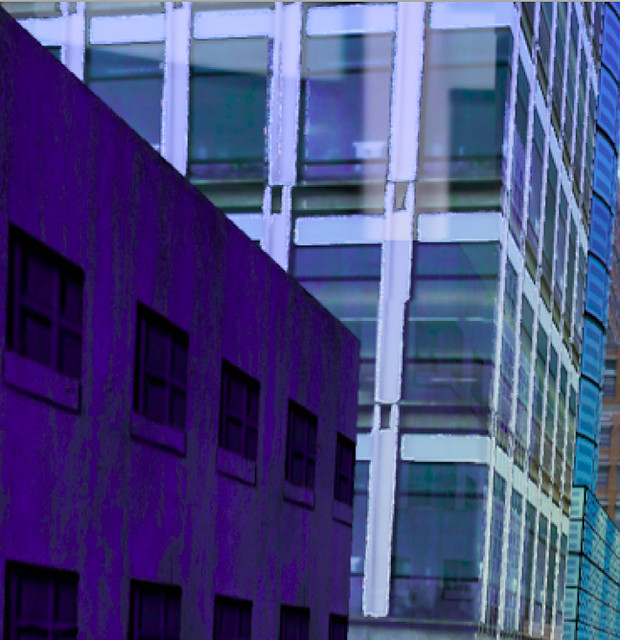
Fig 10.45
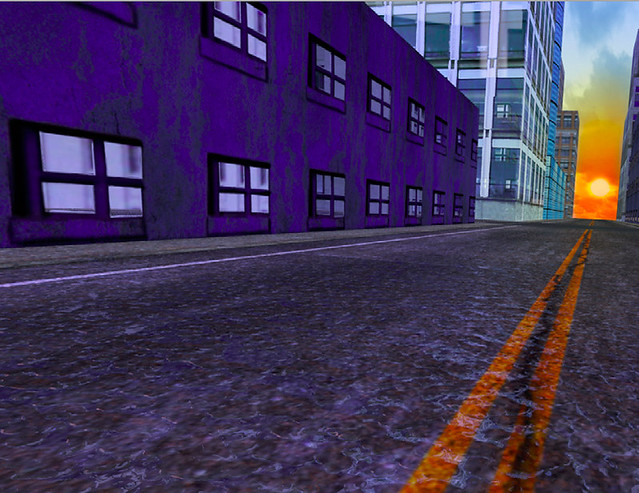
Fig 10.46
[heading]10.7. Adding Depth of Field and the Splash[/heading]
We are about to do something really fun and add the splash that is caused by the speeding car. In addition we will use the new DOF (Depth Of Field) features in the Camera Zoom Tool to limit the focus on the main character, which is the concept car.
Step 1: Let's start with the Car Layer to apply the new DOF feature. Select the 3D Zoom Camera Tool. On the options bar there are two variables that we are interested in. One is the "DOF Blur," which establishes the strength of the blur and the other is "Distance," which will set the plane of focus. In this example the Distance is set so that the rear of the car begins to blur into the distance (Figure 10.47). With the 3D Zoom Camera Tool you can Opt/Alt click on the rear of the car to set that as the focal plane (distance parameter in the options bar).
Step 2: Do the same thing for the City Layer but set the Distance so that the rear of the image is blurred and the foreground is more in focus (Figure 10.48). Also apply some Gaussian Blur (Filter > Blur > Gaussian Blur) to the sunset to honor our chosen depth of focus.
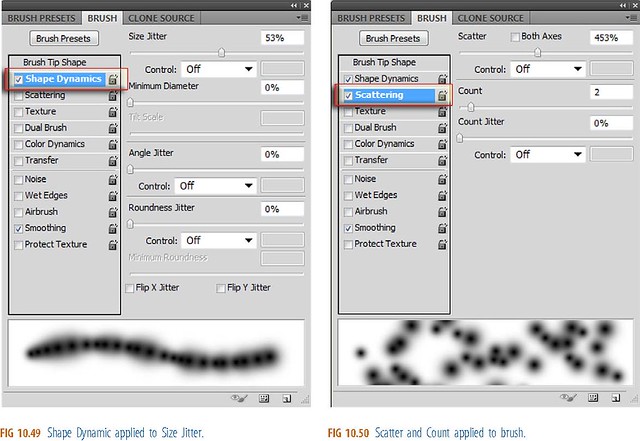
Step 3: A brush is created to start the initial stage of the splash. Figures 10.49 e 10.51 show the brush properties that were used to create the brush for the splash.
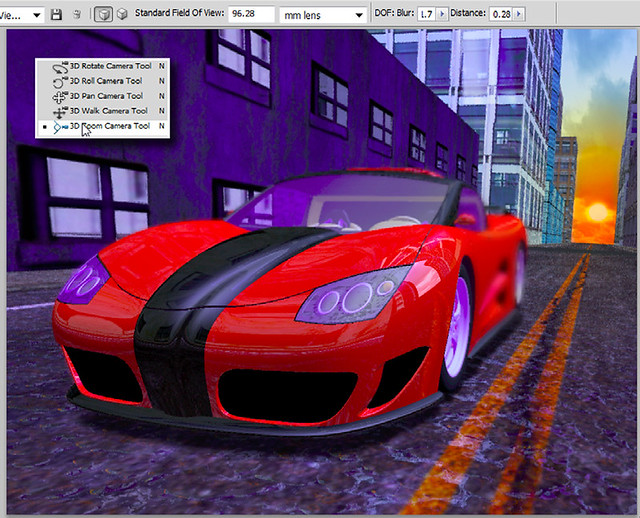
Fig 10.47
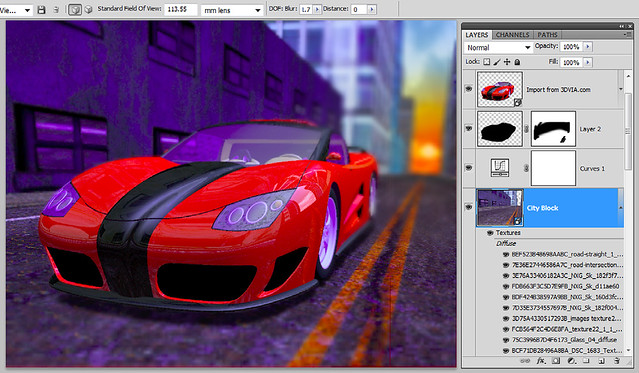
Fig 10.48
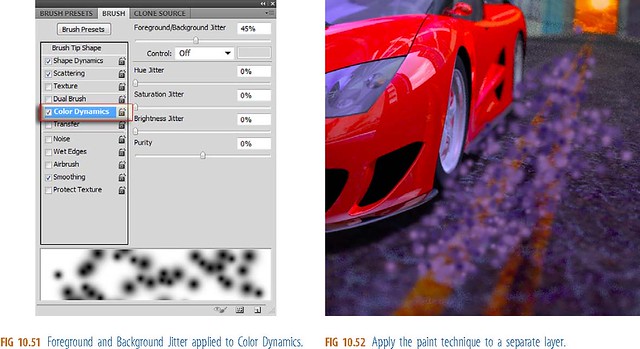
Step 4: Apply a purplish color for the foreground color and a dark blue for the background color. These two colors reflect the two extreme ambient light colors in the scene. Now apply the paint effect to a separate layer above the car. Use Figure 10.52 as a guide.
Step 5: To get the splash started give the paint some Motion Blur (Fillers > Blur > Motion Blur). A distance of 34 is used and leave the angle at "0" (Figure 10.53).
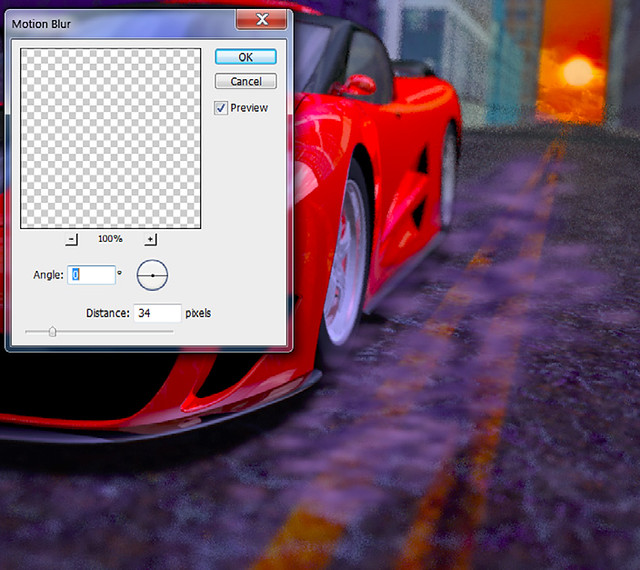
Fig 10.53
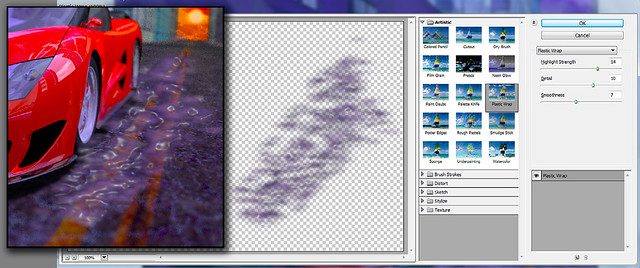
Fig 10.54
Step 6: We will now give this paint stroke the glossy properties of water to apply the Plastic Wrap filter (Filters > Artisic > Plastic Wrap) as shown in Figure 10.54 . Experiment with the settings till you find something to your liking.
Step 7: Now apply Motion Blur (Filters > Blur > Motion Blur), again with a greater distance (Figure 10.55). Now we have our initial splash.
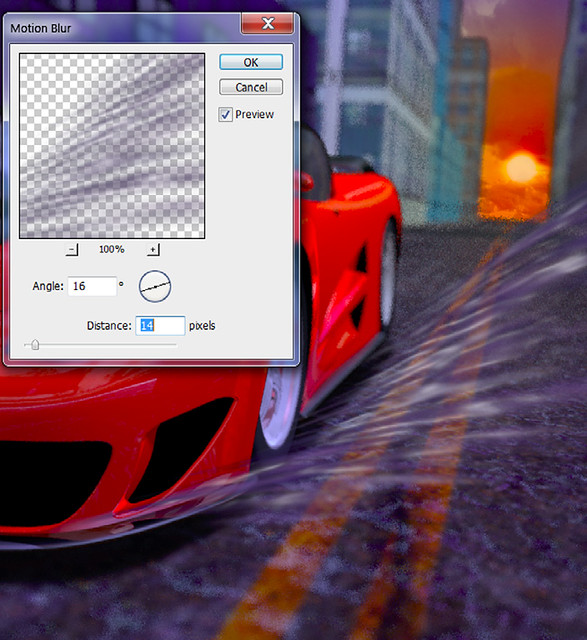
Fig 10.55
Step 8: Duplicate the splash to add a stronger effect. Then give it a drop shadow underneath to show depth from the ground. Also, to further harmonize the colors in the overall scene use a Radial gradient to add yellow to the sunset and a bluish hue to the foreground (Figure 10.56). Now it's time to render the car with ray tracing. In the 3D Scene panel (Window > 3D) select the scene slot on the scene graph area, and under the Quality drop-down menu select "Ray Traced Final." You should see that the reflections in the windows are now rendered.
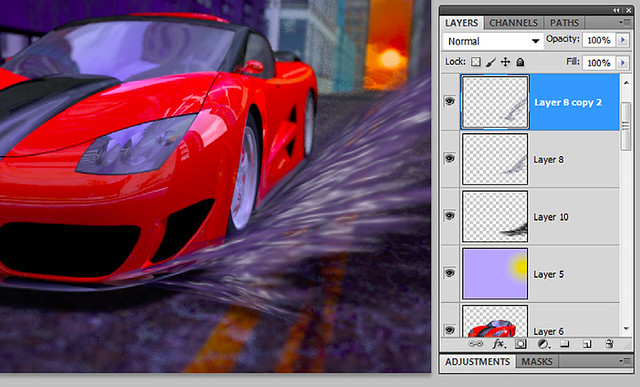
Fig 10.56
Step 9: Duplicate the car layer and change it to a Smart Object (right-click on layer > Convert to Smart Object). Add a Motion Blur with the Angle set to 70 degrees. Here the Distance is set to 41 but you can experiment with this to get a look you like. This gives the car a sense of motion and up and down movement (Figure 10.57).
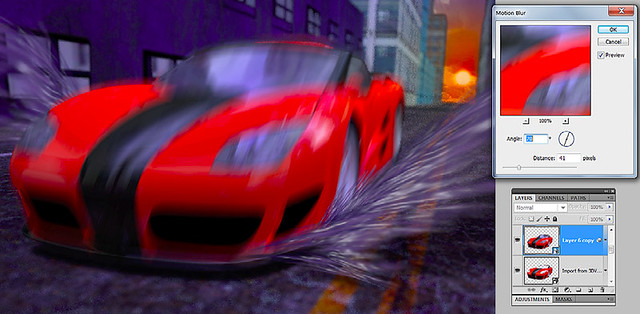
Fig 10.57
Step 10: Edit the mask of the Smart Filter so that the Motion Blur is mostly applied to the rear of the car instead of the front end. In addition, create an additional layer above the car and fill it with 50% gray. Add to this gray layer a Lens Blur (Filter Render > Lens Flair) and then change the blend mode to Hard Light to make the gray pixels transparent e leaving only the lens flair. Place the flare over the headlights to accentuate the glare (Figure 10.58).
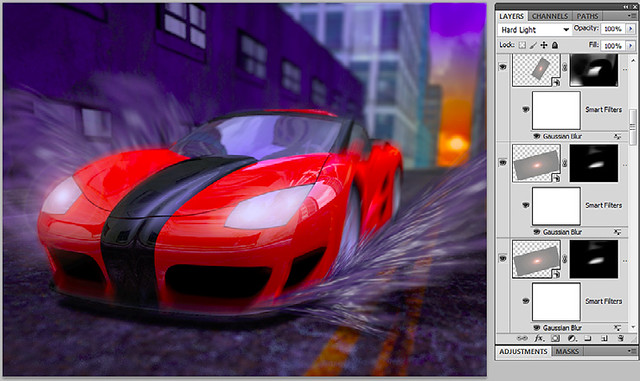
Fig 10.58
With a little more enhancements to the headlights as well as a light spill onto the street (separate layer set to Overlay with white added to the street), Figure 10.59 shows the final render.
I really do hope that you enjoyed this chapter. For more information on myself and my art please go to www.chromeallusion.com
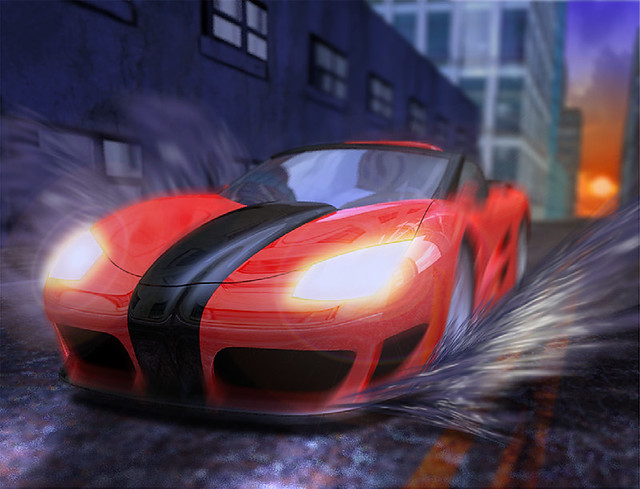
Fig 10.59

