Introduction
3ds Max 2013 is available as a stand-alone package or as part of a suite of tools and, for the first time, Autodesk is also offering an Ultimate Suite that includes both 3ds Max and Maya together along with the other suite packages. This provides a solution to artists that lets them choose the best tool for the task at hand instead of deciding at the project's start which package to stick with.
The 2013 version of 3ds Max includes, as usual, a long list of new and improved features for game, design, visualization and CAD users. For game developers, there are many improvements focused on making it easier than ever to work with characters and for the design users, features such as support for importing multiple CAD formats is a much needed addition.
Render Pass Management with the State Sets Interface
Each release includes lots of little changes and a few major ones. Perhaps the biggest one with this version is the new State Sets interface. Using this interface, you can record a specific set of enabled settings that can be instantly recalled as needed. For example, you could record a state set with one of the non-photorealistic rendering options such as colored pencils enabled, another state set could show the scene using the default scanline renderer and a third state set could be set up using mental ray. Each of these states could be quickly recalled when presenting the scene to a client.
Another way to use the State Sets interface is to setup several different render passes. These states can be nested and can be easily rendered out in a batch with the Render All States command. The State Sets interface also includes a Compositor view (show in Figure 1) that displays each state as a node with connecting wires so you can easily visualize how the composited image is put together. There is even an option to add a Color Correct node if you want to do the basic compositing in 3ds Max.
The interface also allows the data to be transferred in real-time to Autodesk Smoke, Adobe After Effects or Adobe Photoshop using a connection link. Once the link between 3ds Max and the compositing software is established, you can transfer cameras, lights, null objects, plane objects, blend modes, opacity and effects between the two programs.

Figure 1: The State Sets interface includes a Compositor view that shows all states as a hierarchy of nodes and connections.
Layouts Toolbar and Workspaces
One small interface change was the addition of the Layouts toolbar over on the left side of the screen. This simple little toolbar lets you quickly change the interface layout between several different presets. You can also create and save your own custom layouts to the toolbar for quick recall.
Along the title bar, you can find the new Workspaces drop-down list. This control lets you quickly pick from any of the defined workspaces and you can customize and save your own custom workspaces. This lets you set up the interface for different users or for different tasks. I like to keep a modeling workspace with maximized viewports, another workspace for applying materials that makes the Slate Material Editor accessible and another separate workspace for animation that includes the Track View in a viewport.
Nitrous Improvements
In previous versions of 3ds Max, you had to go to several different places in the interface to change the background depending on whether you are using an environment map or a background image. One of the changes to the viewport in this version places all these controls within a single menu in the Views menu. These same commands can also be accessed from the viewport label making it easy to switch backgrounds. Viewports can now use a vertical gradient as their background.
Other improvements to the Nitrous viewports include support for image-based lighting, depth-of-field effects and better particle flow display. There are also two new render styles: Facets and Clay. Also new in the viewports is the ability to add a Sky Color Map to the Skylight object. This map can be a High-Dynamic Range (HDR) image that illuminates the entire scene without the need for an active Light Tracer.
iray and mental ray Improvements
3ds Max 2013 also includes the latest version of iray 2.1. With this updated version, you can enable iray within an ActiveShade window providing real-time rendered results, as shown in Figure 2. The iray renderer also includes a new Hardware Resources rollout that tells you the number of processors available for rendering and lets you allocate the number of processors to use for Production rendering, the number to user for ActiveShade rendering, and how many to leave for the interface. This lets you maximize the processing power to use for final rendering when you reach that stage of the project.
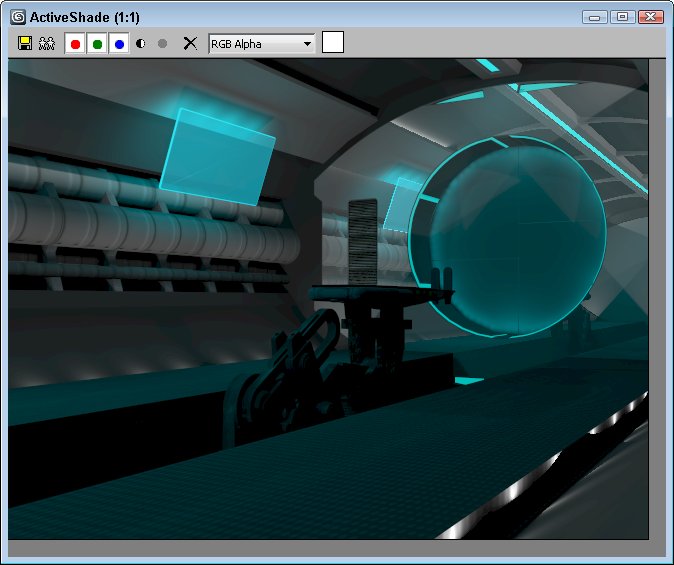
Figure 2: Enabling iray within an ActiveShade window provides immediate feedback on the scene. Image courtesy of Autodesk.
The latest version of iray also includes support for motion blur, a round corner effect, improved sky portal support, and new materials including an Environment Background Switcher that lets you use one map for the background and another for environment reflections.
mental ray has also been upgraded to version 3.10.
Retime Tool and Redesigned Track View
The Retime tool is a new addition to the Track View interface. It adds markers to a selected curve that lets you speed up or slow down the animation curve by simply dragging the markers. There is also a Retime All tool that is used to change the speed of the animation for all animated scene objects.
The Track View interface has also been redesigned. This redesign makes the interface similar to the curve editors found in Maya and MotionBuilder and simplifies the interface making it easier to work with.
Moving CAT Characters to MotionBuilder
The ability to transfer data between Maya, Softimage, MotionBuilder and Mudbox using a single menu option is a great feature and a new option has been added to the list for 2013. 3ds Max data files can now be sent to Autodesk Infrastructure Modeler with a single click.
In addition to a new Send To option, CAT bipedal characters created in 3ds Max that are transferred over to Maya or MotionBuilder are automatically converted to a HumanIK character complete with its skeletal structure and animation. Any changes that are made to the HumanIK character in Maya or MotionBuilder are seamlessly updated back in 3ds Max. This is a huge benefit enabling character animators to build and animate characters using CAT in 3ds Max and then further tweak the animation using the amazing features found in MotionBuilder.
Exchange Data with CAD Packages
The File Link Manager lets you link data files created with Revit, FBX and AutoCAD directly within the scene file using the options found in the Import menu. 3ds Max 2013 also includes Autodesk DirectConnect, which allows support for a broad range of CAD files including AutoCAD, Inventor, Alias, SolidWorks, CATIA, Pro/ENGINEER, PLM Software NX, and JT. CAD objects that are imported appear in 3ds Max as Body Objects. IGES files are also imported as Body Objects instead of NURBS objects.
mCloth, Ragdoll and Other MassFX Improvements
Several additions have been added to the MassFX physics simulation system including the inclusion of mCloth for adding cloth objects to a defined simulation. Another new addition is the ragdoll structure that works with both biped and CAT skeletons. To apply this structure, simply select a skinned character built with either CAT or Biped and click the Create Ragdoll menu command, MassFX then automatically applies all the needed constraints and rigid bodies required to allow the character to be included in a simulation (Figure 3).
Another improvement is the new Multi-Object Editor that lets you edit the properties of multiple rigid body objects and constraints at one time. MassFX simulations can also now include Space Warp forces such as Wind and Vortex, which is especially helpful for simulations involving cloth.

Figure 3: The new Create Ragdoll command lets you include CAT or Biped skeletons within a MassFX simulation.
Animation Store
Within the Animation menu is the Animation Store option. This command opens links directly in the Command Panel to an online repository of models and motions developed by Mixamo. Using the interface, shown in Figure 4, where you can browse for both character models and for specific motions to add to a biped or CAT character. The available characters include male, female and creature characters in a wide variety of outfits including business, casual, medical and sport attire.
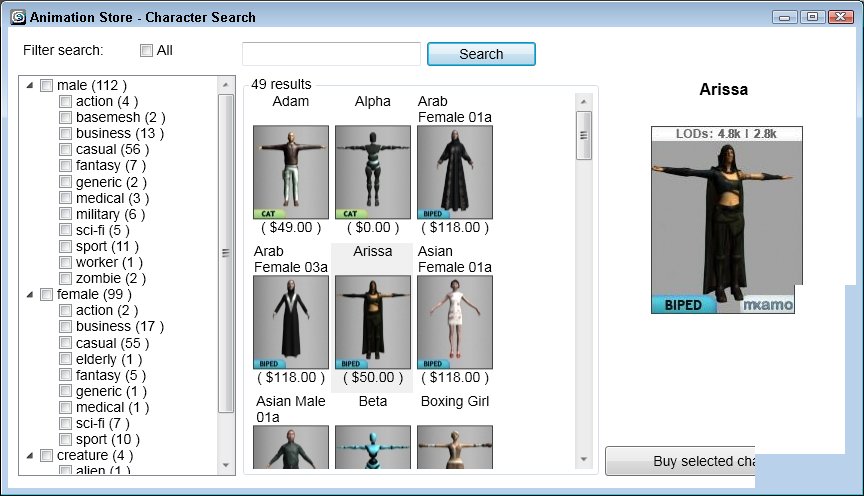
Figure 4: The Animation Store dialog box gives you access to purchasing characters and animated motions from within the 3ds Max interface.
The available motions range from general motions like walking and jumping to more specialized motions like sneaking, strafing and swimming. Each motion has a price tag associated with it and can be applied directly to a character.
Hair Improvements
The Hair and Fur features in 3ds Max 2013 have been updated with better viewport display and faster rendering. Several new features have also been added including new material options like the Squirrel value that highlights the tip color. There is also a new Flyaway rollout that defines how messy the hair gets. There are also several new parameters for defining hair Clumping and Multi-Strand effects.
Other Improvements
Often the most valuable improvements are the smallest ones. The 2013 version of 3ds Max includes a huge list of small improvements that could have a huge impact on your work. A good example of this is support for the 64-bit version of Apple's QuickTime. This one bit me on a previous project when the client wanted the animation output as a QuickTime MOV, but my computer was 64-bit, so I had to find a work around. No more tricky work around is needed now.
Another simple little improvement is the inclusion of an Egg-shaped spline primitive. It only saves a few seconds from creating a circle and pulling out one vertex, but every little second can count on a tight project. Another wonderful addition is that the Array dialog box is now modeless, so you can see the results without having to close and reopen the dialog box.
Models that deformed a lot during animation such as a character skin can be dramatically sped up by applying the new gPoly format. This format is the same format that the software uses internally resulting in a much faster playback. This gPoly format works especially well on meshes whose topology doesn't change.
Another key, under-the-hood improvement is that the 3ds Max 2013 is fully Unicode-compliant, which enables multi-language support within a single program. This lets users switch their language choice on the fly. However, Unicode support is only available running under Windows 7. Running 3ds Max on Windows XP is available in English only.
Finally of note is the new feature that lets you work with 3ds Max using the Maya navigation commands. Once the Maya Interaction Mode preference is enabled, users can use the Maya commands to navigate the viewports and to position objects.
Summary
Although I don't see ground shattering features in this latest release, the cumulative effect of all these small and mid-sized improvements is a software package that is easier to use than ever. The ability to seamlessly move CAT characters between 3ds Max and MotionBuilder along with the gPoly format and the ragdoll structures are huge for game developers and support for the major CAD packages opens up 3ds Max to all kinds of new data that required multiple translations before.
3ds Max 2013 and 3ds Max Design 2013 are both available as a stand-alone products. 3ds Max 2013 is also available as part of the Entertainment Creation Suite, bundled with Maya, Mudbox, MotionBuilder, Softimage, and Sketchbook Designer. For more information on 3ds Max 2013, visit the Max product pages on Autodesk's web site at http://usa.autodesk.com. A free trial version of 3ds Max is also available at www.autodesk.com/3dsmaxtrial.

