Occasionally the development team at Autodesk focuses their efforts on improving the application performance instead of adding flashy new features. The 2015 release of 3ds Max seems to be one of these times. This version has a few nice surprises, but the biggest change is under the hood. The viewports seem more responsive and the software doesn't crash nearly as often as the previous version.
New Welcome Screen
You don't have to go very far into the software to see some new features. The Welcome Screen that appears when you first start the software has been overhauled. It is now divided into three different sections including Learn, Start and Extend.
The Learn section has links to a list of 1-minute movies that cover all the basics of using the software. The videos touch on just the fundamentals, but they are great for those new to the software. There are also links to the 3ds Max Learning Channel on YouTube as well as some example content pages.
The Start section of the Welcome Screen has the same features from the previous Welcome Screen including a list of recently opened files along with a Workspace drop-down list and path to the current Project Folder.
The Extend section includes access to Autodesk Exchange and highlights a new plug-in each time the software is loaded. There is also a link to various scripts found on the Area website and a link to Autodesk 360 where you can access new content such as animation sequences from the Animation Store and new trees and plants using the Download Vegetation link.
One of the new features available through the Autodesk Exchange application store is the Stereo Camera plug-in. This plug-in helps to quickly create stereoscopic scenes with the red and blue views for each eye that creates a 3d effect when viewed using the red/blue 3d glasses.
Placement Tools
One of the more difficult skills to master for new users is positioning and orienting objects in the scene. 3ds Max 2015 includes a new tool called the Select and Place tool that makes it easier to position objects relative to one another.
Using the Select and Place tool, you can drag the selected object and it automatically snaps the pivot of the object to the surface of the other scene objects. If you right click on the tool in the main toolbar, then you can access a dialog box of settings that give you even more control. Within the dialog box is a Rotate button that causes the selected object to spin about its pivot.
The Use Base As Pivot button in the Placement Settings dialog box causes the points closest to the other objects to be the pivot point. For example, a sphere would just touch the edge of another sphere instead of being embedded since its pivot is in the center if this button is enabled.
The Pillow mode button moves the object over the surface of the other objects without allowing the two objects to intersect. The AutoParent automatically makes the moved object a child of the object that it is positioned next to. You can also control the Object Up Axis using the buttons in the Placement Settings dialog box.
This tool is great for beginners, but it is also helpful when placing objects such as characters on the ground surface of a scene. Figure 1 shows this tool in use as the raised object is neatly placed on the surface of the rounded housing.
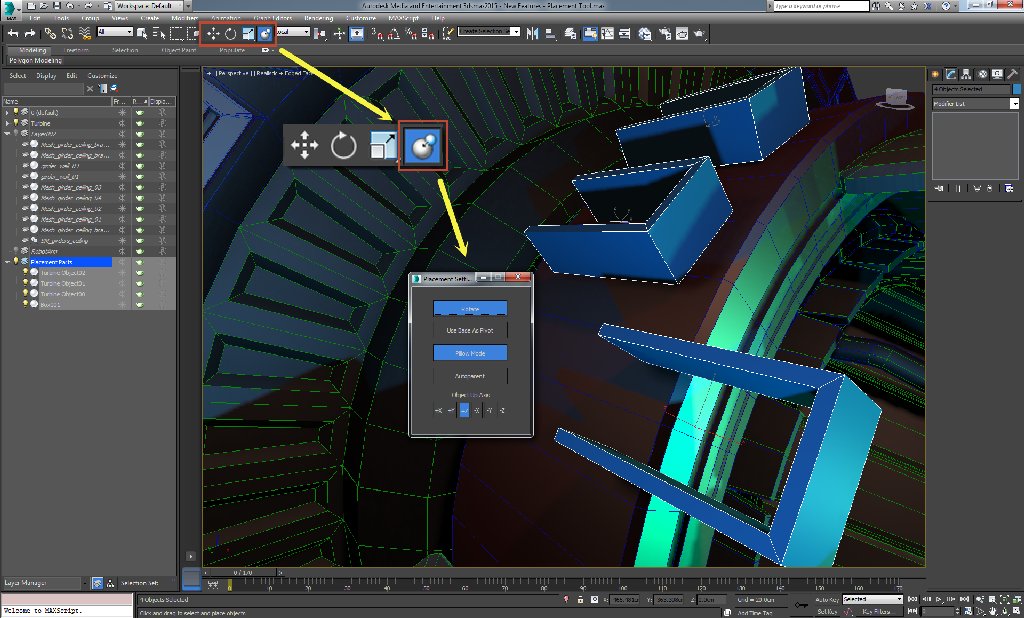 Figure 1: The Select and Place tool lets you place the selected object by moving it over the surface of the other scene objects. Image courtesy of Autodesk
Working with Point Cloud Datasets
A Point Cloud is a dataset that includes a large number of points that together make up a real-world object. Point Cloud datasets are created by scanning an environment and the points are all saved using the RCP or RCS file formats. The points within a Point Cloud object are unique because each point defines a location in space, but they also have a color associated with it, so you could get a point cloud dataset of an entire bridge that can be used as a backdrop for your scene.
Autodesk also has an application called ReCap that works with point scanners to create Point Cloud datasets. These datasets can then be imported into 3ds Max where they appear as a Point Cloud object. These Point Cloud objects aren't affected by the scene lighting, which makes them ideal for backdrops. The drawback to using a Point Cloud object is that they cannot be edited using the modeling tools.
Usually the points are so dense that you wouldn't want to edit them anyway, but you can pare down the points to a specific volume to reduce its size.
You also cannot apply materials to Point Cloud objects. These objects automatically get a Point Cloud material applied to them. This material lets you change the color intensity of the points and you can also change the ambient occlusion and shadow reception settings. If you are planning to render out a scene with a Point Cloud object, then you'll need to activate the mental ray renderer.
Within the Grid and Snap Settings dialog box is a option to snap to Point Cloud points, but most point clouds are so huge, that it could easily take hundreds of hours to convert a Point Cloud object to an editable geometry object, so this really isn't feasible.
When a Point Cloud object is created, you can change the color channel and level of detail of the point cloud using the settings in the Display rollout. The Color Channel options include True Color, Elevation Ramp, Intensity Ramp, Normal Ramp and Single Color. There is also a map button for applying a map to the Point Cloud object.
The Level of Detail setting includes a slider that moves from Performance to Quality. It also updates the number of points included and the total number of points in the Point Cloud object. There are also settings for changing the size of each point, which is helpful to fill in all the empty space.
Although the Point Cloud object seems like a useful construct, most Point Clouds are way too dense to be interactively used within a scene. Also, Point Clouds typically have large gaping areas without any detail that hurts the visual look of the object as a background. More specifically for game developers, Point Clouds aren't supported by any game engines and the work to convert a Point Cloud object to a useable piece of geometry would take too long to be beneficial.
Quad Chamfer
For those that like to model with edge loops, the Chamfer modifier has a new Quad Chamfer option that insures that all chamfer edges are divided using quad-based polygons. This results in cleaner edits that deform better.
The tool also lets you smooth across just the chamfer area or across the entire object. You can also define the number of edges to include, remove the chamfer area or isolate the chamfer sections. Figure 2 shows how edges are smoothed using the enhanced Chamfer tool with a Quad Chamfer setting.
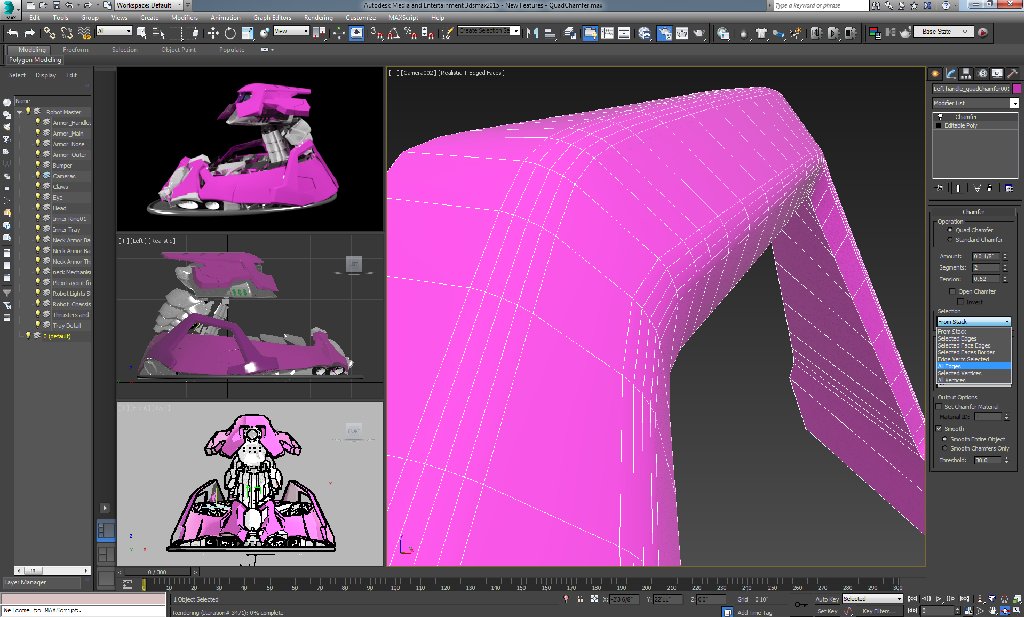 Figure 2: The new Quad Chamfer settings results in smoother objects when applied to edges. Image courtesy of Autodesk
Using the ShaderFX Editor
Previous versions of 3ds Max allowed you use external apps to generate and import shaders, but 3ds Max 2015 finally has added a ShaderFX Editor to the software. When the DirectX Shader material is added to an object, then the Open ShaderFX button appears in the rollout.
The ShaderFX Editor lets you right click to access the various shader nodes. These nodes can be connected together by dragging from output channels to input channels just like using the Slate Material Editor. The inputs and outputs are all color-coded which helps to insure that the right data type is being passed. At the top of each shader node is a preview that shows what the current texture map looks like.
Once you are happy with the shader results, you can export the shader to the HLSL, CLSL or CgFX formats. Created shaders can then be viewed in the viewports, as shown in Figure 3, without having to export the shader to the game engine.
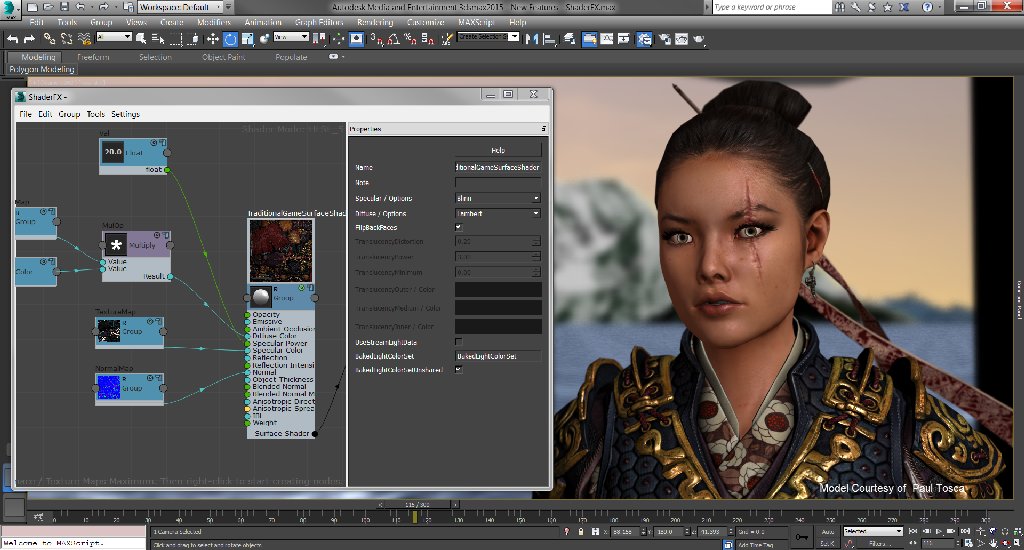 Figure 3: Shaders created in the ShaderFX Editor can be viewed directly in the viewports. Image courtesy of Autodesk
Layer Explorer
The Scene Explorer has been overhauled and now is docked to the left of the viewports for immediate access. Although the Scene Explorer appears docked to the left by default, you can quickly drag it to the right or top of the interface also.
Having the Scene Explorer docked to the side of the interface provides a quick, easy way to select and organize all the scene objects. It also makes it easy to link objects to create a hierarchy.
It has also been upgraded with a layer manager mode that you can quickly select. This makes dividing your scene into layers quick and easy. You can also nest layers which is a huge benefit.
Populate Improvements
The big feature from the last version of 3ds Max was the Populate tool that quickly added diverse animated crowds to a scene. Populate has been improved in a number of ways for this release including the ability to add runners to the crowd and more control over the speed of the crowd characters. There is also an ability to add seated characters to the idle areas so crowds can include restaurants and concert venues. There are also new controls that let you set the appearance of the characters. Finally, if there is a particular character that you like, you can bake its geometry and animation into the scene.
Small Changes with Big Rewards
Autodesk has always been really good at listening to requests from their users. They've even established a set of forum pages called Small Annoying Things that lets users identify annoying parts of the software and then vote on which ones get fixed.
One of the winners in the latest release was to add the Undo and Redo buttons to the main toolbar. This is a good example of a simple change that helps many users greatly.
Another small change that will be a big boost is that mental ray renderings can be viewed within the ActiveShade preview window (Figure 4). The iray renderer also supports render elements, so you can break down rendering to several compositing layers.
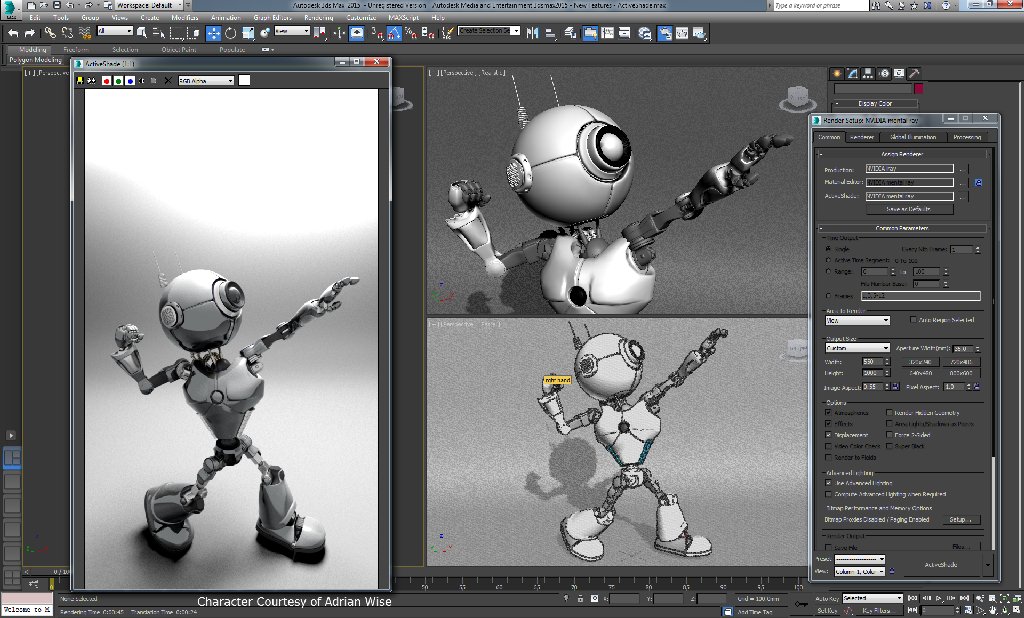 Figure 4: Enabling mental ray within an ActiveShade window lets you interact with the scene in real-time. Image courtesy of Autodesk
Scripters will be happy to hear that there is now a 3ds Max Python API that lets you execute Python scripts from the 3ds Max command line.
Summary
Most of the work in this release was done to improve performance, which is great for users, but can be hard to quantify. The biggest new features in this release are the Point Cloud support and the ShaderFX Editor. As far as game developers go, the Point Cloud features aren't really feasible for game scenes since most Point Clouds are extremely dense and they cannot be used within most of the major game engines. The ShaderFX Editor is a nice addition and one that game creators can take full advantage of, but most shader effect builders already have a process outside of the software and it will take some time before complex shader trees will be built within 3ds Max.
Overall, the improved performance of the software will help users immensely, but something as vague as better performance might be a hard sell for cost-conscience managers.
3ds Max 2015 and 3ds Max Design 2015 are both available as a stand-alone products. 3ds Max 2015 is also available as part of the Entertainment Creation Suite, bundled with Autodesk Maya, Mudbox, MotionBuilder, Softimage, and Sketchbook Designer. For more information on 3ds Max 2015, visit the Max product pages on Autodesk's web site at http://usa.autodesk.com. A free trial version of 3ds Max is also available at http://www.autodesk.com/3dsmaxtrial.


I got so excited when I heard the new release of 3DS Max 2015 that I forgot to log in! lol! I can't wait til I use it! Sounds awesome!