Introduction
Autodesk Maya 2014 software is available as a stand-alone product or as part of a Suite. The Maya Entertainment Creation Suite 2014 includes Maya, Mudbox, MotionBuilder and Sketchbook Designer. There is also a Premium Suite offering, which adds Softimage to the mix and an Ultimate Suite offering, which adds 3ds Max.
The new version of Maya 2014 has lots of small performance enhancing improvements and several larger new features that make the software easier to use. In particular, the new Grease Pencil tool and the Modeling Toolkit are worth looking into. There is also a new Mesh Reduction feature and several interesting new options for working with Paint Effects.
Interface Improvements
The 2014 version of Maya has some subtle changes to the interface that are nice improvements. Maybe it's just the reviewer in me talking, but I love the new What's New Highlight Settings. All the new menus and tools are highlighted with a green set of brackets when this option is enabled. This makes it easy to see where the new features are located. The setting can also easily be disabled once you are comfortable with the new features.
The Head-Up Display feature has a new option called In-View Messages. These messages show up giving tips and explanations of different options as you use certain tools. The messages are often helpful, but I wish there were more of them.
Tooltips are great for helping to identify all the various tools, but now they also include ToolClips, which are expanded information dialogs and video clips explaining how to use the tool. These are great when you are first starting out, but can get old for more seasoned users.
Another bunch of interface improvements can be found in the Node Editor. You can now press the 5 key to cycle between the Node Name, the Node Type or nothing. Each node type is displayed using a different color making it easier to find and identify different node types. The various node ports are also color coded making it easier to make the correct connections. And, of course, you can change these default colors to whatever makes sense to you.
There is a text line beneath each node that lets you type in text to filter the attributes that are shown. Another cool feature is that when a port is selected, only those ports that can accept the connection are made available, all others are grayed out.
Grease Pencil Tool
Even though it is a simple tool, I've found the new Grease Pencil tool extremely valuable. This tool lets you create a frame overlay and draw on it with a brush like an transparent piece of plastic positioned on top of the current scene, as shown in Figure 1. The tool includes modes for drawing with a Pencil, Marker and Soft Pencil, along with an Eraser. The drawn lines show up as the animation is played and is great for writing visual clues and reminders for current work. You can also turn ghosting of previous and post-frame images on and off.
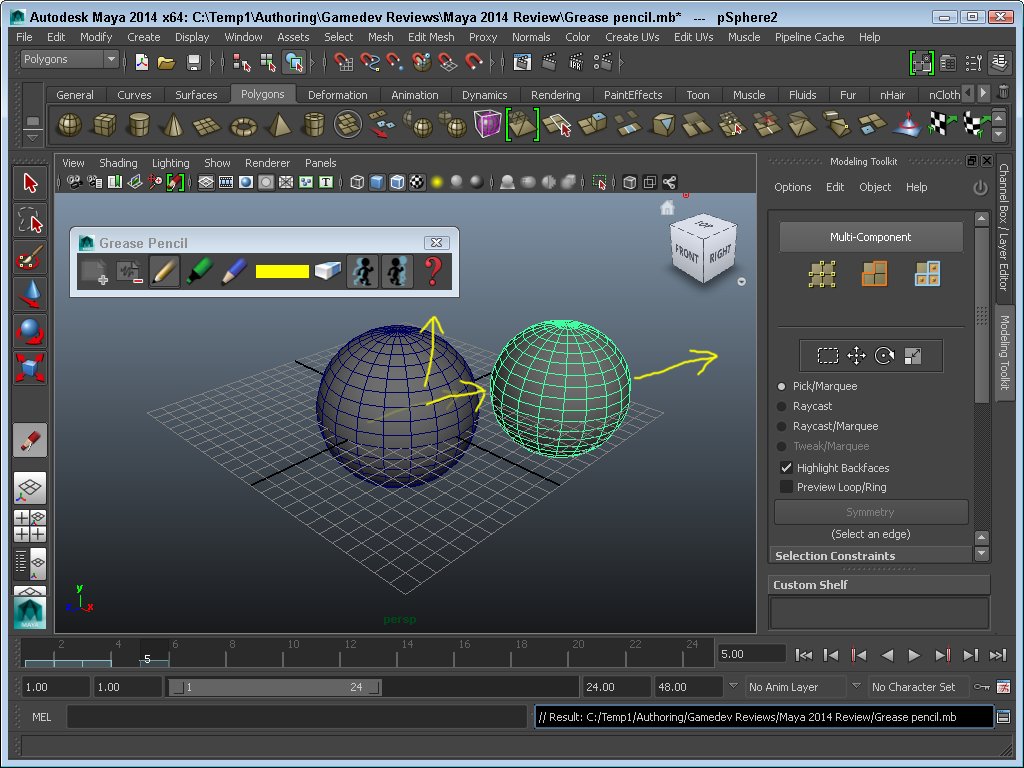
Figure 1: The Grease Pencil tool lets you draw in 2D on the current scene over several frames.
The tool designers envision it being used to compose shots, animation lines and to quickly block-out poses, but I found it was a wonderful review tool allowing me to make visual notes on another person's animation. Since it is drawn right on the screen. It is useful to show where the character needs to move and how to change the model proportions providing accurate feedback for animators and modelers without messing with the scene models. Any drawn lines and notes can be easily turned off and discard as work proceeds.
Modeling Toolkit
My favorite new addition to the latest version of Maya has got to be the Modeling Toolkit. This Toolkit shows up as a floating panel where the Attribute Editor usually is and it has many of the key selection and modeling tools at your fingertips.
It lets you choose the components at the top of the panel and selections can be switched between the different component modes, so if you have a selection of edges and you want to move all the adjacent faces, you simply need to select Face Selection mode while holding down the Ctrl key and all the faces connected to the selected edges are magically selected. There is also a Multi-Component mode that lets you work with vertices, edges and faces at the same time.
It also keeps a count of the number of components selected so you can quickly see if you have any components on the backside of the model selected. The panel also has all the transformation options available for quick selection along with several selection options such as Pick, Raycast and Highlight Backfaces. Beneath the selection options is a button for selecting symmetrical components about the model's axes. There are also several Selection and Transform Constraints that you can use to slide along the edge or surface of the mesh.
With the Mesh Editing Tools section are several awesome tools for quickly performing specific operations such as Bevel, Bridge, Connect, Extrude, Multi-Cut, Target Weld, and Quad Draw. Each of these tools has several options. For example, the Bridge tool is used to create faces that bridge together the selected edges on separate objects. Think of two spheres that could be made into a barbell quickly by bridging the edges of both spheres closest to each other. The tool also has options to specify the number of divisions, the taper and twist along the length of the bridge and an offset value.

Figure 2: The Modeling Toolkit has many key selection and modeling tools in the same panel.
The Quad Draw tool is another marvelous tool that is easy to use. Simply select it and click to place vertices on the home grid or on the surface of a selected object, then hold shift and move the mouse over the vertices to see a preview of the new quad face. Then, simply click to create the face. This is a great tool for creating models from scratch or for resurfacing an existing mesh.
The Modeling Toolkit doesn't have everything you need, but the tools it does have are a good starting point and they are convenient for most of the quick basic roughing aspects of modeling without having to dig through the menus, which are becoming more and more crowded.
Other Modeling Improvements
The Modify, Convert menu has a new option to Convert Geometry to Bounding Box. This provides an easy way to quickly reduce the resolution of complex models for animation timing and for creating proxy objects.
The Mesh Reduce feature has been improved allowing you to reduce the number of polygons in a mesh without changing the basic shape of the model. It also now offers options to keep your existing mesh, UV, color and material borders and hard and crease edges. You can also select to reduce by percentage, vertex count or triangle count. There is also a Slider to set the Preserve Quads value, which keeps the quads in place if you like modeling with edge loops. Figure 3 shows a high-res lamp that was reduced from over 27,000 faces to 2000 face while maintaining its shape.

Figure 3: The Reduce feature lets you aggressively reduce the number of faces in a mesh without altering its basic shape.
The Edge Flow tool has been improved an option to Insert with Edge Flow that adds edges to the mesh that matches the current curvature of the mesh. You can also alter the curvature of the selected edges with the Edit Edge Flow value.
The new Slide brush, which is part of the Sculpt Geometry Tool, lets you push around vertices as you move over them with the brush and the best part is that they stay true to the current model shape. This lets you quickly move vertices from a less important part of the model, like the top of the head, to the place where they are needed more, like the forehead or around the eyes and ears.
There is also a new Crease Set Editor that hold edge selections where the crease needs to be maintained.
Improvements with Paint Effects
Paint Effects have always been awesome at layering details on top of existing meshes, but the Paint Effect tubes always seem to have a mind of their own that didn't play nice with the scene mesh objects. Paint Effects have been improved in Maya 2014 with options to snap to the surface of a mesh. This lets the tubes be aware of the mesh surface and adhere right to it (Figure 4). There is also a Surface Collide option that prevents the tubes from intersecting with the mesh surface. Finally, there is a Surface Attract option that causes the tubes to move towards an object like flowers reaching for the sky.
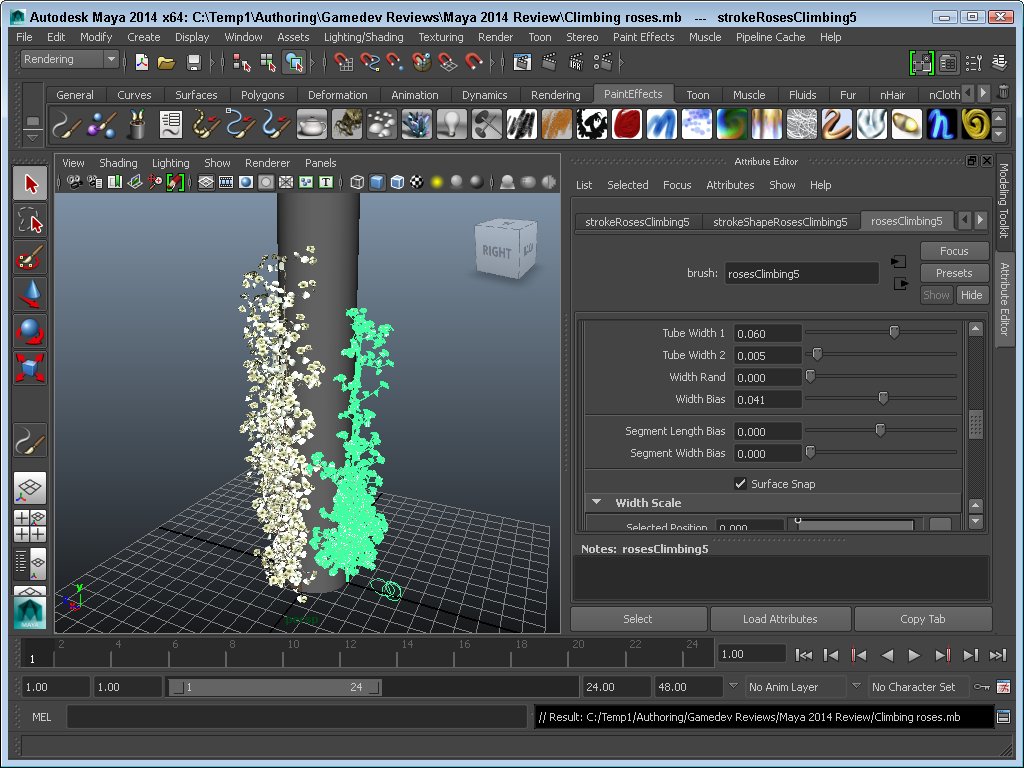
Figure 4: The new Make Collide and Surface Snap options allow Paint Effects to closely follow a selected object.
Another improvement defines how the Paint Effects grow within a volume. Using the Occupation Volume option you can have the Paint Effect tubes stay confined within a given area creating more realistic bushes and plants. Finally, for Paint Effects, are the new options to randomize the size of leaves and flowers on a plant.
Scene Assembly
For those large scale projects where your machine grinds to a halt because of all the assets that it has to work with, the new Scene Assembly features are helpful. Although it takes some time to save and name alternate versions of the scene assets, once they are in place, you can quickly swap out high-res versions for reasonable proxy versions using Alembic-based caches.
This lets you generate pre-visualization scenes and verify animation, lighting and scene layouts before wasting rendering resources to find the problem areas.
Rendering Improvements
The Rendering improvements for Maya 2014 involve both the rendering output and the viewports. The big news is support for DirectX 11 along with support for HLSL shaders. This includes and UberShader that has advanced options for displaying displacement, translucency, and blurred reflections directly in the viewport.
Dynamics Improvements
For the Dynamics side of Maya 2014, you can now add an nHair system to an nCloth system and the collisions are detected both ways. You can also use the new Collide with Mesh option for nHair systems. There is also an option to fill a geometry mesh with fluid so that the fluid takes the shape of the mesh.
SAT Improvements
The Maya development team keeps a list of what it has coined as Small Annoying Things (SAT). These are the small changes that bug users and the team has a project to identify and improve on these requests which come directly from users.
For Maya 2014, several SAT requests that have been addressed include changes to the Interactive Split Tool, the ability to edit edge flow, displaying vertex colors in the viewport, showing notes in the Attribute Editor, a new Increment and Save button and panning in the Outliner.
Autodesk makes the full list of current SATs available online and encourages users to help identify problems with the software that need to be addressed.
Summary
It's great to see a list of improvements that were specifically requested by Maya users. This shows Autodesk's commitment to the users. It's also great to see a simplified panel like the Modeling Toolkit that makes modeling easier by placing a set of only what you need in a small convenient place. All of the improvements together make Maya 2014 an even stronger package than ever before.
Maya 2014 is available for Windows, Linux, and Macintosh OS X. For more information on any of these products, visit the Autodesk web site located at
http://www.autodesk.com. A free trial version is also available at
http://www.autodesk.com/freetrials.


the re topology tools make life sooo much easier now. No more z brush retopo