Welcome to part two of my Minimal Pixel Art Tutorial. I hope you are enjoying it and finding what I'm talking about educational. When we left off I was making selections with the Marquee tool, adding to and removing from selections, and filling them in with color. Now we'll continue on with Selections of different types. Let's take a look at the lasso tool as a different method of selecting areas and as a tool for drawing as well. If you need to set Photoshops's preferences and tool options again as I covered in Part One, I'd recommend doing that now (turn off Anti-aliasing and Feathering).
Exercise 4: Selecting & Drawing with the Lasso Tool
The Lasso Tool (L) is something I use just as much as the pencil for drawing. If I'm plotting one pixel at a time, the pencil tool is the right choice. If I'm looking to make a larger irregular shape consisting of more than a few pixels, the lasso tool is my choice for the degree of control & fluidity it offers. Let's get familiar with the basics of the tool first.
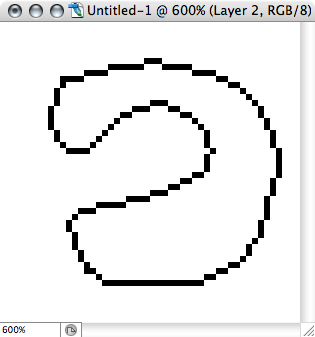
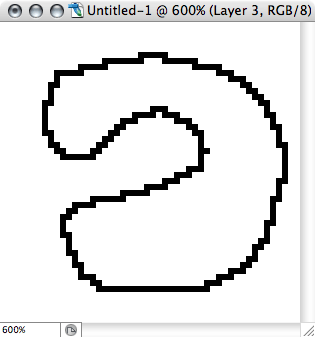
Open a new window, 50x50 pixels or something around that size, with the Background Contents set to Transparent. Zoom in. Choose the Lasso tool. In one continuous movement, draw an irregular shape. Make sure to close the shape off, meaning try to connect with the starting point of your lasso selection. If you stop somewhere away from the starting point, the selection will close itself off in a straight line from the start point to the end point. I'll show you an example below of a shape I drew, and also a similar shape where I didn't close off the selection and what happened to that.
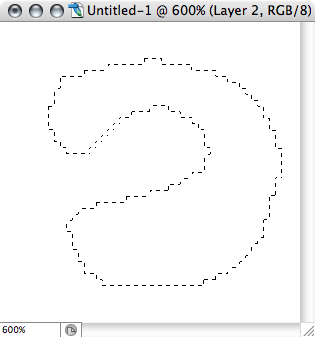
a successfully completed selection.
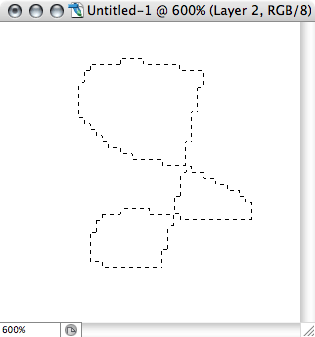
I let go in mid-selection & it closed itself.
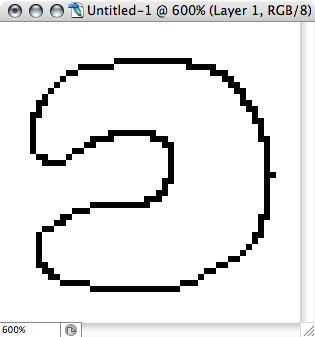
Since this is a selection, just like as with the Marquee tool, we can add and subtract from selections with the Lasso tool, or any other selection tool. Hold "Shift" and draw some more to add shapes to this selection, or hold "Option" on Mac ("Alt" on PC) to subtract shapes from this selection. In this case, I smoothed out a couple extra blocky spots by removing a few small areas here & there.
Now, as with any selection, you have many options. You can move it around using the Arrow Keys, or, if a selection tool is still active, you can grab a selection anywhere inside itself and just drag it around. You can fill it with color, like we did in the last exercise; you can invert the selection and fill the outer space with color like we did before as well. Another useful option for selections is that you can "Stroke" it! Let's do that.
Stroking a selection: Choose "Edit" > "Stroke..." and you'll get a window like this:
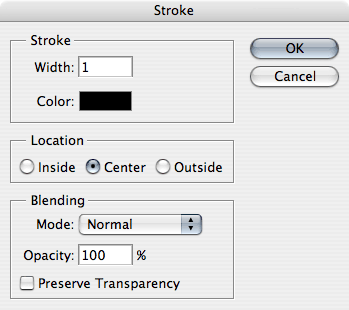
Change stroke width, set where you want a solid outline of pixels to appear. The color will be what the foreground color is, or you can change it here. I usually work with single pixel strokes. Once you start stroking with greater pixels than one the shape starts to become blocky and less like my original Lasso shape. It's worth experimenting with on your own though. Setting the pixel width to two or more pixels may be something useful for you. See some examples below.
Stroke Inside, width = 1 pixel
Stroke Outside, width = 1 pixel
As you can see, stroking inside of a selection with 1 pixel gives a much cleaner line, without hardly any overlapping pixels. Both The "Inside" and "center" stroke option actually gave the same exact results in this case. Stroking outside the selection with 1 pixel creates many of overlapping pixels. This might be a better option depending on what you're going for. Experiment with the options.
Why use the Lasso tool to make that shape above? Why not just use the Pencil tool? Because the Pencil tool will create extra overlapping pixels in my shape, similar to the example on the right above. I'll try drawing a similar shape with the pencil and see what I get.
an irregular shape using the Pencil tool only
The pencil basically gives less control when drawing continuous lines freehand like this. It has more choppy, blocky results than stroking inside a selection. I like to have precise control of what pixels are going to appear where. There is usually some cleanup involved either way (deleting unnecessary pixels from here or there) when trying to automate tasks. I use both the Lasso and the Pencil tools often, and over time I learn what does a better job for what I'm trying to do in each instant.
Getting back to the Lasso tool, there's another way to create shapes than just making one continuous freehand motion from start to finish: Turning the Lasso tool into the Polygonal Lasso tool on the fly. Sometimes it just isn't practical to draw a complete freehand selection, if the shape is large or complex for example, or if the shape has some straight areas that drawing freehand just wouldn't do well. This is achieved by 1) clicking anywhere with the normal Lasso tool, 2) holding the Option key on Mac (Alt on PC), 3) releasing the mouse button, 4) stretching a line to the next point and 5) clicking the mouse button again. You can do this at any point when drawing with the Lasso. In the middle of a shape, you can hold Option/Alt down, let go of the mouse button, stretch it to a point, hold the mouse button down again and continue drawing freehand. Let me show you some examples of selections that use this method, and a combination of methods.
All stretching and clicking makes a polygon. click, hold option, stretch click, stretch, click, repeat.

I started out drawing freehand on top, then held option, stretched down to the bottom, clicked mouse once, stretched back up, clicked & held the mouse button to continue drawing freehand back to the starting point.
Yes, there is an actual "Polygonal Lasso Tool" as well that you can choose, instead of the normal Lasso tool, but since I can get the same results with the normal Lasso, I just use that. There's a "Magnetic Lasso Tool" as well, which I don't use at all. Try 'em out if you like.
Note: Holding "Option/Alt" while drawing is also very useful if you need to let go of the mouse button for a moment when drawing a shape with the Lasso tool and don't want to lose your place and have the selection complete itself prematurely. You don't always have to stretch to a new point, you can just see it as a "pause" option of sorts. Maybe you've reached the edge of your mousepad, for example, and need to reposition the mouse. Holding option while in mid-selection will allow you to release the mouse button & reposition the mouse until you're ready to press it again. You can hold option for the whole time if you like, after the first click of the mouse. Experiment on your own and see the benefits for yourself.
Exercise 5: Selecting with the Magic Wand
The Magic Wand (W) is a great tool. I use it often to select areas of color and other general shapes on the screen. It's a selection tool, but instead of drawing with it, you just click on parts of your graphics and depending what the tool setting are, it will do some auto-selecting for you. Let's try it out.
Let's open up a new window, 50x50 pixels or so, Transparent background. Using whatever tool you like, put some different color shapes in the window. Use a minimum of two colors, but repeat at least one of the colors in different non-connecting places. I made this:

In this image, you can see pink and two shades of blue that are relatively close to each other. Note: to make these circles, I increased the size of the pencil tip in the "Brushes" palette on the upper left of the Photoshop work area. I know I said to set it to 1 pixel in Part One of this tutorial, but every so often it's useful to use different brush sizes.
With the Magic Wand Tool set as follows:

Click on one of the Blue circles. All the circles of one color blue will be selected perfectly. If "Contiguous" were checked, it would only select one blue circle if you clicked on a blue circle. Contiguous essentially means "touching", "connected", "uninterrupted". If you click on the pink, it will select the entire pink area perfectly either way, since the pink is not separated by any other colors at all.
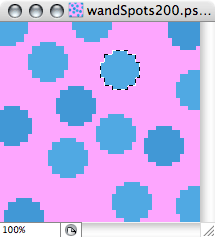
Contiguous turned On
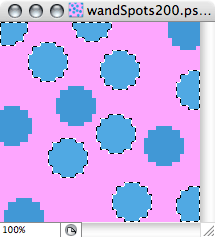
Contiguous turned Off
Pink is all connected.The wand will select it all either way.
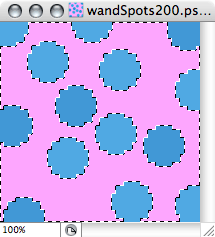
Now, if you wanted to select all Blue circles, even though they are 2 different shades, you can do this a few ways. I'll list four of them, just to show how once more how you can achieve the same results in many ways in Photoshop.
One way is to increase the "Tolerance" of the tool, so it will allow for greater range of a color. In this case it needs to be a tolerance of 22 or greater. Then the tool will select all blue circles, provided "Contiguous" is turned off. A Tolerance of "0" will mean only this one very particular color alone will be selected.
A faster way to do this is to use that same old "Add to selection" trick of holding "Shift" down while selecting, as we did with the other selection tools. Make sure "Contiguous" is turned off. In this case, select one color blue. Half of the blue circles will be selected. Hold down "Shift" and click one of the unselected blue circles. Now they should all be selected.
The same "Subtract From Selection" trick works with the wand as well. Holding "Option" on Mac, or "Alt" on PC, when you click a selected item will unselect parts of your selection.
A fourth way to do this that is good to keep in mind is making use of that Inverse Selection technique we used in Exercise 3 in Part One. In this case, I could select the pink area, Invert the selection, ("SHIFT" + "COMMAND" + "I" on Mac, "SHIFT" + "CTRL" + "I" on PC) and then all the blue circles would be selected.
Hide Active Selections: One more very helpful detail on selections: You can Hide Selections. If you have an active selection, and don't want to see it, press "COMMAND" + "H" on Mac, "CTRL" + "H" on PC. It will still be there, but hidden. Press that combo again to bring it back. I use this as often as I use selections almost. I also use the Deselect command frequently, which I mentioned in part 1. Mac: "COMMAND" + "D". PC: "CTRL" + "D". Also, do this whenever something is not working that you're trying to do. Hidden selections can trip me up if I forget about them being active.
Introduction to Layers
I think this is a good time for us to move on to Photoshop's Layers Palette. Layers are one of the greatest features in Photoshop. I've been using Photoshop since v 3.5, which did not have layers. Everything had to be done on one surface, and with only one Undo and no History Palette. Haha, look at that, I'm talking like the grandpa talking about how he had to walk 5 miles in blizzards to school uphill both ways. I'm just trying to let you know that these are great. In v 4.0, Layers came along, and have been indispensable since. I use many of them in almost all Photoshop activity, pixel art or otherwise.
So what are Layers? Well, I guess they can be described as stacking digital transparencies, except you can do almost anything image related with them. Layers can give you as many options as you use them to give yourself. They allow for greater control and non-destructive image editing. What you put on different layers, you can easily select, move around, remove, duplicate, change the opacity of, shift above or below other layers, and do a number of other useful & creative things with. By default, new windows will have a white "Background", but you can change this in Photoshop Preferences, or each time you create a new document to open, as Transparent, like we've been doing all along.
New Layers fill the image window completely and transparently. You can add as many layers as you like, or as many as your computer can handle. There are many benefits to be had from keeping portions of your work on separate layers, and the main reason is that you give yourself options and can work in ways that build on previous layers without altering their contents. You can even combine the contents of different layers with the different blending modes available in the Layers palette, and I'll talk about that later.
In case your Layers palette is not open, go to "Window" > "Layers", or hit "F7" (on both Mac and PC).
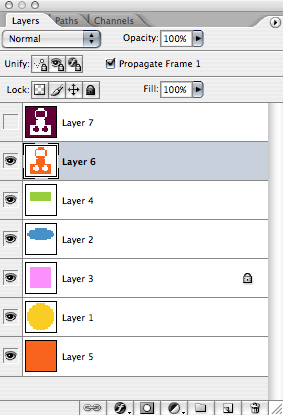
In the screenshot below, the Layers palette example is the one that contains the graphics used in my examples of the first part of this tutorial. I simply made new layers for each example, and turned off the ones I wasn't using when saving my individual images to demonstrate what I was talking about.
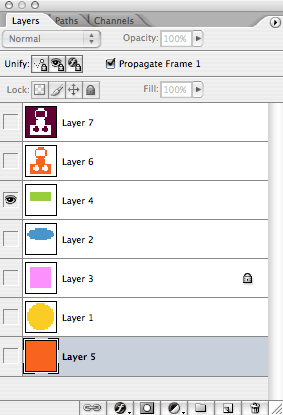

Only the layer containing this graphic is "turned on" so this is all that is showing.
Turn Layers on and off with the eyeball icon to the left of each layer.
I'll turn on more layers and let's see how that looks:
![]()
This time I turned on all the layers (except the top one) so you could see that they all just stack on top of each other and you can see down through the transparent sections.
This would look differently if I switched the order of the layers in the Layers palette.
Notice that layer 3 here has a little icon of a lock. This is because you can lock layers in different ways with those little icons next to "Lock:" up top. I usually only wind up using the Lock Transparent Pixels on the leftmost side. I do this because if I lock a layer's transparency, I can fill what's on the layer already without actually having to select anything. Filling a layer, locked or unlocked, is the same as filling a selection like we did before. Choose a color and fill with the keyboard by pressing "OPTION" + "DELETE" on Mac, or "CTRL" + "BACKSPACE/DELETE" on PC.
Make a "New Layer" in the layers palette. On the bottom section of the layers palette, you'll see some more icons. If you have Tool tips turned on in Photoshop's General Preferences, you can hover the mouse over all of these and see what each one is for. In the following exercise, we're just going to use the "New Layer" icon on the lower right. It looks like a little sheet of paper. Click this with the mouse and a new Layer will be created on top of the currently selected layer. In the example above, a new, blank layer would appear above "Layer 6."
A keyboard shortcut for making a new layer is "COMMAND" + "SHIFT" + "N" on Mac. "CTRL" + "SHIFT" + "N" on PC. Take a moment to make a new layer in a new or existing document just to try both of these methods out.
Other ways to make new layers are to Paste something new into your document, Drag an image from another file onto your current document, by Duplicating an existing layer, and by Typing with the text tool. In the following examples, I will go through all of these processes.
Exercise 6: Working with Layers
I want to go through one example of why to put things on different layers. Let's make a scene. You may want to follow along and make your own multi-layered image. Open a new document, say 50x50pixels, with a Transparent background.
Now, fill the background with a color of your choice. I'm choosing to make an outdoor scene, so I will use blue for the sky. Now, make a New Layer by clicking on the New Layer button in the Layers Palette, or using the keyboard command mentioned above. In my document, I'm going to use the lasso tool to draw the ground/horizon and fill it with green for grass. I'll also make new layers for whatever else I decide to include in this scene. At this point, go ahead and draw something on each layer, and then come back here & see what I've got going on my end.
[time passes]
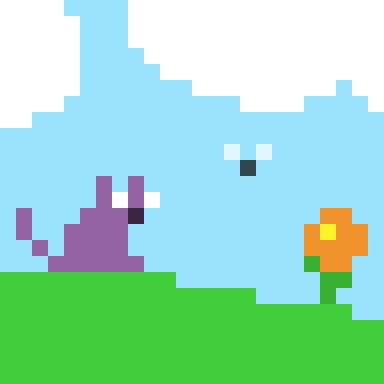
Okay, I'm finished. Here's what I made, and the corresponding Layers Palette.

Look at that happy kitty. Is she really happy? It's hard to tell with so few pixels.
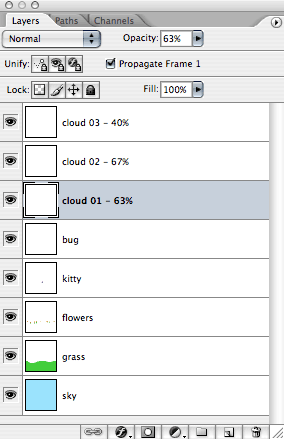
In the above example, I put all of the different types of elements on their own layer. Grass is one, flowers are all on one, etc. You can see in the Layers palette on the right what is positioned where. You may also notice that each layer has a name. This doesn't happen automatically, aside from the default names "Layer 1", "Layer 2", etc. I find it to be a very good idea to name your layers.
I'll quickly run through the process of making this image:
I opened the new file, zoomed in, chose a color and filled the background layer using the keyboard ("OPTION" + "DELETE" on Mac). Then I made a new layer, used the Lasso tool to draw the grass shape, looping the selection around the bottom of the window, and filled it with green. In a new layer, I drew cloud #1 with the Lasso tool, filling it with white. New layer, I drew cloud #2 with the Lasso tool, filling it with white. New layer, I drew the flowers all on one layer using the Pencil tool only. I also used the Eraser tool (E) to remove pixels when I needed. (with the Eraser tool set to "Pencil at the smallest brush size, 1 pixel). Next, I made a new layer, I drew the cat with the Pencil & Eraser tools. In the final layer, I drew the fly with the Pencil, so the cat would have something to play with.
This was looking good to me. I decided to change the Opacity of the clouds, so they wouldn't look so stark white. That also looked nice, but I wanted to demonstrate changing opacity. Each layer has controls on top of the Layer Palette. I selected the layer with Cloud #1, and changed its opacity to 63%. I changed the second cloud layer to 67%. Then I decided I wanted to overlap clouds to give the illusion of depth. I made another new layer, drew a cloud with the Lasso and filled it with white. Since it's on its own layer, I was able to change its position by moving it around to a new spot. I then changed that layer's opacity to 40%. As you can see, the overlapping semi-transparent clouds make some unique effects.
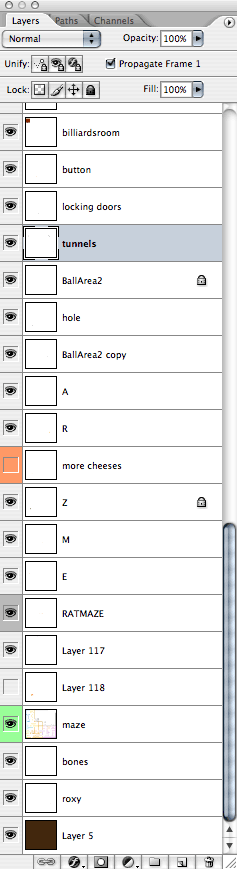
Just for some more examples of my use of the Layers palette, here are a few palettes from files I made for our games:
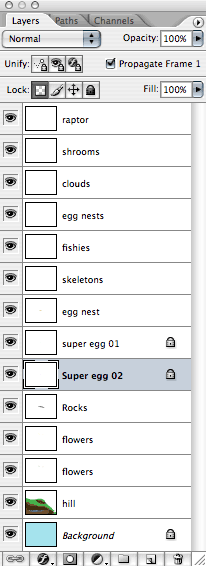
The one on the right is from the original game map file of Ratmaze 2, a portion of the Layers palette, which is the the graphic aspect of the game and all of its elements
That palette also shows that you can color code your layers to help you organize & categorize. Choose colors in the Layers Properties. Click the little arrow on the top right of the Layers palette & you shoud see it, along with a bunch of other Layer options. Notice what else is in there & try other options out some time.
Exercise 7: Moving & Selecting Layer Contents
One of the most useful things to be able to do is moving things around on layers.
If you still have the last file you created open, go to it, and select any layer in the Layers palette. Hold down "COMMAND" on Mac or "CTRL" on PC and proceed to click anywhere in your document and drag the contents of that layer around. If you hold SHIFT and drag, the movement will be confined to straight horizontal, vertical and 45 degree angles. Try it out, it can be very useful to apply at times.
You can also move the contents of a layer using the Arrow Keys. Hold down "COMMAND" on Mac or "CTRL" on PC and tap or hold the arrow keys. The layer contents should move. If you hold SHIFT down while tapping an arrow, each movement will cover more area. Make sure you've got a layer selected that has something on it, and that your layer is not locked
There's also a "Move Tool" (V), which I rarely use due to the convenience of using a keyboard modifier as I just described to any tool. The move tool is also a Transform Tool, but I use the keyboard to access Transform options as well. I'll talk about Resampling images soon.
If for any reason you don't get the desired result you're looking for with layers; moving, filling, deleting, drawing on, changing options for, these are the most common reasons I come across: The layer is locked. I've got the wrong layer selected. There's nothing on the layer I have selected. There's a selection that's hidden and I'm trying to do something outside of it (which won't work). Sometimes I accidentally switch the editing mode to "Quick Mask" above the Color Selector in the Tools palette accidentally, and nothing works. Sometimes if I can't figure it out, I restart Photoshop or my entire computer. This has fixed weird control-loss problems a few times.
Another way to move layer contents around is vertically. You can click and drag layers in the Layer Palette moving them above and below other layers, so their contents appear in front of or behind the contents of other layers.
There is also a very handy way to select different layers on the fly while busily working in the image editing space of your document. On Mac, hold "COMMAND" + "CONTROL" and click any part of the content which is on the layer you want to jump to (I can't find this option on PC). This will pop up a little menu like this:

As you can see, I've clicked on the "grass" Layer, and the little menu came up. The "sky" Layer is an option since it extends behind the "grass" Layer. In this menu, "grass" is on top and selected by default since it is on the upper layer. This feature is so helpful, especially when you're working with large files consisting of many unnamed layers.
There's yet another method of selecting; clicking a Layer with the "COMMAND" key pressed on Mac, "CTRL" on PC. Make sure you click inside the "frame" or box shaped area of the Layer that represents your document window.
So, try that. You don't even have to have a specific Layer selected to select a layer's contents in this way. Just choose one where the content doesn't fill the layer completely so you can see it actually work on a shape.
You can also use this to do some detective work in your own file. If I have large files and don't see anything change on a Layer when turning the layer on or off, and it's not named, I'll Control + click the Layer to see if anything gets selected. If there's nothing on the layer, there will be a "No Pixels were Selected" message.
Let's Take a Break
Do you take breaks often? If you spend days and nights on computers, which is what I've been doing, don't forget to take breaks! Once every hour or two for 15 minutes or so makes a big difference in my own level of energy, focus and enthusiasm for any project I work on. Plus, just like in any art creation, stepping away from your work now and then allows you some perspective on what you've been focusing on. We lose sight of the big picture focusing on details. If there are any fundamental changes that need to be made, seeing this sooner than later is helpful.
Choosing the scale of your pixel art
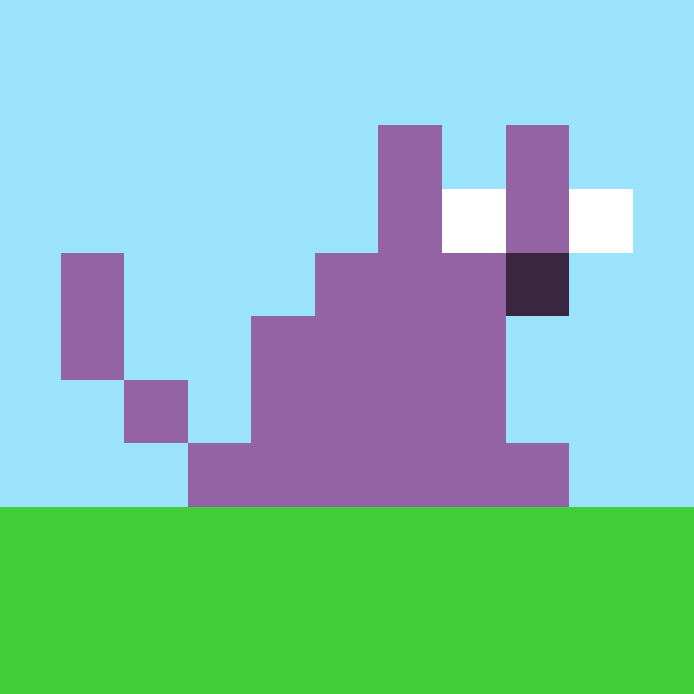
Before I move into the next section, I'd like to show you what that cat/bug/flower image looks like at different sizes. The same pixel art has a different impact & style depending on the size your pixels will be seen at. To illustrate this, I rearranged and Cropped the image using the Crop Tool (C) to focus more closely on the "actors" on my stage.![]()
1x1
![]()
2x1

3x1

4x1

5x1
Bigger...

Bigggger...
and..
Whoa! That's big. Another crop and resize and the cat becomes new again. Quite a different feel from smaller pixels.
Exercise 8: Resizing Images (aka: Resampling Images)
Do you like Math? I'm not the greatest at it, but luckily resampling pixels requires only the simplest math; adding, subtracting, multiplying and/or dividing. When Resampling your images, whether it's the entire canvas, or individual elements in your image, you must use pixel width and heights that are basically multiples of the existing size. If you want to retain the pixel purity of your artwork, that is. Resampling to arbitrary sizes can lead to some off, non-square pixels and generally mess things up. I recommend you try that out too, just to see what kind of results you get.
Resize/Resample your entire image by choosing "Image" > "Image Size" (or "OPTION" + "COMMAND" + "I" on Mac). This should bring up the Image Size palette.

If you altered your preferences as I suggested in Part 1, "Nearest Neighbor" should be already selected for "Resample Image". If it's not, you should go to Photoshop's General Preferences right now since this will affect resizing & transforming specific elements within your file as well. 72 DPI (Resolution) is what you want for a computer screen.
So, stick to multiples of your pixel numbers. For example, if you have a 50x50 image and want to increase the size, you can easily go to 100x100, 150x150, 200x200, 300x300, 500x500, etc. I'm sure you get the picture. You can have odd numbers, such as 384 pixels by 428 pixels, and you can properly resize them too, but stick to the proper multiple or divisible numbers. If I reduce that image size by -4x, the new pixel dimensions work out evenly to 96 pixels by 107 pixels. This should make a perfect reduction.
If you want to Resize particular elements in your file, say if I wanted to resize that cat above I would use the Transform command. If you want to follow along, make a small drawing on a larger layer, less than half the size of the layer. Now choose "Edit" > "Transform" > "Scale", or press "COMMAND" + "T" on Mac, "CTRL" + "T" on windows. This should make an outline selection appear with little "handles" at the corners and the center, like so:
With this, options will also appear up on the top of your workspace for the Transform Tool:
For pixel art, I just use the width and height percentages to increase things with nice even numbers. Play with this and see what you can get away with. Sometimes the math of a percentage or entire image resampling seems to work out but the image gets distorted anyway. So, in this instance, I transformed the kitty to 500%, and made sure that little chain icon was clicked, which is to "Constrain Proportions".
And if you need to resize something to an odd in-between size, you might just have to deal with some re-touching of your image by hand, if the distortion isn't so bad. It sometimes can be worthwhile to consider the final output size you're going for when designing your images.
Conclusion
Well, that's all the time I've got for part 2 of this article. I really thought I was going to be able to cover all of this in one article (haha) but it's looking now like I'll have to continue this in a third (and final!) article. In part 3 I will cover a few more of the tools such as the Paint Bucket, & the Line Tool, Using the Hue/Saturation and Levels controls, some more advanced (and easy) ways of creating pixel graphics from photos and other existing imagery, Working with Pixel Type, Indexing Color Palettes and Saving files as Gifs. That's a lot still... a third article will be out in one or two weeks. I really must spend time wrapping up may part for Dino Run, the next Pixeljam game that is getting close to completion.
If you have questions that need answering on anything covered so far, I may do a Q&A type of article with the most frequently asked questions later on. You can email rich@pixeljam.com. I may or may not get to that Q&A article. Or I may email you a response directly if I have time.