Each material file is an XML file. It is made of two parts: Setup and FX.
Material File Structure:
	 ... SETUP ELEMENTS HERE ...


	 ... OPTIONAL EFFECT SCRIPT HERE ...

   ]]>
The Setup Section
The first section of the XML is the SETUP section. Information in this section defines the maps and properties that the material will use.
The "setup" element requires 2 attributes: "name" and "description".
There are 4 types of elements that can be added to the Setup Section: lighting, world, input, and texture.
Lighting Element
The lighting element takes the form:
If lighting is set to 1 then the following constants will be sent to the shader:
// Light data
int g_light_count;
float3 g_light_vector_array[4];
float3 g_light_color_array[4];
float g_light_specular_array[4];
float3 g_light_ambient_color;
World Element
The "world" element can be of type "matrix", "vector", or "position". This element tells ShaderMap to send world information about the object it is rendering.
- Matrix types are sent to the fx_name as float4x4.
- Vector types are sent to the fx_name as float3.
- Position types are sent to the fx_name as float3.
1. The "matrix" type has the additional attribute "define" which defines the matrix to be sent to the fx_name constant. It can be any combination of the following characters:
- 'w' - World matrix
- 'v' - View matrix
- 'p' - Projection matrix
- 'r' - Rotation matrix
- 'i' - Inverse of matrix
- 't' - Transpose of matrix
Ex.
Each matrix is multiplied by the next. The inverse and transpose are applied to whatever matrix has previously been created.
A string of "wit" sends the world_inverse_transpose matrix
A string of "wvp" sends the world_view_projection matrix
A string of "ri" sends the inversed rotation matrix
There is no scaling in ShaderMap or rather all matrices have a scale of 1.0.
2. The "vector" type has the additional attribute "define" which can be any one of the following values:
- "view" - The view vector in world space
Ex.
3. The "position" type has the additional attribute "define" which can be on of the following values:
- "eye" - The eye position in world space
- "target" - The eye target position in world space
- "object" - The object position in world space
Ex.
Input Element
The "input" element defines a property control that will appear in the map properties section when that map is selected. This element can be a "list", "slider", "checkbox" or "color" control. Each type has additional attributes specific to the type.
Values of the current input are sent to the FX constant defined in "fx_name".
List types are sent to the fx_name as int
Slider types are sent to the fx_name as int
Checkbox types are sent to the fx_name as bool
Color types are sent to the fx_name as float3
1. The "list" type has the additional attributes: "prefix", "items", and "default".
- "prefix" - A prefix to the list. A list of colors might use "color: "
- "items" - A list of strings divided by the ; character. "A;B;C"
- "default" - The default item in the list. A zero based index (integer).
Ex.
2. The "slider" type has the additional attributes: "name", "min", "max", and "default".
- "name" - The name shown next to the slider control
- "min" - The minimum value of the slider (integer)
- "max" - The maximum value of the slider (integer)
- "default" - The default value of the slider (integer)
3. The "checkbox" type has the additional attributes: "name" and "default"
- "name" - The name shown next to the checkbox control
- "default" - The default state 1 or 0.
Ex.
4. The "color" type has the additional attributes: "name" and "default"
- "name" - The name shown next to the color control
- "default" - The default color of the control in HEX format.
Ex.
Texture Element
The "texture" element tells ShaderMap to send a texture to ShaderMap. The texture can be from a Map or an image file. Two types of image files are allowed and they are standard images (jpeg, bmp, etc.) and cube maps (always dds).
If any texture is sent to the shader then the tile constant is sent as well. It is a float2 and is always named g_uv_tile. Multiply this by all texture coords to get proper tiling.
1. The "map" type texture sends a user defined map to the shader. It has the additional attributes: "name", "desc", "is_normal", and "is_checkbox".
- "name" - The name of the map required by the shader.
- "desc" - A description of the map required by the shader.
- "is_normal" - Can be either 1 or 0. If set to 1 then the map sent should be a normal map. An additional constant is sent the the FX shader which contains the coordinate system of the normal map. It will take the form _coordsys. It is a float3 vector. It represents the coordinate system relative to the default tangent space used by ShaderMap. A vector of (1,1,1) means it is in X = +Right, Y = +Down, Z = +Near. A value of (1,1,-1) means that Y = +Up
- "is_checkbox" - Can be 1 or 0. If 1 then a checkbox control will be added to the properties that allows the user to disable sendingthis texture.
Ex.
2. The "image" type texture sends an image from file to the shader. It has the additional attributes: "name", "file", and "is_checkbox".
- "name" - The name of the image shown only if is_checkbox is 1.
- "file" - The filename of the image to load as a texture. It is relative to the location of the material file.
- "is_checkbox" - Can be 1 or 0. If 1 then a checkbox control will be added to the properties that allows the user to disable sending this texture.
3. The "cube" type texture sends a DDS cube map from file to the shader. It has the additional attributes: "file" and "is_checkbox".
- "name" - The name of the cube map shown only if is_checkbox is 1.
- "file" - The filename of the cube map to load as a texture. It is relative to the location of the material file.
- "is_checkbox" - Can be 1 or 0. If 1 then a checkbox control will be added to the properties that allows the user to disable sending this texture.
Ex.
Ex. A Diffuse Lighting Material Setup:
The FX Section
The second section of the XML is the FX section. This section can include an entire Direct3D effect script enclosed in the CDATA section or can just be a link to a file in the same directory as the XML.
Attributes for the "fx" element are "vsm", "psm", and "file". vsm is the maximum vertex shader model required by the material. psm is the maximum pixel shader model required. The file attribute is optional, if set the fx is loaded from an external file rather than from the CDATA section. Ex. file="external_shader.fx"
Because ShaderMap uses DirectX 9c the maximum shader model supported is SHADER MODEL 3.
To learn more about DirectX Effect files see the Direct3D9c documentation:
http://msdn.microsof...9(v=vs.85).aspx
http://msdn.microsof...8(v=vs.85).aspx
or just google it: http://www.google.co...rect3D9 Effects
Diffuse Lighting Material
Here is a complete material example. It serves as a good starting point for creating your own materials. It takes one map as diffuse and uses per-pixel n dot l lighting for each of the project directional lights.
	 // ==============================================================

	 // Light data
	 int g_light_count;
	 float3 g_light_vector_array[4];
	 float3 g_light_color_array[4];
	 float g_light_specular_array[4];
	 float3 g_light_ambient_color;

	 // World data
	 float4x4 g_world_matrix;
	 float4x4 g_world_view_projection;
	 float4x4 g_world_inverse_transpose;

	 // Input data
	 int g_multiplier;

	 // Map data
	 float2 g_uv_tile;
	 texture g_diffuse_texture;

	 // Samplers
	 sampler g_diffuse_sampler =
	 sampler_state
	 {
		  Texture = ;
	 };


	 // I/O structs
	 struct VS_INPUT
	 {
		  float3 position : POSITION;
		  float3 normal : NORMAL;
		  float2 uv : TEXCOORD0;
		  float4 tangent : TANGENT;
	 };

	 struct VS_OUTPUT
	 {
		  float4 position : POSITION;
		  float2 uv : TEXCOORD0;
		  float3 normal : TEXCOORD1;
	 };

	 // ==============================================================


	 // Vertex shader
	 VS_OUTPUT vs_main(VS_INPUT IN)
	 {
		  // Local data
		  VS_OUTPUT OUT;


		  // Store output position, UV, and normal
		  OUT.position = mul(float4(IN.position, 1.0f), g_world_view_projection);
		  OUT.uv = IN.uv * g_uv_tile;
		  OUT.normal = mul(IN.normal, (float3x3)g_world_inverse_transpose);

		  return OUT;
	 }

	 // Pixel (fragment) shader
	 float4 ps_main(VS_OUTPUT IN) : COLOR
	 {
		  // Local data
		  int i;
		  float n_dot_l;
		  float3 n, d, l;
		  float4 c;


		  // Get texture color
		  c = tex2D(g_diffuse_sampler, IN.uv);

		  // Get normal
		  n = normalize(IN.normal);

		  // Base light color
		  d = float3(0.0f, 0.0f, 0.0f);

		  // Calculate diffuse light color
		  for(i=0; i		  {
			   // Light vector
			   l = normalize(-g_light_vector_array);

			   // N dot L
			   n_dot_l = saturate(dot(n, l));

			   // Add in light
			   d += n_dot_l * g_light_color_array;
		  }

		  // Calculate final color and return;
		  c.rgb = saturate(saturate(c.rgb * (g_multiplier / 100.0f)) * d);

		  return c;
	 }

	 // ==============================================================

	 // ShaderMap Technique
	 technique shadermap_material
	 {
		  pass
		  {
			   VertexShader = compile vs_2_0 vs_main();
			   PixelShader = compile ps_2_a ps_main();
		  }
	 }

	 // ==============================================================
	 ]]>
And here is it running in ShaderMap 2:
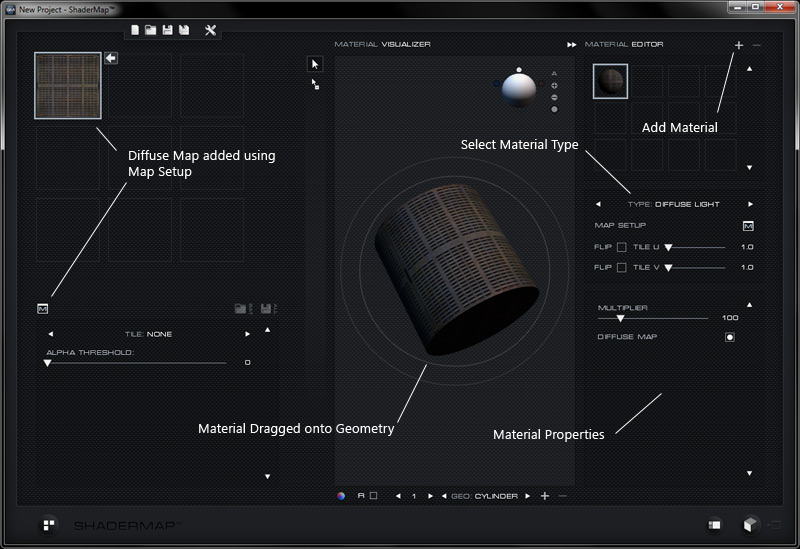
You can download the full material file here: Diffuse Lighting Material
To install the XML material file - place it in the following directory: C:\Program Files\ShaderMap 2\plugins\materials\
For more information and examples download the free ShaderMap SDK: http://shadermap.com/downloads