A couple of things you should know about me. Firstly I'm a solitary programmer. I work every day at my home office which makes me a little nerdy but actually quite personable. I have been married for nearly 10 years to Christa. Together we have raised Brandon for these last 16 years. We moved to Ann Arbor so Brandon could be challenged and make good friends. It was a success; he's a 4.0 in his sophomore year, likes advanced geometry, and just finished his first season of water polo.
In other words, I'm a solitary problem solver / family guy.
The next important fact is that I grew up in a house surrounded by a forest. My childhood consisted of staring at giant pines in the winter months and playing ninja, slashing branches, and generally wanting to be Mr Miyagi the rest of the year.
With that in mind, when I decided to create forests in 3D it immediately felt right. Here was a way for me to return to the forests of my youth and also share a part of my childhood with the world. Win Win!
Enough drama, here's how I did it.
A Fully Animated Tree
My goal was to make a tree where every part (leaf, stem, and branch) is animated in real-time for video games and simulation. Having some background in film, my first thought was to shoot video of tree branches, edit it to a loop, and play those videos on billboarded quads. The quads would then be attached to a geometric branch structure.
After some thinking I realized this method had merits but it was not at all practical to implement. Because I was aiming for platform independence the system could not reply on API specific video. Also the thought of all that video editing was too much. To maintain the desired effect I devised a way to embed the leaf and stem animation frames into a 2D texture. The animation would then be controlled via the texture coordinates. To do this I would need to create a tool to render leaf animations. This would later lead to 2 versions of the Leaf Painter application.
Resource Gathering
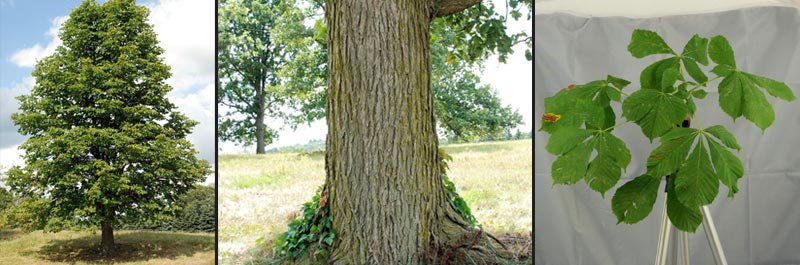
Christa, my business partner and part-time photographer, began collecting texture resources early on in development. Trunk and bark textures were photographed in the field, branches and leaves were a little more complicated to capture. For each branch on a tree we would cut small samples and quickly take them back to our small photo studio. The samples were placed inside a light tent and photographed with reasonable control over the lighting. Individual leaves were then cropped using Photoshop and stored as Targa bitmaps. This method is tedious and time consuming but works well enough.
The Branch Geometry
Back on the programming side I began developing the mesh to be used for each branch in the tree. I developed a base mesh class and derived a branch mesh class. The base mesh provides an interface for allocating and modifying the mesh geometry. It uses a flexible vertex format allowing the user to define arrangement and size of vertex elements. The branch mesh class essentially creates a 3D tube object made of indexed primitives. The number of stacks and slices are defined at creation as well as texture tiling, normals, tangents, etc.
Now that I had the basic mesh to work with I created the branch object class. This class is responsible for shaping the tube mesh into a branch. Using a given number of knots (noise points) I could rotate the mesh vertices to follow the path of a spine interpolating along the knots. The radius of the branch at a given slice is controlled by a curve ranging from zero to radius max along the length of the branch. Early on many of my curve settings were linear resulting in a cone like branch shape. Later, after creating the curve editor, I could create more realistic branch shapes. Noise, distributed along the control points, is also controlled by a curve as are many other settings.
Next I needed to create a tree from the branches. Behold the tree class object; it allocates a list of branch objects during the tree creation phase. Branches are added in levels. The first level is attached to the trunks (level 0). Branches are placed along the length of the trunk given a set of placement parameters. Every branch level contains a randomization seed value for general settings and another for noise. Additional levels are then added. Weights are applied to each level causing them to grow towards a point or along a vector.
In the beginning all parameters were entered manually, this was before I developed the Tree Forge application. Currently all branches are created procedurally using parameter values and curves but my goal is to allow direct user control over branch placement and shape in the Tree Forge.

Leaf Placement
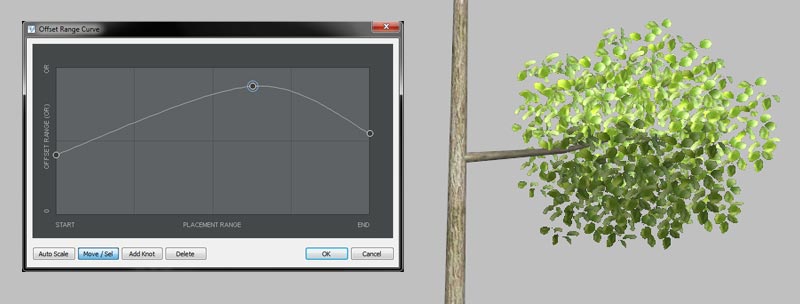
The current leaf placement strategy is quite simple. Leaves are placed along the length of a branch given start and end points. A maximum offset value is entered and a curve controls the offset from 0 - maximum offset along the length of the distribution area. A leaf distance value controls how far apart each quad is placed. A randomization seed is chosen and the system fills the placement area with quads. I have many ideas on how to improve this method as well as additional methods for placement I'll experiment with later.
The Animation Strategy
I realized early that a tree fits neatly inside of a sphere with its center at the base of the trunk. As the wind moves through a tree it's branches bend towards the ground. Using an arbitrary axis rotation matrix, created from a 2D vector on the XZ plane, I could bend the trunk geometry by multiplying a wind intensity value by a flexibility weight element for each vertex. By adding an oscillation value to the wind intensity the trunk movement was simulated with acceptable results.
Once the trunk was animating, I added branches. Each branch inherits it's starting flexibility weights from the parent branch. Now I could create multiple levels of branches that would rigidly bend together in the flowing breeze.
It was clear that a tree with rigid branches neither looked real or sexy. I decided an additional layer of oscillation should be applied to any given level of branches. Each vertex in the tree was given another element, the oscillation offset weight. Using this value I could determine if a vertex was below or above the oscillation branch level. Branches found to be at or above the weight level multiply the wind intensity by the sine of the (oscillation offset weight + an incremented oscillation constant) before calculating the rotation matrix. The result, with a little tweaking of the values, is quite convincing.
Leaf quads were then animated using a sine wave around the view (quad normal) vector. Each leaf has it's own vertex elements with unique phase offsets. This creates a nice randomized movement as the intensity of the wind increases and decreases. Finally the leaf texture coordinates are manipulated, based on the intensity of the wind, to play a smooth leaf animation.
Leaf Painter
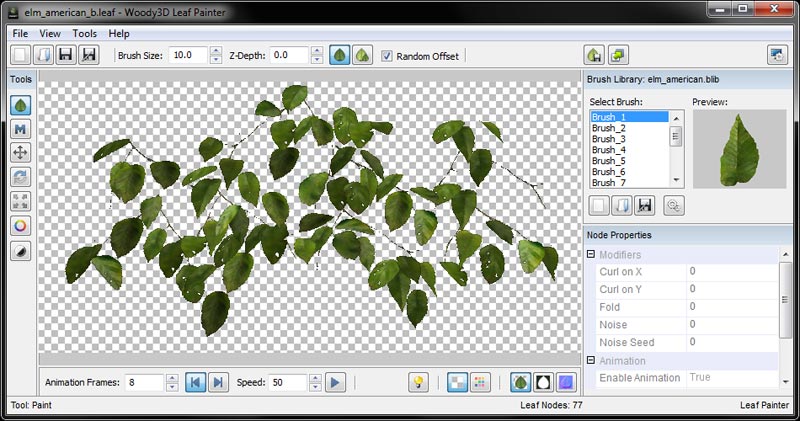
The first tool I created was the Leaf Painter. The original version was simple and allowed the user to load leaf brushes and paint them to a 2D canvas. Each leaf was rotated in 2D and the results were rendered to a 2D texture. It was enough to prove that my animation scheme worked but not enough to achieve the realism I was working for. I would need to create the leaves in 3D.
The second version of Leaf Painter works by painting leaf meshes onto a plane in a 3D window. The meshes are textured with the leaf images. Leaves are rotated using an arc ball gizmo. Each mesh can be rotated, warped, scaled, colored, and rotated in 3D. Because each mesh contains world space normals the Leaf Painter can generate tangent space normal maps from the canvas in real-time. The resulting animations produced by the new Leaf Painter exceed the results of the original.
Tree Forge
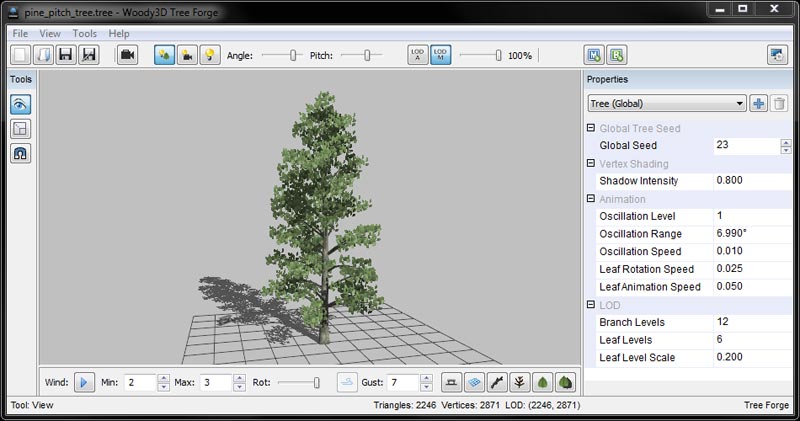
The second tool I created was the Tree Forge application. This is the tree creation tool. Trees are generated from a set of parameters and can be modified and randomized. Level of detail is generated automatically and can be visualized. Animation parameters can be set and viewed in real-time. It essentially creates trees and saves the parameters to an XML file. The XML is then compiled to a platform specific Seed or Mesh binary file which the API loads at runtime.
There is so much to the Tree Forge application that I'll need to devote an entire entry to it later.
My Exit
That's it for now. I hope you've enjoyed reading about my experiences and that you come back to read more. I've been working on this in private for a little over 3 years and have been dying to tell my story and share my work. In the next entry I'll talk about what I'm doing right now and plans for launching Woody3D.
Happy development,
Neil


Of course the big questions are, will there be some form of interactive demo (like the ones you can find for SpeedTree in their Pangaea demo) so people can evaluate it properly. What kind of frame rate and on what hardware are you getting?