I make you deal.
If you're like me, then you're not wealthy. I admit it. I do okay, I keep food on the table and roof over the heads, and every now and then a tank of gas for the truck to play in the mountains. But as an indie/hobbyist, my game development budget consists of whatever random pocket change I can pull out of my pants at any given moment. Which is zero, of course, because my wife has an ear for pocket change and no love for the idea of me shelling out big bucks for some gigantic gob of software, no matter how neat-o and shiny that pile of software might be. So if I want to get graphics done for my games, I have to do it myself, and I have to do it for cheap.
Blender, Gimp, and Sculptris. All available for free, so you can't get much cheaper than that. Sure, the high-dollar applications might be more fully featured (although,in the case of Blender, not by much; Blender is becoming quite the powerhouse) but for indie art creation budgets, it's hard to justify the hundreds, if not thousands, of dollars you can spend on commercial apps, especially when such quality tools are available for free.

And who doesn't like free? Amirite?
I'm not an expert, not by any stretch of the imagination. To be an expert artist takes a lot more time and dedication than I've been able to put forth. I'm pulled in too many directions (programmer, writer, artist, family man) so I dabble, in lots of things. But in my dabbling, I've discovered a few tricks. And because it's been quite awhile since I've posted anything other than a "lol im still hear guyz wut r u doin?" entry, I thought I'd share a little bit about some of the things I've discovered while making graphics for Goblinson Crusoe, and Golem before that, and all my other hundreds of little aborted projects.
If GC concentrates any harder, that plant will fly away
Once upon a time, game artists of the 3D variety were forced to model their creations directly into the low-poly format used by games. Working from sketches, they would instance low-resolution primitives and push, pull and jiggle the individual vertices about until they achieved the form they were looking for. The best ones could perform a kind of magic; cylinders and spheres and boxes magically transformed into hulking armor, bulging muscles, leering demonic grins. There are still quality, dedicated low-poly artists out there, but it's a dying art. Technology, advances in software and hardware, are increasingly making the true art of low-poly redundant
From what I've seen in my meager explorations, the typical pipeline now includes a very high resolution modeling stage, from which the lower resolution data is obtained, rather than modeling directly to low-poly. And, of course, the bar indicated by the term "low poly" has been significantly raised; today's "low poly" models are yesterday's "high poly" models, and so the techniques for creating them have changed.
The first tool I want to discuss, then, is a tool that has proven to be fantastic for creating the high-resolution stage of the pipeline: Sculptris. Sculptris is a small, dedicated digital sculpting tool originally created by Tomas "DrPetter" Pettersson and released as a free tool. Sculptris, along with its creator, have been bought up by Pixologic (makers of the Zbrush software), but the last release that DrPetter made of it remains freely downloadable at http://www.zbrushcen...ead.php?t=90617 . From what I can see, the future of Sculptris is hazy; I have not seen much in the way of activity with the project, nor any community or press releases from Pixologic about the future of Sculptris. I try not to take too dim a view on things, but I highly doubt it goes anywhere, which is why I was reluctant to include it in this article. The picture in the Sculptris forum at ZbrushCentral leads me to believe that Sculptris may be deader than last week's ham sandwich.

You give me sandwich, or I start reapin'
However, the future is not all grim. It is possible that Pixologic does, in fact, plan to do something with it. Even if they do, I highly doubt it will continue to be the free offering that it currently is. Possibly, they will take the good features of Sculptris and fold it into their main product, Zbrush. I don't know. Don't really care because luckily for us there may be another option, and while I will discuss Sculptris as part of the process, I will also make a mention of Blender's capabilities for sculpting.
Recent releases of Blender haveincluded a great deal of improvements to the sculpting mode,including some functionality (which I'll discuss later) that canvastly streamline the high-res to low-res transition in certainsituations. So I am including Sculptris in this article because, forsome things, it tends to be a lot easier to use than Blender'ssculpting, but I also want to say that you can skip Sculptrisaltogether and just use Blender's tools, and with just a little moreforethought and planning, achieve excellent results.
So, the process begins with a sculpture. Or, actually, it begins with a sketch, or a picture of some sort, from which a sculpture is made. I am no artist, like I said. But I have found that in the learning stages of this art (and it is art) it is far easier to work from some kind of reference, be it a sketch or a photograph, in order to get details of form and proportion correct. Even if what you are making is purely fantastical, it will include elements (skin folds, claws, fingers,whatever) that will benefit from having reference material available. So my tip here is this: Build your reference photo library. Make it big, make it robust, make it organized. Name a folder Talons and put inside it a dozen different photos of talons: raptors, lizards, you name it. Then, when you go to create that lizardman character--you know, the one with the big giant talons--you'll be ready.

Big giant talons. These are actually kind of gross, if you really look at them
After the sculpture is completed, complete with lots of details, we need to paint it. Once upon a time, texture artists painting a model would load up an image editor such as Gimp and go to town with paint brushes directly on a wireframe version of the model's UV map. Again, the guys that were really good at this could do a kind of magic. It isn't easy painting directly on the distorted UV map of a model, and having it come out right. It's an iterative process that takes lots of time and practice to get right. Luckily, however, times have changed in this regard as well, and with free software (either Sculptris or Blender will do for this part as well) we can paint directly on the model using a variety of brushes, textures and techniques that make the process of creating the texture maps for our high-resolution model as simple and intuitive as the sculpting process.
Once the model is painted and shiny, we need to process the model to bring down the poly count to something a game engine can handle. For this task, we will be using Blender. There are several different ways of doing this that will be discussed, and I'll to the best I can to weigh the pros and cons as I see them from my own personal standpoint. The methods range from the stupidly simple (with the expected quality level from a stupidly simple method) to the mind-numbingly tedious (with excellent quality, after some practice).
Once the low-poly version is complete, we will UV map the low poly model, then use the high-resolution mesh and Blender to create texture maps (color, ambient occlusion, and normals) to apply to the low poly model to get our final result.
[page]
[aname=SculptrisSculpt]
[size="2"]Sculptris:Sculpting
Sculptris is pretty cool. At its heart, it is a digital sculpting program. When you first fire it up, you see a sphere. Nothing extraordinarily cool about that, of course, but we're just getting started.

Cool, wut?
In the upper left hand corner are the various brushes you can use. Brushes are the basic mesh editing operations, and include:
Crease: Creases the mesh. When inverted, this will raise a sharp ridge-like line following the path of the cursor. When non-inverted, it will carve a wrinkle or crease.
Rotate: Rotates the mesh or parts of the mesh. If the Global button is selected, it will rotate the entire mesh as a whole, otherwise it rotates the part of the mesh under the cursor, with falloff defined by cursor size.
Scale: Scales the mesh or parts of the mesh. If the Global button is selected, it will scale the entire mesh. Otherwise, it scales the part of the mesh under the cursor, gain with a falloff defined by cursor size.
Draw: A basic tool for adding or subtracting volume. If not inverted, the brush will "glob" material onto the mesh, increasing volume, while the inverted brush will carve volume away. It's one of the basic tools for sculpting.
Flatten: A basic tool for flattening and smoothing material. Can be locked to a plane, useful for creating planar angles and flat spots. Stonework, chiselwork on wood, etc...
Grab: Grabs and drags the mesh or parts of the mesh. When Global is selected, it will move the entire mesh, otherwise it moves only the part under the cursor with falloff. This is a highly useful tool for roughing out mesh shapes.
Inflate: This is another tool fo radding or subtracting volume. The non-inverted brush is highly useful for thickening things such as tendrils, fingers, etc...
Pinch: This is another tool for gathering, or pinching, the mesh into folds and creases.
Smooth: This tool is useful to smooth out bumps and sharp edges in a mesh.
Reduce Brush: This brush is useful for removing mesh detail where it isn't needed, and its inverse is useful for adding mesh resolution to an area before you perform detail work.
Most of the tools are affected by the brush settings of Size, Strength and Detail. The Size setting, of course, determines the size of the area affected, while Strength affects the power of the brush's effect. A higher Strength with a Draw brush, for example, adds more material. The Detail setting is special, and is part of what makes Sculptris stand out.
Other digital sculpting applications(such as Blender, currently) work by sculpting on an evenly sub-divided basemesh. The basemesh is subdivided smaller and smaller for high detail work, using a Multiresolution modifier that subdivides equally across the whole mesh. The downside of this technique is that all areas of the mesh receive equal amounts of detail, even areas that are large and smooth, areas that could realistically be represented by a less-dense mesh. Sculptris gets around this by adaptively subdividing the mesh underneath the brush when a tool is applied, and the strength of this adaptive subdivision is controlled by the Detail slider.
The Detail slider all the way to the left (0) will not subdivide the mesh at all, while the Detail slider all the way to the right will subdivide the mesh very finely, and is an excellent way to stomp all over the RAM capacity of your puny little computer and crash the (somewhat buggy) program to a hard-lock or a shiny view of your desktop. Most of my own work is done with the Detail slider in either the 0 position or somewhere less than 1/2.
All of the various tools have other options that can be fiddled with. If you are in the midst of a creative frenzy, and find that moving the cursor up to the corner to adjust brush size, strength and detail is just too much of a burden, then you can hold down Space to get a radial menu with sliders allowing you to adjust those three settings.
Now, with a brush selected, you put the cursor on the mesh and left-click to apply the brush. For brushes that have an invert mode, you can right-click to apply the inverted brush. Holding the middle button and moving the mouse will allow you to rotate the mesh, and the scroll wheel will allow you to zoom in and out. If you hold Shift while left-clicking, it reverts to the Smooth brush, which is handy for quick on-the-fly smoothing of details.
Now, with these basic principles in mind, go crazy. Refer back to your reference material often, try to get the details realistic and correct. The process of sculpting using a digital sculpting program is very intuitive, and Sculptris itself is a very smooth and accessible program. The best way to learn is to fire it up, grab some brushes, and just get a feel for it. Don't be intimidated, it really is a simple program to use. Have fun with it.
My personal workflow involves first the judicious use of the Grab brush, in non-Global mode, to drag out parts of the mesh and rough in the shape. For this, I keep the Detail slider around 1/4. Grabbing with Detail>0 will ensure that as you pull out lumps of mesh, the lumps will be subdivided, and subdivided again, adding detail to them in a way that does not happen in sculpting methods that utilize regular subdivision of the base mesh. In those other apps, the mesh is pulled out but no detail is added, leading to large, ungainly, horridly stretched polygons. This, right here, is exactly why I love Sculptris; this sort of free-form sculpting where I can just create directly on the canvas of the screen.
Pictured: Artistic genius.
Once I have Grabbed the mesh all over like some sort of handsy pervert, pushing it into rough shape, it is time to start adding detail. Sculptris provides the tools; the art has to come from you. If you have multiple monitors, put some of your reference photos up on the second one, and refer back to them often. This part will take lots and lots of practice to get right. Wrinkles, especially, can be tricky. For this stage, I use Inflate a great deal, as well as Smooth and Flatten. Crease is ideal for sharp edges and deep creases, and I have found that using Crease, then applying Flatten with low Strength and un-Locked works well for smoothing without completely destroying your edges, as sometimes happens with Smooth. For things like tails and fingers, I will Grab out a tendril then use Inflate to add volume, smoothing the lumps as I go and trying to stick to the forms I imagine or find in my reference photos.

Do these wrinkles make me look fat?
It is tempting to crank up the Strength sometimes, to really pile on the volume, but in Sculptris I have found that it is far easier to add volume than to remove it. There exist in the algorithms certain flaws or bugs that sometimes result in degenerate mesh formations when too much Deflation or other reduction methods are applied. I have found that using Reduce Brush +Smooth is useful for correcting these messes when they occur.
The best way for me is to use relatively low strengths, and add detail progressively. It is painstaking work, a labor of love for sure, and you are probably going to either love it or hate it. I love it, even as I despair of ever becoming really good at it. (I'm wearing too many hats to ever become really, truly good at something.)
Sculptris also allows you to load greyscale images or textures, and enable them as brushes while sculpting. I have found that they work best judiciously applied, and the best results are achieved at very high detail levels (higher than my poor lappy can realistically achieve) but they can be useful for adding some types of detail.
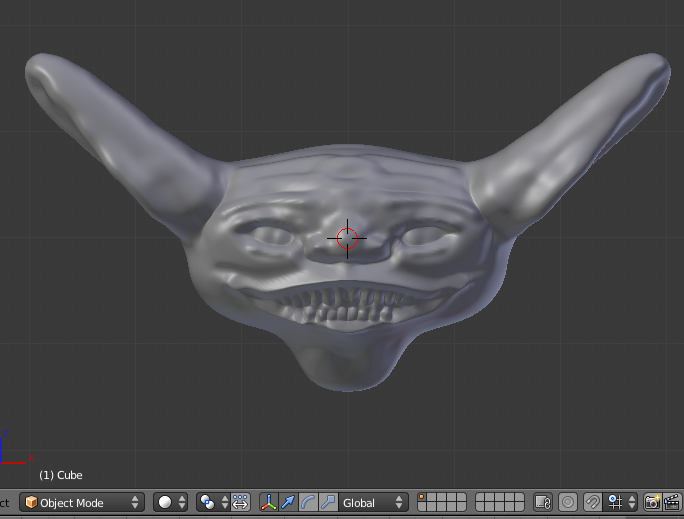
Now, in the above screenshots I am working on some kind of weird head. Might be a character in there somewhere, maybe. Maybe not. However, sculpting isn't just useful for characters; I use it in all sorts of places. Sculpting tree trunks, with lots of gnarly twists and roots, for example. Sculpting rocks, wind-eroded ones and jagged ones alike. Pretty much any type of organic detail. Sculpting like this is a very free-form process, ideal for organic or non-rigid shapes, but not so ideal for sharp edges and geometric shapes, such as buildings. For these, I have found that it is best to create the base meshes in some other program (Blender, anyone?) and then import them into Sculptris to add any necessary detail work. (Although, I must say that for architecture details I tend to keep my workflow strictly to Blender; Sculptris's strength is its adaptive subdivision for roughing-in shapes, and this really isn't needed for architectural details.)
To facilitate moving between Sculptris and Blender, Sculptris allows for importing and exporting meshes in Wavefront .OBJ format. You can create a base mesh in Blender (or work from an existing mesh you have sitting around; just remember to subdivide it a couple times if it is really low poly; Sculptris works best from a mesh with a bit of detail already added to the mesh) and as long as it holds to certain rules (no faces of greater than 4 edges, no edges shared by more than 2 faces, etc...) it should import well into Sculptris. I have run into issues, however, so exercise caution.
If you don't want to use Sculptris, for whatever reason, then you can do your sculpting in Blender. Turn the page to see a quick run-down of how it's done in Blender.
[page]
[aname=BlenderSculpt]
[size="2"]Blender: Sculpting
Sculpting in Blender suffers from one limitation that Sculptris does not: it is difficult to start from a very basic shape such as a sphere, and use Grab to draw it out into a more complex form. Blender does possess a Grab brush, of course, but pulling out a section of mesh is problematic in that the piece being pulled out will not subdivide automatically. The farther out it is pulled, the more stretched and distorted the faces of the mesh become. In order to add detail to the stretched part, it is necessaryto subdivide the entire mesh further, which may introduce unneeded mesh complexity to other areas of the mesh, and will exponentially increase face counts for the entire model. With this in mind, it is important that you have at least a rough idea of the shape of your character or model in mind before you start, so that you can construct an appropriate base mesh to start from, one that will provide a good framework for the sculpt without requiring a great deal of heavy subdivision to preserve detail. This means creating a base mesh using traditional mesh editing tools, rather than simply Grabbing and pulling the mesh into shape.
Look at the stretched polygons! They're so beautiful!
In order to prevent this kind of severe distortion, we need to construct a base mesh that conforms well to the final shape the model will take. This prevents us from having to pull the mesh too far out of place. In this case, it can come in very handy to have a background image set in order to guide our work. A tutorial that discusses how background images can be set in Blender is found at http://www.blenderco...-images-in-2-5/
You can load in multiple views of a sketch or object, then use that pattern as a guide in first constructing the base mesh, and second in sculpting the base mesh into something awesome. Of course, if you prefer a more free-form style, then you can just extrude the faces of your cube any which way, and work with what you get.
Now, in Blender, the key to good sculpting is having a nice, densely-subdivided mesh that gives enough resolution to create the level of details that are needed. We can do this one of two ways: 1) Select all the verts in the mesh in Edit Mode, and hit the Subdivide button in the Object Tools window a whole bunch of times. This way is not optimal, as there is no built-in way to reduce the level of detail (something which, as we will see, is very desirable), and also as the sculpt mode in Blender was optimized for a different method: 2) using a Multiresolution modifier. A Multiresolution modifier can be applied to a mesh using the Modifier stack, found by selecting the little Wrench icon when the base mesh is selected.
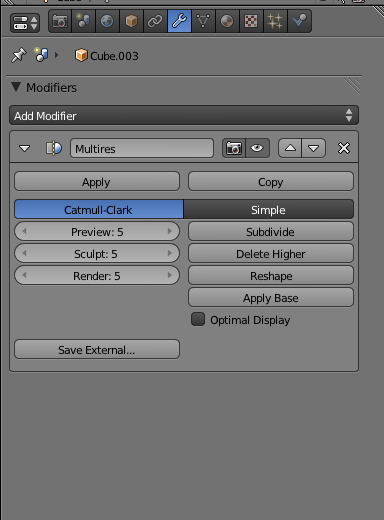
This bastard right here
There are several cool things about the Multiresolution modifier. First, it subdivides a mesh, just as the Subdivision Surface modifier does; however, a subdivision is not final unless applied, and you can revert to lower levels o fsubdivision if desired. Second, you can choose the type of subdivision to perform. Catmull Rom subdivision will "round the corners" of a mesh as it subdivides; a cube with a CR subdivision applied approaches a sphere in shape the more you subdivide it. Simple subdivision will split faces in half without changing shape. A cube with Simple subdivision applied remains a cube in shape no matter how high you subdivide it. The Multiresolution modifier allows you to choose the resolution that you display in the main 3D View Object mode, as well as the resolution at which Sculpting takes place. Sculpting a mesh with the Subdivision Surface modifier will not affect the mesh generated by the modifier, it will only affect the original points of the base mesh. But sculpting a mesh with the Multiresolution modifier will affect the subdivided mesh at the level indicated by the Sculpt level set in the modifier.
To try out Blender sculpting for yourself, fire up a new file, select the default cube, and go to the Modifier stack, represented by the Wrench icon. Add a Multiresolution modifier, and hit the Subdivide button in the modifier controls several times until you get a nice dense mesh. Note, of course, that face count and mesh complexity increases exponentially with subdivision, so once you start hitting 7 or 8 subdivides, you're heading off into Crazy RAM-Usage Land. Also known as Holy Crap Slideshow Editing Land, if your computer's kung fu is weak. (My lappy's kung fu is often called Wet Paper Bag Style, and is quite exceptionally weak.) Try to add just as much subdivided detail as you need and no more, and remember that just as with Sculptris, in Blender you can fake a lot of really small detail using a bump map rather than the mesh itself.
Anyway, subdivide your cube, select Sculpt Mode from the mode drop down box in the 3D View, and using the brush settings on the left of the Sculpt Mode view, go to town. You can Grab and drag, you can Draw, you can Pinch, you can Inflate, you can Smooth. Go ahead and give it a whirl. For learning purposes, select the Grab tool and grab a part of the mesh. Drag it waaaay out, and observe how the mesh distorts. This is the consequence of using a fixed, regular subdivision scheme rather than an adaptive subdivision scheme.
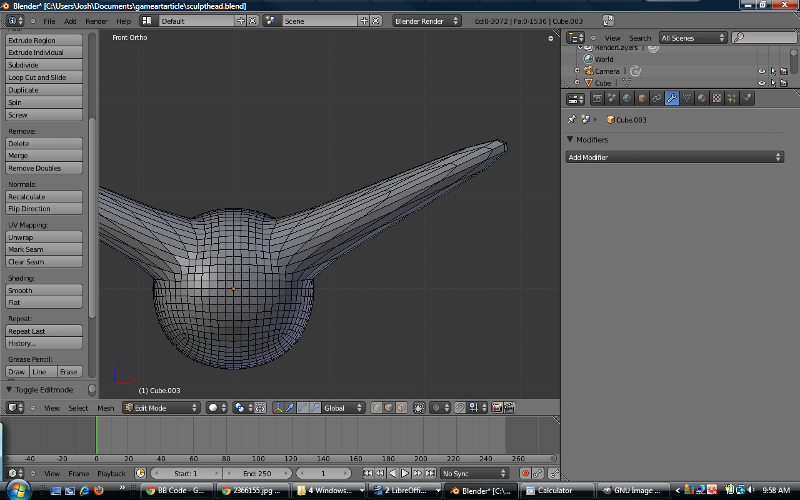
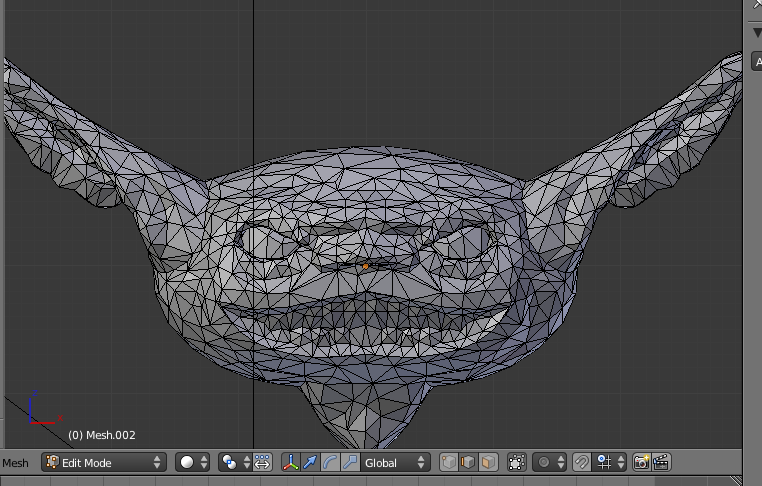
Starting with the default cube isn't optimal for any but the simplest of shapes. (Asteroids, maybe. Giant rocks floating in space.) For anything more complex, you need to extrude the cube out into a more complex base shape. I personally tend to use extruded cubes a lot, with a level or two of Subdivision Surface applied to the mesh as needed, in order to generate base shapes. As an example, here is a base mesh I might start from for the head I sculpted earlier in Sculptris, if I were going to make it in Blender instead:
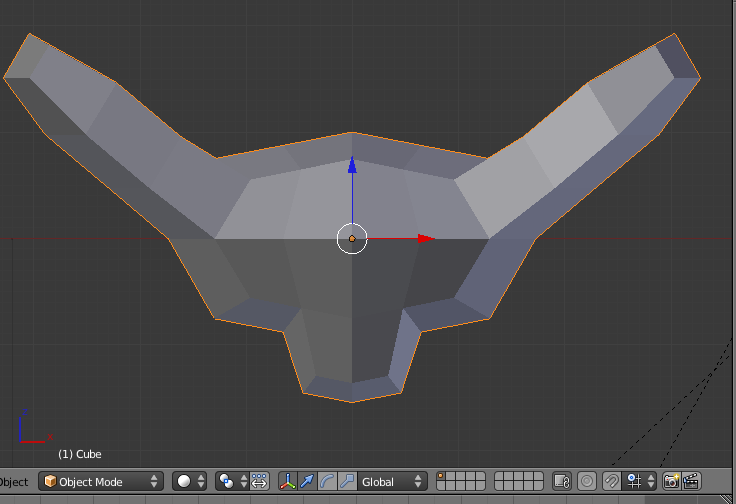
Are those ears on your head, or are you happy to see me?
To make this, I began with the default cube and scaled it along X a bit. I applied a Subdivision Surface modifier of 1 level, then applied the modifier to the mesh. With the subdivided mesh in hand (now a rough oval in shape) I entered Edit Mode and selected faces roughly corresponding to the locations of the ears, extruding those faces and dragging them out, pushing the extrusions around in Front and Side view to match the ears, drawing out a couple segments and scaling them down to fit. Same with the little nubbin on the bottom for the neck. Note that the base mesh is rough; it is supposed to be. This isn't the stage where we are even remotely concerned with adding detail. We are just trying to establish the main form here, with a view toward adding volume where volume is required.
Now, with the rough base mesh in hand, I go to the Modifier stack and apply a Multiresolution Modifier, then Subdivide a few times. I don't need to go crazy here, 4 or 5 levels should do. Once the modifer is applied, I can go into Sculpt Mode and use Grab brush to pull the mesh more closely to the desired shape. Since the rough mesh is pretty close to the final overall form, I don't need to Grab and pull very far, so mesh distortion is minimized. (Contrast to what you would get if you started with a subdivided sphere/cube and pulled those long ears out; ouch.)
Once satisfied with the form, I start in with the details. Note that I lay this out as a sequence, but it is very much an iterative process. There are few hard and fast rules when it comes to the actual sculpting. The only way to get good at it is to practice, practice, practice.
Here's a partially completed sculpt. It's rough, but I didn't really want to spend a whole lot of time duplicating something I've already done:
Not pictured: Moar details!!
I have found Blender sculpting to be slightly less efficient than Sculptris, and the tools work a little differently, but given a bit of practice one can make exceptional things with it. It really has come a long way since sculpting was first introduced in Blender 2.43, and I fully expect more improvements to come. Maybe some day we'll see an adaptive subdivision mode similar to Sculptris.
So, now that we know how to sculpt, it is time to paint.
[page]
[aname=SculptrisPaint]
[size="2"]Sculptris: Painting
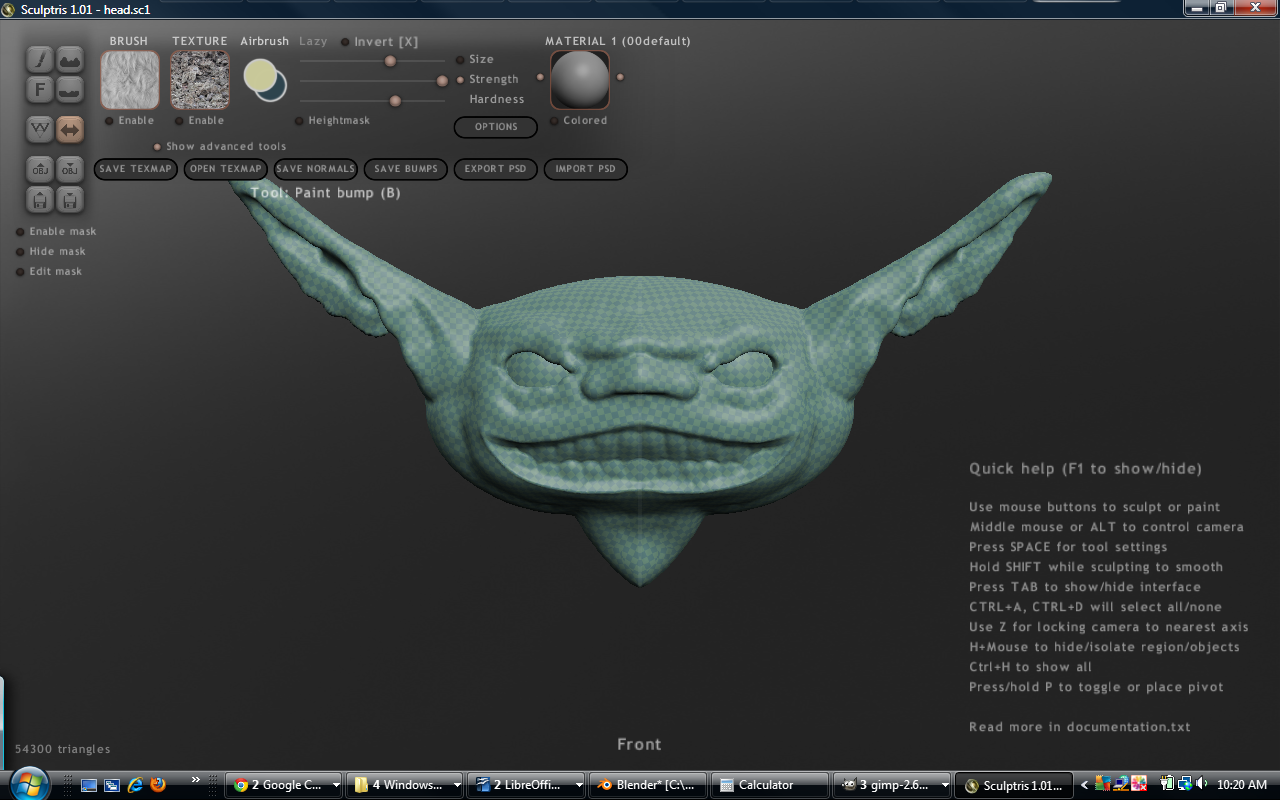
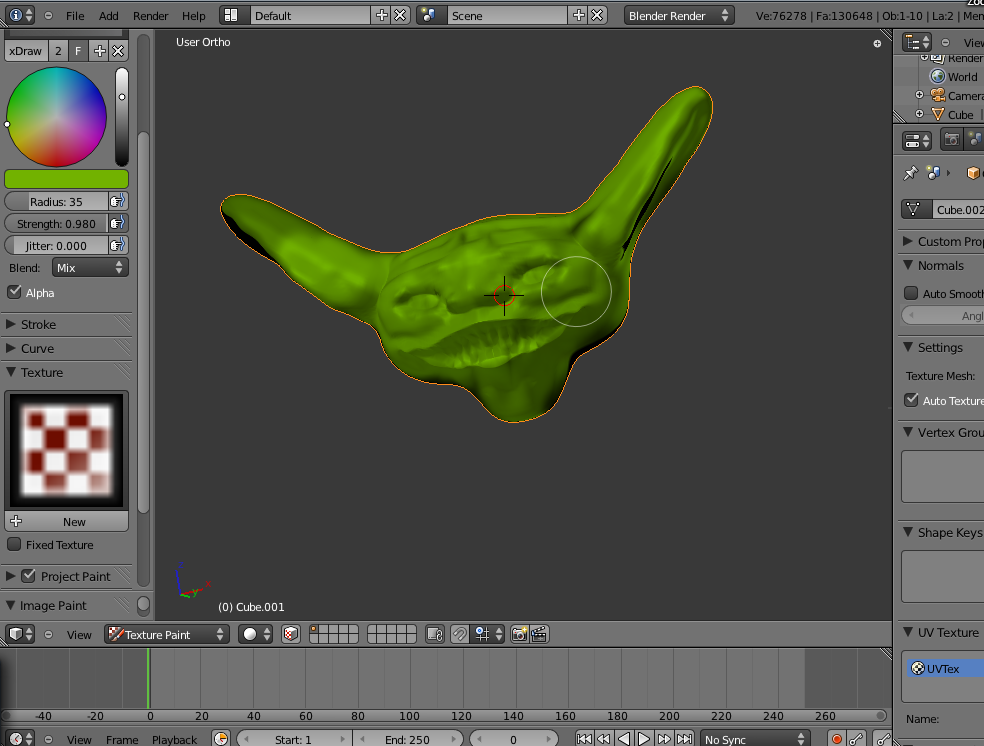
Once you have sculpted your masterpiece, imbuing it with all the pent-up life of Michelangelo's David (or, if you are like me, crudely hacking it out of the clay like my 2-year-old nephew with a chunk of dried-out Play-Doh) then it is time to paint it. Luckily for us, Sculptris is pretty good at painting things, too.
In the upper right of the main Sculptris screen is a big button labeled Paint. Click it, and Sculptris will ask you what size of image you want to create (defaulting to 1024x1024). When you accept the settings (there is a setting for tightening up the mapping; this can slow the UV mapping process somewhat, but does result in a bit less texture wastage; however, Sculptris does not unwrap quite as tightly as I would like sometimes even with tight mapping enabled) then it will go through several stages during which the mesh is unwrapped and laid out in preparation for painting, and texture images are set up to paint into. When finished, it goes to the Paint mode, displaying the mesh with the default Checker texture applied.
Checkers.
In paint mode, the chief tool buttons are, just as in Sculpt mode, found in the upper left. There are fewer ones here, though:
Paint Color: What it sounds like. Paints color onto the model
Paint Bump: Again, what it sounds like Paints bumps onto the model.
Fill: Fills the texture map with a color
Flatten Bump: Smooths out areas of the bump map
Sculptris maintains two maps for the model in Paint mode: Color and Bump. Bump is useful for adding details that you did not, for whatever reason, want to sculpt directly into the mesh. It is useful to determine early on in the process which sorts of details you need to sculpt, and which sorts of details you can get away with bump-mapping, since the fewer details you add to the mesh the more efficient the process becomes.
In Paint mode, you can load two different kinds of texture brushes. The first type, labeled Brush in the upper left, is a greyscale type of texture brush that is used to paint different patterns using the currently selected color. The second brush is useful for loading color texture maps, perhaps from a library of textures, and painting those textures directly onto the model. Both types of brushes have options and parameters that can be set to control hardness, directionality, etc... in order to fine-tune the painting process.
As with Sculpting, Painting in Sculptris is a very intuitive and free-flowing process. It allows you to paint in high detail directly on the mesh itself, without worrying about the underlying UV map layout.

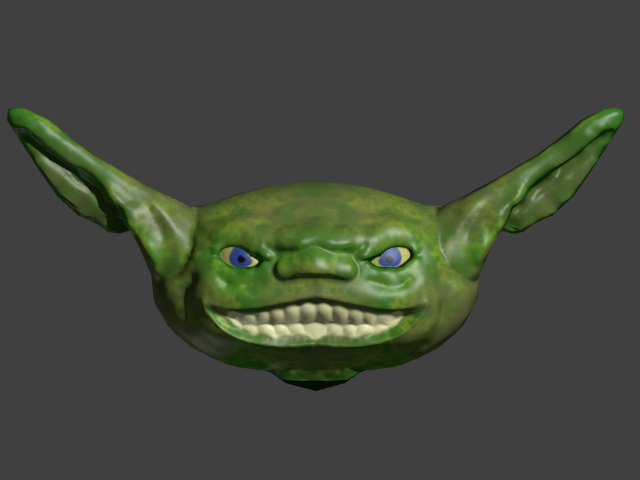
These creepy blue eyes, stare into your soul they do.
Once the model is painted and bump-mapped, the color and bump-maps can be saved to files, and the mesh itself can be exported to .OBJ format. It is important to note that once you enter Paint mode, you can not return to Sculpt mode without closing the program, restarting, and reloading your model. And loading the model into Sculpt mode will destroy the UV mapping, so that if you make changes in sculpt you will be required to re-map the model, and any existing painted textures probably will not work anymore. So you should ensure that your model has been sculpted exactly to your satisfaction before painting, lest you waste effort in re-painting. Also, remember that if you export to .OBJ in Sculpt mode, the .OBJ will be exported without UVs for the vertices, whereas if you export from Paint mode, the UV data will be exported as well. Something to remember.
[page]
[aname=BlenderPaint]
[size="2"]Blender:Painting
Blender offers fairly powerful capabilities for painting directly on the mesh, just as Sculptris does. In some ways, Blender is far more capable, but in a few others, Sculptris is slightly better at painting. One of the chief examples of Blender's limitation is the fact that in Sculptris, you can paint bumps onto the model and the bumps are shown in the view, interactively, showing up as they are painted. By default, this isn't the case with Blender, although I've been hearing about use of GLSL-based materials that can allow this sort of in-view shader-based bump-mapping, so perhaps that won't be quite the limitation that it has been. Also, I tend to prefer the Sculptris color selection model over Blender's. In Sculptris, you can select color on a Hue/Value wheel, then adjust the saturation via slider, whereas Blender selects Hue/Saturation on a wheel and adjusts Value via slider. It's a small detail, but small details can be important with things like this.
Getting set up to do on-the-mesh painting with Blender takes a little bit more work than Sculptris. In Sculptris, you just hit a button, enter image dimensions, and wait for Sculptris to put you in Paint Mode, but in Blender you have to manually complete a few steps. The first step is to map UVs to the mesh.
Now, the Multiresolution modifier is pretty cool in that it subdivides UV coordinates as well as vertex coordinates. What this means is that you can UV map the base mesh of the model, then when the model is subdivided the UV map is subdivided as well. This does simplify the process, since UV mapping a lower-resolution model is much simpler than mapping a high-resolution model. There are drawbacks, of course, since sculpting will change the relative sizes of faces within a given UV island, without reflecting those changes in the proportionate sizes of the faces in the UV map. There are some ways this can be mitigated; namely, by using a higher level of subdivision when creating the base mesh, and by using the Apply Base button in the Multiresolution Modifier dialog, which will actually move the vertices in the base mesh to more closely conform to the sculpted mesh. Do this before you UV map it, and you can obtain results nearer to the ideal.
So, we UV map the base mesh. With a simple mesh, we can do something like Lightmap Pack, which will allocate UVs in regularly sized square meshes. I've had problems with bugs in the lightmap pack extension, however. You can also unwrap by selecting groups of faces and using the Follow Active Quads option, which can work well for regular quad meshes. And, of course, you can do the Mark Seams + Unwrap option, which is a good general-case method. There really are few magic bullets for UV unwrapping; it just takes patience and practice. However, by ensuring that the mesh is clean and well-organized, you can reduce the amount of tedious labor required.
Tedium reduced by an average of 450%!! Results may vary, see your doctor for possible side-effects.
As a quick aside, this is one of the ways that Blender's style of sculpting using non-adaptive subdivision beats out Sculptris. Sculptris unwraps the mesh algorithmically, bu tif you ever need to unwrap the mesh by hand (to get a better pack, for instance, to reduce texture wastage) then you really have your work cut out for you with Sculptris. The adaptive subdivision scheme creates a literal soup of triangles, completely devoid of clean edgeloops and contours, meaning that you have to manually select individual edges, by hand, from a steaming morass of thousands (if not hundreds of thousands, or even millions) of edges which are laid out in no kind of clean order. It can be ugly.
Mark seams on this ugly thing. Go on. I dare you.
Anyway, with the mesh unwrapped we can go to the UV/Image Editor view with the mesh in Edit Mode and all vertices selected. In the UV view, you can create an image to associate with the UV mapping of the mesh. Now, it is possible to create multiple UV mappings for an object, with an image associated with each UV layer. This is how you could go about painting bump and texture information, by painting color to one layer and bump to another.
The actual paint tools are pretty simple. Texture painting mode is activated by selecting Texture Paint from the 3D View menu, at which point the toolbar on the left changes to the paint tools display. The basic paint provides three brushes: Draw, Soften and Smear, which pretty much do what they say. The fourth brush type, however, is interesting. It is called Clone, and allows you to paint from a source, much like the clone or rubber-stamp tool in Gimp. You can set the source to be either the 3D Cursor (which means, it will take color from whatever the cursor happens to be over in the view) or it can be another UV layer on the model. This is handy for being able to load an image into one layer, editing the UV coordinates for that layer to cut out interesting bits from the image, then using the Clone brush to paint those interesting bits onto the "real" UV layer.
Blender texture paint also allows the use of textures as brushes. These can be images loaded from file, procedural textures built using Blender's procedural system or even from the texture node system, and so forth. It's really a pretty powerful little system, and it has come a long way since it was firstintroduced.
It puts the paint on its skin.
So, now that we have a high-resolution model of our character/tree/rock/whatever, all painted and pretty and ready to go, we need to extract from that data a lower-resolution model which we can actually use in a game.
[page]
[aname=Retopologize]
[size="2"]Blender: Mesh Reduction and Re-topologization
A high-resolution sculpt can look pretty good when rendered in Blender. Lots of detail, good form, good silhouette. However, a mid-to-high detail sculpt of a character caneasily run over a million triangles. That kind of detail fed into a game engine would greedily devour framerate; compound it by adding multiple models, with all the overhead, and you have an intractable situation. The solution, then, is to reduce the resolution of the mesh while trying to preserve as much of the detail as possible, and using texture mapping to "fake" the details we couldn't preserve.The first step of this process is to obtain a lower-resolution version of the model.
I've discussed two different methods of obtaining the high-resolution sculpt. The method you choose can have drastic impact on your options for reducing mesh detail. Also, our goal isn't to simply reduce the number of triangles in the object. Blender makes that task very simple, if that is all we want. However, we also need to try to preserve as much of the form and detail of the mesh as we can, and that means we usually need to be smart about how we reduce the triangle count.
The most basic form of mesh reduction is to use a Decimate modifier. This is the stupidly simple option. The Decimate modifier, when applied to a mesh, will give you slider-control over the number of triangles to reduce the model to. You can also enter the number of triangles into the modifier directly, to achieve an exact triangle count. The problem with Decimate, however, is that it performs the decimation algorithmically, by collapsing edges based on criteria other than our "try to preserve detail and form" criteria. The result can sometimes (usually will, in fact) be pretty messy. Even the most well-organized high-resolution meshes will be reduced to willy-nilly triangle soup using a Decimate modifier.
Pictured: triangle soup. Best served with a white wine.
Now, for some applications, this is just fine. Hunky-dory. Maybe the object isn't large, and won't ever be viewed closely. Maybe it is a non-animated part of the background landscape. And that's fine, just do a quick Decimate and carry on.
However, for many applications, you need to be a little smarter about it than Decimate. If the model is animated, then the possibly ugly edges and the lack of edge loops that result from Decimate mean that the mesh may not animate smoothly, or that at certain poses sharp edges will show that disrupt the form and flow. Or if the model is ever viewed up-close with its profile made highly visible (silhouetted against the sky, perhaps)then the profile will betray our laziness to the scrutiny of anyone who happens to look too closely. So while Decimate is a tool we can add to the toolbox, it will probably not be our first choice.
Another option is to use lower-subdivision levels of the mesh. This is possible if we used Blender for the sculpting. We can duplicate the high-resolution mesh (with Multiresolution Modifier still in place) then crank down the levels of the modifier a couple steps before applying the modifier to make it "real". This leaves us with a fairly neatly ordered mesh that is a clean version of our subdivided base mesh. These meshes result in lots of clean edgeloops that make UV unwrapping and animating cleaner.
For many applications, this second type of mesh reduction is more than sufficient. Even some animated models will do well with the model based on this cleaner mesh. Here is the quickly sculpted example I did earlier, showing both the uncompleted high-resolution mesh, and a duplicate of the mesh with a lower-level of the subdivision applied.
Do your ears hang low, do they wobble to and fro?
The drawback of this method is the fact of the mesh being based on a regular subdivision of a base mesh. The subdivision means that detail is generated regularly over the surface. Consequently, many triangles in the mesh may be "wasted" by having a rather dense triangle section representing a flat, non-detailed area that could, realistically, be represented with a much sparser mesh. We could reduce the overall subdivision level further to reduce the density of these areas, but that comes with the price of also reducing detail in the areas where we need to preserve the mesh density to keep smaller details in place. Also, the edge-loops and contours in the resulting low-res model may not be placed exactly to your liking. Edge-loops and face-loops do make a difference when animating a character, so if the character is intended to be shown close-up in extremely high detail, then you will probably want more control over the placement of loops than this method gives you. However, for a great number of applications, this method may be the most ideal. It is quick (little additional work), it produces clean meshes that are easy to UV unwrap, and it produces meshes that exhibit clean topology (if far from perfect) and clean silhouettes. Personally, this is the method I use the most for my own work, if I do the sculpting in Blender.
Unfortunately, this method doesn't work with a high-res triangle soup mesh being imported from Sculptris, since there are no multiresolution levels of subdivision to revert to. Just a steaming, stinky pot of miscellaneous triangles. For these meshes, and for meshes that require more careful planning of contours, edgeloops and face placement, we have to resort to the more brute-force methods of mesh reduction: manual re-topologization.
Topology in 3D modeling refers to the way edges and faces represent a surface. It refers to the way edge loops are constructed and tweaked to follow the contours of the object we are trying to represent. The importance of topology in 3D modeling can not be overstated, even in today's world of high poly counts.
Retopologization (abbreviated retopo) refers to the process of rebuilding the topology of a model to reduce the resolution of the mesh, and in the process trying to optimize the use of edgeloops and face placement to preserve the flow and contours of the surface. Becoming skilled at retopo takes practice, and lots of it. Be warned: the process can be tedious, dull, and time-consuming. But the mark of a true pro is the ability to work through the tedium and get it done.
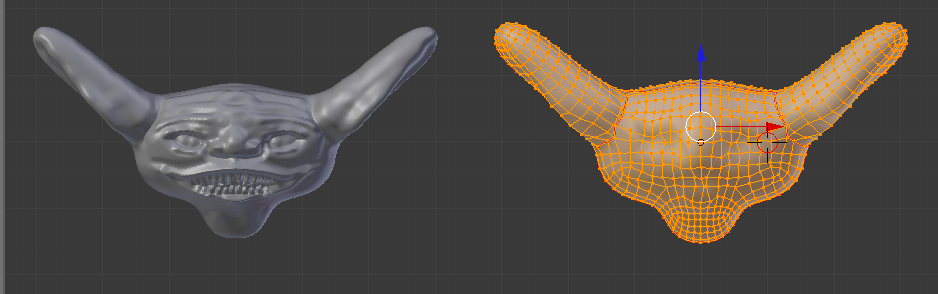
Retopo in Blender 2.57 can be done in a couple of ways. The first is by using a Shrinkwrap Modifier on the low-resolution mesh you are creating, with the Shrinkwrap modifier targeted to the high-resolution mesh. As you add faces to the low-res version, the Shrinkwrap modifier will snap the vertices you create to the nearest point on the target mesh, meaning that they will snap to the surface of the high-res model. To demonstrate it in action, here is the rough basemesh I created for the Blender sculpting section, subdivided a couple times and placed next to the high-res import from Sculptris:
Set phasers to 'shrinkwrap'.
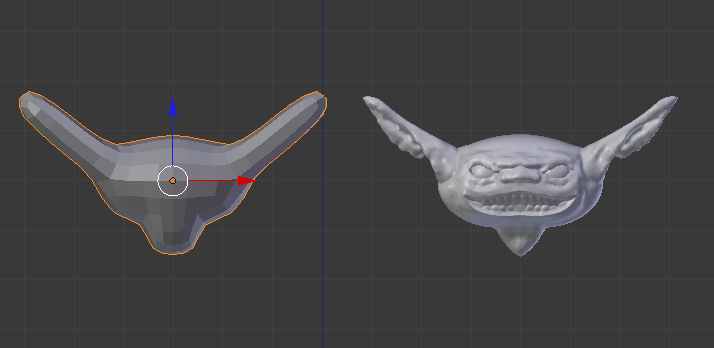
Now, in the following I move the base mesh onto the high-res version, centering it as nearly as I can, and create a Shrinkwrap modifier for the low-res base mesh, targeting it to the high-res mesh:
It's a lot like being suffocated by cling wrap, really.
Finally, here is the base mesh after the subdivision and shrinkwrap modifiers are applied, to get the final mesh.
Please use caution when removing shrinkwrap packaging. Edges may be sharp.
As you can see, the Shrinkwrap forced the lower-resolution base mesh to conform roughly to the surface of the high-res model. Of course, doing it like this isn't much more sophisticated than using a lower-res version of a Blender sculpt, but it does provide a way to cleanly and simply retopo a Sculptris mesh. Note that because of the way Blender snaps vertices to the nearest surface, there can be issues, sometimes severe, where verts snap to the wrong surface and cause artifacts. You can see this demonstrated in the above screenshot, especially on the ears. These issues take time and patience to correct, requiring the vertices of the base mesh to be hand-edited to their proper positions. So while this is a simple method, it is not an end-all solution, and still requires some elbow grease to work right. Luckily, you can do manual vertex editing while the Shrinkwrap modifier is still active, and the vertices being edited will snap to the target surface as they are moved. (To enable interactive editing of a Shrinkwrapped mesh, in the Shrinkwrap modifier dialog, be sure to enable the button for "Use modifier while in edit mode", or the low poly cage will snap back to non-shrinkwrapped positions when Tabbing into Edit Mode.)
The commonly-accepted "correct" way to retopo a mesh is, of course, the most difficult. This method involves manually constructing a mesh "cage" around the high-res mesh, editing it a face at a time, manually pushing around vertices and extruding edges. To do this, it can be useful to start with a simple plane primitive that is shrinkwrapped to the high-res object, and from that plane begin extruding edges and vertices,constructing edgeloops and filling in faces. I have noticed, however, that sometimes the vertices in Edit Mode snap strangely when using just a Shrinkwrap modifier. In many cases, the vertices will simply refuse to be placed in the position I desire; instead, they slide around willy-nilly, and it's almost like trying to force a stubborn child to do something they don't want to do.
The best solution to this difficulty that I have found is one tiny little button at the bottom of the 3Dview. The button is normally greyed out when Blender starts. It looks like a horseshoe magnet, and boy is it useful for retopo. The button enables editing Snap mode.
Let's see how it works. Center your 3D view on your high-res object, and go to Add->Mesh->Plane to add a new plane. Rotate, scale and move the plane until it sits somewhere on or near the surface of your high-res mesh and hit Tab to enter edit mode. Now, click on the little Magnet icon. When activated, the icon will be highlighted. Next to the magnet icon is a button that looks sort of like an eyeball on a tic-tac-toe grid. Click that and a dropdown menu appears giving a number of snap options. For our purposes, we will select Face from the menu.
See? Eyeball on a Tic-Tac-Toe grid. Freaky.
This has the effect of putting us in Snap to Face mode. Now, any edit operation we perform on any of the vertices in the plane we are editing will snap to whatever geometry that is behind them in the 3D View, based on the depth buffer. The snap only takes place when an element is edited, so initially the plane will remain unmodified. But right-click to select a vertex and press 'g', then move the mouse and you will see the vertex snap to somewhere on the mesh. If the vertex was not over a mesh or surface in the 3D view, it will snap in sometimes unpredictable ways; nevertheless, as you move the vertex it will translate and conform to the surface of the mesh beneath it as it moves.
You can select single vertices in the plane mesh and hit 'e' to extrude them in lines to form the edge loop and contour lines of your model. Extruding and moving them while Snap to Face is activated will cause the newly extruded points to conform to the high-res mesh beneath.

This. Only lots more of this.
When edge loops are in place, partially or fully, you can begin selecting groups of four verts and using 'f' to join faces between them. It is painstaking work, and in the learning stages there will be much trial and error. There are websites you can go, forums where 3D artists hang out, that have rich discussions on so-called 'ideal' topology. A lot of the discussion centers on human heads, but the ideas of topology are relevant to just about everything, from humans to orcs to landscapes. Using proper placement of edgeloops, you can accentuate the details that you need to present with a minimum of detail in the mesh.
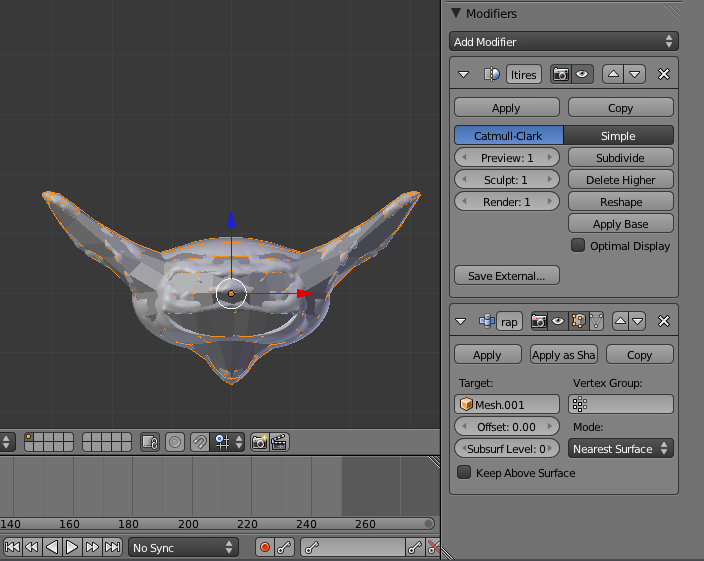
When I am doing a manual retopo, I have found it useful to check the box labeled Keep Above Surface in the Shrinkwrap modifier, to ensure that vertices remain above the surface of the target mesh.The Offset slider bar/value can be set to determine how high above the surface the points remain. This has the effect of helping eliminate protrusions of the high-resolution mesh through the low-resolution cage you are building. Protrusions can affect the quality of the Baked textures, especially of Ambient Occlusion, so it is best to eliminate them. By setting a high enough Offset, you ensure that any consequential bumps that might lie inside a low-resolution face do not protrude through. I've found that you do still want to have Snap to Face enabled while using this method, since the Shrinkwrap modifier doesn't quite have the same precision when snapping to the face beneath the cursor, but the two in conjunction makes for a nice, smooth edit.
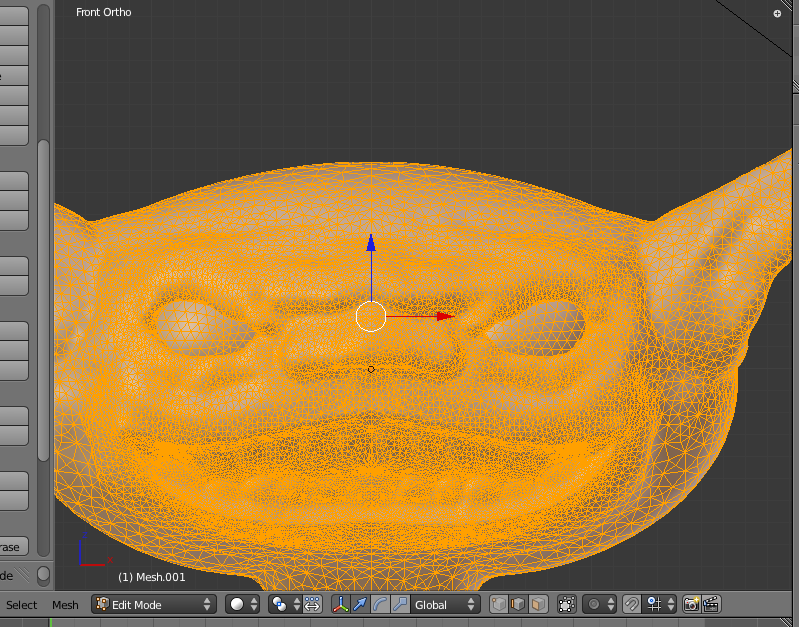
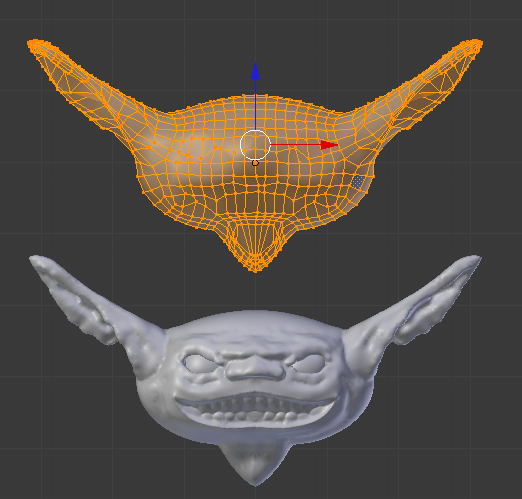
After much labor, here is a possible final retopo of the head mesh from Sculptris:
Don't worry, Jim. They have fine plastic surgeons who can fix your face.
It's not perfect, not by a damn sight. Could probably have done some of the contours better, and the mesh needs a lot of tweaking to make the contours flow more smoothly. I'm still not really all that good at this stuff, although I am getting better, and I currently have too many projects simmering for me to spend too much time on the model for this article. Nevertheless, it works. In order to move on to the next step, I need to generate a UV mapping for it. This will be the final UV mapping for the model, that the game engine will use to texture the mesh in-game. I do it using the conventional methods for UV unwrap: mark some seams, peel away some faces, and try not to make a pig's breakfast of the whole thing. UV unwrapping is something of a black art. It's tedious and dull, almost mind-numbingly so, especially for dense meshes. If you build the mesh right, making intelligent use of edge-loops and good topology, it really helps the process.
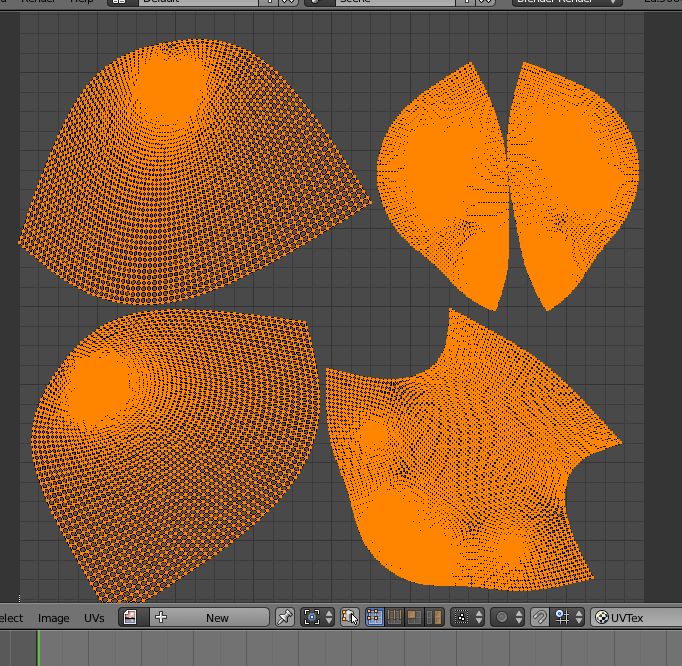
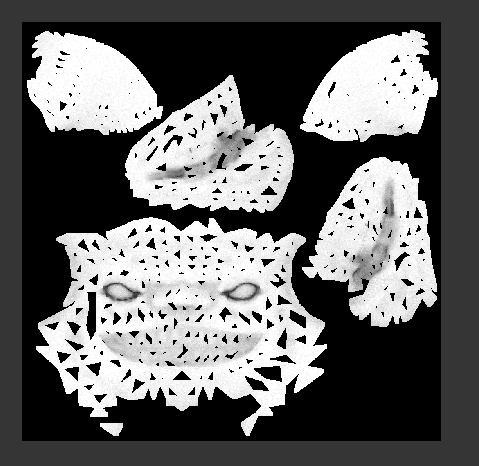
UV unwrapping on organic models like this is never going to be perfect. You are taking a complex curved surface and trying to cut, stretch, and otherwise force it to fit on a flat plane. Doing so requires some tradeoffs. A common method of unwrapping is to go through the mesh selecting edge loops and marking them as seams in strategic locations. It is typically important to "hide the seams", so to speak, by placing them in harder-to-see areas on the mesh, or in areas where there is an absence of fine detail. You use seams to separate out parts of the mesh that you want to stay together in the UV map; parts that stay together tend to texture more smoothly, since the seams can cause discontinuities in the UV map that show up when rendering. Here is a view of what the seams might look like for the head model:
We split the head open here, here and here. Nurse, be ready to pick up the brains.
Probably not perfect (have I mentioned I'm still not all that good at this?) but it gives something to work with. If I now select all verts in the mesh and Unwrap, the result is a set of "islands" in the UV map: clusters of faces adjoined together and split on the seams that were marked. In the UV/ImageEditor view, I can select whole islands at once by pressing 'L' while the mouse cursor is near a vertex in the desired island to be selected. This selects all linked elements, which means the entire island will be selected. Push it around, scale it, move all the islands relative to one another so that the texture is packed as tightly as I can make it. Texture real estate is highly valuable; I do not want to waste pixels if I can help it. Some of the islands can be stretched and deformed to make them pack better, but you should always check your work by using a checkered texture of some sort enabled upon the mesh so you can see how the texture stretches and where it deforms. Like I said, it's a black art and the only real way to simplify it is to practice, practice, practice.
Here's the final UV unwrapping:
UVs: Tasty with fava beans and chianti.[
Now, with our low-resolution model finished and UV mapped and sitting next to the high-resolution mesh, you can see that we've come a long way.
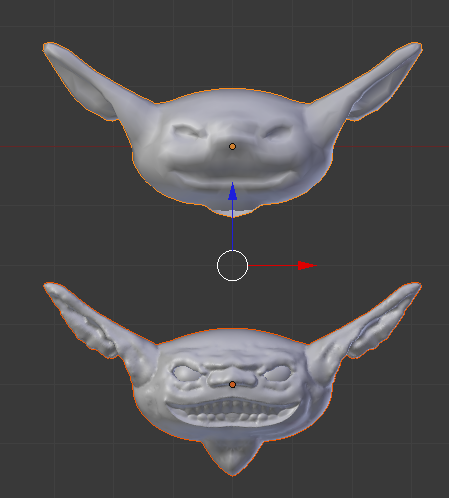
Great Scott! What happened to my teeth?
That high-resolution model sure does have a lot more detail than the low res model, doesn't it? What we want to do is to somehow transfer some of that detail that we weren't able to capture in the retopo process, and apply it as a normal-map. In order to do so, we need to learn about Baking. Grab an apron and a wooden spoon, and turn the page.
[page]
[aname=Bake]
[size="2"]Blender:Baking
My wife just baked cupcakes, and the house is filled with the scent of oven-warmed chocolate. She made cream cheese frosting the best way: from scratch. She has the habit of piling the frosting on thick since she doesn't like to have any left over, so the cupcakes sitting on their wire rack look like white-topped mounds of perfection. It is, quite simply, heaven.

Mine. All mine.
That's not the kind of baking I'm talking about, though, as awesome as it is.
In 3D graphics, baking is a term that is applied to the process of extracting some sort of high-definition data, and embedding it into the texture maps that are applied to a model. It is the process by which we can encode some of the missed surface detail of our high-res model into a normal map to apply using conventional normal-mapping shaders to give the final texture-mapped model the appearance of having more detail than is actually represented in the mesh.
For all the seeming complexity of the idea, it is actually very simple to do in Blender. Under the Render buttons menu (symbolized by a camera icon), if you scroll all the way down to the bottom you will find a sub-menu tab labeled, conveniently enough, Bake. Open that sub-menu and you will see all the options you need for baking. But first, we have to do a little more setup.
First of all, until now we've just been dealing with the basic meshes, and haven't yet begun dealing with textures. However, while we are going to be Baking out a normal map, we are also going to bake a couple other types of texture maps: a diffuse color map (which will acquire the colors that we painted the model with) and an ambient occlusion map (which will encode pre-calculated AO data to help accentuate the shape of the model). In order to Bake the diffuse color map, and in order to retain the bump-map details applied to the high-res mesh, we need to set the high-res mesh up with a material and apply the textures.
Select the high-res mesh and create a new material for it. Add two textures to the material, and set both to UV mapping. For one texture, load the painted color map with which we textured the model, and for the other load the bump map. Change the settings of the bump map texture so that it affects the rendered normal (a check box under the Geometry tab in the texture settings)and uncheck it from the diffuse so it will not affect color. At this point, it is advisable to do a couple of test renderings in order to see how it looks; set up your lighting stage and hit F12, and adjust the normal strength as needed.
I'm not going into detail here, because a primer on Blender materials isn't what I'm after here. If you are confused on all of this, it would be helpful to hit the 'net and find some tutorials. There are aplenty.
So, we have our high-res model mapped and materialed. The next step is to select the low-res mesh, enter Edit Mode, and select all the vertices in the UV/Image Editor window. Then, in the UV window, select New to create a new image, and set the dimensions. This will be used to create your final texture maps for the object, so consider dimensions carefully. A foreground hero character will require a much higher detail texture map than something that stays in the background.
Once you have created your texture map image, return to the 3D View window and exit Edit Mode. Then, use 'g' to drag the low-res model on top of the high-res model (if it isn't there already). If you used the retopo methods outlined earlier, the models should line up pretty well. The closer the better. Ideally, you will want to edit your mesh so that the high-res model is fully enclosed by the low-res model, with as few protrusions as possible since protrusions can sometimes interfere with the quality of the bake. If you do have a few minor protrusions, you can select the high-resolution mesh and take it into Sculpt Mode to apply the Smooth brush and smooth those protrusions down a bit so that the high-res mesh is fully enclosed by the low-res mesh.
Now, with the models aligned, select the high-res model first, then Shift-select the low-res model and turn to the Render Buttons->Bake submenu.

Preheat oven to 350. Bake for 20 minutes.
In the Bake menu, we are presented with a number of options. First we will check the box next to the label Selected to Active. This means that we will be baking details from the selected object (the high-res mesh we selected first) to the active object (the low-res mesh we selected second, which remains as the "active" selection). There is a button that enables a dropdown menu where we can select the actual type of the bake.
The types of baking we can do are: Displacement, Normals, Texture, Shadow, Ambient Occlusion, and Full Render. Displacement will bake a greyscale map representing the high-res surface's displacement offset from the low-res surface. Normals will bake a normal map (with settings to map it into Object Space, Tangent Space, View Space, etc...). Texture will bake colors from the high-res to the low-res; this is the paint we painted the model with earlier. Shadow will bake the shadows from the current lights in the scene that affect the high-res model. Ambient Occlusion will bake the AO from the high-res model. This is the lighting effect that mimics darkening areas that are more enclosed by geometry, and can add a level of realism. Finally, the Full Render selection will bake everything, all at once, using the light, shadow and AO settings of the World environment.
For our purposes we are interested in three of these: Normals, Texture and Ambient Occlusion. The actual process of Baking is extremely easy. With the models currently selected, choose the type of Baking to do, set the options as desired, and hit the Bake button. If you have the main window open to the UV/Image editor, you can see the Baking in action. Parts of the image you created for the low-res model will be filled in as the baking progresses, and you can see the texture map being built up.
Take a nap while it bakes. Read a book. Finish your damn game.
We want to bake all three of the above types. When each is baked, go to the UV/Image Editor window and from the Image menu on the menu bar, select Save As Image to save the texture externally, before returning to the Bake menu to bake the next map. Once we are finished, we should have three texture maps that correspond to the UV layout of the low-poly mesh. In order to save texture space, it is common to combine the Ambient Occlusion and Color texture maps into one; this is simple enough to do with the Gimp by loading both image files, copying the AO image into the Color image as another layer, and setting that layer to Multiply. When the image is flattened, the color pixels will be multiplied by the AO pixels to result in an AO shaded colormap that can be saved back out to file.
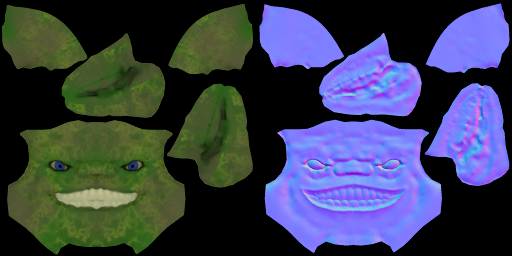
Pictured: Faking it
And with that, we are done modeling. If you want to see your new model in action, go back into Blender and select the low-poly mesh. Add a new material to it, and set your color/AO map as a diffuse texture, and your Normal map as a normal texture. (Be sure to select Normal map in the Image Sampling submenu of the texture dialog, deselect the check button to have it affect diffuse color, and select the button under Geometry to have it affect rendered normal). If you set up the material correctly and hit F12 to render, you should see your low poly mesh looking very much like the high-resolution sculpt:
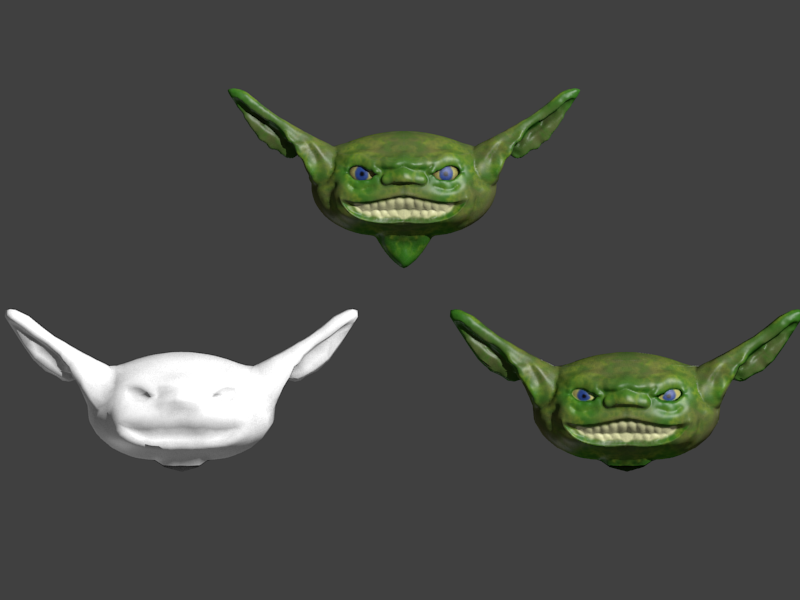
Shit-eating grins.
In the above render, the high-resolution mesh with texture applied is on the top. On the bottom left is the low-poly base mesh we created with no textures applied. On the bottom right is the low-poly base mesh with the baked color and normal textures.
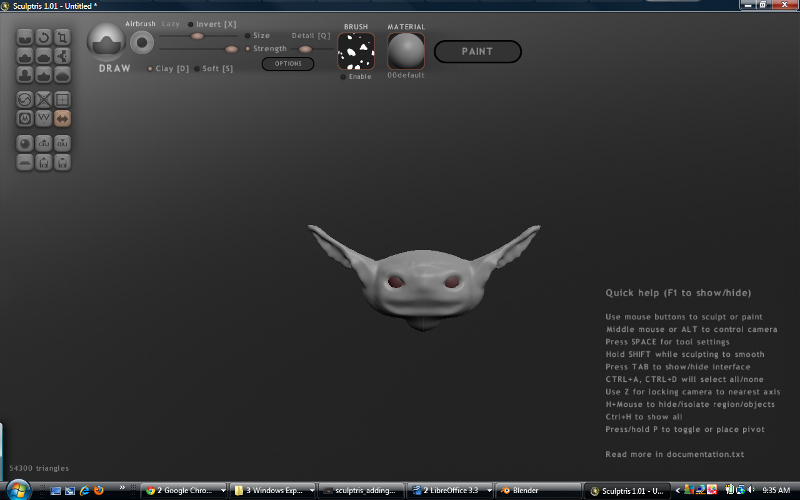
Now, in the above example, the original high-resolution model had around 54,300 faces. This is actually very low, especially for a head sculpt. I have seen head sculpts break the1 million face mark, for extremely crisp and realistic detail. Still, low or not, that is a lot of faces representing a lot of detail.
The low-poly mesh in the above render has 1196 faces. That is a whopping .022 % of the initial face count. A truly skilled 3D modeler could do even better, fewer faces with better representation of the underlying detail. And you can see in the above render that even though we have divided our face count by 45, we haven't lost all that much apparent visual detail. Some detail is lost, certainly; but the normal map we applied goes a long, long way toward making up for the loss.
[page]
[aname=Conclusion]
[size="2"]Conclusion
To summarize the process once more:
Sculpt your model in Sculptris or Blender, using as much detail as your computer will allow. Make heavy use of sketches or reference photographs in order to get details and proportions correct.
Paint the sculpted model in Sculptris or Blender, using colors and textures to achieve a realistic surface coloration. Paint bumps into a bump map to mimic details that would have been too costly to sculpt directly into the mesh.
Retopo the high-resolution mesh using Blender to obtain a much lower resolution version of the mesh, one with face counts that can be handled by today's graphics engines.
Bake details from the high-resolution mesh onto textures meant to be applied to the low-resolution mesh, and use these final textures in your game.
It is simple, really, for all the words I typed. And as you can see, it is possible to create highly-detailed, visually complex characters and video game graphics using freely available tools that cost nothing to obtain, and that provide as much capability as many professional, expensive packages that are available for purchase.