Taking your game to the Cloud with SQL Azure
Part 1 - Introducing SQL Azure
So you're writing an online game, chances are that you've been thinking about how you go about storing all that data your game needs. You'll have account/billing information, player data, game zone data, inventory data and a whole host of other data items that make up the persistent world of your game.
On top of this you'll want to audit a load of information to help you track issues, analyse hot points in the game, predict player behaviour, help identify fraud or cheating - when you start adding it all up, your game's data requirements really start to mount up.
The traditional route to this has pretty much been "well, I buy a server and put a database engine on there". Anyone who's ever set up a database platform will know that you've a whole host of considerations to take in place; you have to plan your storage requirements, make sure the server you're buying will handle the peak transaction throughput, and that your system will scale to your predicted player capacity, then you have to plan your high availability strategy to ensure that you get your 99.9% uptime; then you have to host all of your kit, likely in a couple of places to remove any single point of failure in the event of a disaster. All of this before you've even bought a box or installed a piece of software.
If you're planning an adventurous title or even if you're not - you'll probably find that you are forced to over-specify your hardware - or even worse, make compromises that become very expensive to rectify if your game hits the limits of the hardware you have in place.
Imagine you've taken the plunge and set up your database server; now you have to manage your backups, your growing data files and transaction logs. You make sure that your data is secured on disk to prevent people wandering off with all of your billing data. You have to manage your disks, making sure that your file placement strategies and I/O subsystem can keep the database running with as low latency as possible. You have to provide 24/7 support to keep all of this spinning because if you don't, your players are going to get mad and leave your game.
This is quite a lot to put in place. And if you don't do it, your game won't stand a chance.
Before you quit your idea and retreat back to doing single player pong clones, you'll be relieved to hear that much of the pain I just talked about is taken care of by SQL Azure, Microsoft's cloud database platform. SQL Azure is part of the Windows Azure cloud platform, which provides a huge range of functionality and hosting solutions that I won't talk about here.
In the rest of this article, I'll talk more about SQL Azure and cover how you go about setting it up and creating your first database in the cloud!
What you'll need
To follow along with this article, you'll need the following software and services:
- A Windows LIVE Account (plus a credit card and mobile phone to set up an Azure trial)
- Visual Studio 2010 with SP1, or the Visual Studio 2010 shell
- SQL Server Data Tools (SSDT)
- Microsoft SQL Server Express 2012 RC Tools
Introducing SQL Azure
SQL Azure is a cloud-based relational database platform that's built upon Microsoft SQL Server which is available for on-premise installations. However Azure and SQL Server have different release cycles and so the features and functionality of SQL Azure are different to the on-premise version of SQL Server; you should really consider them to be different platforms.
SQL Server has several features that aren't present in SQL Azure; some of these are simply that they don't make sense or aren't needed in the cloud. Azure supports the concept of Federations which are useful for scaling out, which isn't available in the on-premise version of SQL Server. The following MSDN link is useful for listing the current T-SQL features not supported by Azure.
The key benefits of Azure are:
[indent=1]Self-Management - As the platform is in the cloud, you don't have to incur any of the cost of buying hardware and hosting an on-premise SQL Server.
[indent=1]You can provision the storage you need, when you need it. This is a key benefit, as you can find that your initial costs are reduced because you don't have to buy all the storage you may need up front. This doesn't mean you can neglect storage and capacity planning, as you will still need to plan for the growth of your databases and the arbitrary size limits that Azure imposes upon them (1-5GB for Web and up to 150GB for Business).
[indent=1]Scalability - Azure lets you easily scale the size of your databases up to the fixed limits mentioned earlier. However, Azure provides a powerful scale-out mechanism in the form of Federation and sharding. These techniques allow you to horizontally partition your data across many databases, allowing you to elastically grow or shrink the number of these when you need them.
[indent=1]High Availability - The Azure platform has been designed for 99.9% uptime. Microsoft provides you with load balancing, redundancy and automatic failover, so you don't have to worry too much about keeping your service online.
SQL Azure Pricing
First off, SQL Azure isn't free, so you'll need to understand how much you'll be paying for the service. When costing up SQL Azure you need to know three main things;[list=a]
There's two SQL Azure editions, Web and Business, which effectively let you decide the size cap of the databases you're running. Regardless of the edition, the price of SQL Azure is going to be based upon the size of each database hosted in Azure. Each database cost starts at a fixed point, and then depending on the size, you pay for additional storage on top - until you hit the next boundary. Azure is billed in monthly cycles but the pricing is calculated daily based on the size of the databases each day.
The second thing you need to consider when pricing up Azure is the amount of data transfer you'll be doing. The good news is that inbound transfers are free - meaning that any data you send to the cloud won't cost you anything; however you will be charged for outbound transfers - currently $0.12 per GB in the US and Europe ($0.19/GB elsewhere). This does mean that you will have to think about the data that you're pulling off your databases - make sure your queries are selective so you only retrieve what you need, else you'll end up paying for it!
Here are the details for the Azure pricing plans.
Environment Setup
Great, now we've an idea about what SQL Azure is and how it's costed, we can start looking into getting set up and actually using it.
Before we begin, it's best to get your development environment set up. I recommend two key tools for working with SQL Server and SQL Azure; these are the SQL Server Data Tools and SQL Server Management Studio. Although it's possible to manage your Azure databases through the online portal, it's recommended that you work locally and publish to your Azure servers.
SQL Server Management Studio
SQL Server Management Studio (SSMS) is a database professional's staple tool for managing and querying SQL Server and Azure. If you don't already have the SQL Server 2008R2 or SQL Server 2012 client tools installed, you should get the SQL Server Express 2012 RC edition. It's worth installing both the local database engine and the management tools, as you'll likely want to work locally as well as on Azure.
SQL Server Data Tools
SSDT is based upon Visual Studio 2010 and provides you with a complete development environment for SQL Server and supports project deployment to Azure.
Whilst SSMS is more of a management and querying tool, SSDT is more of a project-centric development tool which can generate deployment packages for you. It's generally a good idea to work in a local environment and then deploy your changes to Azure when you're satisfied with them.
You can install SSDT by following the instructions in this link. The process is simple, but you will need to have either Visual Studio 2010 SP1 or the Visual Studio 2010 Shell installed already.
Setting up SQL Azure
Now that you've got the tools, you can go ahead and set up a SQL Azure account. Microsoft offer a 3 month trial that covers the entire Azure platform (not just SQL), so I'd recommend signing up to that whilst you can. The trial gives you the following limits:
- 750 hours compute
- 20GB storage
- 1GB database (Web edition)
- 20GB data transfer
To sign up for SQL Azure, you'll need to have a Windows LIVE account - most people may have one, but if you don't then you'll need to create one to use Azure. You'll also need a credit card for billing and a mobile phone to verify your identity. If you're signing up to the trial, then your credit card won't be billed unless you go over the very generous limits they impose on the trial, or let your service continue after the 3 months.
When you're ready, head over to https://windows.azure.com/ and complete your signup process.
Creating your first SQL Azure server
Now that you're signed up, you'll need to create your SQL Azure server. A Server in SQL Azure is purely a logical concept that's used as a container for up to 149 user databases.
To create your server, click "Database" in the left hand menu bar, then navigate to your subscription (Subscriptions>3-Month Free Trial); from here, click the "Create Server" icon in the ribbon menu.
When creating the server, you'll be asked for your region - this determines which Azure datacentre your service will be hosted from and can influence the costs of data transfers. Besides, it's always a good thing to pick a datacentre that's closer to you geographically to help reduce latency.
Next you'll be asked for a server administrator login. This is important as it's the master login to manage your server and lets you do almost anything to your databases within Azure. Create an obscure name and use a strong password; remember never to give this out to anyone!
Now you need to add a firewall rule to restrict access to connecting to your SQL Azure server. This provides a layer of security, allowing you to lockdown access to your databases from only your game servers or trusted clients (such as your development machine). If you're trying to connect from an IP that's not on the whitelist, then SQL Azure will deny any access to the server. At this step, you should add in the IP of the machine you're doing your development on; if you're on a dynamic IP, you'll have to remember to keep going in and updating this when your IP changes.
Creating your first SQL Azure database
Great, now we have a server set up which contains only a master database - it's time to create yourself a database to play with.
There's a few ways of doing this:
- Via the Azure management portal you used to create the server
- Via the server manager web portal (https://yourservername.database.windows.net)
- Via SQL Server Management Studio
- Via SQL Server Data Tools
To mix things up a bit, I'll go with option 3 - SQL Server Management Studio. Fire it up and connect - to do this you'll need to know the following:
- The name of your server (XXXXXX.database.windows.net)
- Your server administration login credentials
SQL Azure doesn't accept Windows Authentication credentials, so you will have to connect with the SQL Server Credentials:
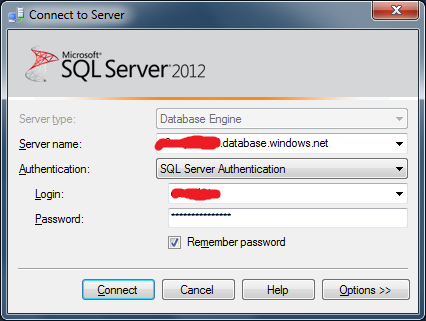
If you get an error here and are sure the credentials are all correct, then go back and check your SQL Azure firewall settings.
Now you're connected up, you can create a database. Open up a new query window by clicking the "New Query" button. From here, you can type the command:
[indent=1][font=courier new,courier,monospace]create database MyDB (maxsize = 1 GB, edition = 'web')[/font]
Anyone that's used SQL Server before will notice something different here - the create database command syntax is different under SQL Azure. In this example I'm telling Azure to create me a database called "MyDB", with a maximum size of 1GB and using the Web edition of Azure.

Execute the command by hitting the "! Execute" button, and your database will be created.
You can create your first table by opening a new query window and setting the database context of the connection to "MyDb".

Type the following statement and execute it to create your table and add a line of data:
[indent=1][font=courier new,courier,monospace]create table dbo.MyTable[/font]
[indent=1][font=courier new,courier,monospace]([/font]
[indent=1][font=courier new,courier,monospace] MyTableId int not null identity primary key,[/font]
[indent=1][font=courier new,courier,monospace] MyField varchar(100) not null[/font]
[indent=1][font=courier new,courier,monospace])[/font]
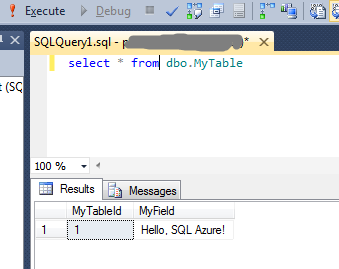
[indent=1][font=courier new,courier,monospace]insert dbo.MyTable(MyField) values ('Hello, SQL Azure!')[/font]
Finally, let's execute a select statement to query this table...
From here, we can create all manner of SQL Server objects, such as tables, stored procedures, views and so forth; I'll be covering this in a bit more detail in subsequent parts - but feel free to play around in your new database.
In this article we learned about the benefits of using SQL Azure to host your game's database in the cloud. We also learned how to set up an Azure account, and create a SQL Azure database server. You also created your very first cloud-hosted database and executed a query against it.
In the next part of this article, I'll start exploring the sort of things you can use your database for - and demonstrate some examples of creating a database project and querying it from a simple application.