Hi all!
As I progress through adding yet more levels to my game, I have decided that next on my to-do list is the ability to turn on and off devices around the levels based upon the crates passing along the conveyor belts. The system should give visual feedback as to what is connected to what, without me needing to manually connect cable actors to things when creating level mechanics. I took inspiration from the way sensors work on conveyor belts when building settlements and manufacturing systems in Fallout 4;
So how would I go about making a similar system? Without further ado, let us begin!
Part 1: The Sensor
I first needed to create a laser sensor object that could detect crates passing through it. A quick google found a tutorial on making a 'laser trip mine', as seen in many FPS games, so I decided to use this as a starting point. The difference between this and a mine though is that once triggered a mine will instantly explode, so there is no need to visually display the beam being stopped by an object. In this case, this is essential as well as the ability to detect the type of object which has intersected it.
I started out by creating a simple red beam particle. This is extra bright, with lots of bloom for gameplay reasons. Although a dimmer, shimmering beam much like a red laser pen or barcode reader would be much more realistic, it is also much harder to see from 'gods eye view';
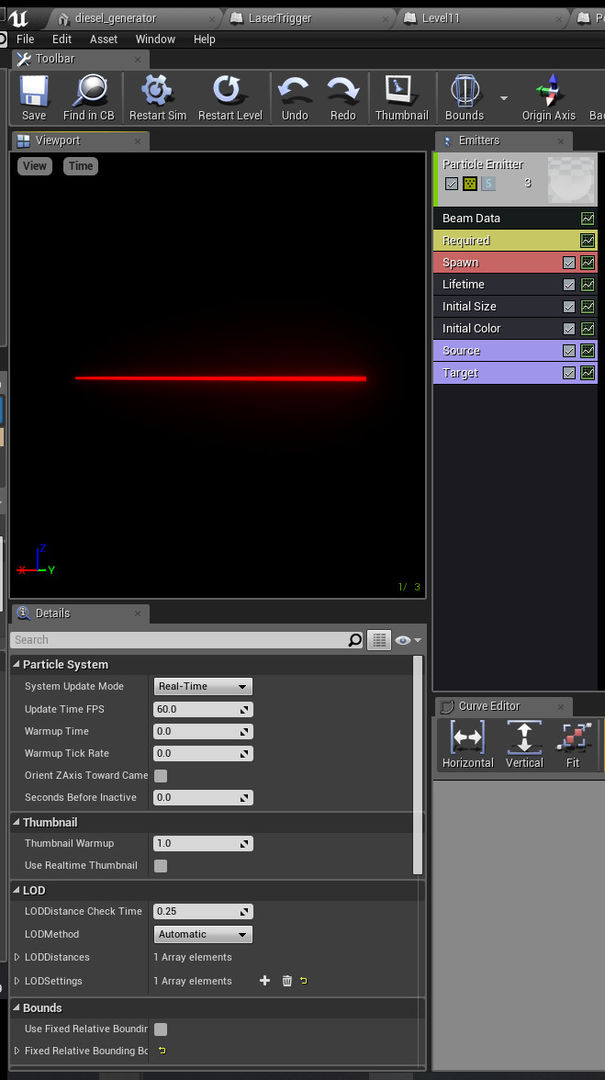
We can then use this beam in an actor. I created an actor which could serve as a beam emitter, which for now is just a placeholder cube with an unrelated brightly coloured texture on it. The beam particle emits from its right hand edge in a straight horizontal line.
To determine how far this beam should go, we calculate its maximum length in the Begin Play blueprint event, and also every time the Tick event fires to compensate for anything in the path of the beam which stops it. The first of these images is the BeginPlay event, which does three things:
1) Find the actor that the switch powers on/off, identified by a tag
2) Call the function to line trace the beam to its endpoint
3) Create and set up a cable actor connecting this sensor to its powered object for visual polish

The function Create Beam is simple, as it simply gets the start and end locations, spawns an emitter at the start location and sets the end point of the particle effect: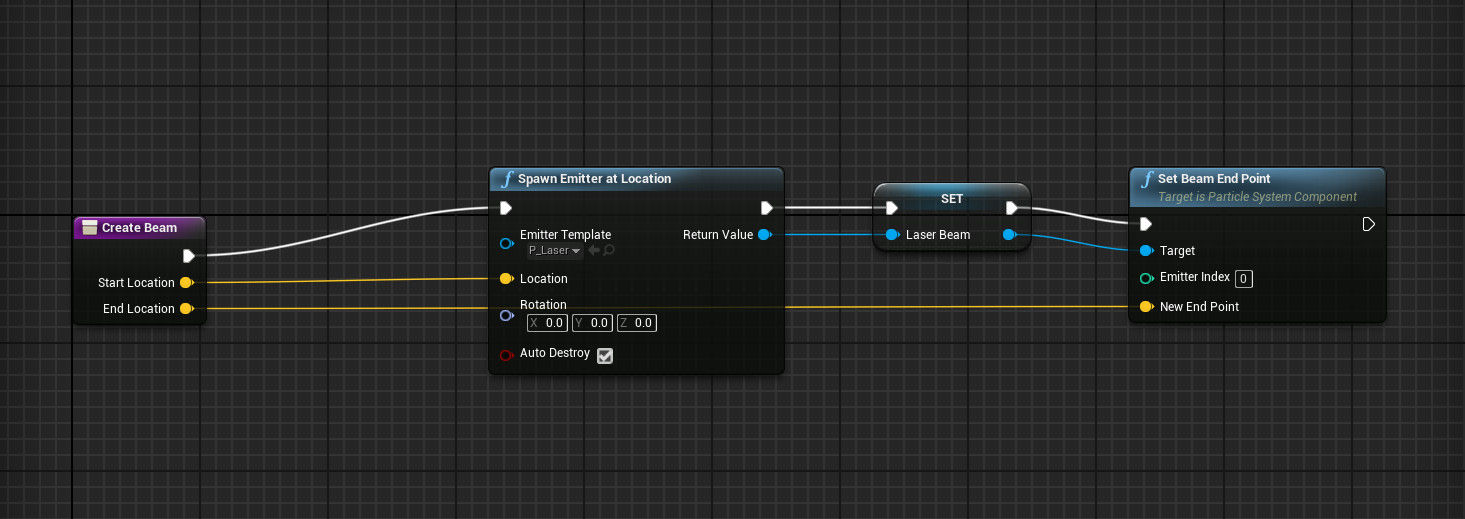
The Calculate Beam Length is a little more complex, and is called every tick (as we need to adjust the length based on what we find intersecting it using a line trace):

You'll note that this function does not just return an end position vector. As well as the ending position, it will return a reference to a Crate if one intersects the beam, or an invalid (null) reference if the beam does not intersect a crate. We use this later on to determine whether or not to toggle power to connected actors:
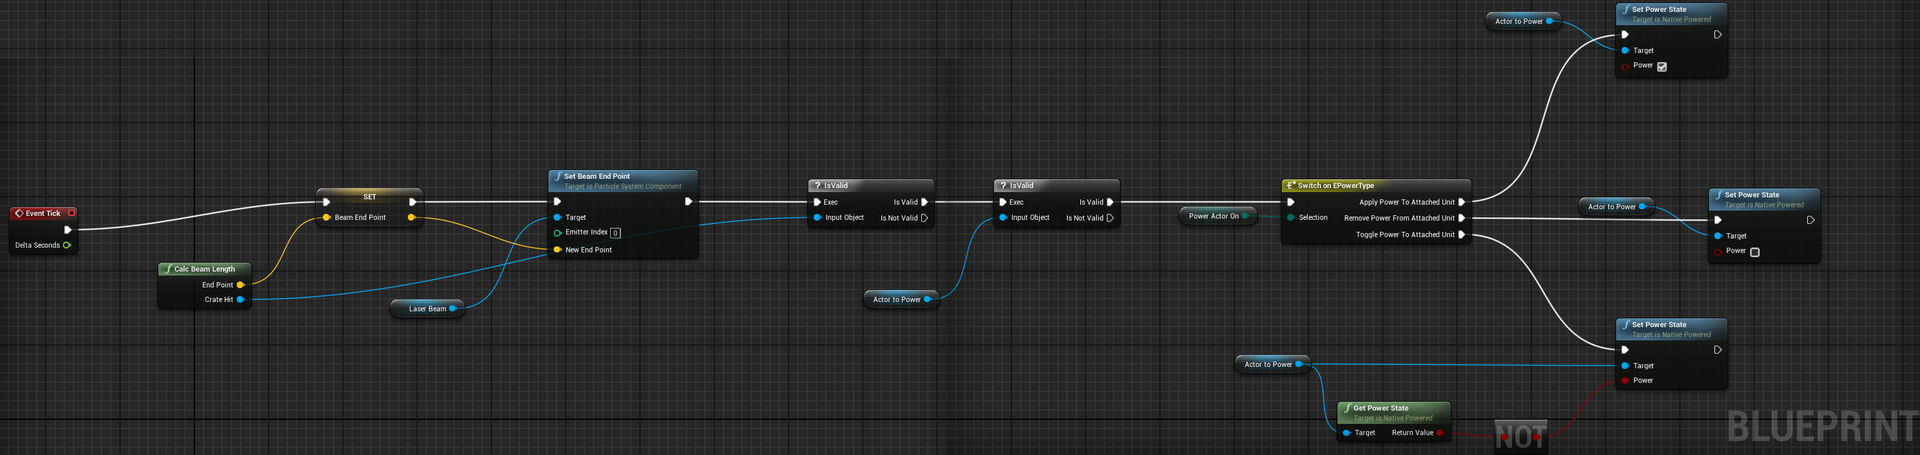
The three options at the end of this event are implemented by the NativePowered class, which I will discuss in the next section...
Part 2: Powered Actors
To make this work, we need a way to represent which actors are powered by electrical connections. I decided to do this as a simple linked list of powered objects which share one common power source. In my game the actual source of the power is not visible, or relavent to the game mechanics, so i don't show a wall socket or similar, to avoid confusing the player. After all, they aren't building these power networks themselves!
All electricity originates from a switch, so in this case the sensor we implemented above. In the tick event, when a crate intersects the laser, this fires the Set Power State method of the class, which sets the power state of that object, calls the Power On or Power Off event for that object, and then propagates the power change to the next object in the linked list.
All objects which can receive power derive from one type of Actor, written as a C++ class:
NativePowered.h
/* Represents an actor which may receive power from a switch, and be daisy chained to other powered actors.
 * If a powered actor is daisy chained to another actor, power state is shared between all connected objects.
 */
UCLASS()
class FWF_API ANativePowered : public AActor
{
	GENERATED_BODY()

	/* Current power state of this actor, on or off */
	bool PowerState;

	/* Next actor in the chain, or NULL if this is the end of the chain */
	class ANativePowered* Next;

	/* Cable component encapsulated within actor, connecting this actor
	 * to the next actor, if there is a chain.
	 */
	class APowerCable* Cable;

public:
	// Sets default values for this actor's properties
	ANativePowered(const FObjectInitializer& ObjectInitializer);

	// Set power state to on or off, also changes the power state
	// of any 'Next' actors connected to this one
	UFUNCTION(BlueprintCallable, Category = "Power|Power State")
	void SetPowerState(bool Power);

	// Get current power state of the actor
	UFUNCTION(BlueprintCallable, BlueprintPure, Category = "Power|Power State")
	bool GetPowerState();

	// Called when the game starts or when spawned
	virtual void BeginPlay() override;

	// Called when the actor is destroyed
	virtual void EndPlay(const EEndPlayReason::Type EndPlayReason) override;

	// Called every frame
	virtual void Tick( float DeltaSeconds ) override;

	// Can be overridden to get notification events when the object receives power.
	// Use this to turn on animations, enable lights, etc.
	UFUNCTION(BlueprintCallable, BlueprintNativeEvent, Category = "Power|Power Event")
	void PowerOn();

	// Can be overriden to get notification events when the object loses power.
	// You can use this for example to stop animations and disable lights.
	UFUNCTION(BlueprintCallable, BlueprintNativeEvent, Category = "Power|Power Event")
	void PowerOff();

	// Called after components are initialised
	void PostInitializeComponents();

	// The main mesh of the powered actor. As objects that receive power are visible
	// in the level and have power cables going into and out of them, they must have a
	// visual presence so a mesh is the default base object.
	UPROPERTY(EditAnywhere, BlueprintReadWrite, Category = "Power|Mesh")
	UStaticMeshComponent* Mesh;

	// A tag value to find in the next connected actor in a chain. This is then used
	// in BeginPlay() to locate and link to the next connection. We use tags here because
	// there is no other way to represent this loose relation in the editor, which
	// only allows selection of actors that are immediate descendents of the level,
	// not actors embedded in child actor components, etc.
	UPROPERTY(EditAnywhere, BlueprintReadWrite, Category = "Power|Power Connection")
	FString NextActorInGrid;
};
NativePowered.cpp
/* Powered actors default to powered off */
ANativePowered::ANativePowered(const FObjectInitializer& ObjectInitializer) : PowerState(false), Next(nullptr), Cable(nullptr)
{
	PrimaryActorTick.bCanEverTick = true;

	/* Create static mesh component */
	Mesh = ObjectInitializer.CreateDefaultSubobject<UStaticMeshComponent>(this, TEXT("Mesh"));
	Mesh->AttachToComponent(GetRootComponent(), FAttachmentTransformRules(EAttachmentRule::KeepRelative, EAttachmentRule::KeepRelative, EAttachmentRule::KeepRelative, false));
}

void ANativePowered::PostInitializeComponents()
{
	Super::PostInitializeComponents();
}

void ANativePowered::EndPlay(const EEndPlayReason::Type EndPlayReason)
{
	/* Don't leave spawned cables hanging around (literally hanging... lol) */
	if (Cable != nullptr) {
		Cable->Destroy();
	}
}

// Called when the game starts or when spawned
void ANativePowered::BeginPlay()
{
	Super::BeginPlay();

	/* Is this powered actor daisy chained to another powered actor? */
	if (NextActorInGrid != TEXT("")) {

		/* Find the actor with this tag. Note that if there are copies of the level actor hanging around,
		 * there may be multiple, so always pick the last.
		 */
		TArray<AActor*> TaggedActors;
		UGameplayStatics::GetAllActorsWithTag(GetWorld(), FName(*this->NextActorInGrid), TaggedActors);
		/* We also can't have the actual NextActorInGrid property be FName directly, because FName values
		 * in properties of a child actor are wiped to 'None' on object initialisation. Bummer.
		 */

		/* Did we find any? */
		if (TaggedActors.Max()) {

			/* Set linked list ptr */
			Next = Cast<ANativePowered>(TaggedActors.Last());

			/* Get the world position of the 'Plug' socket/bone in the source actor.
			 * Enforce a scale and rotation, regardless of the scale and rotation of the actor itself and its components.
			 * If we don't the cable actor flies off in some random direction based on the rotation and scale.
			 */
			FTransform nextlocation = Mesh->GetSocketTransform(FName("Plug"));
			nextlocation.SetScale3D(FVector(1, 1, 1));
			nextlocation.SetRotation(FQuat(FRotator(0, 0, 0)));
			FActorSpawnParameters params;
			params.SpawnCollisionHandlingOverride = ESpawnActorCollisionHandlingMethod::AlwaysSpawn;

			/* NOTE: APowerCable is basically just like ACableActor. It contains nothing but a UCableComponent, and a couple of
			 * lines in the constructor to set its colour and thickness.
			 * I would just be using UCableActor, but due to a BUG, i cant include it because it won't let me spawn it across
			 * module boundaries due to a link error. Clearing intermediate files did not fix this bug, as the answerhub said it should.
			 * UGH!!!
			 */
			Cable = GetWorld()->SpawnActor<APowerCable>(APowerCable::StaticClass(), nextlocation, params);

			/* HACK HACK - To attach to an actor, we must first specify the actor reference in OtherActor, and then we MUST
			 * (NOTE: MUST!!!!) specify a local offset in the EndLocation, from that actor position in actor transform space.
			 * This is the last line here, that sets the relative offset to that of the 'Plug' socket/bone within the static mesh.
			 * Note that this behaviour is quite poorly documented.
			 */
			FComponentReference ref;
			ref.OtherActor = Next;
			Cable->CableComponent->AttachEndTo = ref;
			Cable->CableComponent->EndLocation = Mesh->GetSocketTransform(FName("Plug"), RTS_Actor).GetLocation(); /*FVector(0, 0, 30);*/
		}
	}
}

// Called every frame
void ANativePowered::Tick( float DeltaTime )
{
	Super::Tick( DeltaTime );

}

void ANativePowered::SetPowerState(bool Power)
{
	this->PowerState = Power;
	/* Trigger overridable events for this actor */
	if (this->PowerState) {
		PowerOn();
	}
	else {
		PowerOff();
	}
	if (Next) {
		/* Cascade the change to other attached actors */
		Next->SetPowerState(Power);
	}
}

/* Simple getter for power state */
bool ANativePowered::GetPowerState()
{
	return PowerState;
}

/* Base class, empty implementation */
void ANativePowered::PowerOn_Implementation()
{
}

/* Base class, empty implementation */
void ANativePowered::PowerOff_Implementation()
{
}
As you can see here, we determine the next 'link' in our chain of powered objects by using the tags of the actor. We must use tags, rather than just an object reference or pointer, because which objects we can pick using the editor in this way is highly restricted, we can only choose pointers to objects that are direct instantiated objects at the root of the level itself, not for example a spawned actor that is spawned at runtime, or a child actor within a child actor component.
To get around this restriction we set up our actors in the editor to work with the tags and the code written above:
Source Object
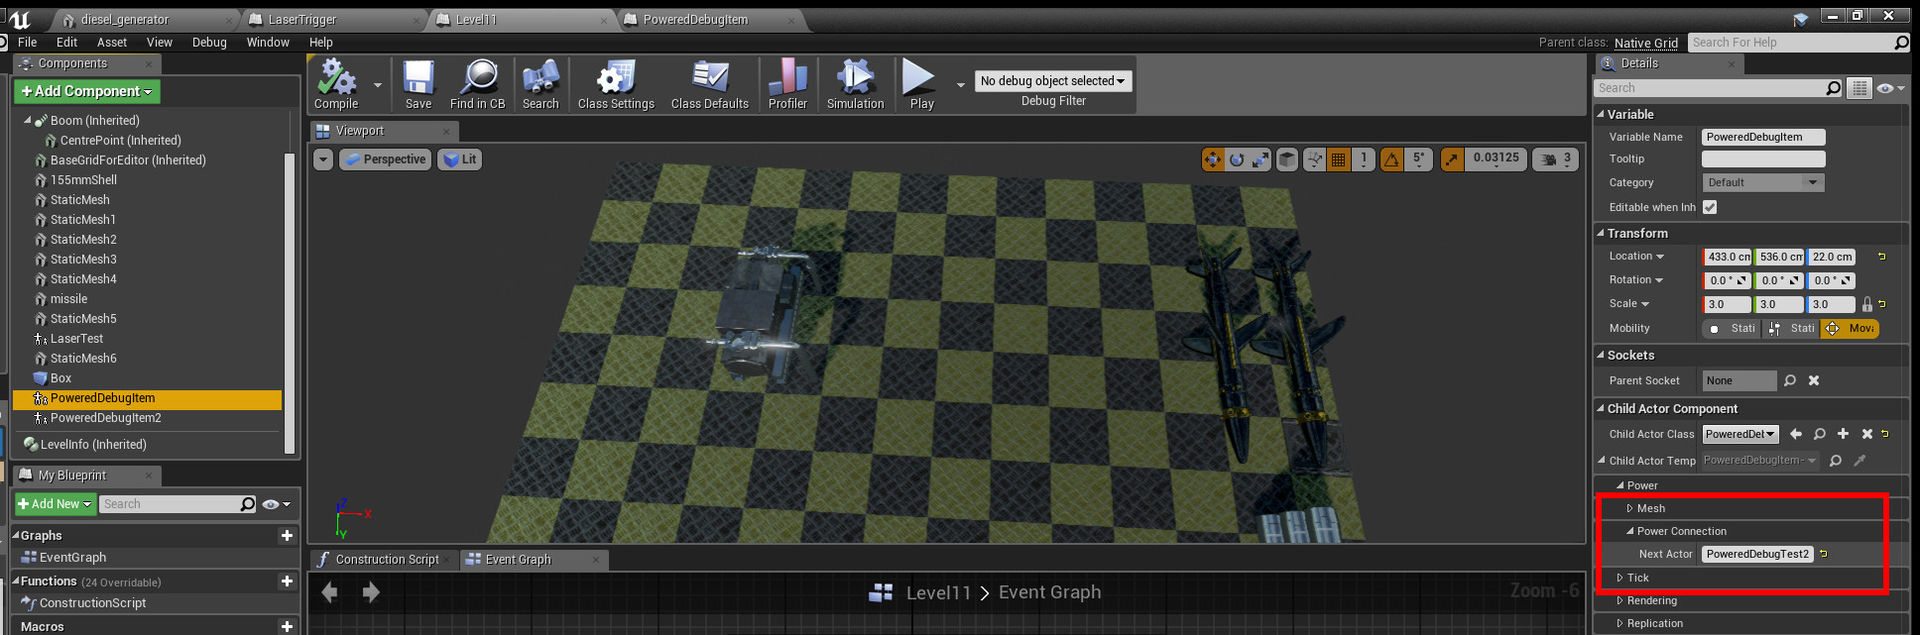
Destination Object

We can repeat this process as many times as we like, within the editor or even at runtime, to create complex chains of powered objects triggered by one switch.
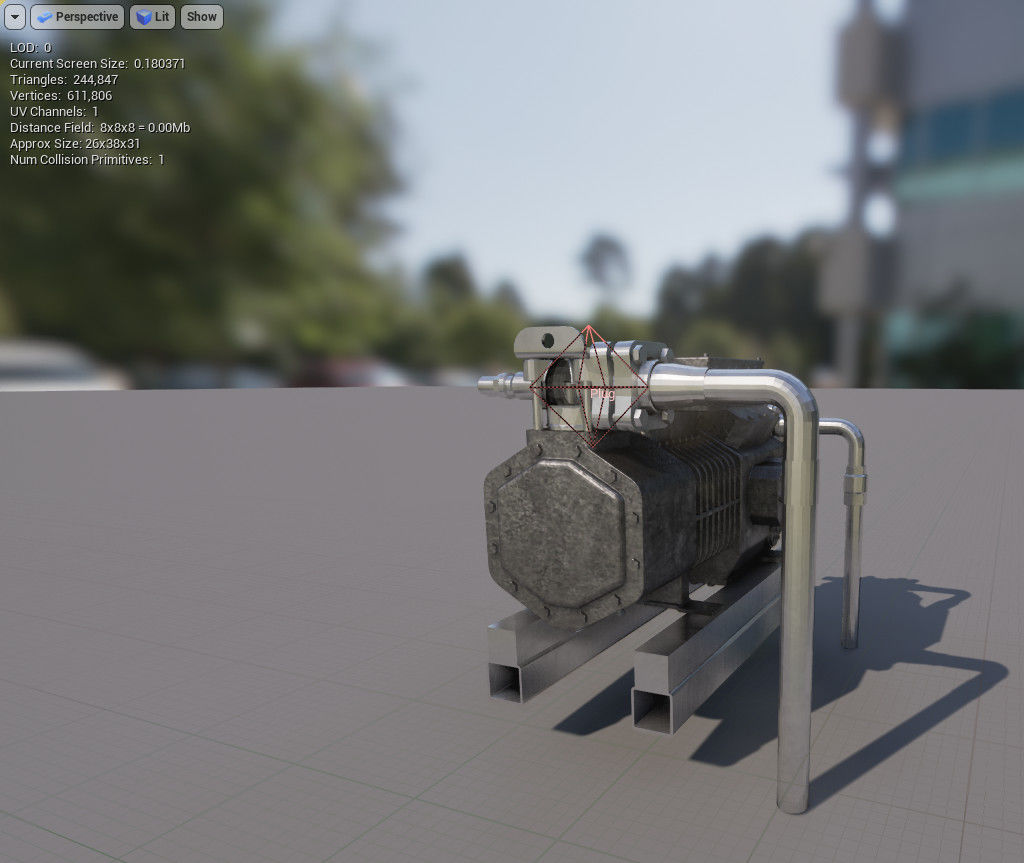
Adding Sockets
All that's needed now is to add a socket to a mesh. In this instance i've picked a random large mesh from my collection of props. We add a socket to it called 'Plug', this is where the cables that link each item visually connect them:
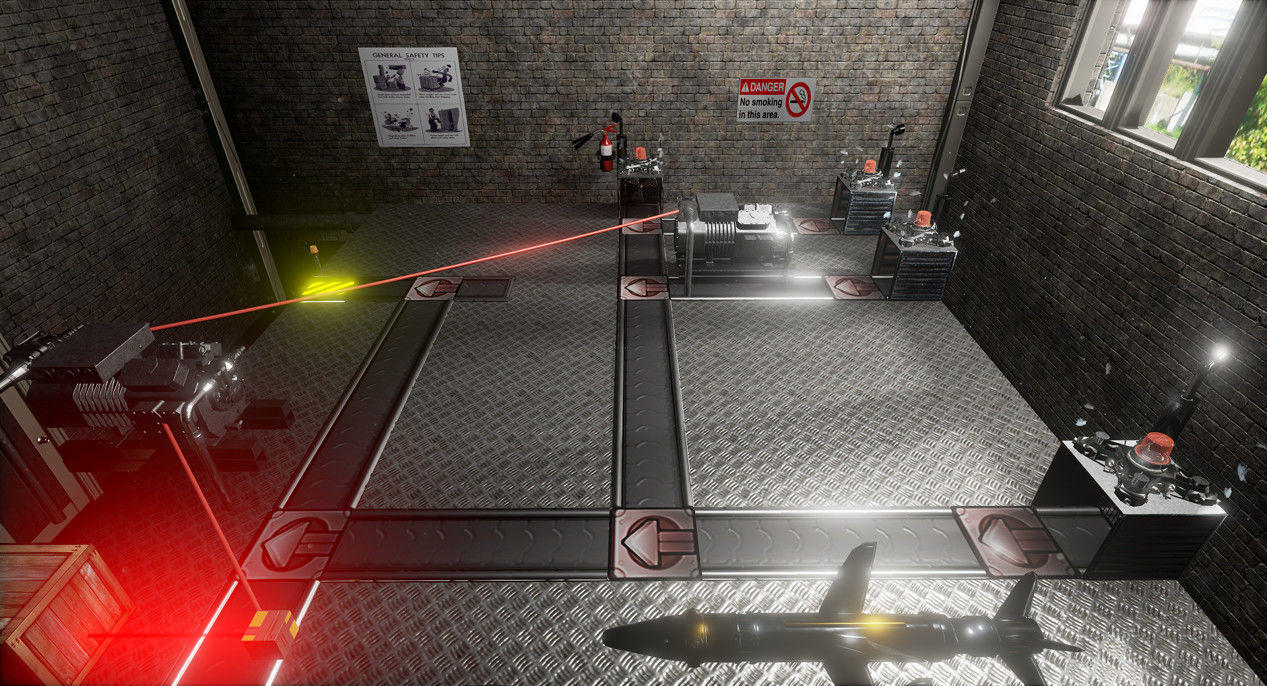
Part 3: The complete system
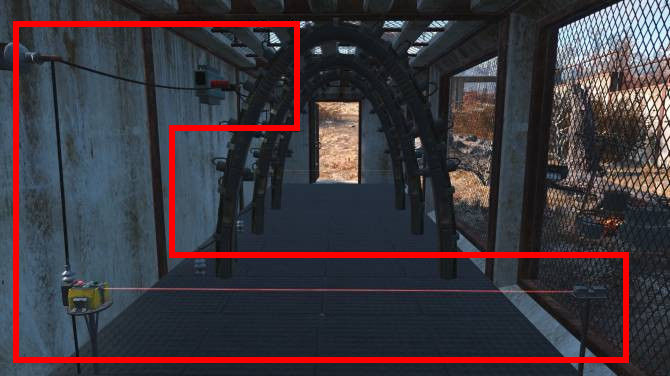
Now we can test and view the complete system as a whole. As you can see, the system visually connects the related objects, as well as having the logical association behind the scenes. Passing a crate through the laser will toggle the connected objects. This will be used in level 12 to power some quite awesome hardware, namely a large hydraulic press that will destroy crates unless you toggle some switches in the right order to turn it off!
The system below is a simple test system, featuring two powered objects and a sensor:
 ##
##As always, comments and feedback are more than welcome! Please vent your spleens below! ?

Glad you were able to come up with a solution for this, even if you had to do a hack job.") Nice job!
Nice job!