I'm sure most of you reading this know that deferred shading and antialiasing basically don't go together. Well, I've managed to crack this nut.
Previously, the only kind of "antialiasing" people could do with DS was just a simple blur along the edges. In my opinion, that method sucks, because it's not using any knowledge of the sub-pixel data, like hardware AA do.
Well, I've devised a method that allows for a blurring using hardware AA data, demonstrated below:
No AA:
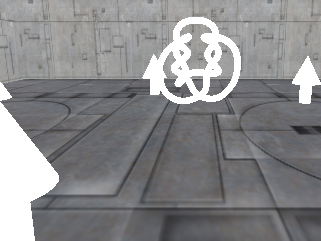
Regular hardware AA: (6 sample stochastic on an ATi card)
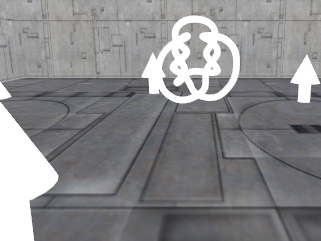 Deferred AA
:
(click the images for uncropped versions)
Anyways, as you can see, the two are virtually indistinguishable from each other (I almost cannot tell the difference in motion), and performance is the same way. The algorithm is basically a weighted 2x1 blur, but because of extra calculations and an extra (cheap) pass (two are needed before the process takes place: an AA'd image, and a non-AA'd image using the same data, the later you'd already have when doing deferred shading of course) it's a tad bit more costly. On my Radeon X800Pro, performance dropped from ~198fps to ~183fps1, without any lighting calculations.
I was only testing with diffuse texture data, as the above images show, but because it's a post-process blur it does with with lighting.
Now for the meat of it:
The algorithm works by first taking an AA'd image, and then a non-AA'd image of the same data, preferably something that is likely going to have aliasing in it, such as normal data. The AA'd image and non-AA'd CAN be different formats (e.g. my demo uses X8R8G8B8 for the AA'd normals, and A16B16G16R16F for the non-AA'd normals which I use for lighting) so long as the data can be compared. Other effective edge-finding data can be used as well, such as position. I did not experiment with that because edges like concave walls won't get AA'd, and the fact that position needs the high precision data that FP16 buffers provide, so it can be AA'd.
After getting the data, the antialiasing postprocess takes place. First, two samples are taken. One from the AA'd image, and one from the NonAA'd image with a ~1 texel offset. The difference is found between them, and then that "length" is taken, and just for safety's sakes, the final value is then saturated (I found that the values could get go outside the 0..1 boundary and cause some aliasing). This gives us the weight, a, to use so that we can interpolate between two values from the final scene (each offset from the pixel in question):
Col = a*FinalNonAA[0] + (a-1)*FinalNonAA[1]
And that's it! See 3 for full HLSL pixel shader code.
One *slight* disadvantage behind this though is that polygons that are smaller than a pixel don't get AA'd properly, and they just end up looking as if they weren't AA'd at all.
Anyways, here are some results from the demo, with lighting:
With AA 1
Without AA 1
With AA 2
Without AA 2
With AA 3
Without AA 3
And, lastly, if you have a card that supports PS2.0 (and 3 simultaneous render targets) you can check out the demo here:
http://www.eng.uwaterloo.ca/~dcrooks/DeferredAA.rar
Controls are E/S/D/F to move around (FPS-style with strafing), B to turn off AA (this only affects image quality. The AA blur isn't actually turned off, it's just that the weighting is set to some constant value), N to stop the lights, Up/down to brighten or darken the lights, and Left/Right to increase or decrease the number of lights.
*NOTE* Make sure that your driver settings (e.g. ATi's Catalyst Control Center) are set to either No AA or application managed. The AA seems to turn right off if you try to force it. By default, the app will try to get your max AA level (either 8x, 6x, or 4x).
1: After writing this out, I just remembered that the implementation that gives those framerates don't do the 2 final scene texture samples, since in this case the final scene was just the diffuse data sampled earlier. Perf shouldn't drop too much further though.
2: I'll edit this topic later to include the logic behind this idea.
3:
float4 DeferredAAPS(float2 Tex:TEXCOORD0, uniform float Width, uniform float Height):COLOR0
{
	float4 Col;
	float3 NonAA;
	float2 Offset = float2(1/Width, 1/Height)*0.75;
	NonAA = abs(normalize(tex2D(NonAASampler, Tex-Offset).rgb));
	float3 AAResult = tex2D(AASampler, Tex).rgb;

	float Weight;

	Weight =  saturate(length(AAResult-NonAA))*WeightFactor; // The weightfactor is set in the main program so I can turn it on and off.

	Col.rgb =	tex2D(ScreenSampler, Tex+Offset).rgb * Weight+
				tex2D(ScreenSampler, Tex-Offset).rgb * (1-Weight);

	Col.a = 1;

	return Col;

}

 Regular hardware AA: (6 sample stochastic on an ATi card)
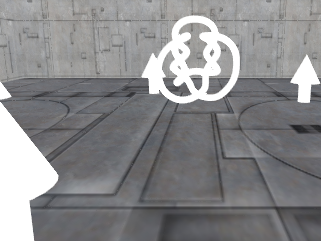
 Deferred AA:
 (click the images for uncropped versions)
Anyways, as you can see, the two are virtually indistinguishable from each other (I almost cannot tell the difference in motion), and performance is the same way. The algorithm is basically a weighted 2x1 blur, but because of extra calculations and an extra (cheap) pass (two are needed before the process takes place: an AA'd image, and a non-AA'd image using the same data, the later you'd already have when doing deferred shading of course) it's a tad bit more costly. On my Radeon X800Pro, performance dropped from ~198fps to ~183fps1, without any lighting calculations.
I was only testing with diffuse texture data, as the above images show, but because it's a post-process blur it does with with lighting.
Now for the meat of it:
The algorithm works by first taking an AA'd image, and then a non-AA'd image of the same data, preferably something that is likely going to have aliasing in it, such as normal data. The AA'd image and non-AA'd CAN be different formats (e.g. my demo uses X8R8G8B8 for the AA'd normals, and A16B16G16R16F for the non-AA'd normals which I use for lighting) so long as the data can be compared. Other effective edge-finding data can be used as well, such as position. I did not experiment with that because edges like concave walls won't get AA'd, and the fact that position needs the high precision data that FP16 buffers provide, so it can be AA'd.
After getting the data, the antialiasing postprocess takes place. First, two samples are taken. One from the AA'd image, and one from the NonAA'd image with a ~1 texel offset. The difference is found between them, and then that "length" is taken, and just for safety's sakes, the final value is then saturated (I found that the values could get go outside the 0..1 boundary and cause some aliasing). This gives us the weight, a, to use so that we can interpolate between two values from the final scene (each offset from the pixel in question):
(click the images for uncropped versions)
Anyways, as you can see, the two are virtually indistinguishable from each other (I almost cannot tell the difference in motion), and performance is the same way. The algorithm is basically a weighted 2x1 blur, but because of extra calculations and an extra (cheap) pass (two are needed before the process takes place: an AA'd image, and a non-AA'd image using the same data, the later you'd already have when doing deferred shading of course) it's a tad bit more costly. On my Radeon X800Pro, performance dropped from ~198fps to ~183fps1, without any lighting calculations.
I was only testing with diffuse texture data, as the above images show, but because it's a post-process blur it does with with lighting.
Now for the meat of it:
The algorithm works by first taking an AA'd image, and then a non-AA'd image of the same data, preferably something that is likely going to have aliasing in it, such as normal data. The AA'd image and non-AA'd CAN be different formats (e.g. my demo uses X8R8G8B8 for the AA'd normals, and A16B16G16R16F for the non-AA'd normals which I use for lighting) so long as the data can be compared. Other effective edge-finding data can be used as well, such as position. I did not experiment with that because edges like concave walls won't get AA'd, and the fact that position needs the high precision data that FP16 buffers provide, so it can be AA'd.
After getting the data, the antialiasing postprocess takes place. First, two samples are taken. One from the AA'd image, and one from the NonAA'd image with a ~1 texel offset. The difference is found between them, and then that "length" is taken, and just for safety's sakes, the final value is then saturated (I found that the values could get go outside the 0..1 boundary and cause some aliasing). This gives us the weight, a, to use so that we can interpolate between two values from the final scene (each offset from the pixel in question):


