What tone-mapping technique are you using?

Started by
6 comments, last by Hodgman 10 years, 10 months ago
tl;dr: I'm playing with tone-mapping ideas at the moment, and I'm looking for ideas/links/etc to read biggrin.png
I've been using a few variations of Reinhard, Hable's curve, and some piecewise linear gradients.
Lately I've been implementing realistic light intensity and falloff values, which has caused extreme amounts of contrast in the lighting levels compared to that I had before. I'm pretty sure that this extreme contrast is physically correct though, compared to what I used to have.
In this new situation, I'm having a hard time tweaking my current tone-mapping code to produce good results, but I made up a new one that's working well for me -- I'm guessing that there's probably existing algorithms that look pretty similar to mine, so share a link if you have one wink.png
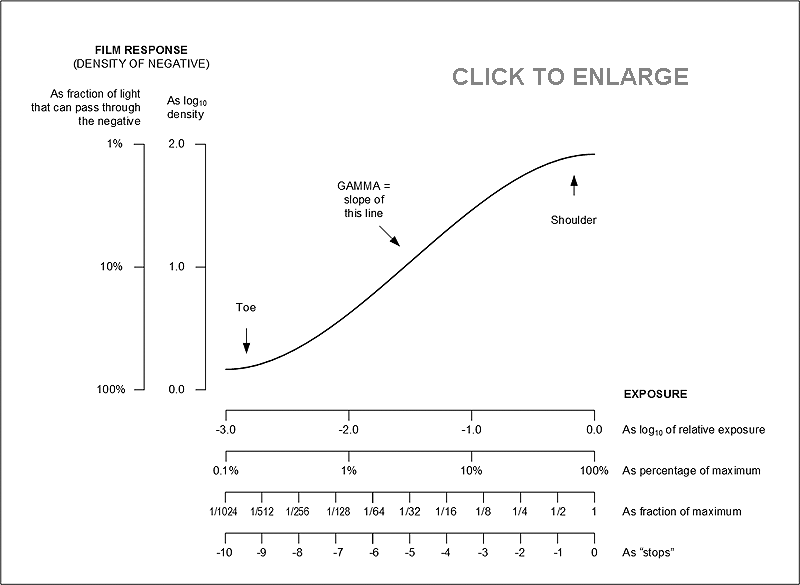
Looking at film response charts like the one below (from this page), the recurring theme is that the horizontal axis is logarithmic, and the shape is an S-curve.
crvFilmSmall.gif
So, I quickly hacked together something with these features (and also a small negative offset to crush the blacks):

float crush = 0.05;
float frange = 10;
float exposure = 10;
 
output.rgb = smoothstep(crush, frange + crush, log2(1+input.rgb*exposure));
//final.rgb = ToOutputGamma(output.rgb);
Log2 basically converts to "f-stops", like at the bottom of that chart, and then smoothstep creates the S-shape. Smoothstep and log aren't cheap, but it's a pretty cheap function compared to some of the other tone-mappers I've tried.
With this curve, I'm getting better results in my current scenes than with my previous code, but I'd like a better understanding of what I'm doing...
Ideally, what I'd like is to simply be using the same curves (and auto exposure programming) as my DSLR, so that I can use realistic lighting values and have everything just look good biggrin.png
While I'm at it, I'm also trying to track down some reference values for physical light values -- typical incandescent bulbs, fluorescent tubes, floodlights, the midday sky, direct sunlight, the overcast sky, moonlight, etc... And also values about the typical range of different camera or the human eye. e.g. the above chart depicts 10 stops, or a factor of 1024 between the dark and light end of the response curve. I've seen references that say that the human eye can perceive in a range of 2^20, but is this in the same scene, or can it, e.g. only see an adaptive slice that's 2^10 wide, out of the 2^20 range?
Advertisement

Hi,

Regarding getting light values for things - I've had some success capturing my own with some of the light metering iOS apps (e.g. LightMeter by whitegoods). I doubt it's super accurate, but it does a good job illustrating how crazily different light values can be.

Although I've worked with engines that use tone mapping for some time, I've not dabbled with anything using real-world values. At home I'm starting from scratch and trying out something with realistic values. I was searching for some docs covering local and perceptual tone mappers, and found this fairly gentle paper: http://aris-ist.intranet.gr/documents/Tone%20Mapping%20and%20High%20Dinamic%20Range%20Imaging.pdf

T

How do you define looking good ?

I once read an article/presentation/blog (can't find it at the moment, sry) in which the author sugguested, that the tone-mapping should represent a close physical mapping (not what the human eye sees) and then apply additional LDR color correction to make it look good. Therefor he sugguested to use even Reinhard over a filmic tonemapper, because the latter already included some kind of color correction.

I think, that the basic idea is to map a scene to LDR in a stable and (physical) color true way and leave all the 'making it pretty' to the color correction mapping.

Well if you're going with physically based stuff a filmic tonemapper: http://mynameismjp.wordpress.com/2010/04/30/a-closer-look-at-tone-mapping/

They're all, supposedly if the name means anything, based off the tonemapping for actual film, which deals obviously with physically base "real world" stuff anyway. There was this huge spiel with data, a pdf, I read months ago explaining exactly why film exposes in that way and how it suits real world scenarios, including real world under/over exposure clipping and light ranges and etc. If anyone knows what I'm babbling about and has it bookmarked then that's the most helpful thing I can think of. Real world light intensity of everything from a moonless night to the middle of a bright day and etc.

One of the specific I can remember was a reason for the toes on either end spreading out in an S shape, and that was to avoid sharp clipping in either over or under exposure, as well as ensuring there's still some saturation in both relatively dark shadows and bright highlights.

It sounds like you're talking about this presentation, which is from the SIGGRAPH 2010 course about color enhancement and rendering.

There we go! Luminance scale for everything from starlight to, (starlight) sunlight, an explanation of why the S curve is there, etc. Mapping a cameras range from the real world, or whatever range you want, to the same LDR displays we have should be the same in principle.

This probably isn't helpful to anyone at all but it's as good of an excuse as any to post my thoughts, I guess.

I'm not using a tone-mapping technique at all, at least not by most definitions. I'm ensuring that my lighting (by which I mostly mean lightmaps) is in the 0-1 range, and then applying an RGB curve (using a texture lookup as described here) to my rendered image. I'm not overly worried about color quantization so far, as I'm not really planning to stretch the values a great deal.

The obvious disadvantages to using an RGB LUT is that a) it assumes independence in the red, green, and blue channel (meaning it's impossible to, say, desaturate the image by this method alone) and b) that it doesn't make any attempt to model a real physical process.

One could, at least in theory, get past a) by using a 3D LUT, but so far I've found that if I grade my image with an actual color grading program, I don't usually violate the independence assumption too heavily. That means I can just apply my grade to a simple gradient and generate a 1-dimensional RGB LUT that more or less captures the same look. I think I will probably add a couple of other features to my algorithm to, for instance, crush saturation at high luminosity, but I haven't even made it that far yet.

As for b), I tend to think that many attempts to model film (or whatever) physically are wasted, because all of my color data is stored as RGB values rather than full spectral information. This is why things like FilmConvert, which presumably uses something very much like a 3D LUT, work well -- but not perfectly: they still only have RGB data as input. For an example of why this isn't always sufficient, consider that for every sensor (or film stock, or even eyes, excluding those fancy people with tetrachromatic vision), there's some color that includes spectral yellow that will be indistinguishable from a color that includes red and blue, but no spectral yellow. The challenge comes from the fact that, between sensors, which colors are indistinguishable can vary, so if we only store RGB information, it's always possible to lose something important.

It'd be fascinating if we could practically work with color that is represented by more than just three channels, and I know that this is not uncommon in some offline renderers, but it would mean we'd need to be able to work with spectral data in every intermediate step. For instance, a lot of extra work (or at least equipment) would be needed for texture acquisition from real-life (not to mention creation of textures not based on reality) to make use of it. This would need to be taken into account for every light bounce, etc. all the way up until we eventually get to simulating what happens once the light actually reaches the camera.

The way I see it, since I'm doomed from the start anyway, I'm better off just doing something simple and tweaking it to taste rather than worrying about simulating certain things accurately when I'll always be missing pieces.

I'm sure none of this is new to a lot of people in this thread, and I doubt my decision to ignore almost everything just because I am forced to ignore something is satisfactory to most people, but maybe it'll be helpful to someone anyway.

-~-The Cow of Darkness-~-

Thanks for the replies, links and app suggestions biggrin.png

How do you define looking good ?

When I put real-world brightness values into my existing code (where a patch of one object might be 10000x brighter than another due to attenuation), there was a lot of clipping to white and/or complete loss of detail. When I look at the same kind of scene in real life, there isn't a corresponding loss of detail, I can still perceive the scene fine (except for the light sources themselves, which saturate to white, bloom out and burn into my retina wink.png).

...but yes, this is a very subjective thing: I want to use physical values and end up with a rendition that's artistically appealing.

This topic is closed to new replies.

Advertisement