SharpDX Direct2D example with deviceContext and hwnd

Started by
3 comments, last by Katy Coe 10 years, 6 months ago

I have found a few examples that cover:

https://github.com/sharpdx/SharpDX/blob/master/Samples/Direct2D1/MiniRect/Program.cs D2D in a Renderform using D2D v1.

https://intmain.codeplex.com/SourceControl/latest#SharpDX/MyFirstDirect2D/MyFirstDirect2D/MyViewProvider.cs in a win8 core window using a D2D v1.1 device context.

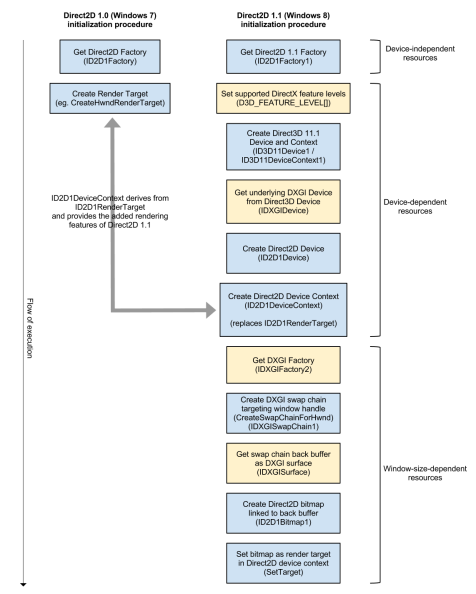
What i need is working sharpdx version of this c++ example:

http://katyscode.wordpress.com/2013/01/23/migrating-existing-direct2d-applications-to-use-direct2d-1-1-functionality-in-windows-7/

as detailed here:

direct2d-initialization-comparison.png?w

I am already at the CreateSwapChainForHwnd stage of this puzzle but can't figure it out.

If anybody knows a working example that would be really helpful.

Thx in advance!

Advertisement

Just an update.

I got a minimal example working.

It is in f# but that shouldn't matter


open System
open SharpDX
open SharpDX.Direct2D1
open SharpDX.Windows
open System

[<EntryPoint>]
let main argv = 
    let form = new RenderForm("Test")
    let d3device = new Direct3D11.Device(Direct3D.DriverType.Hardware,  Direct3D11.DeviceCreationFlags.BgraSupport ||| Direct3D11.DeviceCreationFlags.Debug) //not sure if or flags are working correctly
    let defDevice = d3device.QueryInterface<Direct3D11.Device1>()
    let dxgiDevice2 = defDevice.QueryInterface<DXGI.Device2>()
    let dxgiAdapter = dxgiDevice2.Adapter
    let dxgiFactory2 = dxgiAdapter.GetParent<DXGI.Factory2>()
    let scDescription = ref (new DXGI.SwapChainDescription1(
                                    Width = 0,
                                    Height = 0,
                                    Format = DXGI.Format.B8G8R8A8_UNorm,
                                    Stereo = Bool(false),
                                    SampleDescription = new DXGI.SampleDescription(1,0),
                                    Usage = DXGI.Usage.RenderTargetOutput,
                                    BufferCount = 2,
                                    Scaling = DXGI.Scaling.None,
                                    SwapEffect = DXGI.SwapEffect.FlipSequential
                                    ))

    let swapChain = new DXGI.SwapChain1(dxgiFactory2, defDevice, form.Handle, scDescription, System.Nullable(), null)
    let d2dDevice = new Direct2D1.Device(dxgiDevice2)
    let d2dContext = new Direct2D1.DeviceContext(d2dDevice, Direct2D1.DeviceContextOptions.None)
    let fac = new Direct2D1.Factory(FactoryType.SingleThreaded)
    let dpi = fac.DesktopDpi
    let bMProperties = new BitmapProperties1(new PixelFormat(DXGI.Format.B8G8R8A8_UNorm, AlphaMode.Premultiplied), dpi.Height, dpi.Width, BitmapOptions.CannotDraw ||| BitmapOptions.Target)
    let bb = swapChain.GetBackBuffer<DXGI.Surface>(0)
    let target = new Bitmap1(d2dContext,bb, bMProperties)
    do  d2dContext.Target <- target
    let brush = new SolidColorBrush(d2dContext, Color4.White)

    do  RenderLoop.Run(form, fun () -> 
                                d2dContext.BeginDraw()
                                d2dContext.Clear(Nullable(Color4.Black))
                                d2dContext.FillEllipse(new Ellipse(Vector2(300.0f,300.0f), 50.0f, 50.0f), brush)
                                d2dContext.EndDraw()
                                swapChain.Present(0,DXGI.PresentFlags.None)
                                )
    0 // return an integer exit code
 

Next step will be applying effects.

Some Win8 expamples can be found here:

https://github.com/sharpdx/SharpDX/tree/master/Samples/Win8

and the "documentation" here:

http://msdn.microsoft.com/en-us/library/windows/desktop/hh973241(v=vs.85).aspx

I'm the owner of the site you quoted above. I have examples for this in both SharpDX and SlimDX on this page:

http://katyscode.wordpress.com/2013/08/24/c-directx-api-face-off-slimdx-vs-sharpdx-which-should-you-choose/

Enjoy :)

Katy.

Thx a lot for your great work.

I would never have been able to put it together without your articles.

Some questions if you dont mind:

1.) It looks to me that you are using rendertargets in your sharpdx example instead of a D2D 1.1 device context like in your c++ example which precludes the use of shaders if i am not mistaken.

Also in your comparison you state that both slimdx and sharpdx are not able to use D2D 1.1. in Win7.

Is this information still correct in light of the Win7 platform update http://msdn.microsoft.com/en-us/library/windows/desktop/jj863687(v=vs.85).aspx , and if so why?

2.) On another topic http://msdn.microsoft.com/en-us/library/windows/desktop/hh973241(v=vs.85).aspx gives as the first step:

"After you render the rectangles and text to a intermediate surface"

How do i do this in an efficient way?

3.) Is it possible to apply vertex shaders to D2D Geometries?

Thanks a lot,

Eugen

1. You're right. I just tried to modify the code for both SlimDX and SharpDX now to use a Direct2D device context but at least on my Windows 7 box with the latest nuget packages installed, the relevant objects aren't defined even with Platform Update installed.

This blog shows how to get a Direct2D DeviceContext in SharpDX: http://english.r2d2rigo.es/2012/07/04/basic-direct2d-drawing-with-sharpdx/ - if you get this to work on Windows 7, please let me know smile.png

2. I don't know about an 'efficient' way, but when I used the composite effect to calculate the collision pixels between two objects a while ago I did it like this (in C++):


// Create a Direct2D effect which lets us composite the bitmaps with a compare function
ID2D1Effect *compositeEffect;
Screen->CreateEffect(CLSID_D2D1Composite, &compositeEffect);

// Set the two bitmaps as the input to the effect
compositeEffect->SetInput(0, intersectionA);
compositeEffect->SetInput(1, intersectionB);

// Set the composition comparison function
// D2D1_COMPOSITE_MODE_SOURCE_IN retains solid pixels from B which are also solid in A
compositeEffect->SetValue(D2D1_COMPOSITE_PROP_MODE, D2D1_COMPOSITE_MODE_SOURCE_IN);

// Render the effect (create the composite)
Screen->BeginDraw();
Screen->SetTarget(composite);

// Make sure any previous temporary data in the image is erased
Screen->Clear(D2D1::ColorF(D2D1::ColorF::Black, 0.0f));
		
Screen->DrawImage(compositeEffect);
Screen->EndDraw();

// Change the render target back to the normal screen back buffer
Screen->SetTarget(Direct2DBackBuffer);

/* collision detection code elided */

// Release the effect
SafeRelease(&compositeEffect);

where Screen is a Direct2D 1.1 IDeviceContext, intersectionA, intersectionB, composite and Direct2DBackBuffer are ID2D1Bitmap1. The two inputs to the composite effect (intersectionA and intersectionB) are passed to the effect and the effect's output is rendered to composite. The DeviceContext's render target is then changed back to the main application's window (Direct2DBackBuffer). You can then render composite to the main window if you want. If the main window's surface type is compatible with the effect output, you can skip rendering to a separate composite surface (I think).

3. I have no idea, never tried, so I'll throw that open to someone with more expertise.

Katy.

Edit: Oh, one important thing I forgot about efficiency... don't be creating and destroying temporary ID2D1Bitmap1s every frame for your effect rendering. In the code above, to save on those expensive operations at the cost of memory, I created bitmaps at application start-up using the largest possible dimensions I would be needing and just re-used them every frame, using Clear to erase their previous contents each frame, which is much faster than creating a new bitmap from scratch each frame.
This topic is closed to new replies.

Advertisement