This article will introduce you to the GameMonkey Script (abbreviated to GM Script or simply GM) language and API and how it can be used in your own games. It begins with a short introduction to the language and how it compares to Lua, the most similar language to GM Script and a popular choice in game development. The article will then show you the basic features of the script language itself and teach you how to bind the virtual machine with your game applications. This article does not intend to be a comprehensive tutorial on using GameMonkey Script, nor will it cover the advanced topics and techniques that can be employed when scripting, however it will be enough to
whet your appetite for GM Script and provide you with enough information to explore the language on your own. You can follow along with the examples in the code by experimenting with the
gme.exe program that ships with standard GameMonkey distributions and running the example scripts that are supplied with this article. You can find official GameMonkey Script distributions at the
official site.
This article was originally published to GameDev.net back in 2006 as a two-part series. It was combined and revised by the original author in 2008 and published in the book Beginning Game Programming: A GameDev.net Collection, which is one of 4 books collecting both popular GameDev.net articles and new original content in print format.
Prerequisites
In order to get the most of this article and indeed GameMonkey script, it is assumed that:-
a) You have a working
C++ compiler environment (an IDE or command-line, it doesn't matter)
b) You are able to program to an average level in C++
c) You are able to understand languages with a similar syntax to C/C++
d) You have an interest or requirement in embedding scripting languages
If you fail any of these prerequisites, then by all means correct them before you continue reading as you will probably not get much from this article.
What Is GameMonkey Script?
Scripting in games has long been an important technique for developers to employ. Scripting allows you to separate your game logic from your hardcore engine code and gives you the ability to tweak your content without time-consuming rebuilds of the entire engine. Some games, for example
Unreal, have vastly complicated scripting environments in place which allow you to create graphical effects and perform almost every action imaginable in your game. In the past it was popular for game developers to 'roll their own' scripting language that was tied directly into their game systems, however language parsing and virtual machine design are complex subjects meaning that many developers are choosing to adopt a third party scripting language.
Influenced by the popular embedded scripting language, Matthew Riek and Greg Douglas set about creating their very own language for a game project whilst employment at Auran Software; and thus GameMonkey Script was born. Created specifically for game scripting, GM Script is written with speed and simplicity in mind. The original version of GM Script has been used in several commercial ventures, from PC games to console games, and is growing in popularity amongst hobby game developers.
Comparison to Lua
As GameMonkey script was originally inspired by Lua, it is useful to highlight the differences between the two environments.
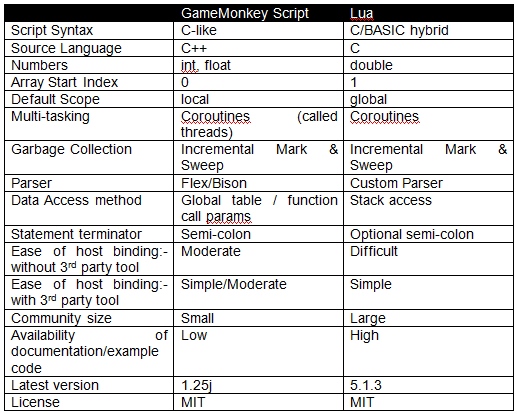
Lua has been used successfully in many commercial and amateur game projects, however it can be difficult to use without a third party binding library as its stack-access method can be confusing for people new to scripting. GameMonkey Script aims to address the complexities of Lua whilst still maintaining its inherent power through flexibility.
Introduction to the Language
In the following section I will introduce you to the GameMonkey Script language. You will learn how to manipulate variables, how to create and call functions and how to use the powerful GM Script 'table' object. This section is intended to be a primer to the language and it is assumed that you have some programming knowledge of C, C++, Java or other similar syntax styles. You can follow the simple examples I present here and experiment yourself using the
gme executable that comes with standard GameMonkey Script distributions.
Syntax Overview
This following section will give you an overview of the syntax used by the GameMonkey Script language. You will have noticed from the previous examples that the basic syntax of GM Script is very much akin to that of C. GM Script features the common elements of most programming languages:-
- Variables
- Comments
- Expressions
- Comparison Statements (if / else)
- Loops (for, while, foreach)
- Functions
GameMonkey Script also features an in-built threading and state system, allowing you to create multiple threads within the virtual machine to run several parallel tasks at once. However, I will not venture into that territory in this introductory article.
GameMonkey Scripts: Defined
A 'script' in GameMonkey contains the functions, variable declarations and expressions that form the basis of the behaviours you wish to implement in your application. Scripts are primarily stored as plain-text ASCII files that are loaded and compiled into bytecode, a form of machine language that is interpreted and executed by the GM environment. It is possible to load and execute precompiled bytecode but this not often done due to it being much harder for people to understand and work with.
GameMonkey Variables
Unlike C/C++, GM Script is a
dynamically typed language; variables do not have to be declared before use and can hold
any type of value, even
functions. The in-built basic types of GameMonkey Script are that of the number (integers or floats), the string, the function and the 'table'. Here are some simple variables in use:
myNull = null;
myNum = 50;
myString = "Hello!";
myFloat = 3.14;

print( myNum );
print( myString );
print( myFloat );
As you will see, a variable declaration is as simple as assigning a value. You will notice that every line is terminated by a semi-colon. This denotes the end of a statement and unlike Lua, is non-optional in GameMonkey Script. To C/C++ developers this will come naturally and so shouldn't cause too many problems.
Comments
Comments in GM Script are exactly like those in C++; you can choose between C++ style line-comments or C-style block comments:-
x = 5;		// This is a line comment

/*
		This is a block comment
*/
Expression and Conditional Syntax
GameMonkey Script can evaluate common expressions using the standard C-style expression syntax and as such, anyone familiar with C or C++ will feel comfortable using GameMonkey Script expressions.
x = 5;			// Assign a value to x
print( x );

y = (x * 10) + 56;	// Assign a value to y
print( y );

if (x == 10)		// Comparison (equality)
{
	print( "x is equal to 10" );
}
if (x != 10)		// Comparison (inequality)
{
	print( "x is not equal to 10" );
}
if (x < 10)			// Comparison (less than)
{
	print( "x is less than 10" );
}
if (x > 10)			// Comparison (greater than)
{
	print( "x is greater than 10" );
}
GM Script also features bitwise operations, such as
or ('|'),
and ('&') and
not ('!') which can be used in assignment or comparison expressions.
One can employ conditional logic in GameMonkey script by using the 'if' comparison.
if (  )
{
	// Do something if true
}
else if (  )
{
	// Do if 2nd condition passes
}
else
{
	// Do if all are false
}
Unlike C/C++, GM Script does not contain a 'switch' or 'case' statement so one must emulate the functionality by using blocks of
if / else if tests.
Loops and iterations
GameMonkey script has several methods of executing a loop. The first is the familiar 'for' statement:-
for (; ; )
{
	// repeated statement
}
A simple example to iterate a variable and print the number it contains would be:-
for (it = 0; it <= 10; it = it + 1)
{
	print( "it = ", it );
}
The output will be the numbers from 0 to 10 printed on separate lines in the output console.
The 'while' statement is used in situations where the conditions around the loop aren't as certain; the most common use of the while loop is to loop until a particular flag is set.
while (  )
{
  // repeated statement
}
For example, to repeat until the user has pressed the 'quit' button:-
while ( !quitButtonPressed )
{
  // do something in the game

  quitButtonPressed = host_check_for_quit();
}
Note that the
host_check_for_quit function is a hypothetical application-bound function. Similarly, an approximation of the 'for' loop you saw previously would be:-
it = 0;

while (it <= 10)
{
	print( "it = ", it );
	it = it + 1;
}
The 'foreach' loop allows you to iterate over the contents and keys of a table. I will cover this in more detail in the table section of this article.
That was a brief overview of the various statements, expressions and symbols used in the GM Script language; however it is far from exhaustive. For a full list of expressions and iterators along with their syntax you are advised to consult the '
GameMonkeyScriptReference' which comes with the official GameMonkey Script releases.
Scripted Functions
The GameMonkey Script machine has two forms of functions. The first is the scripted function, a function that is created and coded in script. A scripted function is specified in the same way as a normal variable:-
myMultiply = function( x, y ) { return x * y; };
As functions are created and specified as variables, it is extremely important to remember the terminating semi-colon at the end of the function declaration. Calling a function is as you'd expect from a C-style syntax:-
a = myMultiply( 100, 2 );
print( a );
The second type of function is that of the host-declared function. An example of a native function is the
print command which is contained within gmMachineLib and bound to every gmMachine you create. Only 'C' style functions or static class methods can be bound to the GameMonkey machine, but there are workarounds to this. I will cover the binding of native functions further on in this article.
GameMonkey Script Tables
The table is an important and powerful structure within GameMonkey script. At its most basic, it allows you to specify arrays of data, it its most complex, you can begin to create organised structures of data and functions for use in your games.
Tables as Arrays
A table can be used as a simple array which contains any type of data.
Initialisation Example:
myArray = table( 1, 2, 3.14, 4, 5, "dog", "cat", 100 );
Much like C/C++ arrays, you need to use indices to access the data within the table. All indices are zero-based when a table is initialised in this manner. Lua programmers should note this difference, as in Lua initialised tables begin at index 1.
Accessing the data:
myArray[0] = 50;
print( myArray[1] );
myArray[100] = "dog_100";	// new item added
print( myArray[100] );
Tables as Associative Arrays
A table can also be used as an associative array, much like the
map structure in the C++ STL. An associative array can be indexed using a non-numeric key, allowing for 'named' data lookups. Again, the data items in an associative array can be of any type.
Initialisation:
myData = table( Name = "Test", Weight = 60 );
Accessing the data is as simple as the first example:
print( myData[ "Name" ] );
print( myData[ "Weight" ] );
myData["Name"] = "Albert";
myData["Test"] = "Some Text Here";
print( myData[ "Name" ] );
print( myData[ "Test" ] );
You will have noticed that we can assign new keys and indexes at any time as the tables have no defined bounds.
Tables as Mixed Arrays
You can use the table as a 'mixed array', an array that contains both indexed data and keyed data (as in an associative array). This makes the table structure very flexible:-
myTest = table( 1, 4, Test = "Text!", 7, 8 );
print( myTest[0] );
print( myTest[3] );
print( myTest["Test"] );
In the example above, the second print statement prints the number 7 and not as you may expect, the word "Text!". The reason for this is because GM Script keeps indexes and keys separate from each other within the table.
Iterating Table Data - 'foreach'
The 'foreach' statement allows you to iterate over the contents of a table in a loop. The most basic form of the foreach statement is to examine just the values within the table:
foreach ( in ) { // statements }
An example of this follows:
fruits = table ( "apple", "pear", "orange" );
foreach ( frt in fruits )
{
  print(frt);
}
The above code will print the contents of the table to the console in no particular order. However, you may have noticed that the table key is often as important as the value it references and may wish to capture that data too:-
foreach ( and in { // statements }
An example:-
fruits = table ( "apple", "pear", Juicy = "orange" );
foreach ( k and f in fruits )
{
  print( "The value at key "", k, "" is "", f, """ );
}
Will print something similar to:-
The value at key '0' is 'apple'
The value at key 'Juicy' is 'orange'
The value at key '1' is 'pear'
Simulation of 'structs' and simple classes with Tables
The final use of the table structure is to simulate C/C++ structs and classes. If you recall what I mentioned before, the GM Script table object can store
any type of data, including functions. Because of this, you can assign a scripted function to an index or key within a table.
myStruct = table(
  SayHello = function() { print( "Hello, world!" ); }
);

myStruct.SayHello();	// Call table-bound function
As you see in the example, you can access keyed table data using the period (dot) operator. This allows us to treat the table as a simple class structure, accessing the named elements in a familiar fashion.
myAlien = table(
  Name = "Alien",
  AttackPower = 20,
  Strength = 50,
  OnAttack = function( entity )
    {
      entity.Damage( this.AttackPower );
    }
);
The slightly more complex example shows how simply a generic alien scripted object can be created using the in-built GameMonkey Script types and how it is centred primarily around the use of the table object.
Unlike C++ classes, it is important to note that the GM Script table object has no constructor/destructor, cannot be inherited from and does not allow for custom operator overriding. However, you can achieve such behaviour through creating your own bound types. It should also be noted that GM tables have no concept of public, private and protected scoping as C++ presents for structs and classes. All table members are declared as being in the public scope and so can be accessed from anywhere. I will continue the scoping discussion in the next section.
Scoping
GameMonkey script has a range of scopes for variables (and hence functions). If you wish your functions or methods to be accessible from outside of the script (for example, to be read directly by the host application) you must declare them as being in the
global scope. The global scope is accessible everywhere in the script; even within other functions. Without this declaration, the objects are implicitly within
local scope, which means they're only accessible to within the current scope or lower.
// Create a variable in the global scope
global myvar = 100;

// parameter "a_param" is in function local scope
myfunc = function( a_param )
{
	// variable myvar is in local scope
	myvar = a_param;
	print( myvar );
};

print( myvar );
myfunc( 50 );
print( myvar );
Hold up a minute; you will notice that I've created 2 variables called
myvar, one in the function and the other in global scope. If you run this script you will notice that the value of the global
myvar is unchanged, even though you set the value of
myvar in the function. The reason for this is simple; they exist in different scopes! GameMonkey allows you to set global variables from within functions by explicitly specifying the scope of the variable. In this case, I add the
global keyword to the
myvar declaration in
myfunc.
// Create a variable in the global scope
global myvar = 100;

// parameter "a_param" is in function local scope
myfunc = function( a_param )
{
	// Access variable myvar in global scope
	global myvar = a_param;
	print( myvar );
};

print( myvar );
myfunc( 50 );
print( myvar );
Things can begin to become tricky, however, when using tables and the
this operator. Whenever a variable is part of a table or user-defined object, it exists in the
member scope of the parent object, or
this. This concept will be familiar to you if you've done any work in C++, so I will not dwell on it. Let's have a look at the member scoping in use:-
global mytable = table(

    myMember = 50,
    setMember = function( a_value )
    {
        myMember = a_value;
    }
);

print( mytable.myMember );
mytable.setMember( 100 );
print( mytable.myMember );
The script above behaves similarly to the local scoping example; the
myMember method isn't altered. However, when you include the
member scoping keyword you will see a different result.
global mytable = table(

	myMember = 50,
	setMember = function( a_value )
	{
		member myMember = a_value;
	}
);

print( mytable.myMember );
mytable.setMember( 100 );
print( mytable.myMember );
The
this scoping is fairly complicated, but at the same time is very powerful. Using
this scoping you can create generic delegates that can access the data of the object that is passed as
this. Confused? Take a look at the following example:-
myTable = table(
	myMember = 50
);

setMember = function( a_param )
{
	this.myMember = a_param;
};

print( myTable.myMember );
myTable:setMember( 100 );
print( myTable.myMember );
In this example the function
setMember is completely external to the
myTable object but is able to access its data and methods. The reason it is able to do this is though use of passing the
myTable object as
this when calling the
setMember function. The body of
setMember explicitly states that it will alter the data belonging to
this without actually belonging to
this at compile time. This allows you to create very powerful scripted functions which can exist in the global scope and be called from objects as if they were a member of that object itself. An abbreviation for typing 'this' is to simply type a single period '.'. For a more complex example of
this in action, please refer to
scoping_6.gm which is available in the attached files.
Embedding GameMonkey Script
Now that you have an understanding of the language syntax and have experimented with its use, you will want to want to do something with it in your games or applications. To do this, the GameMonkey Script library needs to be
embedded in your own code. In order to do this, I will first introduce you to the concept of embedding and then provide some information in order to guide you in doing it yourself.
GameMonkey Script runs as a
Virtual Machine environment that requires binding manually to your host application. A virtual machine is, as its name implies, a piece of software that behaves as if it were a computer itself (Wikipedia, 2005). Typically, a virtual machine will execute programs by interpreting its own 'bytecode' which is similar to the machine code used by the CPU on the machine I'm using to write this document. The game (or application) that uses the virtual machine must interact with its interface. You cannot simply call a scripted function or access data directly from your compiler environment - you must access the correct API functions to do so. Typically, the virtual machine has a very basic set of functions and data types; it is up to your game to
export an interface of its own to the script environment. As you do this, the game and scripting environment become bound in a symbiotic relationship; in this state, the game is often referred to as the 'native' (as in non-interpreted), or 'host application' in which the scripted machine is 'embedded' (Varanese, 2003).
Setting up your Compiler Environment
Compiler environments can vary quite wildly and so this section is by no means a comprehensive tutorial on setting up GameMonkey Script for your compiler. At this stage you will have downloaded the latest GameMonkey Script release zip file, unpacked it and be presented with the C++ source code for the library. To embed GameMonkey script, you can either compile a static library from the source code or compile the source along with your host application. For the sake of convenience, I will go the static-library route and describe the basic method of compiling a static library of the GM Script sources using a typical IDE.
- Create an empty 'static library' C++ project
- Locate your relevant platform configuration file(*) and copy it to your gm/src directory of the standard GM Script distribution
- Import the *.cpp and *.h source files from the gm/src folder excluding the gmDebugger.cpp and gmDebugger.h files
- Set your compiler settings, altering the optimisation, runtime library and debug settings appropriately
- Compile the static library and store in an accessible location
Once you have the static library, you can link it to your application like a normal library and compile programs using the GM Script API (assuming, of course, that you tell your compiler where to find the headers).
You will notice that step
2 has an asterisk next to it. The configuration file
gmConfig_p.h is where all platform-specific defines and settings are kept. You can use it to specify the endian-ness of native CPU, the size of common types or even set specific compiler settings. Choosing your platform configuration is relatively simple for common Windows and Linux platforms (both MSVC and GCC), but you may need to edit your configuration file if you're using an exotic compiler and/or platform.
Creating the GM Virtual Machine
Before you can use GameMonkey Script in any way you must embed it in your application. To do so, you must create an instance of the virtual machine, which is embodied by the
gmMachine class provided by the GameMonkey API.
#include "gmThread.h"

int main()
{
	// Create the GM Machine object on the stack
	gmMachine gm;

	return 0;
}
Example: basic_1.cpp
Compiling and linking should proceed without a problem provided that you a) include the directory containing your GM headers in your project or global search path and b) link to the static library you created earlier. If you run this program you will see nothing special; but it's there. The GameMonkey VM is embedded in your application!
Executing a String as a Script
An embedded virtual machine is next to useless without a script to run on it, so this next section will cover the most basic way you can execute a script on the GameMonkey VM. The
gmMachine object you created earlier has a member function called
ExecuteString which provides you with a method to execute a text string as a script on the GM Machine. Let's see a simple example of this in action:-
#include "gmThread.h"

int main()
{
	gmMachine gm;

	// Execute a simple script
	gm.ExecuteString( "print( \"Hello, world!\" );" );

	return 0;
}
Example: basic_2.cpp
Compiling and running this program should display the immortal words "Hello, world!" in your console window. There are two ways of using string literals within GameMonkey Script; the first is to use the familiar double quotes to denote the beginning and end of the string. For example:-
gm.ExecuteString( "print( \"Hello, world!\" );" );
The second way is to use the back quote character:-
gm.ExecuteString( "print( `Hello, world!` );" );
These both perform the same function but it should be noted that the two styles cannot be mixed within the same string:-
gm.ExecuteString( "print( \"Hello, world!` );" ); //ERROR
Providing GameMonkey Script with a script string containing double-quoted string literals poses us a problem as we're using C++ and we will need to escape these elements in order to compile our program.
In the following code snippet, I will store my script in a
const char* string and pass the data to GM for execution:-
#include "gmThread.h"

int main()
{
const char *myScript = "fruits = table ( \"apple\", \"pear\", \"orange\" );	foreach ( frt in fruits ) { print(frt);	} ";

	gmMachine gm;

	// Execute a simple script
	gm.ExecuteString( myScript );

	return 0;
}
Example: basic_3.cpp
As you can see, hard coding scripts as text strings can quickly become messy and it actually defeats the need for a scripting language in the first place; your strings are still compiled along with the application and any changes to them forces a recompile! In the following section I will talk about loading scripts from a file.
Executing a Script from File
In order to overcome the need for hard-coded scripts, it is beneficial to load the scripted data from a file. However, you may notice that the gmMachine object has no member function for loading scripts from a file resource. To some, this omission may seem to be a startling oversight, but it becomes understandable when you appreciate the context that the GameMonkey Script environment is intended for - games! Games often have many weird and wonderful methods of loading file resources; some choose straight file IO, others use a zip-like format, others have encryption and some even use a network layer to receive the game content. In this context, a single
LoadScript member function is fairly pointless as the majority of games embedding GM would have little use for it.
The basic method of loading a script from file is as follows:-
- Locate the file resource
- Open the file resource
- Obtain the size of the data to load
- Allocate enough memory to load the data plus one byte for the zero terminator
- Load the data from file into the allocated memory
- Close the file
- Compile the script from the loaded data
- Free up the allocated memory containing the script
It is worth bearing in mind that steps 3, 4 and 5 can be combined into a single step because we can use
ifstream and
string from the C++ standard library, however I have chosen to separate out the steps should you be using a non-C++ library such as PhysicsFS or the legacy C FILE functions. With this in mind, it is simple to write our own simple implementation based on the C++ standard library.
#include
#include
#include

int gmLoadAndExecuteScript( gmMachine &a_machine, const char *a_filename )
{
    std::ifstream file(a_filename);
    if (!file)
        return GM_EXCEPTION;

	std::string fileString = std::string(std::istreambuf_iterator(file),
                                         std::istreambuf_iterator());
	file.close();
	return a_machine.ExecuteString(fileString.c_str());
}
Example: loading_scripts_1.cpp
If you now integrate this code with the simple example code shown previously, you should now be able to load and execute scripts from a text file. GameMonkey scripts usually have a *.gm, extension, but this is obviously not required.
#include "gmThread.h"

int main()
{
	gmMachine gm;

	// Execute a simple script file
	gmLoadAndExecuteScript ( gm, "scripts/hello.gm" );

	return 0;
}
Basic Error Checking
Now that your scripts are getting more complex you may begin to experience accidental syntax errors which would cause the script compilation to fail. It is extremely important that you handle at least the basic errors that come from bad script compilation. The
gmMachine object maintains an internal log of the last errors in the compilation process which will help you catch these errors should they occur.
The basic way of checking an error is to catch the return from the
ExecuteString member function. If the value is zero, there is no error and you can proceed as normal. However if the value is non-zero you have an error and should handle it somehow. Simply knowing that there's an error is useless in helping you track it down, so GameMonkey gives you access to the error log for your own use. You can access the compilation log using the
GetLog member function of the
gmMachine object. From the retrieved
gmLog object you can access the
GetEntry function, which allows you to iterate through the errors the log contains, popping them from the list when you're done.
#include "gmThread.h"

void handleErrors( gmMachine &a_machine )
{
	gmLog &log = a_machine.GetLog();
  // Get the first error
  bool firstError = true;
	const char *err = log.GetEntry( firstError );
	while ( err )
	{
		std::cout << "Compilation error: -" << err << std::endl;
		err = log.GetEntry( firstError );
	}
}
Example: error_handling.cpp
In the code above you will notice the use of the
firstError variable; this is used internally by GM Script to control the one-way iteration over the log entries. You must be set the variable to true for the first call to the function; it will be set to false on subsequent calls.
int main()
{
const char *myScript = "fruits = table ( \"apple\", \"pear\", \"orange\" );	foreach ( frt in fruits ) { print(frt);	} ";

	gmMachine gm;

	// Execute a simple script
	int ret = gm.ExecuteString( myScript );
  if ( ret != 0 )
  {
    // There were errors in the script, exit gracefully
    handleErrors( gm );
    return 1;
  }

	return 0;
}
Example: error_handling.cpp
Now that you know how to handle script compilation errors I will set you the task of updating the
gmLoadAndExecuteScript function and adding better error handling and reporting compilation errors to the user.
More on Script Execution
All of the examples we've looked at so far have assumed that you want to execute a script immediately; this can often not be the case in games where data and scripts need to be loaded and compiled at a specific time, usually while a loading screen is presented. GameMonkey has two ways of preventing a compiled script from immediate execution; the first is to set the optional
a_now parameter of the
gmMachine::ExecuteString member function to false when you call it. This will compile the string but not execute it until you call the
Execute member function on the
gmMachine object. An example of this follows:
#include "gmThread.h"

int main()
{
  gmMachine gm;

  // Compile a simple script without running it
  gm.ExecuteString( "print( \"Hello, world!\" );", 0, false );

  // The text wasn't printed!

  // Wait for a key press
  getchar();

  // The script will now execute!
  gm.Execute( 0 );

  return 0;
}
Example: execution_1.cpp
A task for you, the reader, is to create an enhanced version of the
gmLoadAndExecuteScript function which allows you to specify when the code is actually executed by specifying the
a_now parameter appropriately.
The second method of controlling when a script is executed involves compiling it down to raw bytecode and executing the stream as a library. This method is useful in games as the script is converted into a form that isn't as easily readable as a script stored in a text file. One common use for scripting in games is to execute a script within a game level when a certain event is triggered; by using a bytecode version of your scripts you can easily include compiled script code within your game level file. This is beyond the scope of this article and will not be explored further, however if you wish to explore this on your own, you should refer to the functions
CompileStringToLib and
ExecuteLib which are members of
gmMachine. Like using text files, you are responsible for writing your own loading and saving routines for the
gmStream objects that contain the compiled scripts.
In the example code
execution_1.cpp you were introduced to a new member function of the
gmMachine object, namely
Execute. This function effectively tells the machine to execute all active threads in turn. As you can appreciate, it is extremely powerful when it comes to running scripted threads, as you can now update the GameMonkey virtual machine along with the rest of your game logic. Using scripted threads, or
co-routines, is out of this article's scope but I will introduce you to the basic concept of how they work.
Everything within the GameMonkey virtual machine runs in a
gmThread object, which has its own executable bytecode, stack and scope. The virtual machine can hold many of these threads in memory at any one time, preserving the states of them until the threads are next 'ticked' by the machine. What happens behind the scenes of the
ExecuteString function is that GameMonkey will spawn a new GM Script thread, compile the script into the thread and populate its internal structures with references to the functions and variables contained within this script. If
a_now is true, the thread will execute immediately on the
gmMachine, causing the bytecode to be interpreted until there is no more code or the thread yields control back to the virtual machine. If
a_now is false, the thread will be pushed into the queue along with the other threads and will only be updated on an
Execute cycle, again executing until there is no more code or the thread yields.
The GM Script Objects
If you look back you will recall that I said GameMonkey Script has several built-in types, namely integers, floats, strings, functions, tables and null. All variables within GMScript are held and accessed initially by
gmVariable objects, which is a 'catch-all' type and will be explained fully in the next section. Because GameMonkey Script objects are 'reference types' we must allocate them reference through the virtual machine; this rule applies to all but the three basic types - integers, floats and the null type. Therefore, if you need to create a function, string, Table or a user-data type you must use request them from the
gmMachine in the form of the
gmFunctionObject,
gmStringObject,
gmTableObject and
gmUserObject C++ objects.
I am not going to detail exactly how to use these types because you can glean this information from the GM API docs, but I will say that
every time you need GM to handle any of these types you
must allocate them via the
gmMachine object. For example, if you need to pass a string as a function parameter you cannot just pass the literal or a pointer to the null-terminated string data. Instead, you must allocate a new
gmStringObject using
gmMachine::AllocStringObject and populate the data accordingly. Likewise, if you are creating a bound type which needs to reference a native structure you must allocate a
gmUserObject and set its data as your native pointer. You will see examples of these operations in the following section.
gmVariable Object
The
gmVariable type is important in many areas when accessing the VM API. Instead of having to provide multiple API functions to handle every conceivable object type GM has provided the
gmVariable. The
gmVariable is used in everything from function parameters and return data to table data objects; this object is a 'catch-all' class which holds the variable data that can pass to and from the VM as it holds information about the
type of data as well as the data itself. The GM machine will read off the variable
type before deciding how to proceed with handling the data it contains so it is vitally important that you set the appropriate type when manipulating your variables. Let's have a look at how you can create and manipulate a new variable:
int main()
{
	gmMachine gm;

  // Allocate a string from the machine and set it as a variable
  gmVariable stringVar( gm.AllocStringObject("Hello, World") );
  // Allocate a variable containing an int and a float
  // note it doesn't need to be created from the machine
  gmVariable intVar( 100 );
  gmVariable floatVar( 1.5f );

  // Create a variable with a newly created table
  gmVariable tableVar( gm.AllocTableObject() );

  // Reset table var as an int, losing the table data it contained
  tableVar.SetInt( 200 );

  // Variable copying
  intVar = floatVar;

  // Make 'null'
  stringVar.Nullify();

  return 0;
}
Example: variables_1.cpp
As mentioned previously, you need to allocate String and Table objects from the
gmMachine object, but because floats and integers are native types, you are not required to perform any extra allocation to hold the data they contain. The variables created in the example don't actually do anything, but they are all ready to be pushed as a function parameter or set in a table. As you can see above, like in GMScript itself, you are free to assign variables, reset variables with new data or even completely nullify them.
Sometimes you will be presented with a
gmVariable from the machine; it may be come as a function parameter or as the result of a 'Get' on a
gmTableObject. In these situations you will need to know how to retrieve the data. If you look in the
gmVariable.h header you will see the following code in the
gmVariable class.
gmType m_type;
union
{
  int m_int;
  float m_float;
  gmptr m_ref;
} m_value;
This should give you a hint in how to retrieve the data. Before you can do
anything else you must check the
m_type member. This holds the appropriate enumeration and will be either
GM_NULL,
GM_INT,
GM_FLOAT,
GM_STRING,
GM_FUNCTION,
GM_TABLE or an integer for your own types which increment from
GM_USER. Once you have ascertained the type you can retrieve the value from the
m_value union; in the case of integers and floats this is as simple as accessing
m_int and
m_float respectively, but what happens for other types? The answer should be obvious - you need to cast the
m_ref pointer to your appropriate type. It should be noted, however, that there are no runtime checks to ensure you're casting to the correct type; it is for this precise reason that you should
always check the type before you attempt to cast. In a dynamically typed environment such as GameMonkey Script there are no guarantees about the type of data you will receive, so you must place it upon yourself to check before you access the data in the variable. The following example will highlight how to check for the type and access the data accordingly. As an exercise, try experimenting by changing the value you place in the
var gmVariable and examine the results you get back.
using namespace std;

int main()
{
	gmMachine gm;

    // Try setting your own variable here
    gmVariable var( gm.AllocStringObject("Hello, World") );

    switch (var.m_type)
    {
    case GM_NULL:
        cout << "Variable is NULL type" << endl;
        break;
    case GM_INT:
        cout << "Variable is INT type" << endl;
        cout << "Value:" << var.m_value.m_int << endl;
        break;
    case GM_FLOAT:
        cout << "Variable is FLOAT type" << endl;
        cout << "Value:" << var.m_value.m_float << endl;
        break;
    case GM_STRING:
        cout << "Variable is STRING type" << endl;
        cout << "Value:" << reinterpret_cast(var.m_value.m_ref)->GetString() << endl;
        break;
    case GM_TABLE:
        cout << "Variable is TABLE type" << endl;
        cout << "Items:" << reinterpret_cast(var.m_value.m_ref)->Count() << endl;
        break;
    case GM_FUNCTION:
        cout << "Variable is FUNCTION type" << endl;
        break;
    default:
        cout << "Variable is USER type" << endl;
        // retrieve native pointer from user object
        void *ptr = reinterpret_cast(var.m_value.m_ref)->m_user;

    };

	return 0;
}
Example: variables_2.cpp
A final word of caution about
gmVariables; numeric data can be stored with either the
GM_INT or the
GM_FLOAT type depending on whether it has a decimal or not. For example, imagine a script which uses a loop to count from 0 to 10 in increments of 0.5f. The variable will initially hold data of
int type (zero is an int), and alternating between float and int on every second iteration. Because of this, it is important that any function that expects numeric float data performs a check to see if the variable is either a
GM_INT or a
GM_FLOAT.
Calling a Scripted Function
There will often be times that you would like to call a known scripted function from your application; perhaps you specify that your game will need to call an
InitialiseGame scripted function, or perhaps the
Attack function in
scoping_6.gm that was originally presented in previous script examples. In GameMonkey Script there are currently two ways to call a scripted function from native code; the 'manual' way which uses the raw API to push variables and prepare the stack, and the 'simple' way which uses a utility call
gmCall. I will take you through calling a scripted function using
gmCall, since that is the simplest and most common way you'll need to call a function. For purists, I have included some example source that doesn't use
gmCall with this article, but for most purposes I advise using
gmCall.
Using gmCall
The authors of GameMonkey Script realised that the 'manual' way of calling functions can be long-winded and prone to error and so have thoughtfully provided
gmCall to vastly simplify the calling of scripted functions.
- Create the gmCall object
- Call the BeginGlobalFunction / BeginTableFunction member function to initialise
- Push the parameters
- 'End' the call
- Get return values, if required
Here is an example that calls a scripted function
myMultiply which takes two numbers as parameters and returns their sum.
int main()
{
    gmMachine gm;

    // Execute a simple script file
    gmLoadAndExecuteScript ( gm, "scripts/function_test.gm" );

    gmCall  call;
    if ( call.BeginGlobalFunction( &gm, "myMultiply" ) )
    {
      // Push the parameters
      call.AddParamInt( 10 );
      // Example showing a variable can be used
      gmVariable var( 2 );
      call.AddParam( var );
      // Execute the call
      call.End();
      // Handle the return value
      int myReturn = 0;
      if (call.GetReturnedInt( myReturn ) )
      {
    	std::cout << "myMultiply returned " << myReturn << std::endl;
      }
      else
      {
    	std::cout << "myMultiply returned an incorrect value" << std::endl;
      }
    }
    else
    {
        std::cout << "Error calling 'myMultiply'" << std::endl;
    }

	return 0;
}
The
gmCall AddParam* functions allow you add parameters without having to deal with
gmVariable objects (although it is entirely possible to pass your own
gmVariables). Any required allocations and validations are performed automatically for you, allowing you to quickly access the scripted functions you need.
Creating a host-bound function
Now that you know how to call a scripted function from native code, you may be wondering how you export your own functions to GameMonkey Script. The reasons for wanting to do so are understandable; some people may want the speed of native code (although GM is fast, it's still slower than native code), others may want to expose aspects of their game or engine to the script. Whatever your reasons, you need to know how to export your own functions.
Unlike some scripting languages (for example AngelScript), functions must be 'wrapped' for use by the VM. The GM Script VM doesn't have the ability to translate the parameters from the script into a form understandable by your native compiled code - one reason being that function calls and their parameters aren't known until runtime, unlike in C++ where everything is checked during compilation. The process within the wrapped a function usually involves the following steps:
- Parsing the parameters passed from the scripting VM
- Converting them into a usable form for C++ code
- Performing the main action of the function
- Converting any return values to a suitable format for the VM
- Returning control back to script
Here's the code I will be examining for a simple 'native' version of
myMultiply:-
int GM_CDECL gm_myMultiply( gmThread *a_thread )
{
	// Check the number of parameters passed is correct
	if (a_thread->GetNumParams() != 2 )
    return GM_EXCEPTION;

    // Local vars to hold data from params
	int a_x = 0;
	int a_y = 0;

	// Check params are valid types
	if (a_thread->ParamType(0) != GM_INT)
    return GM_EXCEPTION;
    if (a_thread->ParamType(1) != GM_INT)
    return GM_EXCEPTION;

	// Get data from params
	a_x = a_thread->Param(0).m_value.m_int;
	a_x = a_thread->Param(1).m_value.m_int;

	// perform calculation
	int ret = a_x * a_y;

	// return value
	a_thread->PushInt( ret );

	return GM_OK;
}
Like its scripted counterpart, this function takes two parameters and returns the sum of their values. The 'wrapped' function first checks that the number of parameters it has been passed is correct; if not we return a scripted exception, next it checks to see that the parameters are the correct type (in this case,
int). It then reads the values of these parameters from the thread - you will notice that the parameters are held again in the
gmVariable structure. After the parameter data has been collected and converted you can now perform the main body of the function; in this example it is a simple multiplication but in your games it is likely that you will call another function in your engine.
You will notice that a lot of the code to check parameters is repetitive and can be cumbersome to write. Fortunately for us, the GameMonkey authors have provided several macros to aid our task.
int GM_CDECL gm_myMultiply( gmThread *a_thread )
{
	GM_CHECK_NUM_PARAMS(2);
	GM_CHECK_INT_PARAM( a_x, 0 );
	GM_CHECK_INT_PARAM( a_y, 1 );

	int ret = a_x * a_y;

	a_thread->PushInt( ret );

	return GM_OK;
}
The
GM_CHECK_NUM_PARAMS macro is fairly self-explanatory; it checks the number of parameters from the thread. The
GM_CHECK_*_PARAM macros are similar, but they also declare the variables and fill them for you. These macros make the code much simpler to read while still performing the same function.
Creating a simple type
Many game developers will want to expose their own types to a scripting system, and GameMonkey Script is no exception. Imagine a simple class that is in most 3D applications, the
Vector class. This can be as simple as a structure composed of 3 floats for
x,
y and
z or can be as complex as a class which holds member functions to perform operations and calculations on the vector data. Sometimes it is possible to use the integral
table object for custom-bound objects, but in some situations you require the application to have more control over the object - perhaps by providing extra validation, data conversion or updating another object in your game when the data is changed on the object. With a simple
table this sort of control is impossible, hence the need for user-defined types.
Choosing what to bind
When choosing to bind your type you must consider how it will be used in script. For example, the simple
Vector type could be easily represented as a fixed array of 3 floats, it could have the constituent items stored in named members (such as x, y and z), or it could be comprised of both. For example:
v = Vector( 10, 20, 50 );	// Create vector

// Vector could be represented using 3 floats
v[0] = 20;
v[2] = v[1];

// Access vector using named members
v.X = 20;				// Set X member to 20
v.Z = v.Y;
You could choose to provide the exact same interface as your engine's vector class, you could simplify it somewhat, or you could even provide an entirely different interface. For example, some people may wish to access vector maths functions using the
dot operator, whereas others may wish to keep the vector type as data-only and provide specialist functions to manipulate the data. For example:
v = Vector( 10, 20, 50 );	// Create vector

v.Normalise();			// Call normalise using dot operator
NormaliseVector( v );		// Normalise using a specialist function
Many game developers seem to think they need to expose their entire C++ class to the scripting environment. While this is possible, it is often unnecessary; there could be many member functions that are useless in a scripting context so it makes little sense to include them. Even more so, there may be member functions and data that you do not want your script to be able to access so exposing the full C++ class would be undesirable. Unfortunately, the decisions about what to bind are entirely context dependant and will change for every game project, game system or even game class you wish to bind to a scripting language. In my personal experience, I have found it useful to provide a simplified and refactored interface to the scripting environment. The more complicated it is to use the scripted interface the more likely it is to confuse people and create problems for them whilst using it. If the interface is simple, you can also spend less time documenting it and writing code to debug it.
Binding a simple Vector type
The discussion around type binding will continue by expanding the
Vector example examined previously. I will outline a
simple 3D vector class and create a type binding for the GameMonkey Script environment.
Imagine a typical game engine's vector type (simplified):
class Vector
{
public:
  Vector() : x(0), y(0), z(0) { }
  Vector( float a_x, float a_y, float a_z ) : x(a_x), y(a_y), z(a_z) { }

  float x, y, z;

};
There are three constructors; one default constructor, one taking the values to initialise the vector with and a copy constructor. The first thing to do to bind this vector type to GM Script is to specify the basic type library. The 'library' is nothing more than a global function declared within the machine global context and an instruction to the
gmMachine to register this function with a specified type name. This global function effectively becomes the type's constructor and is the ideal place to begin creating our bound type.
The constructor entry point is specified in a
gmFunctionEntry table as such:
namespace gmVector
{
  // Declare a type ID
  gmType   Type   = GM_NULL;

  int GM_CDECL libentry( gmThread *a_thread )
  {
    Vector *p = new Vector();
    a_thread->PushNewUser( p, Type );
    return GM_EXCEPTION;
  }

  gmFunctionEntry lib[] =
  {
    { "Vector", libentry }		// type name, entry point
  };

}; // end of namespace gmVector
Example: vector_1.cpp
You will notice the global declaration of a
gmType variable named
Type; this is to hold the GM type Id once the type is registered with the
gmMachine. You are free to name the constructor whatever you want, but for organisational reasons I have named it
libentry and placed it within the
gmVector namespace. The
libentry function is where the first step of the binding is done; we create an instance of the native class object and return it to GM by pushing it onto the thread as a new
gmUserObject but with the type id stored within our library.
Now that the initial structure of the library is laid out we can register it with the
gmMachine. Initialisation is done with 2 simple function calls:
namespace gmVector
{
  void BindLib( gmMachine *a_machine )
  {
    // Register one function (the entry point)
    a_machine->RegisterLibrary( lib, 1 );
    Type = a_machine->CreateUserType( lib[0].m_name );
  }

}; // end of namespace gmVector
Example: vector_1.cpp
Just like function binding, you need to register the library with the machine. After doing so you create your type and store it away for use in the rest of the library. The
CreateUserType member function simply takes the name of a type to register; in this case I've retrieved it directly from the library constructor's name as you should ensure that it corresponds with the function you just registered as the constructor.
Constructor with Parameters
At present, this type is pretty useless as there is no way of accessing the data the Vector contains. The decision about how to access the data is an important one; shall we allow the user to access it via named properties (e.g.: x, y, z members) or via an array of floats. I shall answer this question shortly, but first we need a way of initialising the data on construction of the type. As in the C++ class, we want to allow the user to specify a constructor with several parameters to initialise the data in the vector as well as providing a default constructor.
namespace gmVector
{
  int GM_CDECL default_constructor( gmThread *a_thread )
  {
    // Create a native object with default params
    Vector *p = new Vector();
    a_thread->PushNewUser( p, Type );
    return GM_OK;
  }

  /// This is the constructor for passed data items
  int GM_CDECL data_constructor( gmThread *a_thread )
  {
    // Check for a valid number of parameters
    if (a_thread->GetNumParams() != 3 )
      return GM_EXCEPTION;

    // Loop through and grab the params, checking their types
    float v[3];
    for (int i = 0; i < 3; ++i)
    {
      switch (a_thread->Param(i).m_type)
      {
        case GM_INT:
        v = a_thread->Param(i).m_value.m_int;
        break;
      case GM_FLOAT:
        v = a_thread->Param(i).m_value.m_float;
        break;
        default:
          a_thread->GetMachine()->GetLog().LogEntry( "Vector: Param %d error - expected int or float", i );
          return GM_EXCEPTION;
      }
    }

    // Create a native object with default params
    Vector *p = new Vector( v[0], v[1], v[2] );
    // Return to GM
    a_thread->PushNewUser( p, Type );
    return GM_OK;
  }

  /// Entry point for the library; this is effectively the constructor
  int GM_CDECL libentry( gmThread *a_thread )
  {
    // Delegate the appropriate call based on the arg count
    switch (a_thread->GetNumParams())
    {
    case 0:
      return default_constructor( a_thread );
    case 3:
      return data_constructor( a_thread );
    };

    // Not handled, log an error and return an exception
    a_thread->GetMachine()->GetLog().LogEntry( "Vector: Bad number of parameters passed" );
    return GM_EXCEPTION;
  }
};	// end namespace gmVector
Example: vector_2.cpp
I have adjusted the
libentry function to delegate the actual constructor operation based on the number of parameters passed. The
default_constructor function is the same as the previous
libentry function, but in
data_constructor you can see that I engage in an operation to retrieve the parameters from the thread. This is exactly the same as if you were binding a regular function, so I won't dwell on how it works. The new constructor validates that the parameters are either
integers or
floats and stores them for passing to the native
Vector class' constructor.
The data constructor could be extended to allow for copy construction of objects, allowing you to pass a variable of your
Vector type and use it to create a copy of itself. This is important to remember as GameMonkey Script user-bound variables are
reference types; if you assign a variable with another they will reference each other and any changes made to one will be visible in the other. As a learning exercise, I will leave the addition of the copy constructor as an extension for you to pursue on your own - you should be able to code it yourself with the information I've given you so far. If you get stuck you may refer to example
vector_2a.cpp for my implementation.
Now that there's some actual data in the vector object you need to allow scripts to retrieve it for use in other operations. It is at this point that we must decide the data access method; I have chosen to provide the members
x,
y z as this is familiar to many people and I feel best represents how I will use the vector in script. As I said previously, the decision is entirely yours and the methods I will describe can be adapted to use the
indexed access method if you choose.
Operator Overrides
If you have ever overridden a class operator in C++ you will know how powerful this feature is - operator overriding allows you to specify a function to control the behaviour of a type when certain script operators are used. The operators you can override for a type in GM Script are:
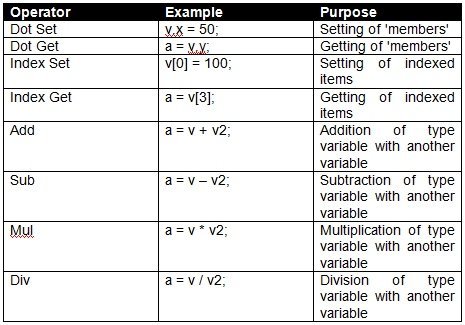
In this simple example I will only override the dot operators to provide access to the simulated 'member' access method of the Vector data. Operator overriding follows the same structure for each operator so it is simple to adapt my example to use the index operators.
Operator functions all have the same signature:-
void GM_CDECL operator_func(gmThread * a_thread, gmVariable * a_operands);
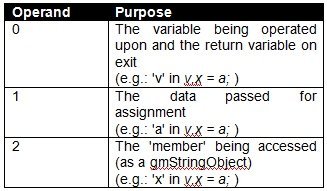
GetDot Operator
The operands passed to the operators vary on the type of operator. For the
GetDot operator the operands are as follows:

The following code details the
GetDot function we will be using:
void GM_CDECL OpGetDot(gmThread * a_thread, gmVariable * a_operands)
{
	GM_ASSERT(a_operands[0].m_type == Type);
  Vector* thisVec = reinterpret_cast(reinterpret_cast(GM_OBJECT(a_operands[0].m_value.m_ref))->m_user);

  GM_ASSERT(a_operands[1].m_type == GM_STRING);
  gmStringObject* stringObj = reinterpret_cast(GM_OBJECT(a_operands[1].m_value.m_ref));    const char* propName = stringObj->GetString();

  // Resolve the member name
  if(::stricmp(propName, "x") == 0)
  {
    a_operands[0].SetFloat(thisVec->x);
  }
  else if(::stricmp(propName, "y") == 0)
  {
    a_operands[0].SetFloat(thisVec->y);
  }
  else if(::stricmp(propName, "z") == 0)
  {
    a_operands[0].SetFloat(thisVec->z);
  }
  else
  {
    a_operands[0].Nullify();
  }
}
Example: vector_3.cpp
The process is simple; first we check that the type of the variable being operated on matches that of the newly bound
Vector type. Afterwards, the string name of the member is retrieved and checked against the members we wish to 'export'. Confusingly operand zero is also the return variable, so it must be set with the relevant value from the bound class. This is as simple as copying the value from the 'real' member in our class to the variable represented by operand zero. If there is a problem, you should nullify the return variable, which returns
null to GameMonkey Script.
With the
GetDot operator function created, it's time to add its registration to the
BindLib function we looked at earlier. This is as simple as calling the
RegisterTypeOperator on the newly bound type, passing the relevant operator and function handler as parameters:
a_machine->RegisterTypeOperator(Type, O_GETDOT, NULL, OpGetDot);
SetDot Operator
If you experiment with some scripts on the new
Vector type, you will notice that you can read data from it but not alter the data in any way outside of actual construction of the variable. We will now provide a
SetDot operator override to handle the setting of the member data. The operands are similar to that of
GetDot:
A function to handle the
SetDot operator for our vector class is as follows:
void GM_CDECL OpSetDot(gmThread * a_thread, gmVariable * a_operands)
{
  GM_ASSERT(a_operands[0].m_type == Type);
  Vector* thisVec = reinterpret_cast(reinterpret_cast(GM_OBJECT(a_operands[0].m_value.m_ref))->m_user);

  GM_ASSERT(a_operands[2].m_type == GM_STRING);
  gmStringObject* stringObj = reinterpret_cast(GM_OBJECT(a_operands[2].m_value.m_ref));
  const char* propname = stringObj->GetString();

  // Create a variable to hold the data to assign
  // handle both ints and floats
  float newFloat = 0.0f;
  if(a_operands[1].m_type == GM_FLOAT)
  {
    newFloat = a_operands[1].m_value.m_float;
  }
  else if(a_operands[1].m_type == GM_INT)
  {
    newFloat = (float)a_operands[1].m_value.m_int;
  }

  // Assign the data
  if(::stricmp( propname, "x") == 0)
  {
    thisVec->x = newFloat;
  }
  else if(::stricmp( propname, "y") == 0)
  {
    thisVec->y = newFloat;
  }
  else if(::stricmp( propname, "z") == 0)
  {
    thisVec->z = newFloat;
  }
}
Example: vector_3.cpp
As you can see, it follows a similar progression from the previous example, except this time we need to retrieve the value passed to the function by the script (operand #1). As before, the member is compared to the exported members and the assignment made accordingly. Adding the following line to the
BindLib function will complete the simple type.
a_machine->RegisterTypeOperator(Type, O_SETDOT, NULL, OpSetDot);
I mentioned previously that GameMonkey Script user variables are reference types; this becomes evident now that you have working dot operators. For example, if one were to write a script such as:
a = Vector( 20, 20, 30 );
b = a;
b.x = 10;
print(a.x);
print(b.x);
You would see that updating the value of
b.x would also update the value of
a.x as they both reference the same data. The solution to this would be to implement a copy constructor for the
Vector type (or add a
Copy function to the type) which would be used as such:
a = Vector( 20, 20, 30 );
b = Vector( a );
b.x = 10;
print(a.x);
print(b.x);
In this case you would notice that the data is copied and the two variables retain their own data.
And there we have it; an
almost complete simple vector type for you to use in your scripts. It is almost complete because we have not yet touched on the subject of Garbage Collection, which plays an important role in any bound type you create.
Garbage Collection
GameMonkey Script, like many other scripting languages, has an in-built garbage collector (GC). A garbage collector will periodically examine the data within the machine and determine whether an object is being referenced or not - if an object is deemed to have no referencing objects, the machine can assume it is no longer in use and will delete it to free memory. The GameMonkey machine uses an
incremental mark & sweep garbage collector which has two main phases of operation. The first stage will examine all of the objects in the machine and 'mark' the unreferenced objects for deletion. Once this phase is complete, the 'sweep' stage is executed which calls the destructors (or more correctly
finalizers) on all the marked objects and removes them from the machine. The GC is said to be incremental as it performs a little work on each execution cycle to reduce the amount of time the script execution cycle of the machine is 'paused' for a full collection sweep.
Garbage collection is important when binding your own types as you can often create a memory leak if an object is garbage collected without cleaning up any native objects it creates. Even more dangerously, if your object references other objects internally the GM machine may delete them and leave you with a bad pointer which could cause your game to crash. Both of these scenarios are undesirable so you need to make the garbage collector aware of your new object and tell it how to handle it.
In order to handle the garbage collection on your bound type you must provide two things to the GameMonkey machine; a '
trace' callback and a '
destruct' callback. The trace callback is used during the
mark phase of the GC and is used to tell the garbage collector which objects your native type is referencing. If you examine the code for the
gmTableObject you will notice that its trace method will trace each of the objects the table holds; without doing this, the GC may remove some of the items from the machine erroneously. The
destruct callback is used when the sweep stage is operational; it is used to free up any memory used by your bound type.
I will complete my simple
Vector type example by providing it with full garbage collection callbacks:
// Effectively the destructor for the object
void GM_CDECL gc_destruct(gmMachine * a_machine, gmUserObject* a_object)
{
	std::cout << "Vector: destructing\n";
	GM_ASSERT(a_object->m_userType == Type);
  Vector* object = reinterpret_cast(a_object->m_user);
  delete object;
}
// Trace the object in the mark phase
bool gc_trace( gmMachine * a_machine, gmUserObject* a_object, gmGarbageCollector* a_gc, const int a_workLeftToGo, int& a_workDone )
{
  // Make sure this is the correct type
  GM_ASSERT(a_object->m_userType == m_gmType);

  // If your object immediately references other gmObjects, you should call GetNextObject for each member here

  // mark 'me' as done
  a_workDone++;
  return true;
}
Example: vector_4.cpp
The
gc_destruct destructor is simple; it merely calls delete on the memory we allocated in the constructor. The trace callback,
gc_trace, is also simple for this particular type, but can get complicated as your type begins to reference more objects. Each immediate member object your type references should be pointed to using the GC method
GetNextObject, which will allow GM to build the tree of referenced objects. You should also update the
a_workDone parameter reference to indicate how many objects you are currently holding a reference to; this allows the incremental GC to effectively govern its own workload. Finally, we must register these callbacks in the
BindLib function:
a_machine->RegisterUserCallbacks(Type, gc_trace, gc_destruct, NULL);
In this call we tell the
gmMachine to register both a trace and destruct callback for this type. If you don't need them you can always pass
NULL, but in the majority of times you will need to specify these callbacks.
Further Exploration
This article has provided you with enough information to begin exploring GameMonkey Script on your own. I have tried to cover as much of the important information as possible without getting too complicated or in depth and so there will invariably be areas that some people wish to expand upon. The topic of binding, for example, can fill many more pages and is a subject that many people will wish to explore. If you are such a person, I will set you the task of building on the simple vector example I provided here. Some example experiments may be:
- Adding copy constructor behaviour to types (Simple)
- Adding Indexed access operators (Simple)
- Handling additional operators on the vector class (Simple)
- Adding extra methods to the class, such as Normalise (Moderate)
- Create a function which takes Vector as a parameter (Moderate)
- Create a simple library and type to bind simple C File I/O to GameMonkey (Moderate)
- Create more complex types which are bound to your game engine (Advanced)
You are urged to experiment further with the examples I have provided for you and begin looking further into what GameMonkey has to offer. Your game may wish to take advantage of scripted threads to remove many asynchronous operations, a subject which is useful but has not been covered here in this introductory article.
References
Code::Blocks IDE.
Douglas, G. & Riek, M. (2003). GameMonkey Script Reference. Included with all official GameMonkey Script distributions.
Lua Website.
Varanese, A., (2003). Game Scripting Mastery. Premier Press, Ohio, USA.
Wikipedia (2005). Wikipedia:
Virtual Machines.


Sounds nice. I'm definitely trying this out. In my case the C-like syntax works in favour of GMS (I would like to keep everything in as fewer languages as possible). The only thing I find lacking in this article are some numbers about efficiency, but perhaps it's a topic for a whole new article: comparing the speed of GMS and Lua. Has anyone any knowlegde about which one of those is faster and would like to share? ;)