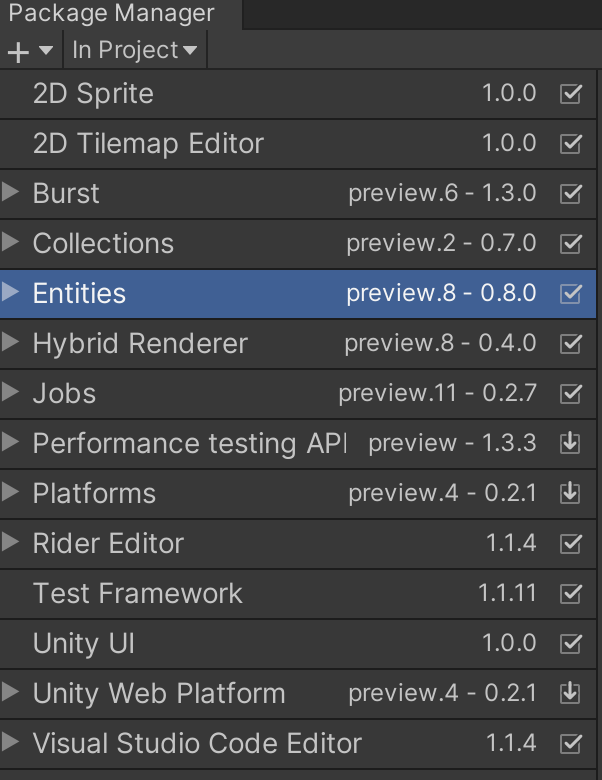
This tutorial covers Conway's game of life in Unity 21019.3.0f3 with entities 0.4.0 preview.10 . Checked against 2019.3.5f1 & Entities 0.8.0 Preview.8 on March 13, 2020. Packages used are shown here Note: platforms are not the latest. it is only 0.2.1 preview 4 because Entities 0.8.0 does not compile with 0.2.2
This first tutorial covers a working game of life in Unity DOTS. The source is at https://github.com/ryuuguu/Unity-ECS-Life.git (The git will include commits past this tutorial for this tutorial download zip here). There is already an excellent tutorial on DOTS made by Unity Getting Started With DOTS: Scripting Pong (Tutorial), that I would recommend watching, but it is for entities 0.3.0 preview.6 package and compiles with errors on the latest package.
Warning: DOTS is still bleeding edge tech. Code written now will not be compatible with first release version of DOTS. There are people using the current version DOTS for release games, but they usually freeze their code to specific package and will not be able use future features without rewriting existing code first to compile and run with newer versions. So if you need 10,000 zombies active at once in your game this is probably the only way to do it. Otherwise, this tutorial is a good introduction if you think you will want to simulate thousands of entities in the future or just want to get a feel for code this type of thing in Unity.
First a quick look at a standard GameObject based implementation of Life. It is in the GOLife folder. The GOCell is either live or not and in the next generation (nextState) it will be live or not. If its live state changes its renderer changes to show alive or not.
public class GOCell : MonoBehaviour {
  public MeshRenderer meshRenderer;
  protected bool _live = false;
  public bool nextState = false;
  public bool live {
    get => _live;
    set { meshRenderer.enabled = value;
      _live = value;
    }
  }
}
The public variables before "GOCell[,] _cells;" are just for positioning and scaling the grid and cells on the screen. _cells will store all cells while running. stay & born are used to specify rules for when a cell stays alive and when a new cell is born in an empty cell. There are public just for ease of debugging and to make it easy to test other rules.
public class GOGrid : MonoBehaviour {
  public Vector2Int size = new Vector2Int(10,10);
  public float zLive = -1;
  public Transform holder;
  public GOCell prefabCell;
  public Vector2 _offset;
  public Vector2 _scale ;
  GOCell[,] _cells;
  public bool[] stay = new bool[10];
  public bool[] born = new bool[10];

  void Start() {
    _scale = Vector2.one / size;
    _offset = ((-1 * Vector2.one) + _scale)/2;
    _cells = new GOCell[size.x+2, size.y+2];
    var cellLocalScale = new Vector3(_scale.x, _scale.y, _scale.x);
    for (int i = 0; i < size.x+2; i++) {
      for (int j = 0; j < size.y+2; j++) {
        var c = Instantiate(prefabCell, holder);
        var pos = new Vector3((i-1) * _scale.x + _offset.x, (j-1) * _scale.y + _offset.y, zLive);
        c.transform.localScale = cellLocalScale;
        c.transform.localPosition = pos;
        c.name += new Vector2Int(i, j);
        c.live = false;
        _cells[i, j] = c;
      }
    }
    RPentonomio((size+2*Vector2Int.one)/2);
    stay[3] = stay[4] = true; // includes self in count
    born[3] = true;
   }
RPentonomio puts an R pentinomio shape in the center of the grid for testing.
  void RPentonomio(Vector2Int center) {
    _cells[center.x, center.y].live = true;
    _cells[center.x, center.y+1].live = true;
    _cells[center.x+1, center.y+1].live = true;
    _cells[center.x, center.y-1].live = true;
    _cells[center.x-1, center.y].live = true;
  }
The work is done in update in two steps. In the ECS version, these steps are in separate functions. It is pretty standard for ECS that functions and components are much smaller than in OO programming.
1) check for each cell if it will be live or not in next the generation. Do this by adding up all its neighbors and itself and comparing this to either the stay or born rule array. In the ECS code, only the neighbors are added and not the cell itself.
2) update all cells to the next generation.
void Update() {
//this is done by GenerateNextStateSystem in ECS version
for (int i = 1; i < size.x + 1; i++) {
for (int j = 1; j < size.y + 1; j++) {
int count = 0;
for (int k = -1; k < 2; k++) {
for (int l = -1; l < 2; l++) {
if (_cells[i + k, j + l].live) count++;
}
}
_cells[i, j].nextState = _cells[i, j].live ? stay[count] : born[count];
}
}
//this is done by UpdateLiveSystem&amp;nbsp;in ECS version
for (int i = 1; i < size.x + 1; i++) {
for (int j = 1; j < size.y + 1; j++) {
_cells[i, j].live = _cells[i, j].nextState;
}
}
}
That covers the GameObject version and the algorithm.
The equivalent of GOCell fields are in CellComponents in the ECSLife folder. Since all cells have a Live component I have included it in the prefab and so it needs [GenerateAuthoringComponent] . The Neighbors component is new. It stores a reference to the surrounding cells. Instead of accessing _cells[,] in Update() it just stores the pointers in a component. I think this faster but have not checked yet.
[GenerateAuthoringComponent]
public struct Live : IComponentData {
  public int value;
}

public struct NextState : IComponentData {
  public int value;
}

public struct Neighbors : IComponentData {
  public Entity nw;
  public Entity n;
  public Entity ne;
  public Entity w;
  public Entity e;
  public Entity sw;
  public Entity s;
  public Entity se;
}
ECSLife Start() and RPentonomio() are the same functions as in GOLife.
The first differences in the setup are zLive & zDead are used for the Z coordinate of live and dead cells. Changing the color of mesh inside ECS is only available in HDRP so I just hide the cell. Also enabling and disabling rendering would have to be done by removing the component RenderMesh component and adding and removing components is slow and more complicated. So I just moved the mesh behind the holder image that is at z = 0
  public static float zLive = -1;
  public static float zDead = 1;
Next some code for setting the ECS world and converting prefabCell GameObject to an Entity
  var settings = GameObjectConversionSettings.FromWorld( World.DefaultGameObjectInjectionWorld, null);
  var entity = GameObjectConversionUtility.ConvertGameObjectHierarchy( prefabCell, settings);
  var entityManager = World.DefaultGameObjectInjectionWorld.EntityManager;
This next code places empty entity cells and puts a pointer in _cells. _cells is only used in the setup code and not for running the simulation. Note that so far these cells do not have a nextState so will not change from one generation to the next.
var instance = entityManager.Instantiate(entity);
var position = new float3((i-1) * _scale.x + _offset.x, (j-1) * _scale.y + _offset.y, zDead)*worldSize;
entityManager.SetComponentData(instance, new Translation {Value = position});
entityManager.AddComponentData(instance, new Scale {Value = _scale.x*worldSize});
entityManager.AddComponentData(instance, new Live { value = 0});
_cells[i, j] = instance;
For cells that are not on the edge add a NextState and Neighbors.
for (int i = 1; i < size.x+1; i++) {
  for (int j = 1; j < size.y+1; j++) {
    var instance = _cells[i, j];
    entityManager.AddComponentData(instance, new NextState() {value = 0});
    entityManager.AddComponentData(instance, new Neighbors() {
      nw = _cells[i - 1, j - 1], n = _cells[i - 1, j], ne = _cells[i - 1, j+1],
      w = _cells[i , j-1], e = _cells[i, j + 1],
      sw = _cells[i + 1, j - 1], s = _cells[i + 1, j], se = _cells[i + 1, j + 1]
    });
  }
}
SetLive() moves the cell to zLive and sets the cell live.
private void SetLive(int i, int j, EntityManager entityManager) {
  var instance = _cells[i, j];
  var position = new float3((i - 1) * _scale.x + _offset.x, (j - 1) * _scale.y + _offset.y, zLive) * worldSize;
  entityManager.SetComponentData(instance, new Translation {Value = position});
  entityManager.SetComponentData(instance, new Live {value = 1});
  entityManager.SetComponentData(instance, new NextState() {value = 1});
}
Now for the actual System code. First UpdateLiveSystem since it is very simple. I am running this on the main thread for simplicity. This will change in the optimizing tutorials to come. [AlwaysSynchronizeSystem] is good for main thread Systems. The ForEach parameters are a query that selects all entities that have components that match the parameters. In this case Live, Translation, NextState, and Neighbors. This means the edge cells will not be selected since they do not have a NextState or Neighbors. The parameters with "ref" (Live, Translation) can be written to, the parameters with "in" (NextState, Neighbors) are read only.
[AlwaysSynchronizeSystem]
public class UpdateLiveSystem : JobComponentSystem{
  protected override JobHandle OnUpdate(JobHandle inputDeps){
    float zDead = ECSGrid.zDead;
    float zLive = ECSGrid.zLive;
    Entities.ForEach((ref Live live, ref Translation translation, in NextState nextState, in Neighbors neighbor)=>{
      live.value = nextState.value;
      translation.Value = new float3(translation.Value.x, translation.Value.y,
      math.select( zDead, zLive, live.value == 1));
    }).Run();
    return default;
  }
}
The GenerateNextStateSystem is more complicated because it needs to reference other entities. This is done with GetComponentDataFromEntity<Live>() which returns a pointer to an array that can be indexed with entity reference from neighbor. I had problems making this work with Burst so have turned of Burst with ".WithoutBurst()" for now. This problem has to be solved before this can run on worker threads. The other notable point is the math.Select(). It is like the ?: operator but the parameter ordering of the true and false values is revered.
math.Select(falseValue, trueValue, boolSelector)
boolSelector ? trueValue : falseValue
The reason to use a select() is that it allows Burst to compile your code with branches in some cases when the target has SIMD instructions. Branches are slow and mean SIMD can not be used to speed up those operations.
[AlwaysSynchronizeSystem]
public class GenerateNextStateSystem : JobComponentSystem{
  protected override JobHandle OnUpdate(JobHandle inputDeps){
    // did not use ECSGrid.stay & ECSGrid.born because they caused a Burst error
    // born[numLiveNeighbors] if born is a pointer to ECSGrid.born this cause burst error
    int[] stay = new int[9];
    int[] born = new int[9];
    stay[2] = stay[3] = 1; // does NOT include self in count
    born[3] = 1;

    var liveLookup = GetComponentDataFromEntity<Live>();
    //var liveLookup = liveLookupX ;
    Entities
    // Burst error about class that I do not understand
    .WithoutBurst()
	.ForEach((ref NextState nextState, in Live live, in Neighbors neighbors) => {
      int numLiveNeighbors = 0;

      numLiveNeighbors += liveLookup[neighbors.nw].value;
      numLiveNeighbors += liveLookup[neighbors.n].value;
      numLiveNeighbors += liveLookup[neighbors.ne].value;
      numLiveNeighbors += liveLookup[neighbors.w].value;
      numLiveNeighbors += liveLookup[neighbors.e].value;
      numLiveNeighbors += liveLookup[neighbors.sw].value;
      numLiveNeighbors += liveLookup[neighbors.s].value;
      numLiveNeighbors += liveLookup[neighbors.se].value;

      //Note math.Select(falseValue, trueValue, boolSelector)
      nextState.value = math.select( born[numLiveNeighbors],stay[numLiveNeighbors], live.value== 1);
    }).Run();
    return default;
  }
}
That completes this tutorial. The actual code also has some debug code commented out in it. I left it in as an example of a simple way to look at what is happening while ECS code is running. If you have any questions please ask in the comments. The next Tutorial will either be speeding this up by moving the systems to worker threads or an update to work on the next version of DOTS when Unity releases a change that breaks this code.