GameDev.net gamedev.net
🔒 Locked

Classic Outrun-esque racing game display

Started by Inverse Feb 1, 2006 at 2:41 PM 5 replies 17.8k views
Original Post
Inverse
Inverse
Hi, I'm all out on programming a simple classic '80 racing game (think Pole Position, Out Run, etc), but I'm wondering how to handle the representation. I know how to handle the projections, my problem mostly resides in how to represent the curves once the player is entering one, as there is some sort of rotation on the road for which there must be some efficients algorithms I would like to learn. Though it's an old issue, there must be some paper on this somewhere. Maybe anybody can point me in the right direction. :) Thanks in advance !!
Greetings from Inversemr_santana@hotmail.commembers.nbci.com/shaolinroad
CGameProgrammer
CGameProgrammer
I have to ask: Why? Those games used tricks to try to emulate a 3D view on extremely limited hardware. You can create an actual 3D game with little effort.

Anyway my guess is they used simple math to plot two lines representing the edge of the road, adjusting the variables to make it become curved when need be.
~CGameProgrammer( ); Developer Image Exchange -- New Features: Upload screenshots of your games (size is unlimited) and upload the game itself (up to 10MB). Free. No registration needed.
haphazardlynamed
haphazardlynamed
I heard from a friend who's into old arcade games

the way they did it was you had your straight road on screen
and to go through curves they would shift each row of video memory, so it would warp the image and look curved
no 3d projection math at All

that kind of memory access is NOT a capability on modern 3d hardware
so if you're going to go that route, you will probably need to make your own software renderer; i dont know the details of how you'll pull that off.....


so, like CGameProgrammer said, its probably easier on todays hardware to make a real 3d game, than to try and emulate the tricks used by the old stuff

is the method of 'faking' curved roads all that important? maybe it's ok to make them really 3d, but caputre the style of the old game? consider rendering without any lighting to make it look old?
Nik02
Nik02
You can easily emulate scanline manipulations by using pixel shaders, if you really want to.

As this is obviously a "for fun" project, I recommend writing a software graphics engine for the purpose [wink] Modern processors are very capable of emulating old graphics tricks on software.
Niko Suni
Endurion
Endurion
You take a one pixel high image of a road and scale it down the farther "away" the position is. According to haphazardlynamed you modify the x position of the scaled image. Ditto with the 2d images which come moving about the street.

All you need to have is a 2d scaling algorithm.

Alternative to the one pixel height: A several pixel high snippet of the road allowing for more detail, but then you have to take the perspective into account: Y position inside the image is not linear to the display y position.

Fruny: Ftagn! Ia! Ia! std::time_put_byname! Mglui naflftagn std::codecvt eY'ha-nthlei!,char,mbstate_t>
Inverse
Inverse
Thanks for your replies. I intend to do it on a cellphone, that's why I chose an arcadey feel (besides, I like it more :)). Maybe I should have posted this in the Consoles, PDAs and Cellphones section, but the topic looked generic enough to me to be posted here.
Thanks again :).
Greetings from Inversemr_santana@hotmail.commembers.nbci.com/shaolinroad
Thomas Harte
Thomas Harte
I appreciate I'm a month late to this thread, but I've just found it from Google and happen to be a mini-expert on Outrun-esque game display so have signed up specifically to post here. I am slowly developing an Outrun style game right now (for the nostalgia factor), and have the drawing code down to a tee.

Strictly speaking what I have worked out is not the Outrun algorithm because Outrun is full of half-maths and things that sort of looked right in 1986. If you play it again now you'll see that it is actually really bad at perspective, and hills in particular. Chase HQ is a much better basis for comparison, as it mostly displays depth and height correctly, even though corners are still not exactly true 3d.

Endurion is right when he says you only need a 2d stretcher to produce the 3d display and haphazardlynamed also has generally the right idea.

The floor is built in much the same way as the walls in Doom or Wolfenstein - one scanline at a time. If you don't want hills or don't mind implementing them as a bit of a hack you can precalculate this information, calculate it using simple interpolation (although remember to interpolate 1/z and texy/z per scanline then divide to get texture y, or the perspective will very be wrong) or calculate it using a trivial fixed point to y plane ray caster.

That will give you both depth from the camera and texture y offset for every scanline with track on it. You can grab the correct slice of road texture, scale it according to depth and plot it. Magically you have a straight flat road! Of course many old games can't afford a texture scale at this step and instead use simple threshold tests on texture y, e.g. "if(y&16) draw_red_line else draw_blue_line" would produce a series of red and blue bars which appeared to disappear into the horizon. You can easily write a custom function to draw something that ends up looking like a road in this fashion but even on modern mobile phones you can probably afford a real texture stretch or can use a LUT. But I digress.

Corners are achieved by skewing the scanlines. The question is how to calculate the correct skew. I use a solution based on the following function:

xoffset = Curvature*(cos(HALF_PI*(depth/MAX_DEPTH)) - 1.0f);

MAX_DEPTH is the artificially close horizon you have picked, so this will only evaluate cos in the range 0 -> half pi (which is 90 degrees if you think in degrees rather than radians). That's because that is the region in which the tangent of cos goes from 0 to its greatest magnitude. Of course the derivative of cos is -sin, so that's easy to verify. I subtract 1 because cos(0) is 1 but at a depth of 0 we want no skew.

If you add that to whatever method you are using to get texture ys and depths then you can do a view with decent perspective that always shows exactly one corner, and you can alter the degree of curvature. This is actually all that several old games do to achieve their entire 3d effect. As you "enter" a corner, curvatute slowly increases and as you "exit" the corner, curvature slowly decreases again. Chequered Flag on the Atari Lynx is an example. I also have strong suspicions about Pole Position but don't have enough experience to be certain.

Sprites can be added quite trivially - a normal perspective projection on their position and then a skew using the same formula as for the corner will do the trick.

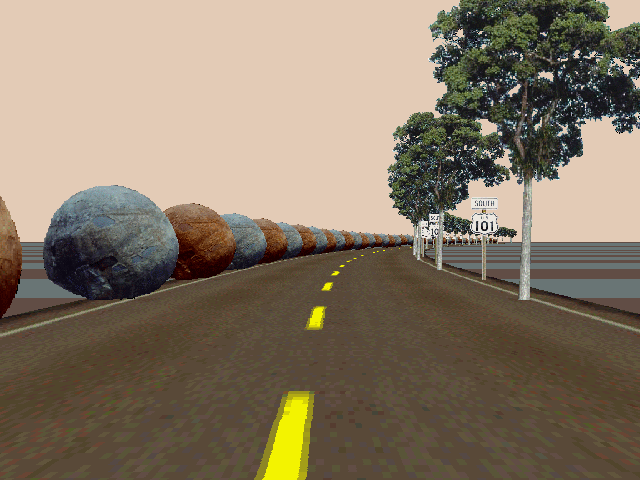
This is about as far as I got when I first had a bash at an Outrun style display in 2001. Here is an image from the time:

2001 attempt at Outrun algorithm

Anyway, after that I got a bit bored of the whole thing and let it lie dormant. At one point I hacked in hills using a simple voxel style front to back drawer, but they had the usual voxel style problems of looking really ugly close up and being hard to map a texture so that it has a constant dpi. Nevertheless, it may be one idea to investigate. I don't know if you know the Allegro library, but appended to the end of this message is an 87 line program that reproduces a road of this style with voxel style hills. The actual drawing part is only 38 lines, but the rest is necessary for setting the display, reading the keyboard, etc. Even if you don't know Allegro it is very straightforward. Keys are cursors and QAOP to control your viewpoint and the curvature of the road respectively.

Another idea, certainly that employed by the SNES Super Chase HQ, is to do only very gradual hills by gradually tilting the camera over time but still casting onto a flat surface.

Late last year I decided to have a new go at an Outrun style game, this time with "proper" corners (so you can be in a corner and already see the next corner, corners will more clearly approach, and so on) and "proper" hills. I have ultimately ended up with a renderer most close in style to a convex sector based ray caster such as Duke Nukem 3d.

The basic idea is that the map is made of segments. For simplicity, just imagine that each segment has a particular curvature, a particular length and a particular angle to the horizontal. So from the viewer's point of view, these segments go off into the distance with their start and end edges exactly parallel to the horizontal and the space inbetween a flat plane at an arbitrary angle.

You can easily ray cast onto those using a front to back approach. The algorithm looks something like:

find segment player is positioned over, make it the current segment;seed current scanline at bottom of display;while(scanlines left to draw){   while(1)   {      test if a ray cast for the current scanline onto the current segment would produce a visible scanline;      if so, break while(1) loop;      advance to next segment;   }   while(1)   {      cast ray for current scanline onto current segment;      if(ray goes beyond end of current segment)         break while(1) loop;      if(ray goes beyond MAX_DEPTH)         stop drawing;      draw scanline;      set things up so that we know the scanline above the current one is the new target;   }}


That sort of thing gives correct hills. Correct corners are a little more complicated as you have to modify your skew function. First of all you have to stop using depth as an absolute and instead work in relative depth to start of corner (or viewer position if viewer is partway through that corner). So you first move to:

xoffset = Segment Curvature*(cos(HALF_PI*((depth - base depth)/MAX_DEPTH)) - 1.0f);

Then you need to account for the cumulative effect of corners. First of all you need to allow for some sort of cumulative skew so that every new corner doesn't suddenly jump back to the middle of the screen. That's quite trivial.

Second of all you need to find a way to pretend that the road after the corner is a little rotated. For example, imagine a corner turning left that then connects to a straight. Obviously the straight should appear to be angled so that it heads leftward and not straight into the horizon.

The solution is a new variable, which I've variously called either Skew Ratio or Skew Multiplier in my various bits of code. The idea is that when the curve ends it has some particular tangent. That tangent determines that "straight" is from then on. To put it more simply, your skew function now looks like:

xoffset = base skew + Segment Curvature*(cos(HALF_PI*((depth - base depth)/MAX_DEPTH)) - 1.0f) + (depth - base depth)*Skew Ratio.

So in the example of the straight after the left corner, Skew Ratio would be some number that meant progressive scanlines were placed a progressively further to the left. To calculate that Skew Ratio I threw a little basic calculus at the problem, using the good ol' chain rule. So,

f(x) = x/MAX_DEPTH
g(y) = curvature*cos(y)

=> g(f(x)) = curvature*cos(x/MAX_DEPTH)

n(x) = g(f(x))
=> n'(x) = g'(f(x)) * f'(x)

Certainly when I learnt it here in the UK not quite a decade ago, that was something you learnt early on at A Level (i.e. aged 16 or 17). Anyway, we want to set Skew Ratio = n'(x), as that will be the tangent. at the end of the corner. Just differentiating the Curvature* part gives:

-sin(HALF_PI*((depth - base depth)/MAX_DEPTH)) / MAX_DEPTH

as a result of the chain rule. This is something we must add to our Skew Ratio at the end of every corner either logically because one corner cannot undo the curvature of an earlier one or as a calculus result due to the result of differentiating (depth - base depth)*Skew Ratio.

Adding sprites becomes a more complicated process. You now need to keep track of which segment they are on and for each segment, its base skew, base depth, skew ratio and the first scanline it appears on. Use the first three to locate the object in 3d space, use the final one to correctly clip the object so that it is correctly obscured by hills.

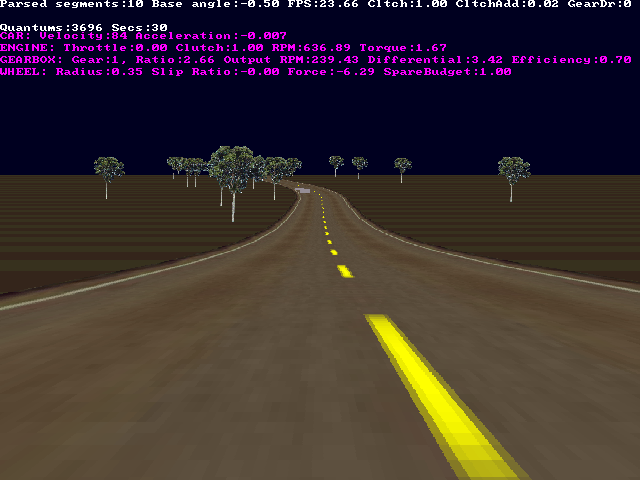
Well, that explains everything as much as it makes sense. I actually keep corners and elevation changes separate but that's an easy modification that would just have confused things in discussion above. With respect to my little Outrun style project I'm just about done on the level editor which includes a live preview and have decided against using an earlier code base that strove for a "realistic" driving feel and look but couldn't ever quite achieve it. A screenshot of that (reusing textures from 2001):

2005 attempt at Outrun algorithm

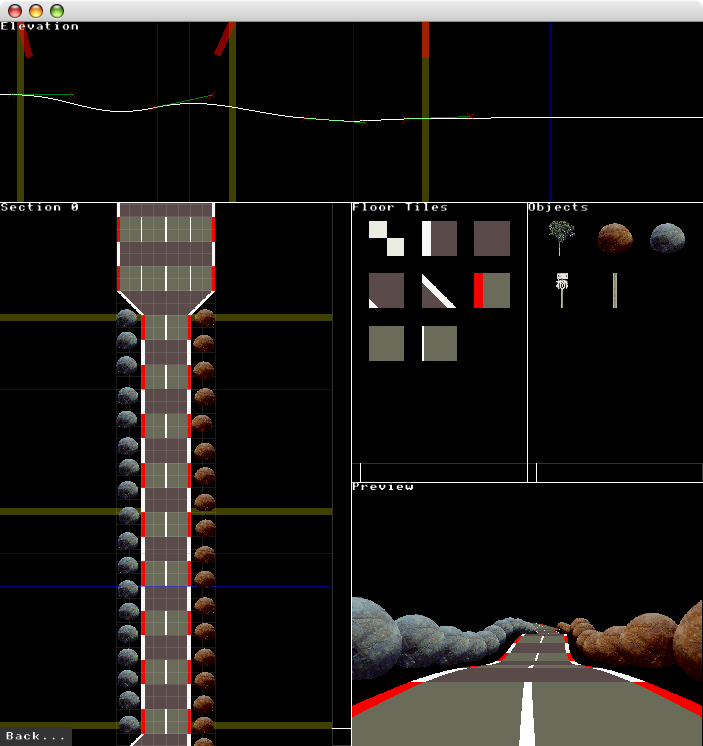
And one from my editor, showing my current cartoony aim for the end product:

2006 Outrun style map editor

I'm the sort of person who always publishes their source but rarely comments it very well. Stuff related to my current Outrun project is available from http://members.allegro.cc/ThomasHarte/city.html and materials concerning my 2001 project are on http://members.allegro.cc/ThomasHarte/pointers.html (you'll need to scroll down a bit).

It is very late here and I am quite tired, so I expect very little of this post makes complete sense. I'll private message Inverse to bring his attention to this new post, otherwise please ask questions or email me if you want to be sure of a response as I'm a brand new gamedev.net member and may well not end up coming here habitually.

Now the source I promised:
#include "allegro.h"#include <math.h>void DrawPerspective(BITMAP *t, BITMAP *tex, int y1, float z1, int y2, float z2, float x, float xmul, float ymul, float texoff){	float curvdiv = z1/(3.141592654f*0.5f);	float zpos = 1.0f /z2;	z1 = 1.0f / z1;	/* sample 16 times for each scanline */	y1 <<= 4;	y2 <<= 4;	ymul *= 16.0f;	int BottomY = y2;	float zadd = (z1 - zpos) / (float)(y2 - y1);	while(y2 > y1)	{		float z = 1.0f / zpos;		/*			NOTE: z is the actual depth of this scanline, zpos is 1/z. The most common			perspective projection formula is used, i.e.			transformed_x = (centre of screen) - (half width of screen)*(x / z)			But instead of dividing by z we can multiply by zpos if we like.		*/		float centx = x + xmul*(cos(z/curvdiv) - 1.0f);		int topy = y2 + (SCREEN_H >> 1)*(ymul*(cos(z/curvdiv) - 1.0f) / z);		if((topy >> 4) < (BottomY >> 4)) /* question is: are we at least one pixel line above what was last drawn ? */		{			stretch_blit(tex, t, 0, (int)((z+texoff)*4.0f)&(tex->h-1), tex->w, 1, (SCREEN_W >> 1) + (SCREEN_W >> 1)*(centx-1.0f)*zpos, (topy) >> 4, (SCREEN_W >> 1)*(2.0f)*zpos, (BottomY >> 4) -(topy >> 4));			BottomY = topy;		}		zpos += zadd; 		y2--;	}}int main(int argc, const char *argv[]){	allegro_init();	install_keyboard();	if (set_gfx_mode(GFX_AUTODETECT_WINDOWED, 640, 480, 0, 0)) {		allegro_message("Error setting 640x480 gfx mode:\n%s\n", allegro_error);		return -1;	}	BITMAP *back = create_bitmap(SCREEN_W, SCREEN_H);	/* obviously it would be better to load a road texture here, but we'll just generate a chequered	pattern ... */	BITMAP *tex = create_bitmap(8, 2);	int xp, yp;	for(xp = 0; xp < tex->w; xp++)		for(yp = 0; yp < tex->h; yp++)			putpixel(tex, xp, yp, (xp+yp)&1 ? makecol(255, 255, 255) : makecol(0, 0, 0));	/* seed some variables */	float x = 0, xmul = 0, ymul = 0, z = 0;	while(!key[KEY_ESC])	{		clear_to_color(back, makecol(0, 0, 0));		DrawPerspective(back, tex, SCREEN_H >> 1, 20, SCREEN_H, 1, x, xmul, ymul, z);		blit(back, screen, 0, 0, 0, 0, back->w, back->h);				if(key[KEY_LEFT]) x+= 0.05f;		if(key[KEY_RIGHT]) x-= 0.05f;		if(key[KEY_UP]) z+= 0.05f;		if(key[KEY_DOWN]) z-= 0.05f;		if(key[KEY_P]) xmul-= 0.1f;		if(key[KEY_O]) xmul+= 0.1f;		if(key[KEY_A]) ymul-= 0.1f;		if(key[KEY_Q]) ymul+= 0.1f;	}	destroy_bitmap(back);	destroy_bitmap(tex);	return 0;}END_OF_MAIN()


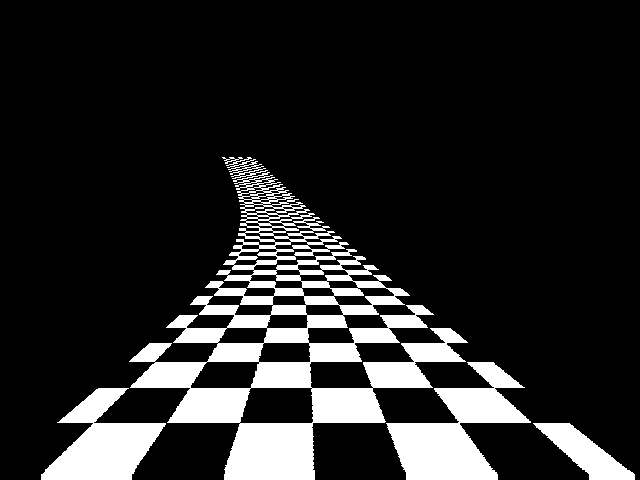
And a screenshot of the code above:

tiny perspective road code

[Edited by - Thomas Harte on March 5, 2006 7:28:42 PM]

Topic Locked

This topic has been locked by a moderator. New replies are not allowed.

Sign in to reply to this topic.