GameDev.net gamedev.net
🔒 Locked

Light pre-pass HDR

Started by n00body Nov 11, 2008 at 4:20 PM 28 replies 18.3k views
Original Post
n00body
n00body
I have a few questions on implementation details of a light pre-pass renderer. Specifically, I'm wondering how one would handle HDR with this setup? Because the alpha channel is in use for specular light properties, I can't use an RGBA8 target with an alternate color-space. I know an RGBA16F target would work, but that seems like overkill, and would reduce the number of platforms I could support. Also, it'll cost me MSAA, and might force me to do something like Quincunx AA. I suppose I could use MRTs, but that wouldn't be much better and I was hoping to avoid it if I could. Can anyone help me with this conundrum?

[Hardware:] Falcon Northwest Tiki, Windows 7, Nvidia Geforce GTX 970 [Websites:] Development Blog |
wolf
wolf
you have several options here :-)
1. the light buffer just holds a bunch of vectors with the diffuse color. If you can live with a 8:8:8:8 render target here I would just keep it :-)
2. you compete with Crysis and can afford using a 16:16:16:16 render target
3. Use LUV color space
L = N.L * Attenuation or Spotlight Factor
u and v are in the next two color channels and specular is in alpha

The advantage of the LUV color space is that the light colors are better preserved ... just looks better than the RGB model here. Pat Wilson wrote a ShaderX7 article about this.
n00body
n00body
I'm not especially familiar with the LUV color space. Can it handle HDR values, even if the target is RGBA8? Or are you saying I'll only get HDR if I use an RGBA16 target?

On that note, do I want to store the values in the LUV color space, or convert the final result to LUV to extract the luminance? If I'm having to store it in LUV, can I additively blend lights in this color space?

Can you point me to any resources that explain clearly the equation/implementation of LUV conversion?

[Hardware:] Falcon Northwest Tiki, Windows 7, Nvidia Geforce GTX 970 [Websites:] Development Blog |
wolf
wolf
LUV seems to create better results than RGB. The only reason I can think of why this is the case is that luminance is more important than the RGB color values.
The reason why I do not use it is that I do not want to additively blend it. On one of my target platforms, alpha blending is next to free.
On the other platform I will consider the LUV conversion in the near future. Although you only have three color channels for LUV it seems like the luminance differences are better preserved.
I saw Pat Wilson's screenshots and when the number of overlapping lights increase you can see that the colors are better preserved.
LUV<->RGB conversions are pretty fast in a pixel shader. You can look up the conversion via Google.
Drilian
Drilian
One suggestion that was given (complements of reltham) to me which works great (and yes, this is within the context of light pre-pass rendering):

Instead of storing the calculated light value in the buffer, store 2^(-lightValue).

When decoding, then, you can simply use -log2(lightValue) to get the result.

For blending (and I'm doing this bit from memory, so forgive me if I'm wrong - I'll check my FX file when I'm at home and correct this if I'm incorrect):

SrcBlend = DestColor
DestBlend = Zero

(that is, it's pure multiplicative blending)

...and you'll want to clear the light buffer to WHITE instead of black, because multiplying with black is not terribly useful :)

In my case, it made a fairly big difference in quality (as the brightness of the light value was no longer bound by the diffuse color).

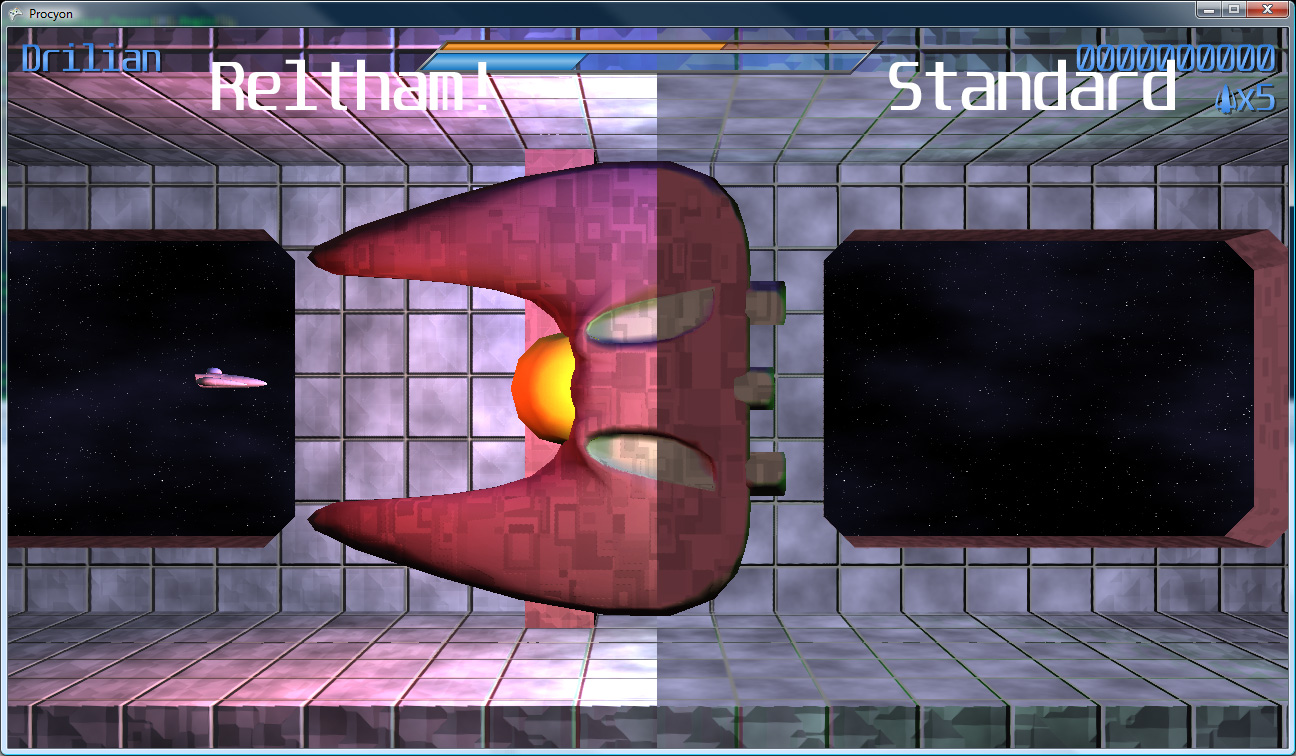
Here's a picture (sorry, no thumbnail). The left half is the log-based encoding, the right half without. Note that the right half, when the light gets bright, washes out because the diffuse material color caps the brightness. on the left, the lighting can get brighter than 1.

It doesn't give you total HDR, it's more of a "medium dynamic range," but it seems to work pretty well for me.
n00body
n00body
Cool trick, thanks for the tip. ;)

Thanks to both of you for the info so far. Curious to see if anyone else chimes in. ;)

EDIT:
Okay, Drilian, I need some clarification on how to integrate that trick. So I would convert the light value to 2^(-lightValue), and multiply the result with diffuse colors. Then, when I'm reading the lights, I do the luminance extraction trick. Now, I would do -log2(lightValue) with the extracted value?

EDIT: Is this trick MSAA safe?

[Edited by - n00body on November 12, 2008 8:45:40 PM]

[Hardware:] Falcon Northwest Tiki, Windows 7, Nvidia Geforce GTX 970 [Websites:] Development Blog |
Drilian
Drilian
So, just as a basic run down of the technique:


Step 1. Render all objects' normal/depth to a buffer.


Step 2. Use that buffer to render the (pure diffuse/specular) light to a buffer (additive blending to blend the lights together)


Step 3. Render each object, using the output of step 2 (the light buffer) instead of doing lighting calculation.

So step 1 remains unchanged. You render normal/depth to a buffer.

In step 2, you calculate whatever lightValue you would be rendering. Rather than writing them (additively) to the light buffer like you would, you instead write out 2^(-lightValue) multiplicatively (SrcBlend = DestColor, DestColor = Zero). [I believe the HLSL function is exp2(-lightValue)]

Multiplicative makes sense when you think about it: 2^a * 2^b = 2^(a+b)
Since the exponent is what you care about, multiplicative blending is just adding the exponents together!

Just remember that, before you start your light pass, to clear the buffer to white instead of clearing to black like you had been (I made that mistake the first time and couldn't figure out what I'd done wrong).

So, once that is complete, what you have is a buffer that contains 2^(-totalLightValue) of each pixel.

So, then, for step 3, when you sample that texture (tex2d, perhaps), you use -log2(sampledValue) to get the actual light value that's stored at that pixel. Then you proceed as you would have before.

As to whether it's MSAA safe, no less so, in my opinion, than light pre-pass is in general. Light Pre-Pass rendering (abbreviating as LPPR from now on) suffers from the same edge artifacts as deferred shading does (because the depth value written in step 1 is an average of surrounding depths, you end up with a value that's generally neither on the object in front nor on the object behind it). I don't consider LPPR to be MSAA-safe at all, personally.
n00body
n00body
Thanks for going to the extra effort with the visual aids, and the breakdown of the steps.

One last clarification. When you say "lightValue", you mean (NdotL * lightColor), right?

[Hardware:] Falcon Northwest Tiki, Windows 7, Nvidia Geforce GTX 970 [Websites:] Development Blog |
Drilian
Drilian
Exactly. It's the NdotL * lightColor value that gets calculated during step 2.
Enrico
Enrico
Quote:
Original post by wolf
I saw Pat Wilson's screenshots and when the number of overlapping lights increase you can see that the colors are better preserved.

Any chance to get/see these screenshots without buying the book? =)

--
wolf
wolf
I will ask Pat ...
patw
patw
Hey guys,
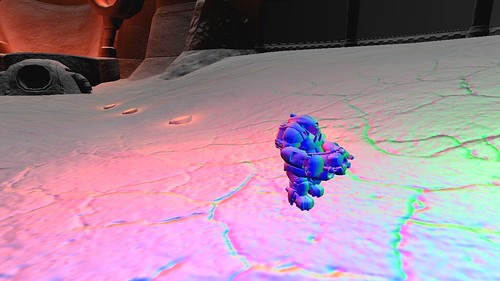
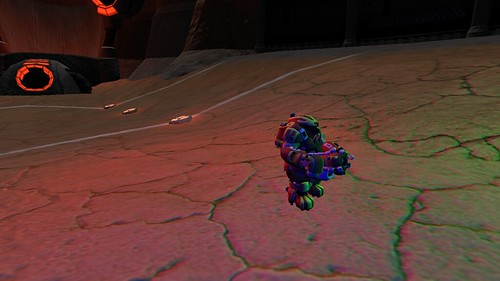
Here are some screenshots comparing RGB and LUV accumulation.

a) RGB Light Accumulation Buffer
RGB Light Accumulation

b) RGB Light Accumulation Result
Scene with RGB Lighting

c) LUV Light Accumulation Buffer
LUV Light Accumulation

d) LUV Light Accumulation Result
Scene with LUV Lighting

As Wolf notes, using LUV accumulation means you can't benefit from free alpha blending during the light pass. My article describes some optimizations that help to alleviate the cost. Because it is based on LUV, which tries to model human perception of light, the luminance values for blue are significantly lower than in RGB. I don't think that's a downside, but it's something to be aware of.

I like this method because it preserves color values no matter how many lights are applied to an area. RGB always saturates at some point, and scaling RGB values alters colors, not just their brightness.
n00body
n00body
Cool beans!

Thanks for showing actual shots.

EDIT: Not technically part of my original question, but what coordinate space do you guys recommend for the normal buffer? For purposes of support for multiple platforms, I can only use RGBA8 or RGB10_A2 buffers. I've been considering clip-space, since I can easily recover clip-space position from the depth buffer. Any thoughts?

[Hardware:] Falcon Northwest Tiki, Windows 7, Nvidia Geforce GTX 970 [Websites:] Development Blog |
Drilian
Drilian
I used view space (is this clip space?) normals. Encoding-wise, my buffer is RGBA8888, where R = Normal.x, G = Normal.Y, the high bit of B = Sign(Normal.Z), and the rest of B combined with A are 15 bits of depth. For the scenes in my game, 15 bits is perfectly fine for depth information.

Normally, people simply reconstruct normals so that Z is always pointing towards the camera, but because normal mapping can modify normals, sometimes Z could be pointing away, which is why I spent a bit on the sign for the Z component.

The code to pack/unpack this format is as follows:

float4 PackDepthNormal(float Z, float3 normal){  float4 output;  // High depth (currently in the 0..127 range  Z = saturate(Z);  output.z = floor(Z*63);    // Low depth 0..1  output.w = frac(Z*63);    // Normal (xy)  output.xy = normal.xy*.5+.5;    // Encode sign of 0 in upper portion of high Z  if(normal.z < 0)     output.z += 64;  // Convert to 0..1  output.z /= 255;      return output;}void UnpackDepthNormal(float4 input, out float Z, out float3 normal){  // Read in the normal xy  normal.xy = input.xy*2-1;    // Compute the (unsigned) z normal  normal.z = 1.0 - sqrt(dot(normal.xy, normal.xy));  float hiDepth = input.z*255;    // Check the sign of the z normal component  if(hiDepth >= 64)  {    normal.z = -normal.z;    hiDepth -= 64;  }    Z = (hiDepth + input.w)/63.0;;}
patw
patw
Drilian,
I started off with that encoding, but I switched to spherical co-ordinates.
I am storing: { Normal.Theta, Normal.Phi, DepthHi, DepthLo }
Having that extra bit for depth can make all the difference.

atan2 (and sincos for the g-buffer read) can be encoded into a texture lookup for lower-end cards. I do dev on an x1300 (horrible) and a 8800GT. The x1300 benefits from this optimization, the 8800 does not. Since you are in view-space, you should be able to roll in range-reduction into the trig-lookup textures if you chose to go that route.

I wrote a blog entry about this, initially looking for help. I found my bug and the solution is in the comments.
http://www.garagegames.com/index.php?sec=mg&mod=resource&page=view&qid=15340

Here is some shader code for encoding/decoding spherical:
inline float2 cartesianToSpGPU( in float3 normalizedVec ){   float atanYX = atan2( normalizedVec.y, normalizedVec.x );   float2 ret = float2( atanYX / PI, normalizedVec.z );   return POS_NEG_ENCODE( ret );}inline float2 cartesianToSpGPU( in float3 normalizedVec, in sampler2D atan2Sampler ){#ifdef NO_TRIG_LOOKUPS   return cartesianToSpGPU( normalizedVec );#else   float atanYXOut = tex2D( atan2Sampler, floor( POS_NEG_ENCODE(normalizedVec.xy ) * 255.0 ) / 255.0  ).a;   float2 ret = float2( atanYXOut, POS_NEG_ENCODE( normalizedVec.z ) );   return ret;#endif}inline float3 spGPUToCartesian( in float2 spGPUAngles ){   float2 expSpGPUAngles = POS_NEG_DECODE( spGPUAngles );   float2 scTheta;   sincos( expSpGPUAngles.x * PI, scTheta.x, scTheta.y );   float2 scPhi = float2( sqrt( 1.0 - expSpGPUAngles.y * expSpGPUAngles.y ), expSpGPUAngles.y );   // Renormalization not needed   return float3( scTheta.y * scPhi.x, scTheta.x * scPhi.x, scPhi.y );}inline float3 spGPUToCartesian( in float2 spGPUAngles, in sampler1D sinCosSampler ){#ifdef NO_TRIG_LOOKUPS   return spGPUToCartesian( spGPUAngles );#else   float2 scTheta = POS_NEG_DECODE( tex1D( sinCosSampler, spGPUAngles.x ) );   float2 expSpGPUAngles = POS_NEG_DECODE( spGPUAngles );   float2 scPhi = float2( sqrt( 1.0 - expSpGPUAngles.y * expSpGPUAngles.y ), expSpGPUAngles.y );   // Renormalization not needed   return float3( scTheta.y * scPhi.x, scTheta.x * scPhi.x, scPhi.y );#endif}


[Edited by - patw on November 14, 2008 2:45:52 PM]
n00body
n00body
Quick question, back on topic, if I were to go with an RGBA16F target, would the luma extraction trick work for values above the range (0, 1)? If not, then that pretty much decides the matter for me.

EDIT:
Another possible normal encoding scheme I've been considering that would be low on the storage, but high on the math would be the one outlined in these slides (pg. 40-51):
http://developer.nvidia.com/object/nvision08-DemoTeam.html

Has anyone here ever implemented this style of bump-mapping, who can comment on it's performance and drawbacks? Would it only be viable for high-end cards, or could it also run efficiently on early SM3.0 cards? Any comments in general, even from those who haven't implemented it?

[Edited by - n00body on November 18, 2008 11:52:29 PM]

[Hardware:] Falcon Northwest Tiki, Windows 7, Nvidia Geforce GTX 970 [Websites:] Development Blog |
wolf
wolf
I went through the slides but I did not see how they compress the normals .. I probably just missed it. Can you outline how they do this?
patw
patw
n00body:
That trick is basically the sRGB->XYZ matrix row for the 'Y' component of XYZ color. If I remember, the sRGB->XYZ transform is only valid if all components of the RGB color are in the range [0..1], so I do not believe that the result is "correct", however it may be "correct enough".
wolf
wolf
patw: how did you end up using specular?

patw
patw
I should have clarified, I meant that if he used an R16G16B16A16F target with HDR values, I am not sure if that specular trick would work, since the conversion from RGB->XYZ relies on RGB values being in the range [0..1].

Topic Locked

This topic has been locked by a moderator. New replies are not allowed.

Sign in to reply to this topic.