I'm in the need for a smart guy/girl again to finish the last bits of "Voxel Cone Tracing". Though this problem is not just for VCT, but for raymarching & using a volume(3D) texture to test collisions in general.
So far I made the octree, the bricks, and mipmapped the whole thing. There are some differences with the original CVT technique. For one thing, I'm making 2x2x2 pixel bricks instead of 3x3x3. I can still smoothly interpolate the bricks over the geometry without getting a tiled view.
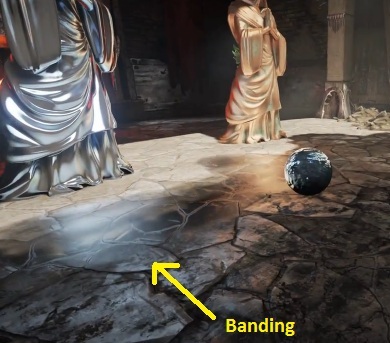
However, the actual raymarching is penetrating the walls (thus sampling light behind an obstacle) too often. I know why (see the picture), but how to solve it? In short, when doing linear sampling in a brick, the occlusion value I get is often too small to stop the ray. So the result will partially pick from geometry further behind. Also another problem is that my results are too dark in some cases, if the ray samples from a higher mipmapped level that was mixed with black pixels (no geometr-vacuum octree nodes). In the image, you can see that the results really depend on at which point I sample within a brick. When MipMapping =blurring with unfulled neighbor nodes, all these problems get worse, One extra little annoying problem is that this also created "banding" artifacts.
There are 2 simple things I can do A: sample with "nearest" instead of "linear" filtering and B: take a lot more (smaller) steps to assure you sample the same node multiple times. However, solution A will lead to "MineCraft" results, and B makes the already heavy technique even slower. And still doesn't guarantee rays penetrating unless I take awfully much samples.
As for the (compute) shader code, let's illustrate the path of a single ray:
rayPos = startPoint + smallOffset
occluded= 0
color = (0,0,0)
radius = 0.25 // my smallest nodes start at the size of 0.25 m3
while (occluded < 1)
{
// Get a node from the octree. The deepest level
// depends on the current cone radius
node = traverseOctree( rayPos, radius )
// Check if there might be geometry (thus nodes)
// at the current cone size level
if (node.size <= radius)
{
// Sample brick
// localOffset depends on the ray position inside
// the
localOffset = absToLocalPosition( rayPos, node.worldPos )
texCoord3D = node.brickCoord + localOffset
// increase cone size so we take bigger steps
// but also sample from higher (more blurry) mipmapped nodes
radius += coneAngleFactor
// March!
rayPos += rayDirection * radius
}
So, to put it simple, the ray keeps moving until the occlusion value gets 1 or higher. When there might be geometry at the ray position, we add the values we sample from a brick, stored as 2x2x2 pixels in a 3D textures. Probably important to know as well, the color and occlusion we sample also depends on the ray direction, and in which way the voxels were facing.
// Using 6 textures to store bricks.
// Colors & Occlusion get spread over the 6 axis (-X, +X, -Y, ...)
float3 dotValues;
dotValues.x = dot( float3( 1,0,0 ), rayDirection );
dotValues.y = dot( float3( 0,1,0 ), rayDirection );
dotValues.z = dot( float3( 0,0,1 ), rayDirection );
dotValues = abs( dotValues );
Your analysis of the problem is pretty accurate. You'll always get rays leaking through geometry with cone tracing due to the fact that a voxel averages the opacity of the underlying geometry. Moreover, when doing reflections you must ensure that the distance between samples is small enough so that you don't miss the walls and if possible ensure that you hit the center of the voxels to obtain maximum opacity and immediately kill the rest of the ray.
Regarding the banding, you'll always get a banding effect when using cone tracing to render reflections due to the fact that the voxels are not sampled at their center. The problem is that the reflection rays for neighbour pixels will intersect the same voxel at slightly different positions which will yield different opacities depending on the linear interpolation of the texel and give a banding effect. The strange thing is that this banding should be smooth while yours shows harsh transitions.
Unfortunately, none of the above problems is easy to solve. I've seen these problems appear in the video of Unreal Engine 4 Elemental demo so I assume they also suffer from them to some extend. I can also tell you from my experience that in general, glossy and sharp reflections rendered through voxel cone tracing yield poor quality due to these and other limitations.
Regarding the color darkening, you should be careful when creating the mipmaps. Instead of just averaging the voxels you should probably add a weighting factor so that empty voxels are ignored. You may even need to apply a different approach regarding color and opacity, intuitively I'd say that empty voxels should be ignored when calculating the color average to avoid darkening (because empty = black) while for opacity you should take the average of the voxels. Of course, to do this you'd need a custom mipmap creation shader.
>> I've seen these problems appear in the video of Unreal Engine 4 Elemental demo
In a strange way, that sounds like a relief. If the smart guys over there didn't solve it yet, then I don't have to shame myself hehe. And more important, it indicates with some blurring or other post-enhancements, the artifact is probably not that noticable. At least, I didn't see it when watching that movie.
Now (sharp) specular lighting is not a must, as I have other techniques available as well. For GI, light leaks and banding are probably harder to notice. Plus I noticed one of the leak problems is just a bug in my octree as well, so maybe it won't hurt the eye that much in the end.
Doing different averaging when mipmapping isn't easy, at least not in the way how I construct the whole thing. I had to make some crazy workarounds, as OpenCL on my computer doesn't allow to write pixels in a 3D texture.Then again, "vacuum" nodes are sort of ignored, as they don't have an "occlusion" factor either. If in the image above the ray samples on the empty side of a brick, it won't directly stop. However, in order to prevent skipping the wall I should at least take 2 (or 4?) steps inside a node. And maybe increase the occlusion value for "geometry pixels" on higher levels to assure the ray stops in time. Anyone knows if the guys that made the VCT techniques are doing such tricks as well?
One other thing I could try -but I'm afraid it leads to other errors- is doing a "inflate" filter: all non-filled brick pixels will copy the color (and maybe occlusion) from their neighbors that actually are filled.
>> I've seen these problems appear in the video of Unreal Engine 4 Elemental demo
In a strange way, that sounds like a relief. If the smart guys over there didn't solve it yet, then I don't have to shame myself hehe. And more important, it indicates with some blurring or other post-enhancements, the artifact is probably not that noticable. At least, I didn't see it when watching that movie.
The artifact is actually very noticeable, but in the video they barely show VCT being used for sharp/glossy reflections which is why you haven't noticed it. In the screenshot bellow taken from their video you can see the smooth banding effect I told you. In general, VCT reflections look like if the reflected objects are made of aligned neon lights, which is why they don't look very good even for glossy reflections.
Doing different averaging when mipmapping isn't easy, at least not in the way how I construct the whole thing. I had to make some crazy workarounds, as OpenCL on my computer doesn't allow to write pixels in a 3D texture.Then again, "vacuum" nodes are sort of ignored, as they don't have an "occlusion" factor either. If in the image above the ray samples on the empty side of a brick, it won't directly stop. However, in order to prevent skipping the wall I should at least take 2 (or 4?) steps inside a node. And maybe increase the occlusion value for "geometry pixels" on higher levels to assure the ray stops in time. Anyone knows if the guys that made the VCT techniques are doing such tricks as well?
If you do a bottom-up approach for the mipmap generation, going from leaf nodes no the root node, you should be able to choose whatever mipmapping scheme you want right?
One other thing I could try -but I'm afraid it leads to other errors- is doing a "inflate" filter: all non-filled brick pixels will copy the color (and maybe occlusion) from their neighbors that actually are filled.
That could avoid missing the walls but it would also make the reflected scene look..well..inflated, which be particularly bad for small objects which would get deformed.
Son of a bitch, that's some banding indeed we got there. Although the smooth blur makes it less worse than my results. I guess I just limit to very glossy reflections then, which is a cube replacement for the cubeMaps I'm using now. Sharper reflections can still use RLR (screen space reflections) or the good old mirror technique. Was this banding artifact also visible in the original VCT video btw? Though the Sponza theatre doesn't use sharp reflections either probably.
Talking about how others do it, do you know how many bounces Unreal4 uses? Yesterday night I finally got it working with one bounce, at a stunning 5 frames per second (but on an a 2009 videocard, and a lot of other stuff going on). It looked pretty cool, apart from the blockiness that also appears in GI more or less. But the real problem is that, of course, a single bounce still isn't much to realistically spread the light. I believe the VCT video shows 2 bounces at some point. Would that mean I have to:add up the indirect light and redo the whole thing? Ifso, it's still not correct as we only got Indirect light for geometry that appears on the screen.
After fixing some leak bugs and doing weights per subpixel of a brick, the mipmapping problems causing rays to stop too early and sample "darkness" seems to be somewhat solved, although there is still work to do here. Mipmapping is quite tricky in my case because ordinary texture mipmapping doesn't work to start with. The bricks are scattered everywhere in the ("sparse") volume texture, so 1 birck does not know where its 8 child "bricks" are. To fix that, I supply the nodes with additional coordinates, supplied by the compute shader. It would help if OpenCL would be able to write directly into a 3D texture, but that seems impossible on my hardware.
Well, I'm pretty proud it works a bit by now, this is certainly one of the most difficult graphics thingies I did so far. But at the same time, I'm at the point where I see the results and think "hmmmm..... pre-baked GI is still a lot better" hehe. Having it realtime is cool, but at what cost? Oh well, let's improve some things further first.
Talking about how others do it, do you know how many bounces Unreal4 uses? Yesterday night I finally got it working with one bounce, at a stunning 5 frames per second (but on an a 2009 videocard, and a lot of other stuff going on). It looked pretty cool, apart from the blockiness that also appears in GI more or less. But the real problem is that, of course, a single bounce still isn't much to realistically spread the light. I believe the VCT video shows 2 bounces at some point. Would that mean I have to:add up the indirect light and redo the whole thing? Ifso, it's still not correct as we only got Indirect light for geometry that appears on the screen.
The 5 FPS that you're getting are for glossy reflections or diffuse GI? I'm particularly curious about this because from my experiments it seems that tracing an octree is much slower than tracing a simple 3D texture which is why I've dropped them. If I recall correctly, on my Nvidia GTX260 I got about 5 FPS tracing an octree and 30 FPS or more tracing a 3D texture.
I'm almost sure UE4 uses a single bounce for sharp/glossy reflections as well as for GI which is more than enough for most cases. Notice that in the case of reflections you would only need more than one bounce if you had mirror like surfaces bouncing light from each other which is not that common and the impact on image quality is not very noticeable. For the diffuse GI, more bounces would increase the image quality a bit but a single bounce already provides pretty good results.
Including the indirect lighting into the voxel volume should work well. For that you'd need two voxel volumes, one that represents the scene voxelized with direct lighting only (this is what you have now, right?) and use it to generate a second volume where the scene is voxelized using both direct lighting and indirect lighting (calculated by cone tracing the first volume).The cool thing about this approach is that you don't have to build an Octree for each volume, since the scene structure remains the same you can keep a single Octree and use it to index the two brick volumes.
>> The 5 FPS that you're getting are for glossy reflections or diffuse GI?
Both. The same (compute) shader fires 1 ray for the specular, 9 others for GI. Then each ray takes up to 25 steps, though in my pretty narrow areas, they probably collide much earlier.
Got to add that constructing the octree and mipmapping it already brought the fps back to 10 or 12. Also, I only read from the bricks if a raystep successfully traverses down all the way till the point the node cells are smaller than the cone sample radius. So in practice, most steps in the loop aren't reading from a 3D texture, as its octree nodes are "vacuum".
I tried 3D textures as well before doing this whole VCT thing, but never got satisfied. Banding errors like explained earlier were one reason, but also the lack of mipmapping caused undersampling and wrong results. I used 2 or 3 3D-textures btw, moving along with the camera. One with the small "voxels", one medium sized, and one coarse. Either how, those went pretty slow on my computer as well (though faster than 5 FPS). And probably also just unfinished business on the implementation.
As for multi bounce, it's possible to map the screen results back into the octree and add the values up to the original bricks (that only contain direct lighting so far). But the real pain in the ass is that you have to redo the screen tracing. Maybe it's possible to store the path sample points you did in the first pass, so a second or third bounce just has to read these points and sample the same bricks again. However, storing 1 or even multiple points for 9 or more rays per screen pixel... Probably that takes quite some memory.
And then it's still incorrect since we only sample indirect light for geometry present on the screen. Instead, we would have to sample the GI for each voxel one or more times, before doing the final screen pass. Maybe that ain't so bad if the voxelcount keeps relative low. The bad thing is that the performance becomes more dependant on the screen complexity, while screen-space techniques are sort of constant.
Well, I'm thinking to far ahead probably. Got to make the 1st bounce work better first.
Both. The same (compute) shader fires 1 ray for the specular, 9 others for GI. Then each ray takes up to 25 steps, though in my pretty narrow areas, they probably collide much earlier.
That's some promising performance, perhaps with some optimizations and a powerful GPU you could run it at a decent frame rate. My implementation ran much slower probably because for each sample I traversed the whole tree down to the leaves and sampled the bricks. I did this to stress test the performance of the octree approach.
I tried 3D textures as well before doing this whole VCT thing, but never got satisfied. Banding errors like explained earlier were one reason, but also the lack of mipmapping caused undersampling and wrong results. I used 2 or 3 3D-textures btw, moving along with the camera. One with the small "voxels", one medium sized, and one coarse. Either how, those went pretty slow on my computer as well (though faster than 5 FPS). And probably also just unfinished business on the implementation.
Why didn't you use mipmaps with the 3D textures? Without them you're doing ray-tracing not cone-tracing and the GI will definitely look awful. Adding mipmaps should be quite straightforward, for starters you can just request your GPU to automatically generate them just to see it working and then improve it by implementing the custom mipmapping generation scheme to avoid empty voxels.
And then it's still incorrect since we only sample indirect light for geometry present on the screen. Instead, we would have to sample the GI for each voxel one or more times, before doing the final screen pass. Maybe that ain't so bad if the voxelcount keeps relative low. The bad thing is that the performance becomes more dependant on the screen complexity, while screen-space techniques are sort of constant.
Exacty, once you have the first voxel octree ready it should be fairly easy to revoxelize the scene and calculate the diffuse GI for each voxel. Of course, since you're rendering every polygon of the scene you may get a performance hit due to the huge fillrate, but it's hard to know for sure since you're also rendering the scene at a lower resolution than fullscreen.
Probably you did that already, but one thing is to use direct addressing (pointers) as much as possible and try to avoid access via indexing (node = array[x]). And yeah, I don't get down the octree all the way if not needed. As the ray grows wider and wider, it only samples the nodes it fits inside. So that eases the work for longer-range rays a bit. The screen resolution I used so far is (too) small as well btw. 1/4 fo the width/height. So when scaling up, my eyes may still get raped. Though using softer normals (lerped a bit with the flat wall they are mapped on), the low resolution should be less visible.
Also, distant voxels are inserted at a higher level in the mipmap (Unreal shows this as well I believe). That makes the raymarching for distant geometry slightly lighter, plus I needed it trim down the memory requirements. Forgot the exact numbers, but the total requirements for my "solution" (octree nodes, voxels, 3D textures) is less than 100 MB. In order to make the relative small set of nodes still work for larger areas (I have a roaming game, so there is no clear boundary), I'm actually using a simple 32x32x32 meter quadtree first. Then each cell points to an octree. Usually those cells remain empty until geometry is intersecting. However, I'm not so sure if the relative low memory requirements still fit when trying to render a bigger outdoor scene... Then again outdoor scenes usually can do with less detail, this skipping the tiny nodes.
Mipmapped 3D textures would certainly produced better results, but I had to learn that the painful way. It was after that when I saw the "cone" concept. Yet my major concern is the size of the 3D textures. As you know, a 128^3 texture is pretty big already, and still doesn't cover a lot of area. So you need several volume textures, like the "Cascaded approach" Crytek used for the Light Propagation Volumes. Then you would for example need 3 or 4 textures. Multiplied by 6 if you want directional information(or 3 if you use Spherical Harmonics, but that turned out in tears for me hehe).
Well, if done right it might not be so bad, but I haven't tried it yet. Both techniques have pros and cons, and usually I just follow what the guru's would do then. I'm pretty sure the guys at Unreal thought at least twice about GI as well