Introduction
Explosions and other chaotic events are commonplace in modern video games. The visual effects used to create these events have improved dramatically over recent years, so how can we make sound effects to match these visuals? This step-by-step guide will look at how beginner and veteran alike can use a high-end audio engine, in this case FMOD Designer, to do exactly that. By the end you should be able to generate explosion sounds in real time, changing depending on the materials present in the game world and differing every time they play.Figure 1. The explosion effect in this video was created by the Vicious Engine Particle Effects tutorial. Vicious Engine does not support FMOD - this video was used for demonstration purposes only
If you don't have FMOD Designer it is free to download. There is also an in-depth tutorial available that will delve further into using FMOD and explain exactly what is going on and how it all works.
Understanding explosions
Essentially an explosion is a release of energy that affects the environment around it. Explosions and the sounds they generate depend on the environment in which they occur and the cause of the explosive force. The goal when designing the sound is usually to create a sound of suitable magnitude to match the visual representation. Logically, it is best to include the materials present in the visuals of the explosion, but certain sound elements lend themselves very well to creating explosion sound effects regardless of what materials may be present visually.The environment is also crucial to how an explosion will sound. A gas ignition explosion in air will generate a sound as the gas ignites and burns the fuel available. The same gas igniting underwater will create a completely different sound as water transmits sound differently and underwater there is no direct oxygen to burn. Both of these are long sounds as the quantity of gas ignites and burns. A military grade explosive however is an immediate concussive event that will produce a short bang impulse.
For more detailed information on explosion sounds refer to this tutorial.
Understanding materials
The strength of this particular approach to sound design is that we are not creating final sounds to add to a game, instead we are utilising many of the smaller sound elements that would be used to create an explosion sound effect and implementing them directly into FMOD to be generated in real time to create the desired sound effect. I refer to these elements as materials as they are the individual sounds of wood, metal, glass and the many other material components we use to build the larger sounds. These material sounds can be sourced from anywhere but for this tutorial I am taking them from my sound library at www.stephanschutze.com. This library has thousands of sounds and is free for all users so feel free to make use of it as a resource. The specific files for this tutorial can be downloaded here. [Ed Note: We just realized the archive of files hadn't been compiled. Will update our twitter and Facebook with notice when they are available]Choosing the materials
The choice of exactly which materials to use is entirely up to the individual and the desired end result. I am going to create a classic house explosion so I will be including the sounds of wood, metal, glass and brick as well as sounds to represent the energy release of the explosive substance. I will also demonstrate how to create a radically different sound event using sounds recorded underwater as a contrast. The provided files are grouped into several folders to indicate the material groups.Metal is always an effective sound to include in explosions as it generates harsh sounds through either impact or scrape movements. Wood provides a good solid basis for many dramatic sounds as does stone. Glass is excellent for the inclusion of debris movement as it shatters into many smaller fragments. Glass also produces high frequency sounds that are uncomfortable to listen to and so adds a sense of threat to an explosion sound.
Creating the effect
Step 1
Create a folder and appropriate sub folders for your material sounds. I always make separate copies of any sounds I want to use from a sound library. This means all the source material for any project can be submitted to source control and it also means that if I make any changes to the source files I do not destroy my originals.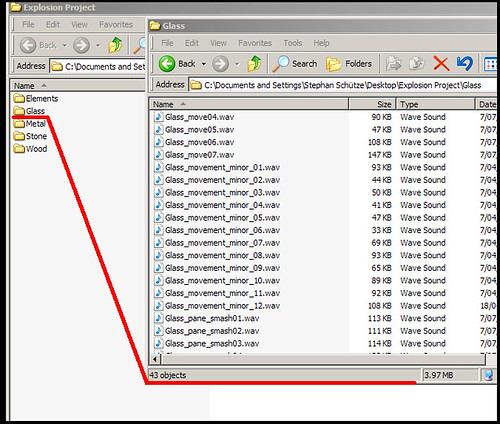
Figure 2. Note the various sound types within the material folder
Step 2
Choose the sound files you wish to use to create your explosion. These will generally be short samples of a particular material. A metal crash, a wood clank, a stone grind or clunk.My sound library has nearly 2000 material sounds sorted by material and labelled by the type of action. You need to be pretty thorough and systematic here; you do not want to stare at metal 10 and not know if it is a crash, clank or scrape. Note the naming convention used in figure 2.
Step 3
Open FMOD Designer, create a new project and save it with an appropriate name in your project folder. Next, navigate to the Sound definitions view and in the left-hand column right-click to create a series of empty Sound definitions that correspond to your materials and sound types, then drag and drop the appropriate sound files from your project folder into the Sound definitions folders.Initially we are only going to use the material Sound definitions, so create one for each of the glass, metal, stone and wood material types. A Sound definition should only contain one type of material of one particular sound type. So one Sound definition would contain Metal_light_crash01.wav to Metal_light_crash09.wav the next might contain Wood_metal_fall01.wav to Wood_metal_fall07.wav and so on. In this way each definition has a selection of similar sound types. This makes tweaking and altering your sound events much easier.

Figure 3. Creating Sound definitions. Files can be dragged directly from windows into FMOD.
Step 4
Defining the parameters for the Sound definitions is the key to creating a good explosion event that will alter each time it is triggered. FMOD allows you to select a group of Sound definitions and alter their common parameters. Being able to work in groups is a big time saver, so select all the Sound definitions we have added and set the parameters to match those in figure 4. I have created all my Sound definitions to save time.These values tell FMOD that each time a Sound definition is called we want it to randomly choose from the sound files contained in each definition and then randomise its Volume, Pitch, 3D position and trigger delay. This randomisation is what will help us create a unique sound every time our explosion event is triggered. This is also why we place the same material and sound type in each definition. As they are the building blocks to create our sounds we need them to be predictable when we use them. Mixing metal, and glass into one Sound definition would limit our control of the sound event.
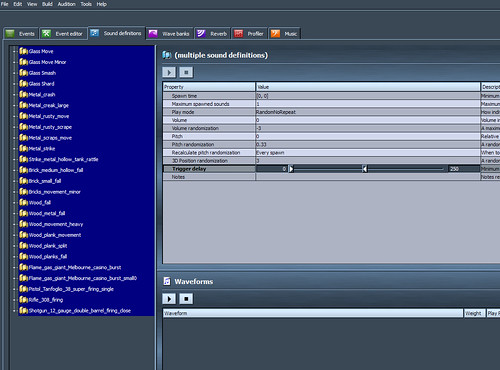
Figure 5. Sound definition parameters.
These are the initial Sound definition parameter values I start with. But I will constantly change and tweak these individually as I progress.
Step 5
Now it is time to create our Event. The event name is what a coder programs into a game, this is what is triggered when our sound is to be played. Events can be as simple as a single sound file or complex combinations of many sounds. We are going to create a more complex Event. Go to the Events tab and there should already be a default event in the untitled folder. You can either rename and use this event or right-click and create a new one. I am going to call our Event Surface_Explosion; I have also renamed the group folder to Explosion Tests.Once you have named your Event you can either double click on it or select it and click on the Event editor tab. This is where we will create our Event.
Step 6
Inside the Event editor you will see a single layer, layer00. Right click underneath it to add further layers. Create 7 more layers for our explosion. Next right-click in the main window in layer00 and choose Add sound. A pop up window will appear with all the available Sound definitions in our project. Chose one of the available Sound definitions and add it to your project. Ensure you select One Shot from the tick boxes otherwise the sound will play over and over in a looping fashion. Add sounds to all of the 8 layers in this manner. (DO NOT add the flame ignite sound or shotgun sound yet). This will create the most basic explosion sound, but already it changes every time the event is triggered. Press play to audition your sound. These are the Sound definitions I have used.
Figure 7. FMOD Event. A multilayer event containing 5 Sound definitions
Step 7
So far we have only included the sounds of various materials in motion, but the result still sounds dramatic. The event is more like a building collapse, or something crashing into a building. We have not yet added the sounds of the initial explosive force. I did this intentionally to demonstrate what can be created with simple material sounds and to show how the sound evolves with more layers.If we think back to how an explosion plays out we have the initial release of force, followed by the reactions of materials in the environment. Logically this means that our release of force sound must occur before our materials respond. To more accurately reflect that in our event we will individually alter the trigger delays for each Sound definition. The trigger delay is one of the most important parameters in creating effective chaotic events because it is what defines the order in which our Sound definitions will be triggered. We still want to maintain a level of randomness in our event so we will create a window of time in which each event will occur.
A large range of values can create effective results but as a general rule the explosive force sounds should be sooner. [0,250] Trigger delay for the explosive force sounds and the materials should come later with a value of [200,500]. The more you mix up the delays the more random the sound will be. Another tip is to set two different values for the initial explosive forces. Try setting the sounds of the shotguns at [0,200] and the sounds of the rifles at [200,300] this creates an effective "double blast" effect that can sound very effective. I also add an overall Pitch value of -2 to the gunshot sounds. This lowers them by 2 octaves and makes them sound much more like an explosive concussion. As always experiment with different settings.
Now add some more layers and add several of the elemental Sound definitions. I have used the rifle, shotgun and flame burst Sound definitions. This will now add the initial explosive force to the event and make it sound more like a triggered explosion. The large gas flame eruption or loud concussive bang added to the initial collapse event changes the overall dynamic of the Event.
You are pretty much there. Experiment with changing the Sound definitions (right-click on an existing Sound definition and choose Replace Sound) in each layer to hear the different results you can achieve, you can also mute any of the layers in the event to test how it sounds without that layer. I am going to add some more layers to build on the initial simple version of the explosion. The Advanced sounds folder contains additional sounds that can be added to this event to add further depth to the sound. Continue to experiment with the available sounds.
In regards to the actual sound files that are present in each of the Sound definitions, I sometimes find when I audition my sound events that there are sounds elements that just don't quite work. For example, sometimes a sound of metal collapsing that worked really well in a car crash just doesn't suit an explosion. When I audition my events I listen carefully for anything I don't like, I mute various layers to try and isolate the problem and when I find it I return to the Sound definition. By listening to each sound file in a Sound definition individually I can find any that I don't like and delete them from the project. Sometimes I will remove an entire definition and all its files, sometimes I only need to remove a couple of files here and there. Do not feel that you need to keep all the sounds just because they were grouped together to start with. It is this fine tuning that really makes the difference between a well crafted sound and a fairly generic sound.
A quick swap of some of the Sound definitions being used and an adjustment to some parameters and a second explosion can quickly be produced. Once the building blocks have been assembled, producing assets and adjusting them to specific requirements should be easy and allow for a more organic process as project requirements change, which they invariably do during the course of development.
Going Further
So far we have created a simple explosion sound by combining a variety of materials and an energy release. By adding more layers it is possible to increase the depth and complexity of the sound. It is also possible to completely alter the nature of the explosion by using an entirely new set of Sound definitions.Create a second set of Sound definitions from the sound files provided in the Underwater sounds folder. Remember to group sound files of the same name into the same Sound definition. For the initial explosion event we initially used the same parameters for each Sound definition. While this provided a basic explosion effect, more realistic sounds were created by tailoring the parameters for each Sound definition to suit its place in the Event.
The following table lists the Sound definitions I have used and the trigger delay values I have chosen. These can of course be altered to individual tastes. Set the other Sound definition parameters to match those in Figure 4.
The above values indicate that Sound definitions such as the flame bursts, the shotgun firing and the tone are all set to trigger earlier than the other definitions. These are the sounds that I want to represent the initial release of energy. The remaining definitions I have set to create a kind of cascade after the initial bang. Once you place the Sound definitions into an Event you can audition your sound effect and continue to tweak it until you are happy with it.
Tweaking within the Event
Once all the trigger values have been set for each Sound definition create 13 layers in a new event and add one of each of the Sound definitions for the new Event. This Event will sound more chaotic when triggered, as there is the varied triggering of each individual Sound definition. Play the Event over and over and listen to each instance, listen carefully for elements that stand out as inappropriate. For this tutorial I edited the raw sound files for the elemental sounds to make them a more appropriate match to the underwater movement sounds. It was not until I auditioned the Event over and over that I realised I had not edited one of the raw files correctly. This process of auditioning sounds should become a regular part of creating audio.The process of repeated auditioning and tweaking resulted in me further tweaking a few of the trigger delay values slightly to achieve a sound I was happy with, but I also realised that several of the layers were not needed. Mute each layer individually and if it does not greatly alter the overall sound then remove it. Never keep a layer that is not a direct benefit to the final sound.
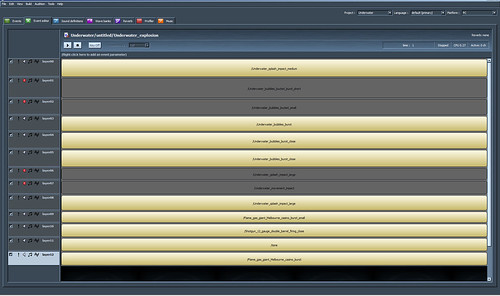
Figure 9. Working with layers
The greyed out layers are muted and will be deleted as they add nothing to the final sound.
A new way of thinking
In a short amount of time we have created three basic but effective explosions sound effects. These can be expanded upon with more layers or different raw materials. The raw sounds used can also be used as building blocks to create a great many other sounds within the same project. Pitching down a stone movement sound can create the effect of a giant stone door, the metallic crash sounds can be used in a variety of situations, and of course the gun shot sounds can all be used in their basic form as weapon sounds. This example uses a large variety of high resolution samples. To accommodate system resource limitations, fewer samples can be used or files can be down sampled. A better solution is to think of all the sounds you will need in a project and then assemble the building blocks you would normally use to create these sounds. Instead of creating the sounds in an editing program and being stuck with a sound effect that may only suit one situation and will repeat endlessly, create an audio environment in a system that allows you to define how you want the sounds to function and allow them to be created in real time. Sounds created on demand unique to the situation.Randomization of sound effects in games is an important part of avoiding annoying repetition in the audio environment, but its impact on the game can be far more than simply removing a bad aspect. Well designed and unique sound events will drastically increase the realism of any game environment. The change from repetitive to uniquely generated events should not be seen as a single step of improvement such as using higher resolution sounds or a few more choices in a sound pool. A sound event that is different every time it is triggered can alter how visual are perceived and ultimately the experience the player will have.
There are several main ideas behind this tutorial that are worth restating:
Firstly that randomisation is your best friend in sound design, especially when dealing with chaotic dramatic events. Secondly there are very few rules, and many guidelines. Experimentation is one of your best tools. Play with the parameter values, the choice of source files and the order in which you assemble your materials, you will be amazed at the results you stumble across. Thirdly there is no substitute to using your ears. Listening to your sound again and again and again is essential. Listen to what is there, but also listen to what isn't there. If a certain layer can't be heard or doesn't seem to be contributing to the mix, then remove it. And lastly enjoy the process; there is nothing more enjoyable than creating something amazing out of nothing.