This is an excerpt from the book, Unity 2017 Game AI Programming - Third Edition, written by Ray Barrera, Aung Sithu Kyaw, and Thet Naing Swe, and published by Packt Publishing. This book will show you how to use Unity 2017 to create fun and unbelievable AI entities in your games with A*, Fuzzy logic and NavMesh.
Path following and steering
Sometimes, we want our AI characters to roam around in the game world, following a roughly-guided or thoroughly-defined path. For example, in a racing game, the AI opponents need to navigate the road. In an RTS game, your units need to be able to get from wherever they are to the location you tell them navigating through the terrain and around each other.
To appear intelligent, our agents need to be able to determine where they are going, and if they can reach that point, they should be able to route the most efficient path and modify that path if an obstacle appears as they navigate.
Obstacle avoidance is a simple behavior that allows AI entities to reach a target point. It's important to note that the specific behavior implemented in this post is meant to be used for behaviors such as crowd simulation, where the main objective of each agent entity is just to avoid the other agents and reach the target. There's no consideration of what would be the most efficient and shortest path.
Technical Requirements
You will be required to have Unity 2017 installed on a system that has either Windows 7 SP1+, 8, 10, 64-bit versions or Mac OS X 10.9+. The code in this book will not run on Windows XP and Vista, and server versions of Windows and OS X are not tested.
The code files of this post can be found on GitHub.
Check out this video to see the code in action.
Navigation mesh
Let’s learn how to use Unity's built-in navigation mesh generator that can make pathfinding for AI agents a lot easier. Early in the Unity 5.x cycle, NavMesh was made available to all users, including personal edition licensees, whereas it was previously a Unity Pro-only feature. Before the release of 2017.1, the system was upgraded to allow a component-based workflow, but as it requires an additional downloadable package that, at the time of writing is only available as a preview, we will stick to the default scene-based workflow. Don't worry, the concepts carry over, and when the final implementation eventually makes its way to 2017.x, there shouldn't be drastic changes.
For more information on Unity's NavMesh component system, head over to GitHub.
Now, we will dive in and explore all that this system has to offer. AI pathfinding needs a representation of the scene in a particular format; we've seen that using a 2D grid (array) for A* Pathfinding on a 2D map. AI agents need to know where the obstacles are, especially the static obstacles. Dealing with collision avoidance between dynamically moving objects is another subject, primarily known as steering behaviors. Unity has a built-in tool for generating a NavMesh that represents the scene in a context that makes sense for our AI agents to find the optimum path to the target. Pop open the demo project and navigate to the NavMesh scene to get started.
Inspecting our map
Once you have the demo scene, NavMesh, open, it should look something like this screenshot:
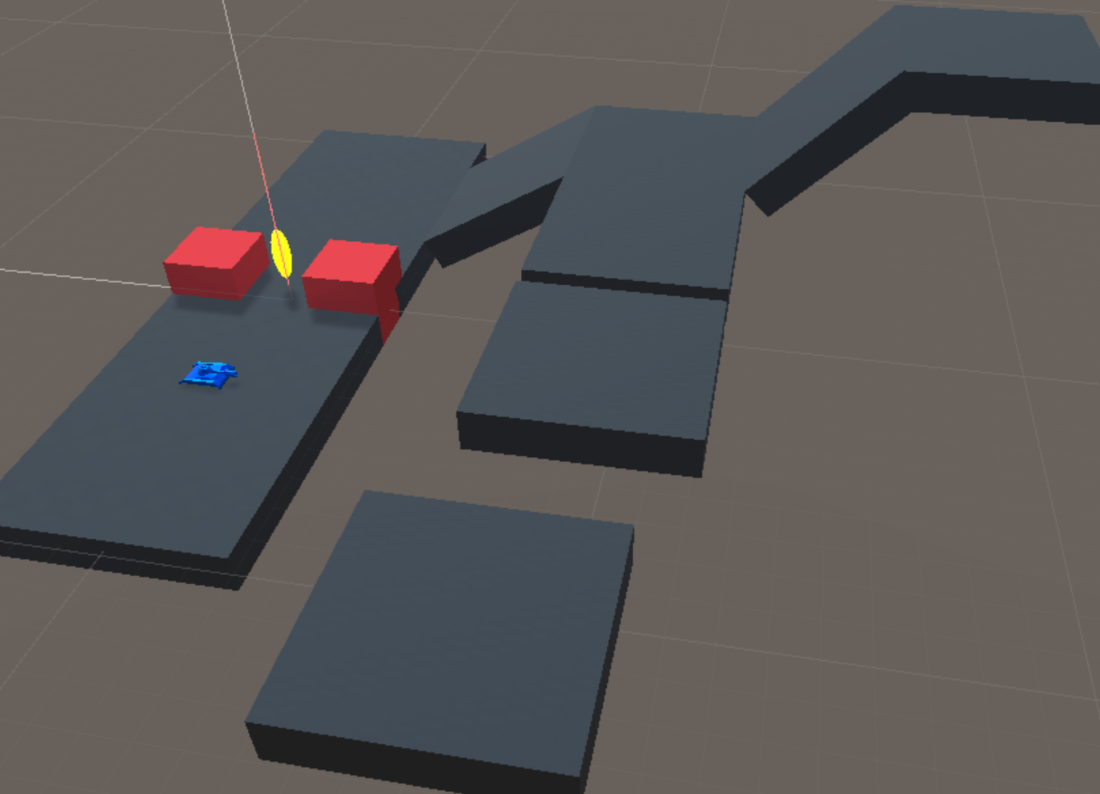
A scene with obstacles and slopes
This will be our sandbox to explain and test the NavMesh system functionality. The general setup is similar to an RTS (real-time strategy) game. You control the blue tank. Simply click at a location to make the tank move to that location. The yellow indicator is the current target location for the tank.
Navigation Static
The first thing to point out is that you need to mark any geometry in the scene that will be baked into the NavMesh as Navigation Static. You may have encountered this elsewhere, such as in Unity's light-mapping system, for example. Setting game objects as static is easy. You can easily toggle the Static flag on for all purposes (navigation, lighting, culling, batching and so on), or you can use the dropdown to specifically select what you want. The toggle is found in the top-right corner of the inspector for the selected object(s). Look at this screenshot for a general idea of what you're looking for:
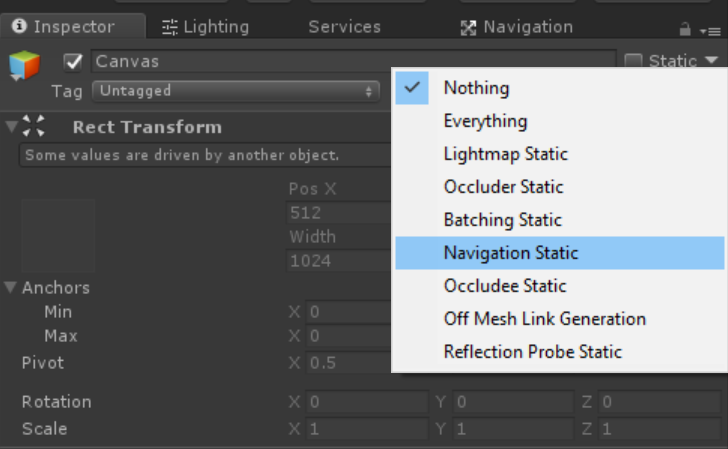
The Navigation Static property
You can do this on a per-object basis, or, if you have a nested hierarchy of game objects in your hierarchy, you can apply the setting to the parent and Unity will prompt you to apply it to all children.
Baking the navigation mesh
The navigation settings for the navigation mesh are applied via the Navigation window on a scene-wide basis. You can open the window by navigating to Window | Navigation in the menu bar. Like any other window, you can detach it to be free-floating, or you can dock it. Our screenshots show it docked as a tab next to the hierarchy, but you can place this window anywhere you please.
With the window open, you'll notice four separate tabs. It'll look something like this screenshot:
The Navigation window
In our case, the preceding screenshot shows the Bake tab selected, but your editor might have one of the other tabs selected by default.
Let's take a look at each tab, starting from the left and working our way to the right, starting with the Agents tab, which looks like the following screenshot:
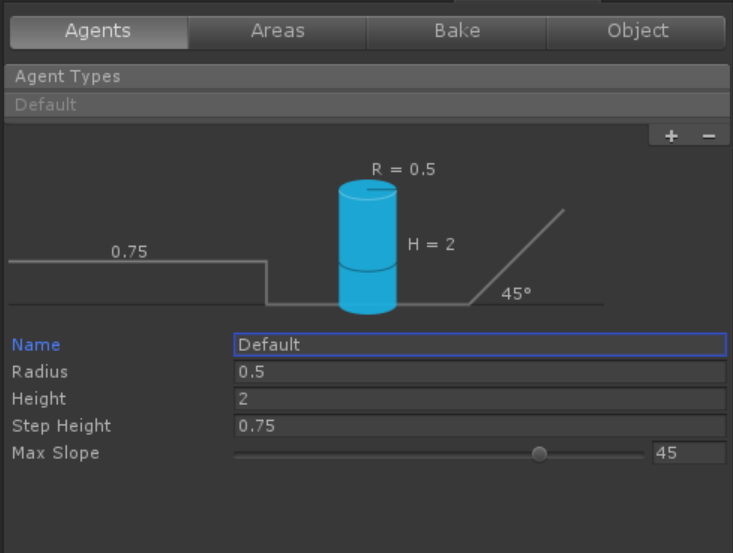
The Agents tab
If you're working on a different project, you may find that some of these settings are different than what we set them to in the sample project from which the preceding screenshot was taken. At the top of the tab, you can see a list where you can add additional agent types by pressing the "+" button. You can remove any of these additional agents by selecting it and pressing the "-" button. The window provides a nice visual of what the various settings do as you tweak them. Let's take a look at what each setting does:
Name: The name of the agent type to be displayed in the Agent Types dropdown.
Radius: Think of it as the agent's "personal space". Agents will try to avoid getting too cozy with other agents based on this value, as it uses it for avoidance.
Height: As you may have guessed, it dictates the height of the agent, which it can use for vertical avoidance (passing under things, for example).
Step Height: This value determines how high of an obstacle the agent can climb over.
Max Slope: As we'll see in the coming section, this value determines the max angle up which an agent can climb. This can be used to make steep areas of the map inaccessible to the agent.
Next, we have the Areas tab, which looks like the following screenshot:

As you can see in the preceding screenshot, Unity provides some default area types that cannot be edited: Walkable, Not Walkable, and Jump. In addition to naming and creating new areas, you can assign default costs to these areas.
Areas serve two purposes: making areas accessible or inaccessible per agent, and marking areas as less desirable in terms of navigation cost. For example, you may have an RPG where demon enemies cannot enter areas marked as "holy ground." You could also have areas of your map marked something like "marsh" or "swamp," which your agent could avoid based on the cost.
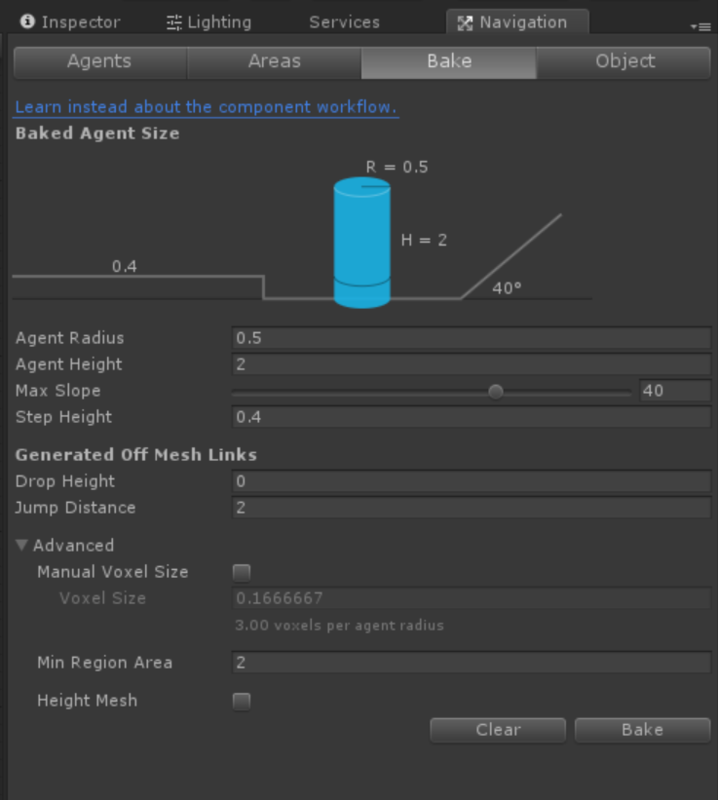
The third tab, Bake, is probably the most important. It allows you to create the actual NavMesh for your scene. You'll recognize some of the settings. The Bake tab looks like this:
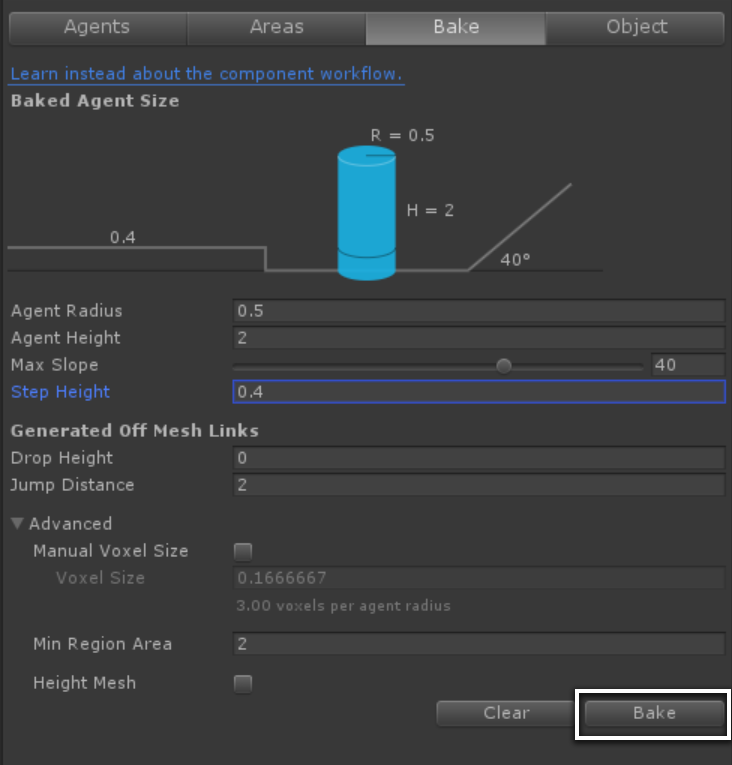
The Bake tab
The agent size settings in this tab dictate how agents interact with the environment, whereas the settings in the Agents tab dictate how they interact with other agents and moving objects, but they control the same parameters, so we'll skip those here. The Drop Height and Jump Distance control how far an agent can "jump" to reach a portion of the NavMesh that is not directly connected to the one the agent is currently on. We'll go over this in more detail up ahead, so don't sweat it if you're not quite sure what that means yet.
There are also some advanced settings that are generally collapsed by default. Simply click the drop-down triangle by the Advanced heading to unfold these options. You can think of the Manual Voxel Size setting as the "quality" setting. The smaller the size, the more detail you can capture in the mesh. The Min Region Area is used to skip baking platforms or surfaces below the given threshold. The Height Mesh gives you more detailed vertical data when baking the mesh. For example, it will help preserve the proper placement of your agent when climbing up stairs.
The Clear button will clear any NavMesh data for the scene, and the Bake button will create the mesh for your scene. The process is fairly fast. As long as you have the window selected, you'll be able to see the NavMesh generated by the Bake button in your scene view. Go ahead and hit the Bake button to see the results. In our sample scene, you should end up with something that looks like the following screenshot:

The blue areas represent the NavMesh. We'll revisit this up ahead. For now, let's move on to the final tab, the Object tab, which looks like the following screenshot:
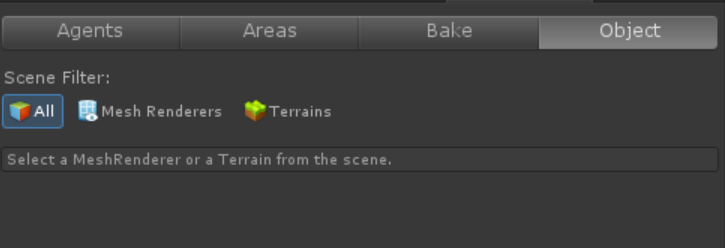
The three buttons pictured in the preceding screenshot, All, Mesh Renderers, and Terrains, act as filters for your scene. These are helpful when working in complex scenes with lots of objects in the hierarchy. Selecting an option will filter out that type in your hierarchy to make them easier to select. You can use this when digging through your scene looking for objects to mark as navigation static.
Using the NavMesh agent
Now that we have our scene set up with a NavMesh, we need a way for our agent to use this information. Luckily for us, Unity provides a Nav Mesh Agent component we can throw onto our character. The sample scene has a game object named Tank with the component already attached to it. Take a look at it in the hierarchy, and it should look like the following screenshot:

There are quite a few settings here, and we won't go over all of them, since they're fairly self-explanatory and you can find the full descriptions in the official Unity documentation, but let's point out a few key things:
Agent Type: Remember the Agents tab in the Navigation window? The agent types you define there will be selectable here.
Auto Traverse Off Mesh Link: We'll get into Off Mesh Links up ahead, but this setting allows the agent to automatically use that feature.
Area Mask: The areas you set up in the Areas tab of the Navigation window will be selectable here.
That's it. The component handles 90% of the heavy lifting for you: placement on the path, pathfinding, obstacle avoidance, and so on. The only thing you need to do is provide the agent with a target destination. Let's look at that next.
That's it. The component handles 90% of the heavy lifting for you: placement on the path, pathfinding, obstacle avoidance, and so on. The only thing you need to do is provide the agent with a target destination. Let's look at that next.
Setting a destination
Now that we've set up our AI agent, we need a way to tell it where to go. Our sample project provides a script named Target.cs that does just that.
This is a simple class that does three things:
Shoots a ray from the camera origin to the mouse world position using a ray
Updates the marker position
Updates the destination property of all the NavMesh agents
The code is fairly straightforward. The entire class looks like this:
using UnityEngine;
using UnityEngine.AI;

public class Target : MonoBehaviour
{
    private NavMeshAgent[] navAgents;
    public Transform targetMarker;

    private void Start ()
    {
      navAgents = FindObjectsOfType(typeof(NavMeshAgent)) as NavMeshAgent[];
    }

    private void UpdateTargets ( Vector3 targetPosition )
    {
      foreach(NavMeshAgent agent in navAgents)
      {
        agent.destination = targetPosition;
      }
    }

    private void Update ()
    {
        if(GetInput())
        {
            Ray ray = Camera.main.ScreenPointToRay(Input.mousePosition);
            RaycastHit hitInfo;

            if (Physics.Raycast(ray.origin, ray.direction, out hitInfo))
            {
                Vector3 targetPosition = hitInfo.point;
                UpdateTargets(targetPosition);
                targetMarker.position = targetPosition;
            }
        }
    }

    private bool GetInput()
    {
        if (Input.GetMouseButtonDown(0))
        {
            return true;
        }
        return false;
    }

    private void OnDrawGizmos()
    {
        Debug.DrawLine(targetMarker.position, targetMarker.position + Vector3.up * 5, Color.red);
    }
}
There are a few things happening here. In the Start method, we initialize our navAgents array by using the FindObjectsOfType() method.
The UpdateTargets() method runs through our navAgents array and sets their target destination to the given Vector3. This is really the key to making it work. You can use any mechanism you wish to actually get the target destination, and all you need to do to get the agent to move there is set the NavMeshAgent.destination field; the agent will do the rest.
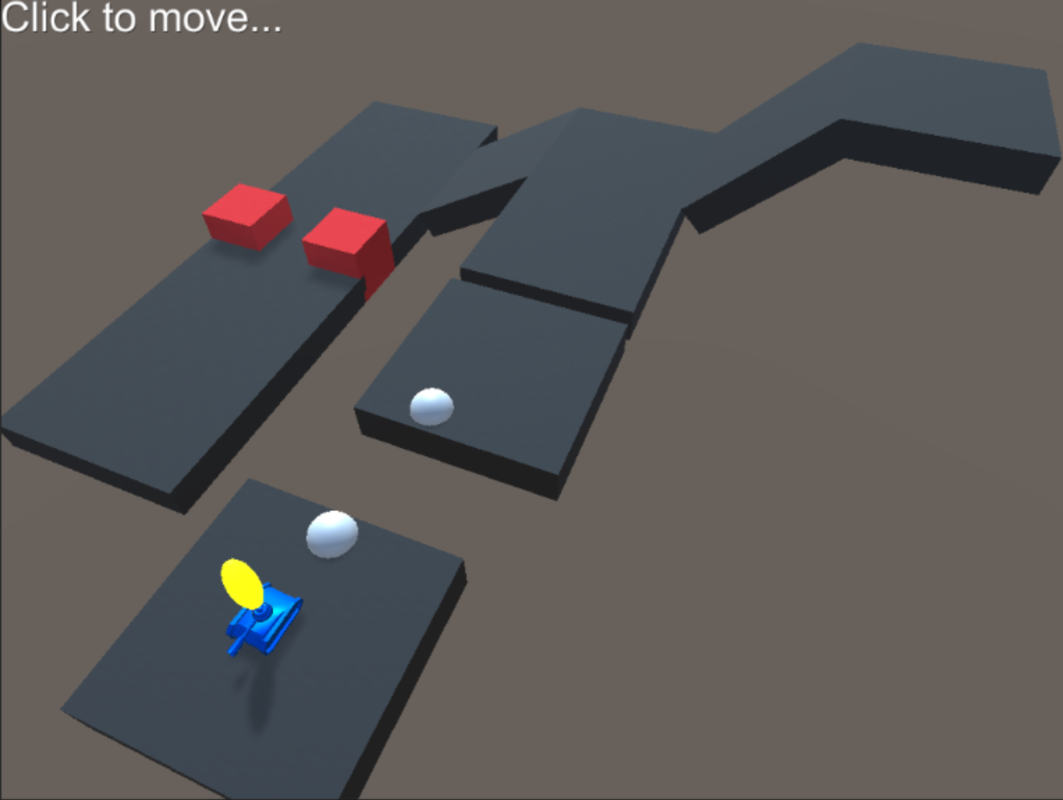
Our sample uses a click-to-move approach, so whenever the player clicks, we shoot a ray from the camera into the world towards the mouse cursor, and if we hit something, we assign that hit position as the new targetPosition for the agent. We also set the target marker accordingly for easy in-game visualization of the target destination.
To test it out, make sure you baked the NavMesh as described in the previous section, then enter play mode, and select any area on the map. If you go click-happy, you may notice there are some areas your agent can't reach—the top of the red cubes, the top-most platform, and the platform towards the bottom of the screen.
In the case of the red cubes, they're too far up. The ramp leading up to the top-most platform is too steep, as per our Max Slope settings, and the agent can't climb up to it. The following screenshots illustrate how the Max Slope settings affect the NavMesh:
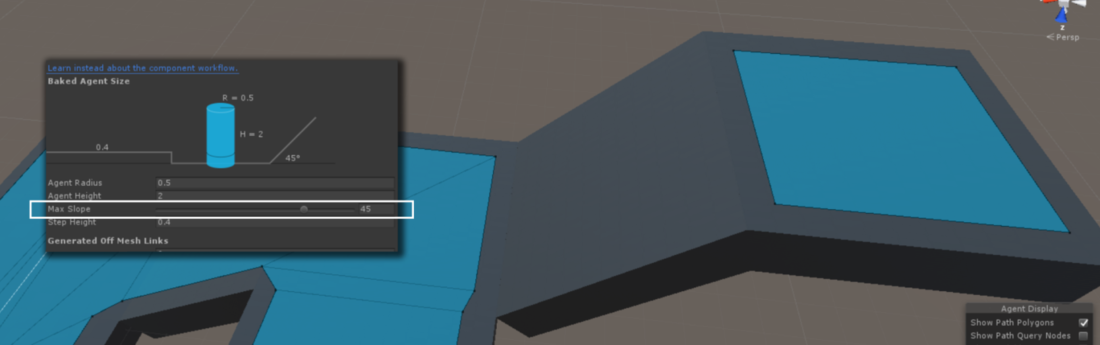
NavMesh with the max slope value set to 45
If you tweak the Max Slope to something like 51, then hit the Bake button again to re-bake the NavMesh, it will yield results like this:
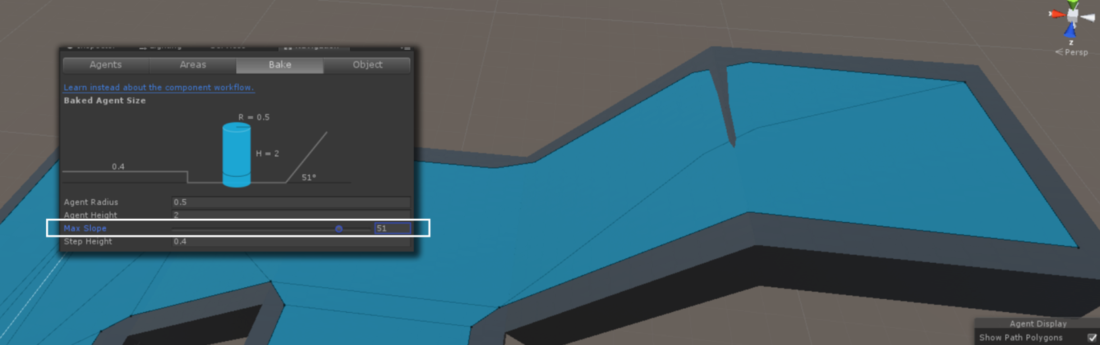
NavMesh with the max slope value set to 51
As you can see, you can tweak your level design to make entire areas inaccessible by foot with a simple value tweak. An example where this would be helpful is if you had a platform or ledge that you need a rope, ladder, or elevator to get to. Maybe even a special skill, such as the ability to climb? I'll let your imagination do the work and think of all the fun ways to use this.
Making sense of Off Mesh Links
You may have noticed that our scene features two gaps. The first one is accessible to our agent, but the one near the bottom of the screen is too far away. This is not completely arbitrary. Unity's Off Mesh Links effectively bridge the gap between segments of the NavMesh that are not connected. You can see these links in the editor, as shown in the next screenshot:
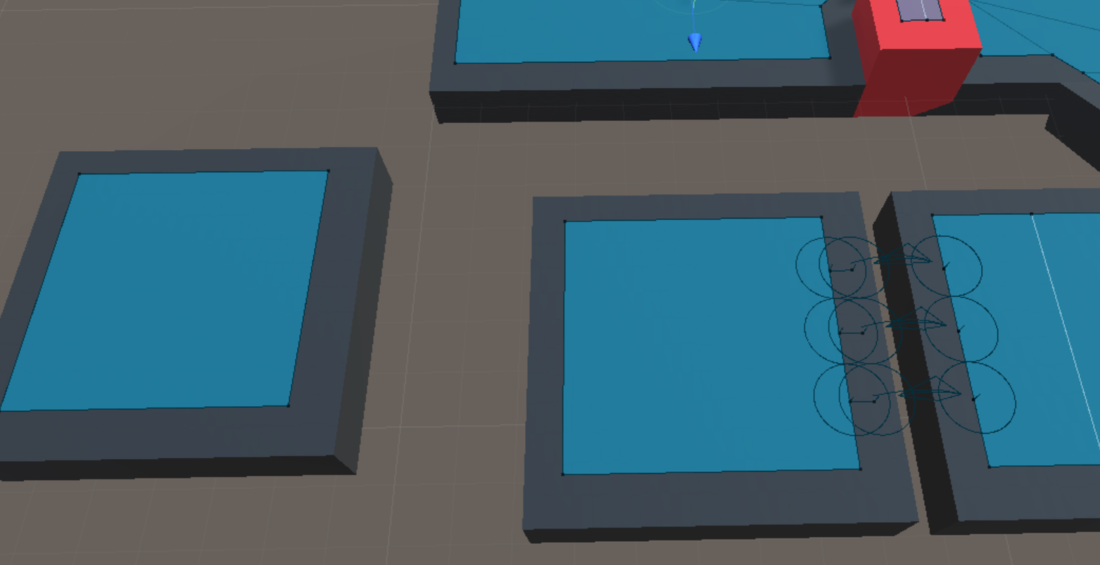
The blue circles with the connecting lines are links
There are two ways that Unity can generate these links. The first we've already covered. Remember the Jump Distance value in the Bake tab of the Navigation window? Unity will automatically use that value to generate the links for us when baking the NavMesh. Try tweaking the value in our test scene to 5 and re-baking. Notice how, now, the platforms are linked? That's because the meshes are within the newly-specified threshold.
Set the value back to 2 and re-bake. Now, let's look at the second method. Create spheres that will be used to connect the two platforms. Place them roughly as shown in the following screenshot:

You may already see where this is going, but let's walk through the process to get these connected. In this case, I've named the sphere on the right start, and the sphere on the left end. You'll see why in a second. Next up, add the Off Mesh Link component on the platform on the right (relative to the preceding screenshot). You'll notice the component has start and end fields. As you may have guessed, we're going to drop the spheres we created earlier into their respective slots—the start sphere in the start field, and the end sphere in the end field. Our inspector will look something like this:
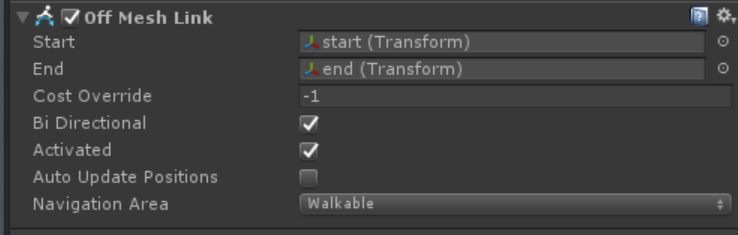
The Cost Override value kicks in when you set it to a positive number. It will apply a cost multiplier to using this link, as opposed to, potentially, a more cost-effective route to the target.
The Bi Directional value allows the agent to move in both directions when set to true. You can turn this off to create one-way links in your level design. The Activated value is just what it says. When set to false, the agent will ignore this link. You can turn it on and off to create gameplay scenarios where the player has to hit a switch to activate it, for example.
You don't have to re-bake to enable this link. Take a look at your NavMesh and you'll see that it looks like the following screenshot:
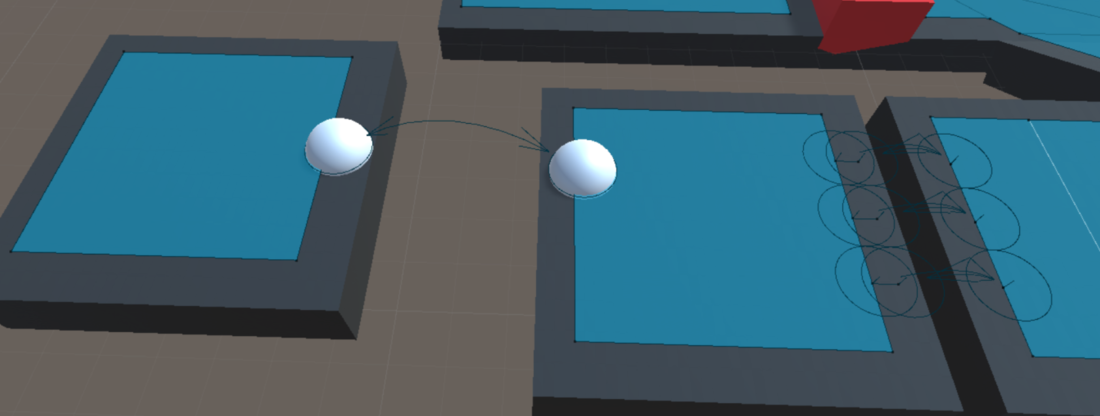
As you can see, the smaller gap is still automatically connected, and now we have a new link generated by our Off Mesh Link component between the two spheres. Enter play mode and click on the far platform, and, as expected, the agent can now navigate to the detached platform, as you can see in the following screenshot:
In your own levels, you may need to tweak these settings to get the exact results you expect, but combining these features gives you a lot of power out-of-the-box. You can have a simple game up and running fairly quickly using Unity's NavMesh feature.
This tutorial is an excerpt from the book, Unity 2017 Game AI Programming - Third Edition written by Ray Barrera, Aung Sithu Kyaw, and Thet Naing Swe, and published by Packt Publishing.
Use the code ORGDA09 at checkout to get recommended eBook retail price for $9 only until July 15, 2018.

