Active rendering is a style of programming that allows Java code to handle all of the rendering in a simple while loop. This approach resembles traditional game programming, allowing more time to be spent developing a game and less time spent worrying about which paint method to override.
What is Active Rendering?
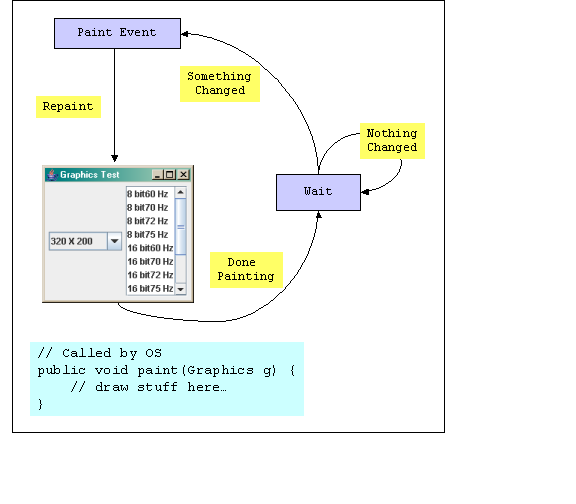
There are two different kinds of rendering: active and passive. Anyone who has ever written a swing application has experienced passive rendering. The drawing code is placed in a paint method and the code is called in response to repaint requests. These can come from the code itself, but may also come from the operating system in response to events such as resizing a window or clicking on a component.
Figure 1 shows an example of Passive rendering. There is nothing wrong with letting java handle painting for you, but it is not the only way to develop an application.
Figure 1 - Passive Rendering
Active rendering (Figure 2) is just the opposite. Instead of letting someone else decide when to paint, the program constantly repaints the screen in a very tight while loop. While this sort of behavior is not recommended for regular applications, it is exactly the kind of control needed to make computer games.
Figure 2 - Active Rendering

Why use Active Rendering?
The first time I tried to write a computer game in Java, I wanted to write the following:
public class Game {

    public static void main(String [] args) {
        setup();
        while( isRunning() ) {
            gameLoop();
        }
        shutDown();
        System.exit(0);
    }
}
Active Rendering in a Window
The first thing needed is a window. The important thing to note is the call disabling paint notifications. When doing active rendering, there is no need to let the operating system call the paint method.
// Create game window...
JFrame app = new JFrame();
app.setIgnoreRepaint( true );
app.setDefaultCloseOperation( JFrame.EXIT_ON_CLOSE );
Remember - do not forget to ignore repaint on the canvas!
// Create canvas for painting...
Canvas canvas = new Canvas();
canvas.setIgnoreRepaint( true );
canvas.setSize( 640, 480 );

// Add canvas to game window...
app.add( canvas );
app.pack();
app.setVisible( true );
// Create BackBuffer...
canvas.createBufferStrategy( 2 );
BufferStrategy buffer = canvas.getBufferStrategy();
Remember - when using active rendering, the dispose() method needs to be called on the graphics object.
Graphics graphics = null;
while( true ) {
  try {
    // clear back buffer...
    graphics = buffer.getDrawGraphics();
    graphics.setColor( Color.BLACK );
    graphics.fillRect( 0, 0, 639, 479 );

    // Draw stuff here using Java's Graphics Object!!!

    // blit the back buffer to the screen
    if( !buffer.contentsLost() )
      buffer.show();

    // Let the OS have a little time...
    Thread.yield();
  } finally {
    if( graphics != null )
      graphics.dispose();
  }
}
import java.awt.*;
import java.util.Random;
import javax.swing.JFrame;

/*
 * This is an example of a simple windowed render loop
 */
public class SimpleWindowedGame {

  public static void main( String[] args ) {

    // Create game window...
    JFrame app = new JFrame();
    app.setIgnoreRepaint( true );
    app.setDefaultCloseOperation( JFrame.EXIT_ON_CLOSE );

    // Create canvas for painting...
    Canvas canvas = new Canvas();
    canvas.setIgnoreRepaint( true );
    canvas.setSize( 640, 480 );

    // Add canvas to game window...
    app.add( canvas );
    app.pack();
    app.setVisible( true );

    // Create BackBuffer...
    canvas.createBufferStrategy( 2 );
    BufferStrategy buffer = canvas.getBufferStrategy();

    // Get graphics configuration...
    GraphicsEnvironment ge =
        GraphicsEnvironment.getLocalGraphicsEnvironment();
    GraphicsDevice gd = ge.getDefaultScreenDevice();
    GraphicsConfiguration gc = gd.getDefaultConfiguration();

    // Create off-screen drawing surface
    BufferedImage bi = gc.createCompatibleImage( 640, 480 );

    // Objects needed for rendering...
    Graphics graphics = null;
    Graphics2D g2d = null;
    Color background = Color.BLACK;
    Random rand = new Random();

    // Variables for counting frames per seconds
    int fps = 0;
    int frames = 0;
    long totalTime = 0;
    long curTime = System.currentTimeMillis();
    long lastTime = curTime;

    while( true ) {
      try {
        // count Frames per second...
        lastTime = curTime;
        curTime = System.currentTimeMillis();
        totalTime += curTime - lastTime;
        if( totalTime > 1000 ) {
          totalTime -= 1000;
          fps = frames;
          frames = 0;
        }
        ++frames;

        // clear back buffer...
        g2d = bi.createGraphics();
        g2d.setColor( background );
        g2d.fillRect( 0, 0, 639, 479 );

        // draw some rectangles...
        for( int i = 0; i < 20; ++i ) {
          int r = rand.nextInt(256);
          int g = rand.nextInt(256);
          int b = rand.nextInt(256);
          g2d.setColor( new Color(r,g,b) );
          int x = rand.nextInt( 640/2 );
          int y = rand.nextInt( 480/2 );
          int w = rand.nextInt( 640/2 );
          int h = rand.nextInt( 480/2 );
          g2d.fillRect( x, y, w, h );
        }

        // display frames per second...
        g2d.setFont( new Font( "Courier New", Font.PLAIN, 12 ) );
        g2d.setColor( Color.GREEN );
        g2d.drawString( String.format( "FPS: %s", fps ), 20, 20 );

        // Blit image and flip...
        graphics = buffer.getDrawGraphics();
        graphics.drawImage( bi, 0, 0, null );
        if( !buffer.contentsLost() )
          buffer.show();

        // Let the OS have a little time...
        Thread.yield();
      } finally {
        // release resources
        if( graphics != null )
          graphics.dispose();
        if( g2d != null )
          g2d.dispose();
      }
    }
  }
}
Full Screen Active Rendering
To change the above windowed example into a full screen application requires a few changes. The first thing that needs to be done is removing the JFrame border and title bar. Doing this, however, will leave no way for the user to exit the application. A simple key handler and a static boolean variable does the trick...
public class SimpleFullScreenGame {

static boolean running;

public static void main( String[] args ) {

  // Create game window...
  JFrame app = new JFrame();
  app.setIgnoreRepaint( true );
  app.setUndecorated( true );

  // Add ESC listener to quit...
  app.addKeyListener( new KeyAdapter() {
    public void keyPressed( KeyEvent e ) {
      if( e.getKeyCode() == KeyEvent.VK_ESCAPE )
        running = false;
      }
  });
// Get graphics configuration...
GraphicsEnvironment ge = GraphicsEnvironment.getLocalGraphicsEnvironment();
GraphicsDevice gd = ge.getDefaultScreenDevice();
GraphicsConfiguration gc = gd.getDefaultConfiguration();

// Change to full screen, 640 x 480, 32 bit color
gd.setFullScreenWindow( app );
if( gd.isDisplayChangeSupported() ) {
  gd.setDisplayMode(
    new DisplayMode( 640, 480, 32, DisplayMode.REFRESH_RATE_UNKNOWN )
  );
}
running = true;
while( running ) {
  // do game stuff here!
}

gd.setFullScreenWindow( null );
System.exit(0);
import java.awt.*;
import java.util.Random;
import javax.swing.JFrame;

public class SimpleFullScreenGame {

  static boolean running;

  public static void main( String[] args ) {

    // Create game window...
    JFrame app = new JFrame();
    app.setIgnoreRepaint( true );
    app.setUndecorated( true );

    // Add ESC listener to quit...
    app.addKeyListener( new KeyAdapter() {
      public void keyPressed( KeyEvent e ) {
        if( e.getKeyCode() == KeyEvent.VK_ESCAPE )
            running = false;
          }
    });

    // Get graphics configuration...
    GraphicsEnvironment ge =
        GraphicsEnvironment.getLocalGraphicsEnvironment();
    GraphicsDevice gd = ge.getDefaultScreenDevice();
    GraphicsConfiguration gc = gd.getDefaultConfiguration();

    // Change to full screen
    gd.setFullScreenWindow( app );
    if( gd.isDisplayChangeSupported() ) {
      gd.setDisplayMode(
        new DisplayMode( 640, 480, 32, DisplayMode.REFRESH_RATE_UNKNOWN )
      );
    }

    // Create BackBuffer...
    app.createBufferStrategy( 2 );
    BufferStrategy buffer = app.getBufferStrategy();

    // Create off-screen drawing surface
    BufferedImage bi = gc.createCompatibleImage( 640, 480 );

    // Objects needed for rendering...
    Graphics graphics = null;
    Graphics2D g2d = null;
    Color background = Color.BLACK;
    Random rand = new Random();

    // Variables for counting frames per seconds
    int fps = 0;
    int frames = 0;
    long totalTime = 0;
    long curTime = System.currentTimeMillis();
    long lastTime = curTime;

    running = true;
    while( running ) {
      try {
        // count Frames per second...
        lastTime = curTime;
        curTime = System.currentTimeMillis();
        totalTime += curTime - lastTime;
        if( totalTime > 1000 ) {
          totalTime -= 1000;
          fps = frames;
          frames = 0;
        }
        ++frames;

        // clear back buffer...
        g2d = bi.createGraphics();
        g2d.setColor( background );
        g2d.fillRect( 0, 0, 639, 479 );

        // draw some rectangles...
        for( int i = 0; i < 20; ++i ) {
          int r = rand.nextInt(256);
          int g = rand.nextInt(256);
          int b = rand.nextInt(256);
          g2d.setColor( new Color(r,g,b) );
          int x = rand.nextInt( 640/2 );
          int y = rand.nextInt( 480/2 );
          int w = rand.nextInt( 640/2 );
          int h = rand.nextInt( 480/2 );
          g2d.fillRect( x, y, w, h );
        }

        // display frames per second...
        g2d.setFont( new Font( "Courier New", Font.PLAIN, 12 ) );
        g2d.setColor( Color.GREEN );
        g2d.drawString( String.format( "FPS: %s", fps ), 20, 20 );

        // Blit image and flip...
        graphics = buffer.getDrawGraphics();
        graphics.drawImage( bi, 0, 0, null );

        if( !buffer.contentsLost() )
          buffer.show();

      } finally {
        // release resources
        if( graphics != null )
          graphics.dispose();
        if( g2d != null )
          g2d.dispose();
      }
    }

    gd.setFullScreenWindow( null );
    System.exit(0);
  }
}
Now What?
WOW! That covered a lot of material in a short amount of time. Active rendering makes it possible to learn the fundamentals of 2D game programming while using Java. While there are still many things that need to be handled to make a complete game, such as input polling, image loading, and sound, this should be enough to get those creative juices flowing. Stay tuned for more articles covering Java games!
References
- Full-Screen Exclusive Mode API by Michael Martak - Article about the basics of Full Screen Exclusive mode
- Avoid Common Pitfalls when Programming 2D Graphics in Java by Alexandre Denault and J?rg Kienzle - Article about the lessons learned while programming the minueto game library
- Killer Game Programming in Java by Andrew Davison - Great book with lots of source code to download
Article written by Tim Wright
Copyright(C) 2007 - All rights reserved
