- Writing a workflow condition
- Writing a workflow validator
- Writing a workflow post function
- Editing an active workflow
Introduction
Workflows are one standout feature which help users to transform JIRA into a user-friendly system. It helps users to define a lifecycle for the issues, depending on the issue type, the purpose for which they are using JIRA, and so on. As the Atlassian documentation says at http://confluence.at...guring+Workflow:
[indent=1]A JIRA workflow is the set of steps and transitions an issue goes through during its lifecycle. Workflows typically represent business processes.
JIRA uses Opensymphony's OSWorkflow which is highly configurable, and more importantly pluggable, to cater for the various requirements. JIRA uses three different plugin modules to add extra functionalities into its workflow, which we will see in detail through this chapter.
To make things easier, JIRA ships with a default workflow. We can't modify the default workflow, but can copy it into a new workflow and amend it to suit our needs. Before we go into the development aspect of a workflow, it makes sense to understand the various components of a workflow.
The two most important components of a JIRA workflow are Step and Transition. At any point of time, an Issue will be in a step. Each step in the workflow is linked to a workflow Status (http://confluence.at...+%27Status%27+F ield+Values) and it is this status that you will see on the issue at every stage. A transition, on the other hand, is a link between two steps. It allows the user to move an issue from one step to another (which essentially moves the issue from one status to another).
Few key points to remember or understand about a workflow:
- An issue can exist in only one step at any point in time
- A status can be mapped to only one step in the workflow
- A transition is always one-way. So if you need to go back to the previous step, you need a different transition
- A transition can optionally specify a screen to be presented to the user with the right fields on it
OSWorkflow, and hence JIRA, provides us with the option of adding various elements into a workflow transition which can be summarized as follows:
- Conditions: A set of conditions that need to be satisfied before the user can actually see the workflow action (transition) on the issue
- Validators: A set of validators which can be used to validate the user input before moving to the destination step
- Post Functions: A set of actions which will be performed after the issue is successfully moved to the destination step
These three elements give us the flexibility of handling the various use cases when an issue is moved from one status to another. JIRA ships with a few built-in conditions, validators, and post functions. There are plugins out there which also provide a wide variety of useful workflow elements. And if you still don't find the one you are looking for, JIRA lets us write them as plugins. We will see how to do it in the various recipes in this chapter. Hopefully, that gives you a fair idea about the various workflow elements. A lot more on JIRA workflows can be found in the JIRA documentation at http://confluence.at...guring+Workflow.
Writing a workflow condition
What are workflow conditions? They determine whether a workflow action is available or not. Considering the importance of a workflow in installations and how there is a need to restrict the actions either to a set of people, roles, and so on, or based on some criteria (for example, the field is not empty!), writing workflow conditions is inevitable.
Workflow conditions are created with the help of the workflow-condition module. The following are the key attributes and elements supported. See http://confluence.at...ules-Conditions for more details.
Attributes:
Class to provide contexts for rendered velocity templates. Must implement the com.atlassian.jira.plugin.workflow.WorkflowPluginConditionFactory interface.
Elements:
Class to determine whether the user can see the workflow transition. Must implement com.opensymphony.workflow.Condition. Recommended to extend the com.atlassian.jira.workflow.condition.AbstractJiraCondition class.
Getting ready
As usual, create a skeleton plugin. Create an eclipse project using the skeleton plugin and we are good to go!
How to do it...
In this recipe, let's assume we are going to develop a workflow condition that limits a transition only to the users belonging to a specific project role. The following are the steps to write our condition:
- Define the inputs needed to configure the workflow condition.
We need to implement the WorkflowPluginFactory interface, which mainly exists to provide velocity parameters to the templates. It will be used to extract the input parameters that are used in defining the condition. To make it clear, the inputs here are not the inputs while performing the workflow action, but the inputs in defining the condition.
The condition factory class, RoleConditionFactory in this case, extends the AbstractWorkflowPluginFactory, which implements the WorkflowPluginFactory interface. There are three abstract methods that we should implement, that is, getVelocityParamsForInput, getVelocityParamsForEdit, and getVelocityParamsForView. All of them, as the name suggests, are used for populating the velocity parameters for the different scenarios.
In our example, we need to limit the workflow action to a certain project role, and so we need to select the project role while defining the condition. The three methods will be implemented as follows:
		private static final String ROLE_NAME = "role";

			private static final String ROLES = "roles";

			.......

			@Override

			  protected void getVelocityParamsForEdit(Map

			velocityParams, AbstractDescriptor descriptor) {

				velocityParams.put(ROLE, getRole(descriptor));

				velocityParams.put(ROLES, getProjectRoles());

			  }  @Override

			  protected void getVelocityParamsForInput(Map

			velocityParams) {

				velocityParams.put(ROLES, getProjectRoles());

			  }  @Override

			  protected void getVelocityParamsForView(Map

			velocityParams, AbstractDescriptor descriptor) {

				velocityParams.put(ROLE, getRole(descriptor));

			  }
Let's look at the methods in detail:
- getVelocityParamsForInput: This method defines the velocity parameters for input scenario, that is, when the user initially configures the workflow. In our example, we need to display all the project roles so that the user can select one to define the condition. The method getProjectRoles merely returns all the project roles and the collection of roles is then put into the velocity parameters with the key ROLES.
- getVelocityParamsForView: This method defines the velocity parameters for the view scenario, that is, how the user sees the condition after it is configured. In our example, we have defined a role and so we should display it to the user after retrieving it back from the workflow descriptor. If you have noticed, the descriptor, which is an instance of AbstractDescriptor, is available as an argument in the method. All we need is to extract the role from the descriptor, which can be done as follows:
		private ProjectRole getRole(AbstractDescriptor descriptor){

				if (!(descriptor instanceof ConditionDescriptor)) {

				  throw new IllegalArgumentException("Descriptor must be a

			ConditionDescriptor.");

				}


			  ConditionDescriptor functionDescriptor = (ConditionDescriptor)

			descriptor;


			 String role = (String) functionDescriptor.getArgs().get(ROLE);

				if (role!=null && role.trim().length()>0)

				  return getProjectRole(role);

				else

				  return null;

			  }
Just check if the descriptor is a condition descriptor or not, and then extract the role as shown in the preceding snippet.
- getVelocityParamsForEdit: This method defines the velocity parameters for the edit scenario, that is, when the user modifies the existing condition. Here we need both the options and the selected value. Hence, we put both the project roles collection and the selected role on to the velocity parameters.
- getVelocityParamsForInput: This method defines the velocity parameters for input scenario, that is, when the user initially configures the workflow. In our example, we need to display all the project roles so that the user can select one to define the condition. The method getProjectRoles merely returns all the project roles and the collection of roles is then put into the velocity parameters with the key ROLES.
- The second step is to define the velocity templates for each of the three aforementioned scenarios: input, view, and edit. We can use the same template here for input and edit with a simple check to keep the old role selected for the edit scenario. Let us look at the templates:
- edit-roleCondition.vm: Displays all project roles and highlights the already-selected one in the edit mode. In the input mode, the same template is reused, but the selected role will be null and hence a null check is done:
			#foreach ($field in $roles)

						  #if ($role && (${field.id}==${role.id}))

					SELECTED

				#end

				>$field.name

			#end


	Select the role in which the user

	should be present!
- view-roleCondition.vm: Displays the selected role:
- edit-roleCondition.vm: Displays all project roles and highlights the already-selected one in the edit mode. In the input mode, the same template is reused, but the selected role will be null and hence a null check is done:
#if ($role)

	  User should have ${role.name} Role!

	#else

	  Role Not Defined

	#end
public boolean passesCondition(Map transientVars, Map args,

	PropertySet ps) throws WorkflowException {

		Issue issue = getIssue(transientVars);

		User user = getCaller(transientVars, args);	project project = issue.getProjectObject();

		String role = (String)args.get(ROLE);

		Long roleId = new Long(role);	return projectRoleManager.isUserInProjectRole(user,

	projectRoleManager.getProjectRole(roleId), project);

	}
The issue on which the condition is checked can be retrieved using the getIssue method implemented in the AbstractJiraCondition class. Similarly, the user can be retrieved using the getCaller method. In the preceding method, projectRoleManager is injected in the constructor, as we have seen before.
public Map getDescriptorParams(Map

	conditionParams) {

		if (conditionParams != null &&

	conditionParams.containsKey(ROLE))

			{

				return EasyMap.build(ROLE,

	extractSingleParam(conditionParams, ROLE));

			}

			// Create a 'hard coded' parameter

			return EasyMap.build();

	  }
The method here builds a map of the key:value pair, where key is ROLE and the value is the role value entered in the input configuration page. The extractSingleParam method is implemented in the AbstractWorkflowPluginFactory class. The extractMultipleParams method can be used if there is more than one parameter to be extracted!
How it works...
After the plugin is deployed, we need to modify the workflow to include the condition. The following screenshot is how the condition looks when it is added initially. This, as you now know, is rendered using the input template:

After the condition is added (that is, after selecting the Developers role), the view is rendered using the view template and looks as shown in the following screenshot:
/sites/default/files/Article-Images/1803-04-02.png
(Move the mouse over the image to enlarge.)
If you try to edit it, the screen will be rendered using the edit template, as shown in the following screenshot:

Note that the Developers role is already selected.
After the workflow is configured, when the user goes to an issue, he/she will be presented with the transition only if he/she is a member of the project role where the issue belongs. It is while viewing the issue that the passesCondition method in the condition class is executed.
Writing a workflow validator
Workflow validators are specific validators that check whether some pre-defined constraints are satisfied or not while progressing on a workflow. The constraints are configured in the workflow and the user will get an error if some of them are not satisfied. A typical example would be to check if a particular field is present or not before the issue is moved to a different status.
Workflow validators are created with the help of the workflow- validator module. The following are the key attributes and elements supported.
Attributes:
Class to provide contexts for rendered velocity templates. Must implement the com.atlassian.jira.plugin.workflow.WorkflowPluginValidatorFactory interface.
Elements:
Class which does the validation. Must implement com.opensymphony.workflow.Validator.
[indent=1]See http://confluence.at...ules-Validators for more details.
Getting ready
As usual, create a skeleton plugin. Create an eclipse project using the skeleton plugin and we are good to go!
How to do it...
Let us consider writing a validator that checks whether a particular field has a value entered on the issue or not! We can do this using the following steps:
- Define the inputs needed to configure the workflow validator:
We need to implement the WorkflowPluginValidatorFactory interface, which mainly exists to provide velocity parameters to the templates. It will be used to extract the input parameters that are used in defining the validator. To make it clear, the inputs here are not the input while performing the workflow action, but the inputs in defining the validator.
The validator factory class, FieldValidatorFactory in this case, extends the AbstractWorkflowPluginFactory interface and implements the WorkflowPluginValidatorFactory interface. Just like conditions, there are three abstract methods that we should implement. They are getVelocityParamsForInput, getVelocityParamsForEdit, and getVelocityParamsForView. All of them, as the names suggest, are used for populating the velocity parameters in different scenarios.
In our example, we have a single input field, which is the name of a custom field. The three methods will be implemented as follows:
		@Override

			protected void getVelocityParamsForEdit(Map velocityParams,

			AbstractDescriptor descriptor) {

				velocityParams.put(FIELD_NAME, getFieldName(descriptor));

			  velocityParams.put(FIELDS, getCFFields());

			}@Override

			protected void getVelocityParamsForInput(Map velocityParams) {

				velocityParams.put(FIELDS, getCFFields());

			}@Override

			protected void getVelocityParamsForView(Map velocityParams,

			AbstractDescriptor descriptor) {

				velocityParams.put(FIELD_NAME, getFieldName(descriptor));

			}
You may have noticed that the methods look quite similar to the ones in a workflow condition, except for the business logic! Let us look at the methods in detail:
- getVelocityParamsForInput: This method defines the velocity parameters for input scenario, that is, when the user initially configures the workflow. In our example, we need to display all the custom fields, so that the user can select one to use in the validator. The method getCFFields returns all the custom fields and the collection of fields is then put into the velocity parameters with the key fields.
- getVelocityParamsForView: This method defines the velocity parameters for the view scenario, that is, how the user sees the validator after it is configured. In our example, we have defined a field and so we should display it to the user after retrieving it back from the workflow descriptor. You may have noticed that the descriptor, which is an instance of AbstractDescriptor, is available as an argument in the method. All we need is to extract the field name from the descriptor, which can be done as follows:
		private String getFieldName(AbstractDescriptor descriptor){

			  if (!(descriptor instanceof ValidatorDescriptor)) {

				throw new IllegalArgumentException('Descriptor must be a

			ValidatorDescriptor.');

			  }


			  ValidatorDescriptor validatorDescriptor = (ValidatorDescriptor)

			descriptor;  String field = (String)

			validatorDescriptor.getArgs().get(FIELD_NAME);

			  if (field != null && field.trim().length() > 0)

				return field;

			  else

				return NOT_DEFINED;

			}
Just check if the descriptor is a validator descriptor or not and then extract the field as shown in the preceding snippet.
- getVelocityParamsForEdit: This method defines the velocity parameters for the edit scenario, that is, when the user modifies the existing validator. Here we need both the options and the selected value. Hence we put both the custom fields' collection and the field name onto the velocity parameters.
- getVelocityParamsForInput: This method defines the velocity parameters for input scenario, that is, when the user initially configures the workflow. In our example, we need to display all the custom fields, so that the user can select one to use in the validator. The method getCFFields returns all the custom fields and the collection of fields is then put into the velocity parameters with the key fields.
- The second step is to define the velocity templates for each of the three aforementioned scenarios, namely, input, view, and edit. We can use the same template here for input and edit with a simple checking to keep the old field selected for the edit scenario. Let us look at the template:
- edit-fieldValidator.vm: Displays all custom fields and highlights the already selected one in edit mode. In input mode, the field variable will be null, and so nothing is pre-selected:
		#foreach ($cf in $fields)

				  #if ($cf.name.equals($field)) SELECTED #end

		  >$cf.name

		#end


	Select the Custom Field to be validated

	for NULL
- view-fieldValidator.vm: Displays the selected field:
#if ($field)

	  Field '$field' is Required!

	#end
- edit-fieldValidator.vm: Displays all custom fields and highlights the already selected one in edit mode. In input mode, the field variable will be null, and so nothing is pre-selected:
public void validate(Map transientVars, Map args, PropertySet ps)

	throws InvalidInputException, WorkflowException {

		Issue issue = (Issue) transientVars.get("issue");

		String field = (String) args.get(FIELD_NAME);	  CustomField customField =

	customFieldManager.getCustomFieldObjectByName(field);	if (customField!=null){

		  //Check if the custom field value is NULL

		  if (issue.getCustomFieldValue(customField) == null){

			throw new InvalidInputException("The field:"+field+" is

				 required!"); }

		}

	  }
The issue on which the validation is done can be retrieved from the transientVars map. customFieldManager is injected in the constructor as usual.
class="com.jtricks.FieldValidatorFactory">

		Field Not Empty Workflow Validator	com.jtricks.FieldValidator	location="templates/com/jtricks/view-fieldValidator.vm"/>

		location="templates/com/jtricks/edit-fieldValidator.vm"/>

		location="templates/com/jtricks/edit-fieldValidator.vm"/>
Note that we have stored the role name instead of the ID in the workflow, unlike what we did in the workflow condition. However, it is safe to use the ID because administrators can rename the roles, which would then need changes in the workflows.
How it works...
After the plugin is deployed, we need to modify the workflow to include the validator. The following screenshot is how the validator looks when it is added initially. This, as you now know, is rendered using the input template:
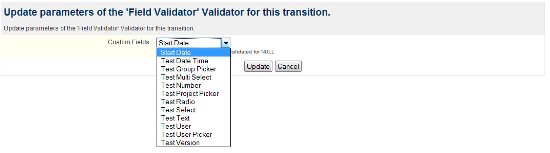
After the validator is added (after selecting the Test Number field), it is rendered using the view template and looks as follows:

If you try to edit it, the screen will be rendered using the edit template, as shown in the following screenshot:

Note that the Test Number field is already selected.
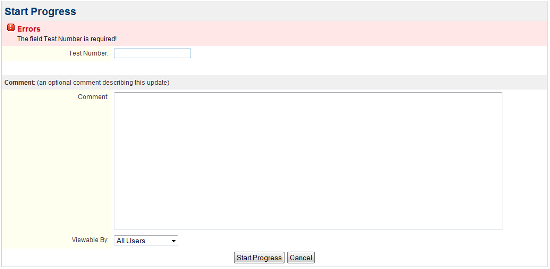
After the workflow is configured, when the user goes to an issue and tries to progress it, the validator will check if the Test Number field has a value or not. It is at this point that the validate method in the FieldValidator class is executed.
If the value is missing, you will see an error, as shown in the following screenshot:
Writing a workflow post function
Let us now look at workflow post functions. Workflow post functions are very effective and heavily used. They allow you to do a lot of things when you progress on the workflow on an issue. A lot of customizations and workarounds take this route!
Workflow post functions are created with the help of the workflow-function module. The following are the key attributes and elements supported.
Attributes:
Class to provide contexts for rendered velocity templates. Must implement the com.atlassian.jira.plugin.workflow.WorkflowNoInputPluginFactory interface if the function doesn't need input, or com.atlassian.jira.plugin.workflow.WorkflowPluginFunctionFactory if it needs input.
Elements:
Class which does the validation. Must implement com.opensymphony.workflow.FunctionProvider. Recommended to extend com.atlassian.jira.workflow.function.issue.AbstractJiraFunctionProvider, as it already implements many useful methods.
There are three other elements that can be used with a post function. They are explained as follows:
- orderable - (true/false) Specifies if this function can be re-ordered within the list of functions associated with a transition. The position within the list determines when the function actually executes.
- unique - (true/false) Specifies if this function is unique, that is, if it is possible to add multiple instances of this post function on a single transition.
- deletable - (true/false) Specifies if this function can be removed from a transition.
[indent=1]See http://confluence.at...dules-Functions for more details.
Getting ready
As usual, create a skeleton plugin. Create an eclipse project using the skeleton plugin and we are good to go!
How to do it...
Assume we have a user custom field and we want to set the current user or a specified user name on to the custom field when a particular transition happens. A typical use case for this will be to store the name of the user who last resolved an issue. The following are the steps to write a generic post function that sets the current username or a username provided by the user on a user custom field:
- Define the inputs needed to configure the workflow post function:
As opposed to workflow conditions and validators, there are two interfaces available for a workflow post function factory class. If there are no inputs needed to configure the function, the factory class must implement WorkflowNoInputPluginFactory.
An example will be to set the current user's name as the custom field value instead of the user configured name. If inputs are needed to configure the post function, the factory class must implement WorkflowPluginFunctionFactory. In our example, we take the username as the input.
Both the interfaces mainly exist to provide velocity parameters to the templates. They will be used to extract the input parameters that are used in defining the functions. To make it clear, the inputs here are not the input while performing the workflow action, but the inputs in defining the post function.
The function factory class, SetUserCFFunctionFactory in this case, extends the AbstractWorkflowPluginFactory and implements the WorkflowPluginFunctionFactory interface. Just like conditions, there are three abstract methods that we should implement, namely, getVelocityParamsForInput, getVelocityParamsForEdit, and getVelocityParamsForView. All of them, as the names suggest, are used for populating the velocity parameters for the different scenarios:
		@Override

			protected void getVelocityParamsForEdit(Map velocityParams,

			AbstractDescriptor descriptor) {

				velocityParams.put(USER_NAME, getUserName(descriptor));

			}@Override

			protected void getVelocityParamsForInput(Map velocityParams) {

				velocityParams.put(USER_NAME, CURRENT_USER); }@Override

			protected void getVelocityParamsForView(Map velocityParams,

			AbstractDescriptor descriptor) {

				velocityParams.put(USER_NAME, getUserName(descriptor));

			}
You may have noticed that the methods look very similar to the ones in workflow conditions or validators, except for the business logic! Let us look at the methods in detail:
- getVelocityParamsForInput : This method defines the velocity parameters for input scenario, that is, when the user initially configures the workflow. In our example, we need to use a text field that captures the username to be added on the issue.
- getVelocityParamsForView: This method defines the velocity parameters for the view scenario, that is, how the user sees the post function after it is configured. In our example, we have defined a field, and so we should display it to the user after retrieving it from the workflow descriptor. You may have noticed that the descriptor, which is an instance of AbstractDescriptor, is available as an argument in the method. All we need is to extract the username from the descriptor, which can be done as follows:
		private String getUserName(AbstractDescriptor descriptor){

				if (!(descriptor instanceof FunctionDescriptor)) {

				  throw new IllegalArgumentException("Descriptor must be a

			 FunctionDescriptor.");

				}	FunctionDescriptor functionDescriptor =

			(FunctionDescriptor) descriptor;

			 String user = (String)

			functionDescriptor.getArgs().get(USER_NAME);

				if (user!=null && user.trim().length()>0)

				  return user;

				else

				  return CURRENT_USER;

			  }
Just check if the descriptor is a validator descriptor or not, and then extract the field as shown in the preceding snippet.
- getVelocityParamsForEdit: This method defines the velocity parameters for the edit scenario, that is, when the user modifies the existing validator. Here we need both the options and the selected value. Hence, we put both the custom fields' collection and the field name on to the velocity parameters.
- getVelocityParamsForInput : This method defines the velocity parameters for input scenario, that is, when the user initially configures the workflow. In our example, we need to use a text field that captures the username to be added on the issue.
- The second step is to define the velocity templates for each of the three scenarios: input, view, and edit. We can use the same template here for input and edit with a simple checking to keep the old field selected for the edit scenario. Let us look at the templates:
- edit-userCFFunction.vm: Displays all custom fields and highlights the already selected one in the edit mode:
- view-userCFFunction.vm .displays the selected field:
#if ($user)

	  The 'Test User' CF will be set with value : $user!

	#end
- edit-userCFFunction.vm: Displays all custom fields and highlights the already selected one in the edit mode:
public void execute(Map transientVars, Map args, PropertySet ps)

	throws WorkflowException {

		MutableIssue issue = getIssue(transientVars);

		User user = null;	if (args.get("user") != null) {

		  String userName = (String) args.get("user");

		  if (userName.equals("Current User")){

			// Set the current user here!

			user = authContext.getUser();

		  } else {

			user = userUtil.getUser(userName);

		  }

		} else {

		  // Set the current user here!

		  user = authContext.getUser();

		}

		// Now set the user value to the custom field

		CustomField userField =

	customFieldManager.getCustomFieldObjectByName("Test User");

		if (userField != null) {

		  try {

			setUserValue(issue, user, userField);

		  } catch (FieldLayoutStorageException e) {

			System.out.println("Error while setting the user Field");

		  }

		}

	 }
Like a validator, the issue on which the post function is executed can be retrieved using the transientVars map. The user can be retrieved from the args map.
Here the setUserValue method simply sets the username on the passed custom field, as shown in the following block of code:
private void setUserValue(MutableIssue issue, User user,

	CustomField userField) throws FieldLayoutStorageException {

		issue.setCustomFieldValue(userField, user);

		Map modifiedFields = issue.getModifiedFields();

		FieldLayoutItem fieldLayoutItem =

	ComponentManager.getInstance().getFieldLayoutManager().getFieldLay

	out(issue).getFieldLayoutItem(userField);

		DefaultIssueChangeHolder issueChangeHolder = new

	DefaultIssueChangeHolder();

		final ModifiedValue modifiedValue = (ModifiedValue)

	modifiedFields.get(userField.getId());

	userField.updateValue(fieldLayoutItem, issue, modifiedValue,

	issueChangeHolder);

	  }
How it works...
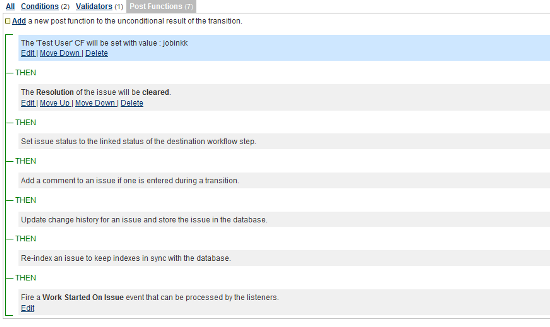
After the plugin is deployed, we need to modify the workflow to include the function. The following is where the function appears along with the built-in ones:
/sites/default/files/Article-Images/1803-04-08.png
Clicking on our post function takes us to the configuration page, shown next. This, as you now know, is rendered using the input template:

After the function is added (after entering in the UserName field), it looks as follows:
If you try to edit, the screen will be rendered using the edit template, as shown in the following screenshot:

Note that the UserName field is already populated.
After the workflow is configured, when the user executes the workflow action, the Test User custom field is set with the value jobinkk.
Editing an active workflow
We have seen how the workflow plays an important role in configuring our JIRA and how we can write plugins to add more workflow conditions, validators, and post functions. Once these plugins are added, we need to modify the workflow to include the newly created components at the appropriate transitions.
Modifying an inactive workflow or creating a new workflow is pretty easy. You can add the conditions/validators/post functions when you create the transition or just click on the transition to modify them. But to edit an active workflow, there are a few more steps involved which we will see in this recipe.
A workflow is active when it is being used in an active workflow scheme that is tied to a project. You can check whether a workflow is active by navigating to Administration Global Settings | Workflows|.
How to do it...
The following are the steps to edit an active workflow:
- Login as a JIRA Administrator.
- Navigate to Administration Global Settings | Workflows|.
- Click on the Create a draft workflow link on the workflow you want to edit. The link can be found under the Operations column.
- Click on the step or transition that you want to modify.
- Make the changes. The changes won't be effective until the workflow is published.
- After all the changes are made, click on the publish this draft link at the top of the page if you are still viewing the modified workflow. You can also click on Publish under the Operations column while viewing all the workflows.
- Make a copy of the old workflow, when prompted, if you need a backup, and click on Publish.
How it works...
After making changes on the draft and clicking on Publish, the new workflow will be active. However, there are some limitations to this procedure, which are detailed as follows:
- You can't delete an existing workflow step
- You can't edit the status associated with an existing step
- If an existing step has no outgoing transitions, you can't add any new outgoing transitions
- You can't change the step IDs for any existing steps
If you want to overcome these limitations, you need to copy the workflow, modify the copy, and make it active by migrating the projects on to the new workflow.
After the new workflow is active, any transitions on the issue will be based on the new workflow.
There's more...
If you want to modify an active workflow, thus overcoming some of the limitations aforementioned but don't want to go through the pain of migrating all the projects involved, you might want to look at modifying it directly in the JIRA database.
Note that we should be careful about the workflow changes when we do this. For example, if there are issues in a status that is removed in the modified workflow, those issues will be stuck at the removed status. The same can happen for the removed steps.
Modifying workflows in JIRA database
The following are the steps to modify the workflows in the database:
- export the workflow that needs to be modified into XML. You can do it using the XML link under the Operations column of a workflow.
- Modify the XML to include your changes (or alternatively, make changes in a copy of the JIRA workflow and export that as XML).
- Stop the JIRA instance.
- Connect to your JIRA database.
- Take a backup of the existing database. We can revert to this backup if anything goes wrong.
- Update the JIRAWORKFLOWS table to modify the descriptor column with the new XML file for the appropriate workflow. When the workflow XML is huge, it might be useful to rely on database-specific methods to update the table. For example, we can use Oracle XML database utilities (http://download.orac...90/xdb01int.htm), if JIRA is connected to the Oracle database.
- Commit the changes and disconnect from the database.
- Start the JIRA instance.
- Re-index JIRA.

