Note: This article was originally published on LinkedIn. If you enjoy my article, please click through and consider connecting with me.
Can programmers art? How far can creativity and programming take you?
I have summarized what I learned in several months into 7 key techniques to improve the visual quality of your game.
"Programmer art" is something of a running joke. For those unfamiliar with the term, it refers to the "placeholder" or "throw-together" art that programmers tend to use while developing games.
Some of us don't have the necessary artistic skills, however, sometimes we just can't be bothered to put in the effort. We're concerned about the technical side of things working - art can come later.
Here's what this usually means -
I worked on a game jam with some new people a few months ago. I just wanted to make sure that my gameplay and AI code was doing what it was supposed to do. This would have to interface with code from other teammates as well, so it was important to test and check for bugs. This was the result.
That's not what I'm going to talk about today though.
I'm going to take a different angle on "programmer art" - not the joke art that programmers often use, but the fact that there's a LOT that a programmer can do to improve the visual appeal of a game. I believe some of this falls under "technical art" as well.
My current job kind of forced me to think in this capacity.
I was tasked with visualizing some scientific data. Though this data was the result of years of hard work on the part of scientists, the result was unimpressive to the untrained eye - a heap of excel files with some words and numbers.
There are very few people in the world who can get excited by seeing a few excel files.
My job? To make this data exciting to everyone else.
My task was to visualize connectome data for a famous worm known as C. Elegans, made available by the wonderful people working on the OpenWorm project.
Part of the data parsing to read and display the data as a worm's body with neurons on it was done by my teammate. My main task was to improve the visuals and the overall graphical quality.
The first thing that comes to mind is using HD textures, PBR materials and high-poly models. Add in a 3D terrain using a height map, some post-processing and HDR lighting, and BOOM! Gorgeous 3D scene. I'm sure you've all seen loads of those by now.
Except, almost none of that would really help me.
The idea was very abstract - neurons and connections visible in a zoomed-in, x-ray-like view of a worm. I don't think rolling hills would have helped me much.
I had no 3D modelling skills or access to an artist - even if I did, I'm not sure what kind of 3D models would have helped.
As a result, what I've made isn't a gorgeous 3D environment with foliage and god-rays and lens flares. So it's not applicable in every case or the perfect example of how a programmer can make a gorgeous game.
But, it does provide a distinct viewpoint and result. The special sets of constraints in the problem I had to solve led to this.
So here's what I actually did:
The 7 things I did to improve the visuals of my Unity game
1. Conceptualizing the look
This could be considered a pre-production step for art or any visual project. Ideally, what should it look like? What's the goal? What are your references?
In this case, the viewer had a hologram-like feel to it (also there were plans to port it to a HoloLens eventually). I liked the idea of a futuristic hologram. And the metaphor of "AI bringing us towards a better future".
So what were my references? Sci-fi of course!
My first pick was one of my favourite franchises - Star Wars. I love how the holo-comms look in the movies.
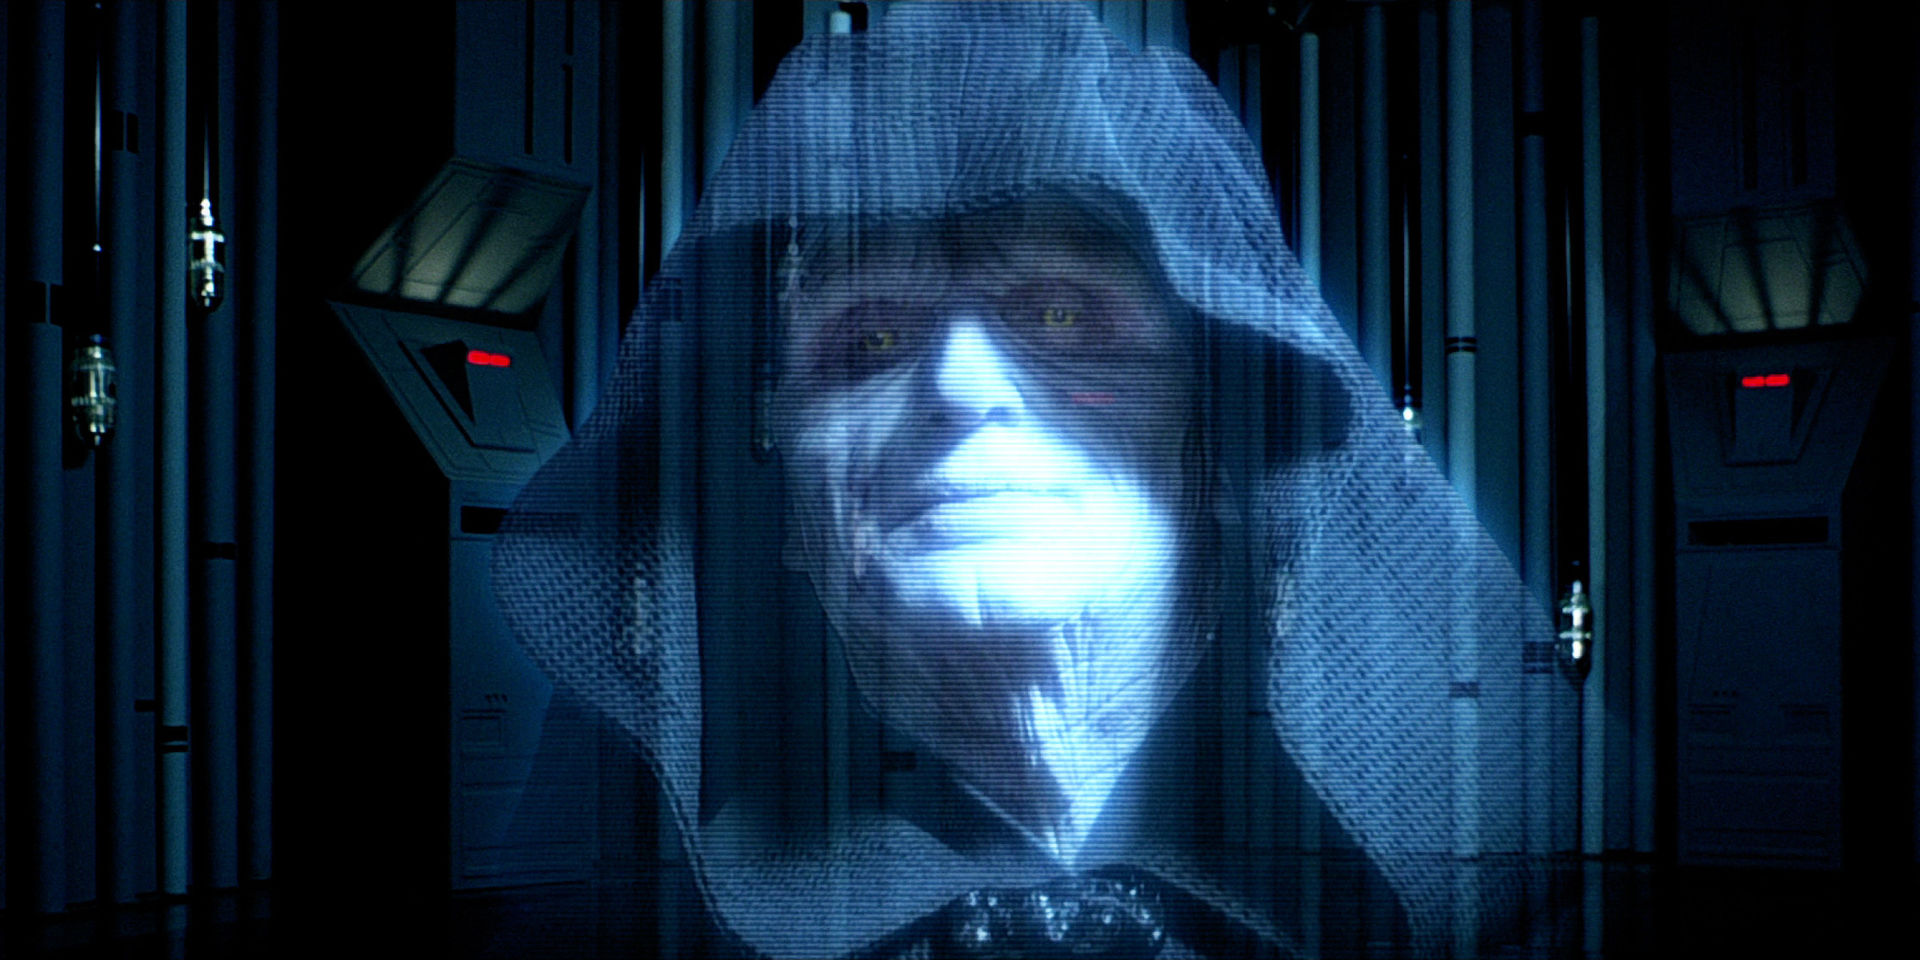
Holograms became a key component of my design.
This is a HUD design from Prometheus that I found on Google -
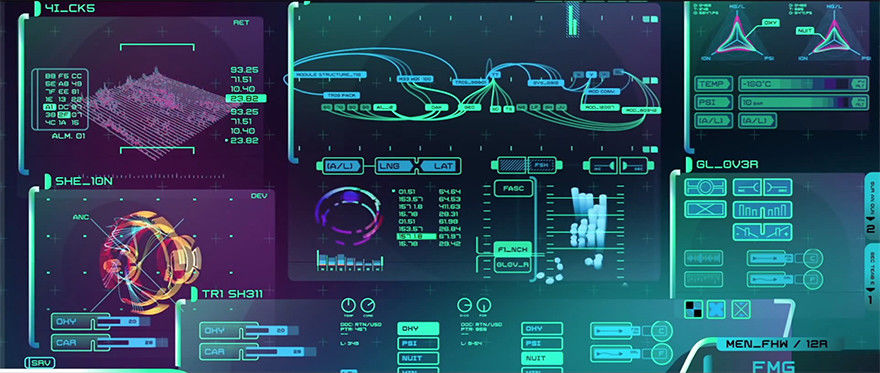
In this case, the colours appealed to me more than the design itself. I ended up basing the UI design on this concept.
Key takeaway - Your imagination is the very first tool that helps you create impressive art. Use references! It's not cheating - it's inspiration. Your references will guide you as you create the look that you want.
2. Shaders can help you achieve that look
I had some shader programming experience from University - D3D11 and HLSL. But that work had been about building a basic graphics engine with features like lighting, shadows, and some light post-processing. I had done some light Shader programming in Unity before as well.
What I really needed now was impressive visual effects, not basic lighting and shadows.
I was really lucky that this was about the time Unity made Shader Graph available, which made everything much easier. I can write Shader code, but being able to see in real time what each node (Which can be considered a line of code) does makes it so much easier to produce the effects you want.
I familiarized myself with all the samples Unity had included with this new tool. That wouldn't have been enough though. Thankfully due to my previous experience with Shaders, I was able to make some adjustments and improvements to make them suit my needs.
Some tweaking with speed, scaling, colours, and textures led to a nice hologram effect for the UI panels.
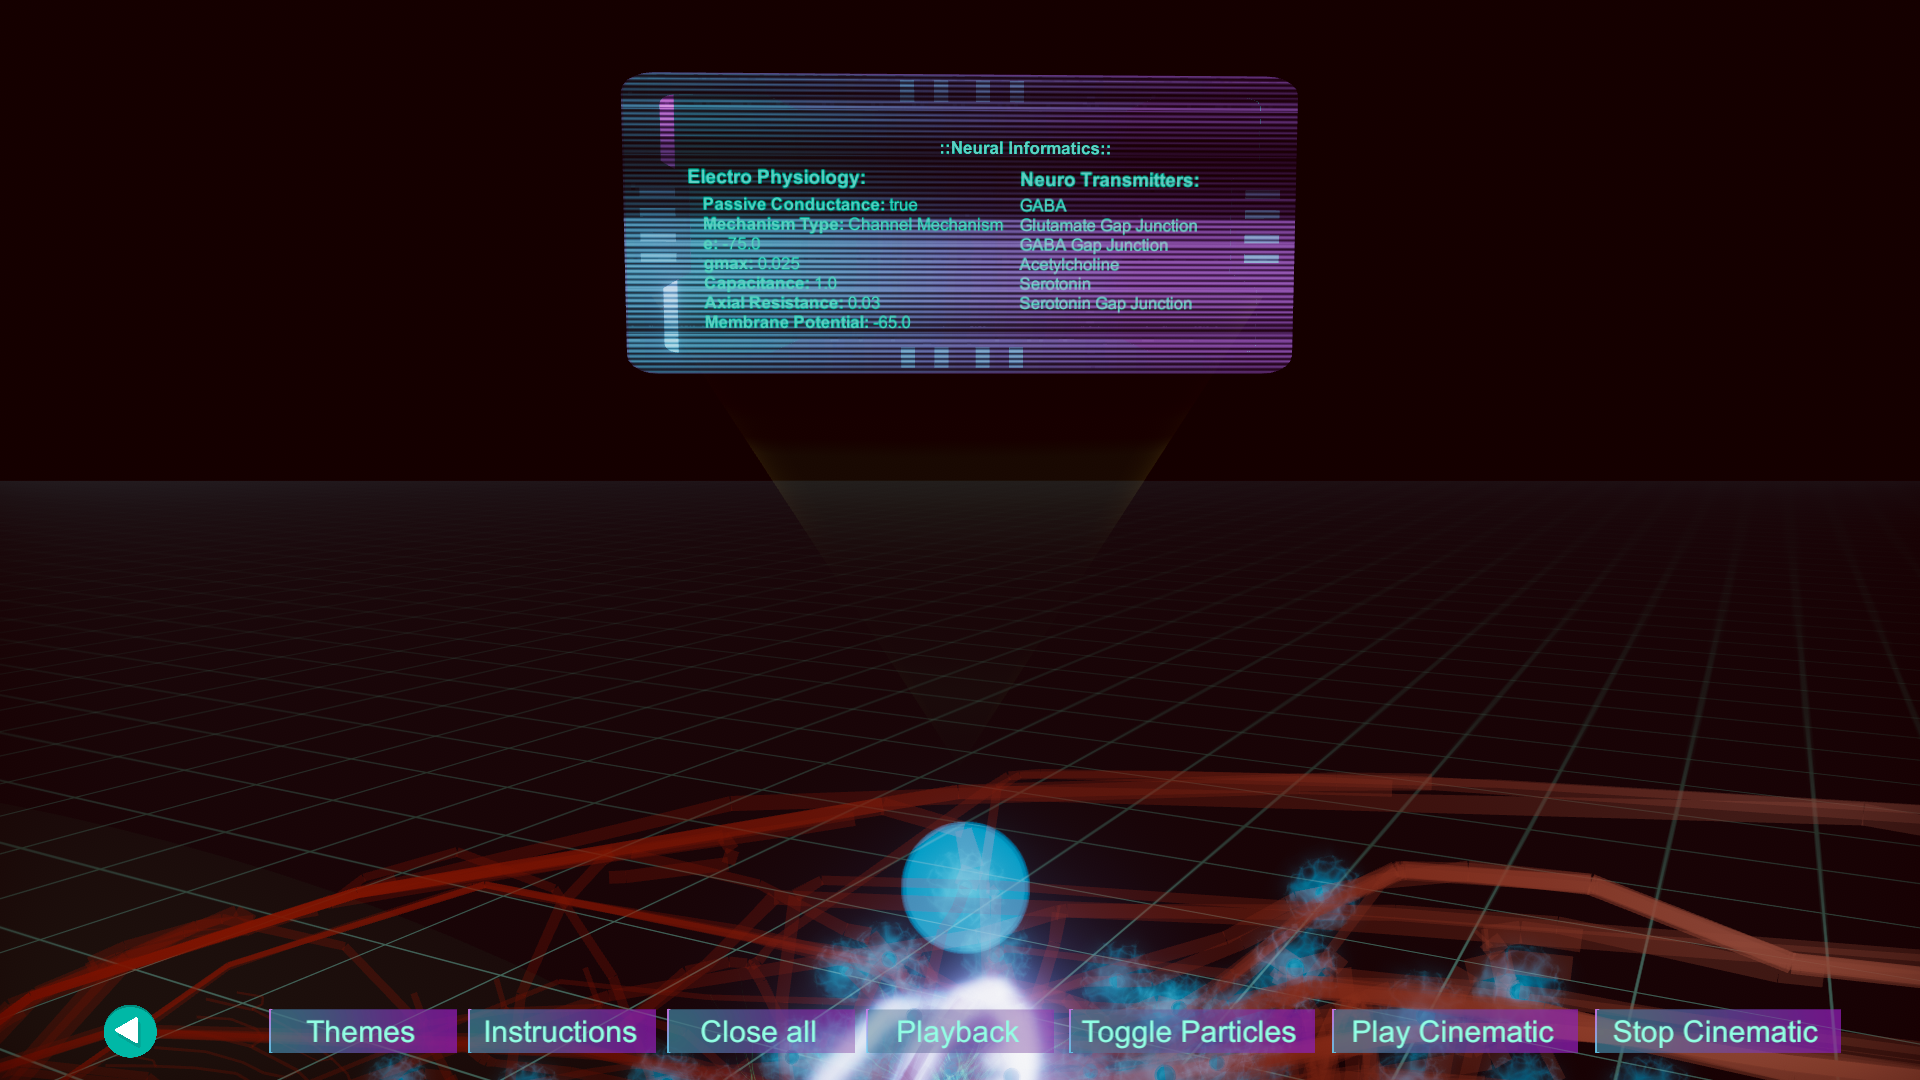
I wanted the viewer to feel good to interact with as well, and some work implementing a glow effect (alongside the dissolve effects) led to this -
Key takeaway - Shaders are an extremely powerful tool in a Game Programmer's repertoire. Tools like Unity's Shader Graph, the old Shader Forge asset, and Unreal's material editor make Shaders more accessible and easier to tune to get the exact look you want.
PS - Step 5 below is also really important for getting a nice glow effect.
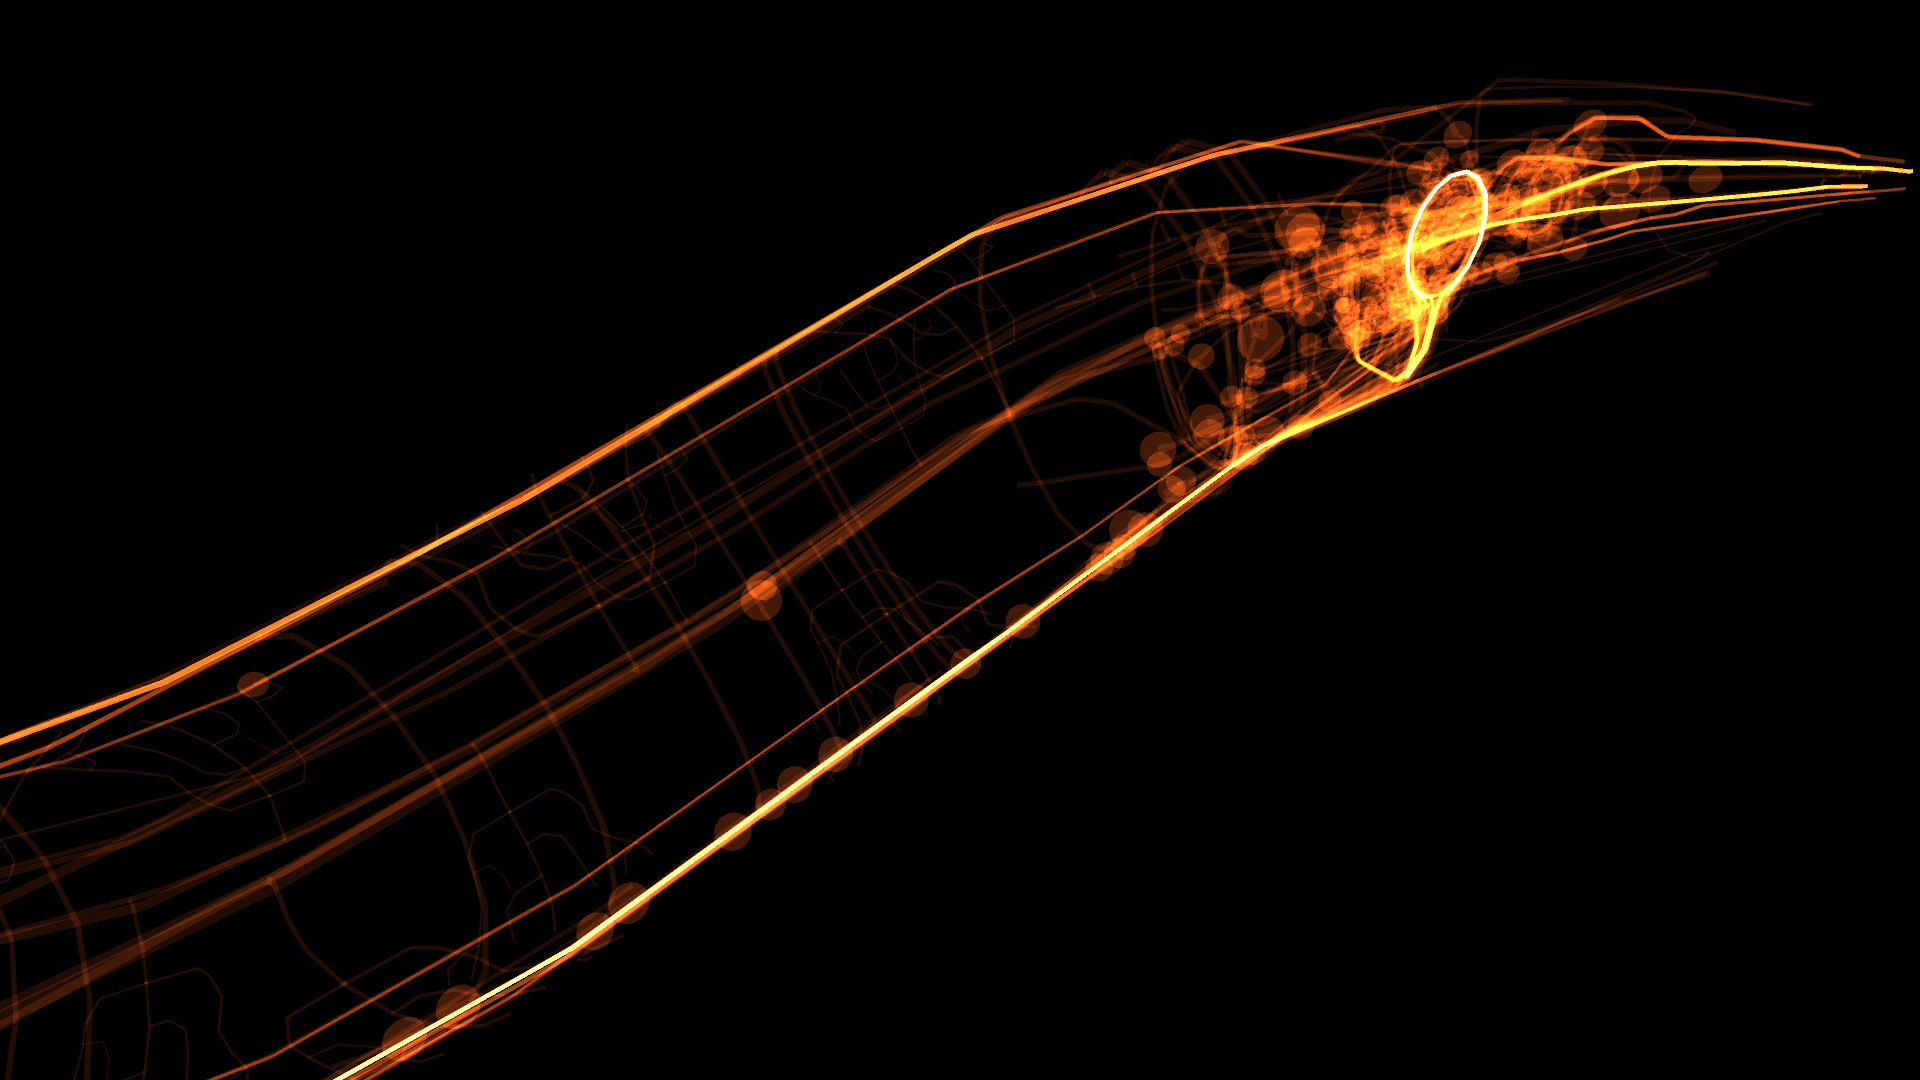
3. Visual Effects and Animations using Shaders
I was able to extend the dissolve and hologram shaders to fake some animation-like visual effects.
And a combination of some timed Sine curves let me create an animation using the dissolve effect -
The work here was to move the animation smoothly across individual neuron objects. The animation makes it look like they're a single connected object, but they're actually individual Sphere meshes with the Shader applied to them. This is made possible by applying the dissolve texture in World Space instead of Object Space.
A single shader graph for the neurons had functionality for colour blending, glow, and dissolve animation.
All of this made the graphs really large and difficult to work with though. Unity was constantly updating the Shader Graph tools, and the new updates include sub-graphs which make it much easier to manage.
Key takeaway - There is more to shaders than meets the eye. As you gain familiarity with them, there are very few limits to the effects you can create. You can create animations and visual effects using Shaders too.
4. Particle systems - more than just trails and sparks
I have no idea why I put off working with the particle systems for so long!
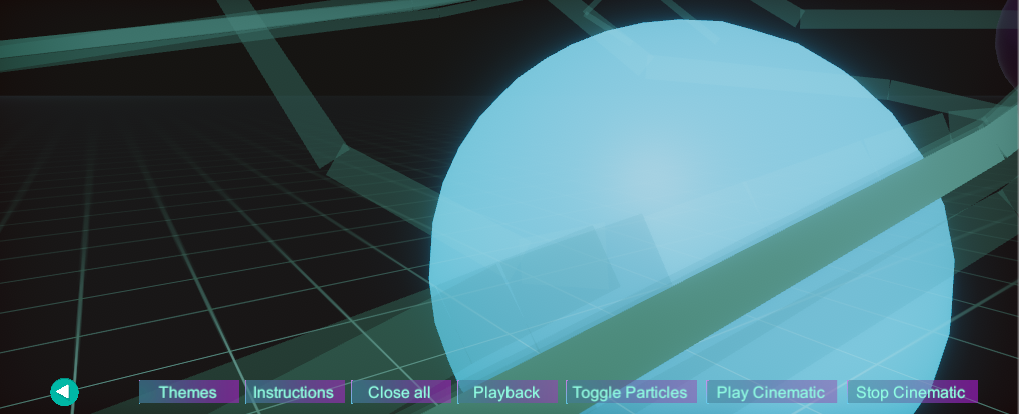
The "neurons" in the viewer were just spheres, which was pretty boring.
Once I started to understand the basics of the particle system, I could see how powerful it was. I worked on some samples from great YouTube tutorials - I'm sharing a great one by Gabriel Aguiar in the comments below.
After that, I opened up Photoshop and experimented with different brushes to create Particle textures.
Once again, I referred to my sources of what neurons should look like. I wanted a similar look of "hair-like" connections coming out of the neurons, and the core being bright and dense.
This is what it looked like finished, and the particle system even let me create a nice pulsating effect.
Part of my work was also parsing a ton of "playback data" of neurons firing. I wanted this to look like bright beams of light, travelling from neuron to neuron. This involved some pathfinding and multi-threading work as well.
Lastly, I decided to add a sort of feedback effect of neurons firing. This way, you can see where a signal is originating and where it's ending.
Key takeaway - Particle systems can be used in many ways, not just for sparks and trails. Here, I used them to represent a rather abstract object, a neuron. They can be applied wherever a visual effect or a form of visual "feedback" seems relevant.
5. Post-processing to tie the graphics and art together
Post-processing makes a HUGE difference in the look of a game scene. It's not just about colours and tone, there's much more to it than that. You can easily adjust colours, brightness, contrast, and add effects such as bloom, motion blur, vignette, and screen-space reflections.
First of all, Linear colour space with HDR enabled makes a huge difference - make sure you try this out.
Next, Unity's new post-processing stack makes a lot of options available without impacting performance much.
The glow around the edges of the sphere only appears with an HDR colour selected for the shader, HDR enabled, and Linear colour space. Post-processing helps bump this up too - bloom is one of the most important settings for this.
Colour grading can be used to provide a warm or cool look to your entire scene. It's like applying a filter on top of the scene, as you would to an image in Photoshop. You can completely override the colours, desaturate to black and white, bump up the contrast, or apply a single colour to the whole scene.
There is a great tutorial from Unity for getting that HD look in your scenes - if you want a visible glow you normally associate with beautiful games, you need to check this out.
Key takeaway - Post processing ties everything together, and helps certain effects like glows stand out.
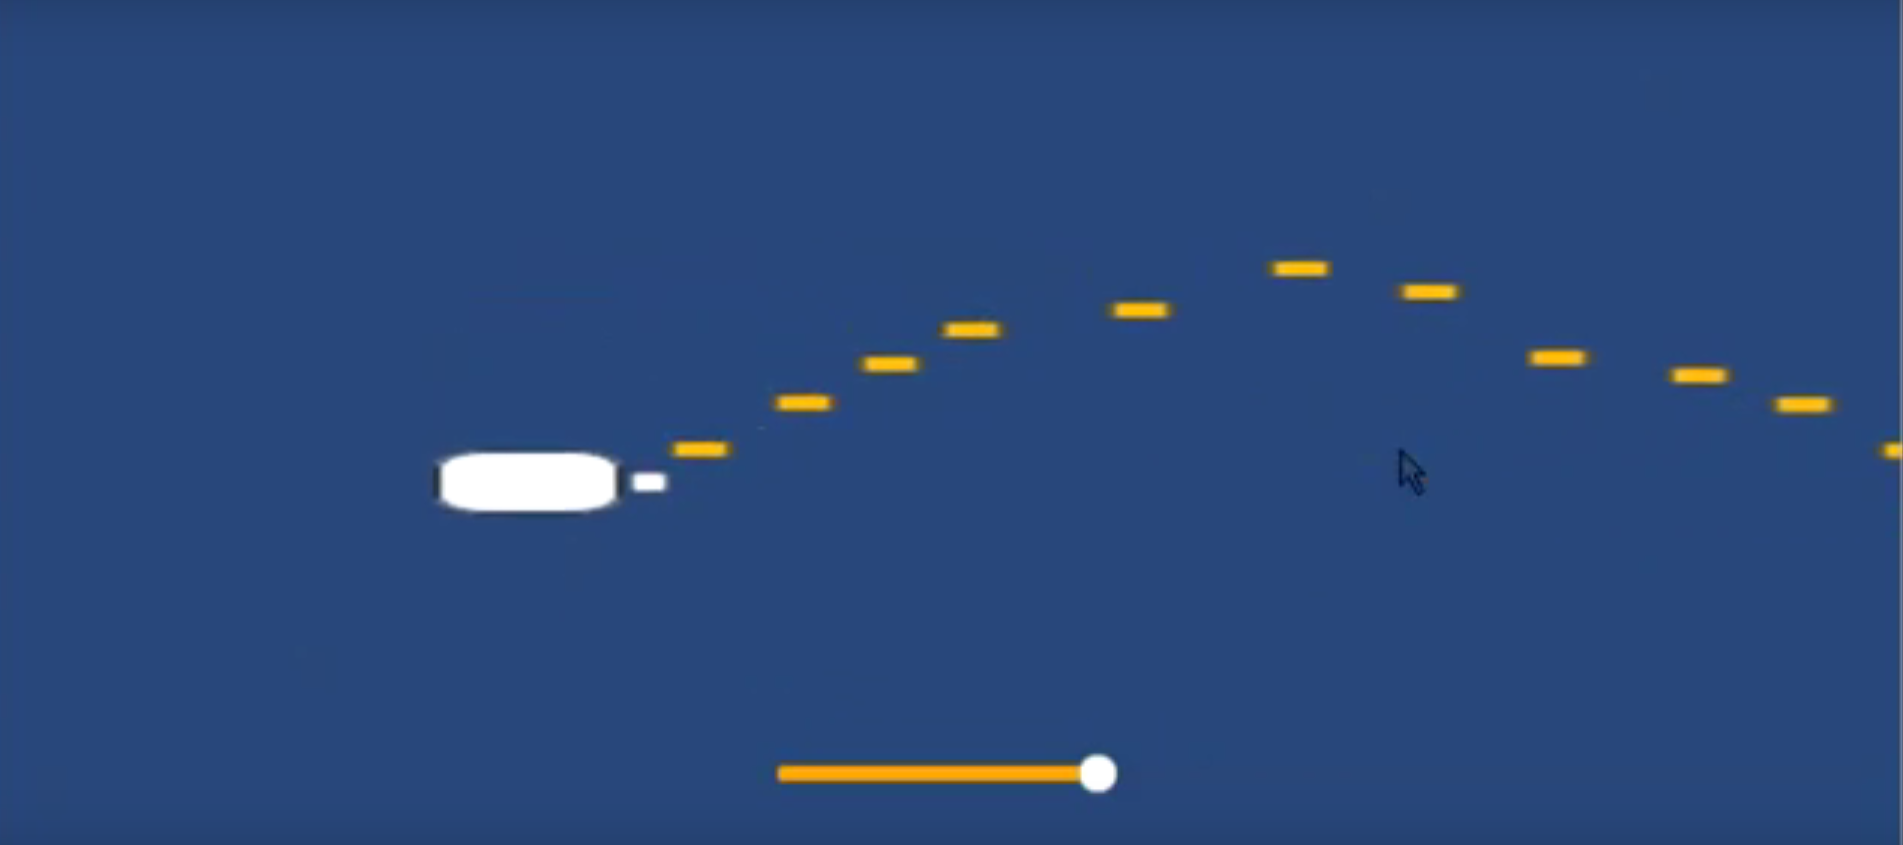
6. Timing and animation curves for better "feel"
This is a core concept of animation. I have some training in graphic design and animation, which is where I picked this up. I'm not sure about the proper term for it - timing, animation curves, tween, etc.
Basically, if you're animating something, it's rarely best to do it with linear timing. Instead, you want curves like this -
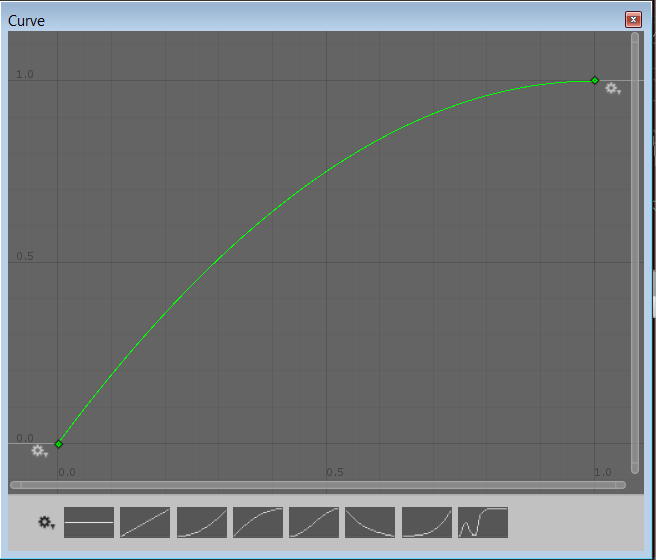
Or more crazy ones for more "bouncy" or cartoon-ish effects.
I applied this to the glow effects on the neurons, as I showed earlier.
And you can use this sparingly when working with particle systems as well - for speed, size, and similar effects. I used this for the effect of neurons firing, which is like a green "explosion" outwards. The particles move outwards fast and then slow down.
Unity has Animation Curve components you can attach to objects. You can set the curve using a GUI and then query it in your C# scripts. Definitely worth learning about.
Key takeaway - Curves or tweens are an animation concept that is easy to pick up and apply. It can be a key differentiator for whether your animations and overall game look polished or not.
7. Colour Palettes and Colour Theory - Often overlooked
Colour is something that I tend to experiment with and work with based on my instincts. I like being creative, however, I really underestimated the benefits of applying colour theory and using palettes.
Here's the before -
Here are some of the afters -
I implemented multiple themes because they all looked so good.
I used a tool from Adobe for palettes, called Adobe Colour - link in the comments.
I basically messed around with different types of "Colour harmony" - Monochrome, triad, complementary, and more. I also borrowed some colours from my references and built around that.
Key takeaway - Don't underestimate the importance of colour and colour theory. Keep your initial concept and references in mind when choosing colours. This adds to that final, polished look you want.
Bonus - consider procedural art
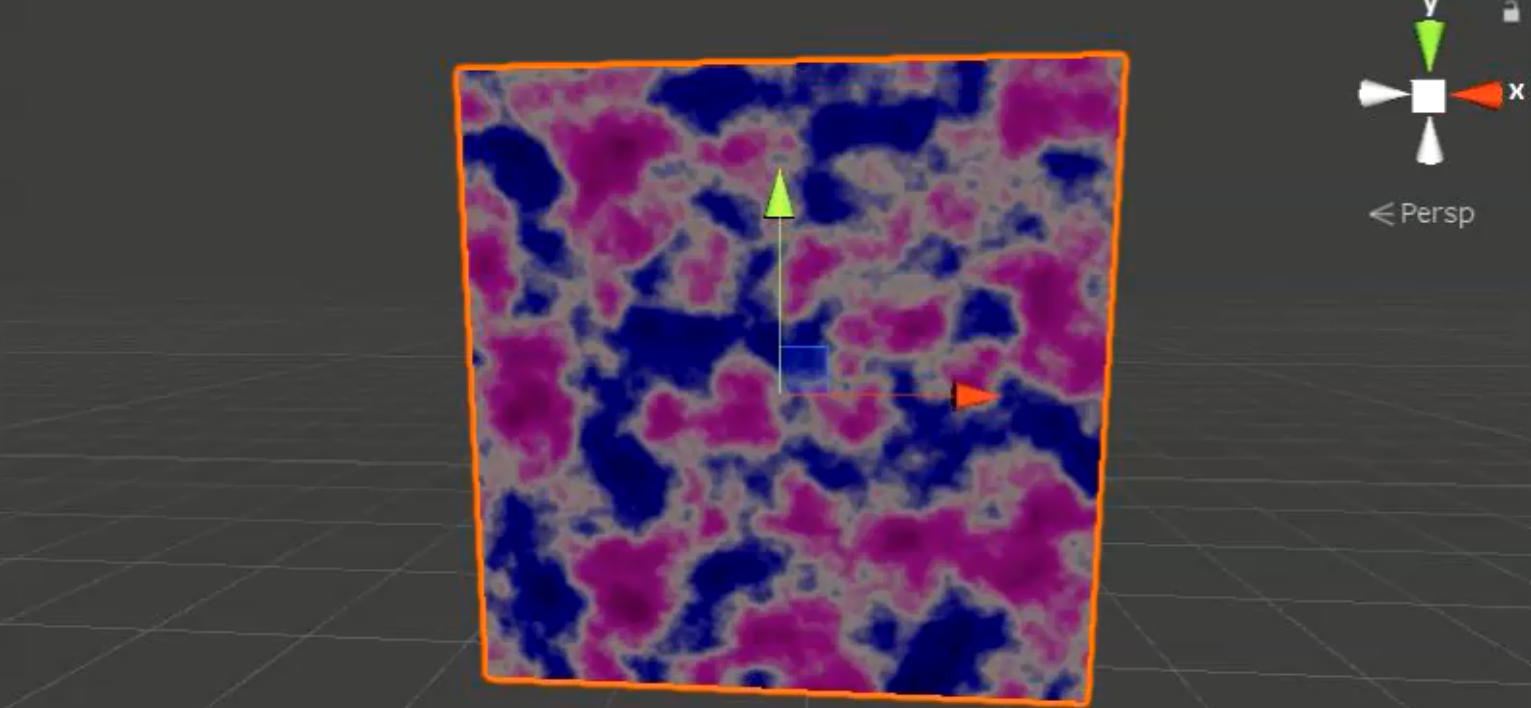
Procedural Generation is just an amazing technique. I didn't apply it on this project, but I learned the basics of it such as generating Value and Perlin noise, generating and using Height maps for terrains, and generating mazes.
Procedural art is definitely something I want to explore more.
A couple of interesting things (Links in the "extra resources" section below) -
- Google deepdream has been used to generate art.
- There's an open-source AI project that can colour lineart.
- Kate Compton has a lot of interesting projects and resources about PCG and generative art.
I hope this leads to tools that can be directly applied to Game Development. To support the creation of art for games. I hope I get the opportunity to create something like that myself too.
Conclusion
These 7 techniques were at the core of what I did to improve the visual quality of my project.
This was mostly the result of the unique set of constraints that I had. But I'm pretty sure some famous person said: "true creativity is born of constraints". Or something along those lines. It basically means that constraints and problems help channel your creativity.
I'm sure there is more that I could have done, but I was happy with the stark difference between the "before" and "after" states of my project.
I've also realized that this project has made me more of an artist. If you work on visual quality even as a programmer, you practice and sharpen your artistic abilities, and end up becoming something of an artist yourself.
Thanks for reading! Please like, share, and comment if you enjoyed this article.
Did I miss something obvious? Let me know in the comments!
Extra Resources
OpenWorm project
Great tutorial by Gabriel Aguiar
Unity breaks down how to improve the look of a game using Post processing
Another resource on post-processing by Dilmer Valecillos
Brackey's tutorial on post-processing
Adobe Colour wheel, great for colour theory and palettes
An open-source AI project that can colour lineart
A demo of generative art by Kate Compton
Note: This article was originally published on LinkedIn. If you like it, please click through, get in contact, and consider connecting.


Thanks for sharing the information. It is very helpful for everyone.