In Part 2 we made a simple state machine interface and a generic state machine runner. We also created one boring state machine instance.
Now in Part 3 we are going to actually make a game. It isn't much of a game, but it has all the elements of gameplay. It has risk. It has danger. It has a way to win.
Okay, it is just navigating a maze of rooms in a text adventure. There are no monsters, no inventory, and no plot (we'll add all those later). For now we can just navigate a castle full of rooms.
We won't modify the state machine interface or the state machine runner that we made in part 2. They work just fine for our purposes right now.
The States of the Game
Just like the boring state machine, each state implements the IState interface and also contains some useful information specific to that state machine implementation.
The 'useful information' is a name of the room, a description of the room, and links to the neighboring rooms. The name and description are set by the constructor and the neighbors are added by the state machine when it builds the graph.
The run function actually does something this time: It writes out the description of the room as written by the constructor.
On to the code!
class FunMachineState : IState { string mName; string mDescription; List mNeighbors = new List(); public List Neighbors { get { return mNeighbors; } } /// /// Initializes a new instance of the FunnerState class. /// /// Name to display for this state /// Text to display for this state public FunMachineState(string mName, string mDescription) { this.mName = mName; this.mDescription = mDescription; } #region IState Overrides public override string GetName() { return mName; } public override void Run() { // We don't do any fancy stuff, just print out where we are Console.WriteLine(); Console.WriteLine(mDescription); } #endregion }That wasn't too bad, was it?
Most of the State Machine
Now comes the time to describe the state machine implementation.
This one gets to be a little more interesting.
I'm going to include everything in the short listing EXCEPT the state machine constructor. I'll go over that in detail in the next section.
It implements the generic IStateMachine interface and that is pretty simple.
It also adds three machine-specific values: A list of states, a link to the current state, and a link to the exit state (which we'll get rid of in the next lesson).
You might have realized this already, but each state represents a room in the map. Hopefully that was already clear, but if not I figured I should point that out.
Of special note is how it gets the list of possible transitions and how it advances. We look at the names of the current node's neighbors -- in this case is the name of a room on the map. We advance by making sure we can only travel to neighboring rooms. That avoids the exploit of typing in "move Exit" and winning the game in the first step.
class FunMachine : IStateMachine { List mStates; FunMachineState mCurrent; FunMachineState mExit; /// CONSTRUCTOR NOT SHOWN #region IStateMachine Overrides public override IState CurrentState { get { return mCurrent; } } public override string[] PossibleTransitions() { List result = new List(); foreach (FunMachineState state in mCurrent.Neighbors) { result.Add(state.GetName()); } return result.ToArray(); } public override bool Advance(string nextState) { foreach (FunMachineState state in mCurrent.Neighbors) { if (nextState == state.GetName()) { mCurrent = state; return true; } } System.Console.WriteLine("Invalid state."); return false; } public override bool IsComplete() { return mCurrent == mExit; } #endregion }Again, this is mostly straightforward. We've got our game state machine in just a few lines of code.
On to the Game's State Machine Constructor...
Here is where the fun is.
This state machine is also hard coded. In order to generate the game's maze we'll need to manually construct each room (aka FSM state, or vertex, or node). And we'll need to construct each transition (aka edge) of the state machine.
public FunMachine() { // Create all the fun states in our mini-world FunMachineState entryHall = new FunMachineState("Grand Entrance", "You are standing in a grand entrance of a castle.\nThere are tables and chairs, but nothing you can interact with."); FunMachineState staircase = new FunMachineState("Grand Staircase", "The staircase is made from beautiful granite."); FunMachineState eastWing = new FunMachineState("East Wing", "This wing is devoted to bedrooms."); FunMachineState westWing = new FunMachineState("West Wing", "This wing is devoted to business."); FunMachineState bedroomA = new FunMachineState("Master Suite", "This is the master suite. What a fancy room."); FunMachineState bedroomB = new FunMachineState("Prince Bob's Room", "The prince has an extensive library on his wall.\nHe also has more clothes than most males know what to do with."); FunMachineState bedroomC = new FunMachineState("Princess Alice's Room", "The princess has filled her room with a small compur lab.\nShe spends her days playing games and writing code."); FunMachineState workroomA = new FunMachineState("Study", "This is the study. It has many books."); FunMachineState workroomB = new FunMachineState("Bathroom", "Every home needs one"); FunMachineState workroomC = new FunMachineState("Do Not Enter", "I warned you not to enter.\nYou are in a maze of twisty little passages, all alike."); FunMachineState passage = new FunMachineState("Twisty Passage", "You are in a maze of twisty little passages, all alike"); mExit = new FunMachineState("Outside", "You have successfully exited the castle."); // Hook up doors. entryHall.Neighbors.Add(staircase); entryHall.Neighbors.Add(mExit); staircase.Neighbors.Add(eastWing); staircase.Neighbors.Add(westWing); staircase.Neighbors.Add(entryHall); eastWing.Neighbors.Add(bedroomA); eastWing.Neighbors.Add(bedroomB); eastWing.Neighbors.Add(bedroomC); eastWing.Neighbors.Add(staircase); bedroomA.Neighbors.Add(eastWing); bedroomB.Neighbors.Add(eastWing); bedroomC.Neighbors.Add(eastWing); westWing.Neighbors.Add(workroomA); westWing.Neighbors.Add(workroomB); westWing.Neighbors.Add(workroomC); workroomA.Neighbors.Add(westWing); workroomB.Neighbors.Add(westWing); // Trap of doom. workroomC.Neighbors.Add(passage); passage.Neighbors.Add(passage); // Add them to the collection mStates = new List(); mStates.Add(entryHall); mStates.Add(staircase); mStates.Add(eastWing); mStates.Add(westWing); mStates.Add(bedroomA); mStates.Add(bedroomB); mStates.Add(bedroomC); mStates.Add(workroomA); mStates.Add(workroomB); mStates.Add(workroomC); mStates.Add(passage); mStates.Add(mExit); // Finally set my starting point mCurrent = entryHall; }This creates a fun little graph.
In case you're having trouble visualizing it, the picture version looks like this:
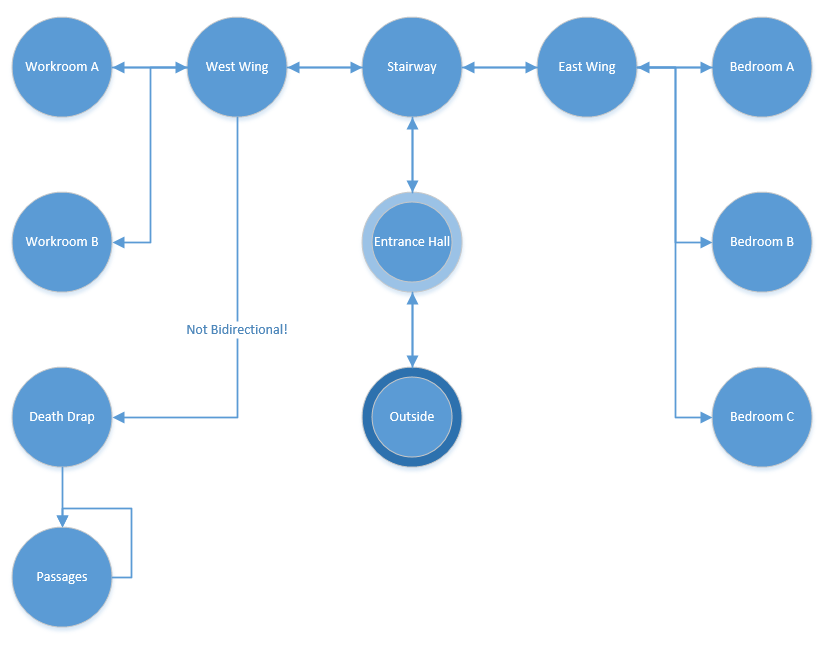
It has a few rooms with their descriptions. It has a death trap room, and it has a route to victory.
It looks like a game!
It isn't much of a maze but that's all I wanted to hard code right now.
Run the Sample Code
Now is the time to actually see the game start to come together. If you haven't downloaded the source code already from the first two samples, you can download it at the bottom of this article.
Just run the project.
When you run it you can hit "1" for the boring state machine we had in Part 2. It is boring but it works.
Much more interesting is to hit "2" for this funner state machine. Navigate the map. Get lost in the death trap (and manually close the window or Ctrl+C out of the app because there is no way out).
And you can hit "3" to see a preview of what is coming.
Always Leave Them Wanting More
So now we're done with Part 3. We have made a minimal game with state machines.
Sure the game has no items to manipulate, or plot, but that will all come later. Also to come later are other uses for state machines, such as for AI systems.
Now I'm getting ahead of myself.
If you hit "3" in the sample code (I know you did) you have had your preview to Part 4 - making your state machine data driven.
Why make it data driven? You weren't seriously thinking of hard coding a large complex dungeon into your game, were you?
[sharedmedia=core:attachments:14149]