So. Back at this.
First things first. You can safely disregard most everything I said last post. All of that was very observation-based, and is actually incorrect in almost every way. Which might seem strange, cause most of it made sense. For clarity and completeness, though, here's a list of why everything last post was wrong:
- The idea that a fold is a collection of fold segments in order starts falling apart after you do certain folds, like petal folds. The idea that you can keep track of where they are and which way they're going would be way to hard, and you could conceivably connect everything under one fold, since all origami crease diagrams are Hamiltonian.
- The idea that folds only reflect is another screwy one. It falls apart when you have more than 4 fold segments touching a vertex
- The fold tree was a nice idea, but constructions using it can only create a subset of all origami, so it's not what I'm looking for
Notable things that I'm keeping un-debunked:
- Fold segments are straight lines that represent part of a fold. They come in 2 flavors: mountain and valley. The ends of the segments either end at an edge of the paper or at the end of another fold segment. These places of union are called vertexes and the graph of all fold segments on the paper, including the edges of the paper, is called a fold diagram
- All flat folded origami is non-directed and complete
- If you sum up the amount of mountain and valley fold segments coming out of any vertex, they will always differ by two. I don't really know why it's like that, but it definitely is.
Aight. I think that's enough talking about the past. Math time.
.
Flat Folding
.
First of all: Flat folding. In a physical sense, this is a type of origami that can be folded flat, pressed between the pages of a book. So, for example, a paper crane without the wings.
.
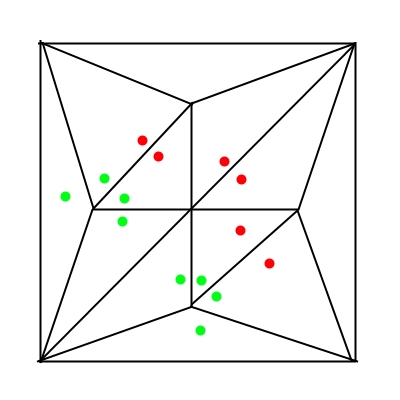
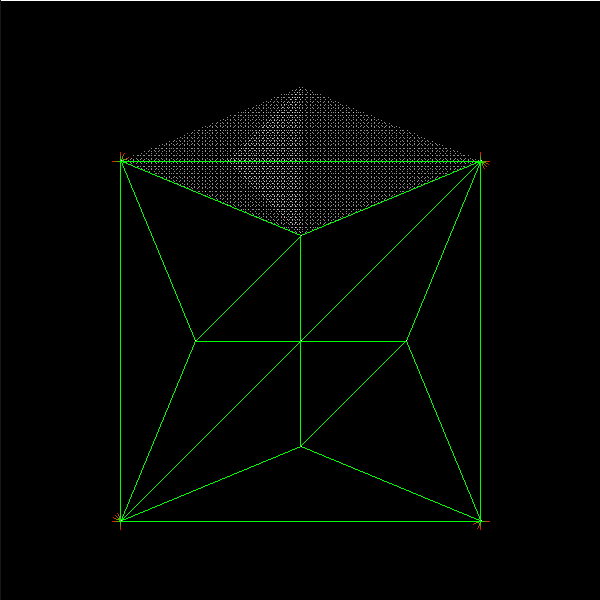
So if you make a flat folded origami, and you take a pin and poke a hole completely through it, through every layer, and open it up, you'll see that there are multiple holes in the paper. In essence, many points on the origami paper map to the same point in 3D space. These points also map perfectly to reflections along the axes of the creases themselves. Here's a picture to illustrate:
.
.
[in this image, the red points all map to the same point in 3D space, and the green points all map to the same point as well]
.
Though that was probably pretty obvious. However, I discovered a couple facts that are not so obvious I think. The first is that, for flat folded origami, when you reflect a point around creases like in the above image, one by one, if the path you take ever ends up in the face that you started with, you'll have the exact same point you started with. In other words, no matter what face you're viewing from, the the original point you start out with will always be equal to itself, relative to its starting face. Second is that this property is not present in all fold diagrams. See the images below for further explanation.
.
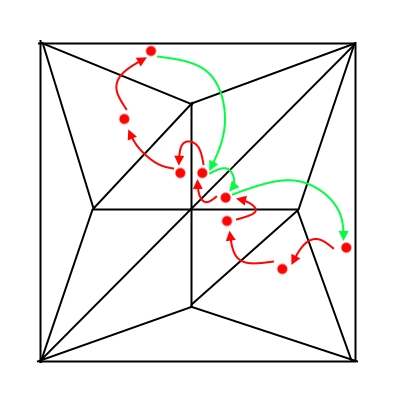
[as you can see in this image, the path that a point takes on this fold diagram, even though you can take two very different paths back, you will still always end up at the same point again]
.
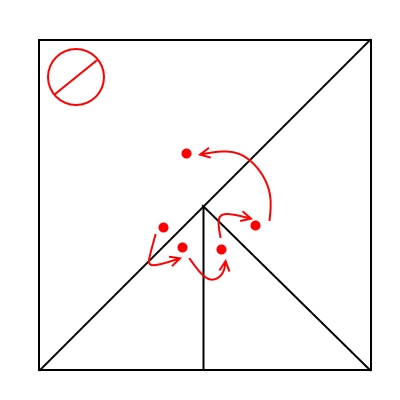
[in this example, however, the path that the point took back to the original face did not correspond to the same starting point. Likewise, you cannot possibly fold a piece of paper along these lines]
.
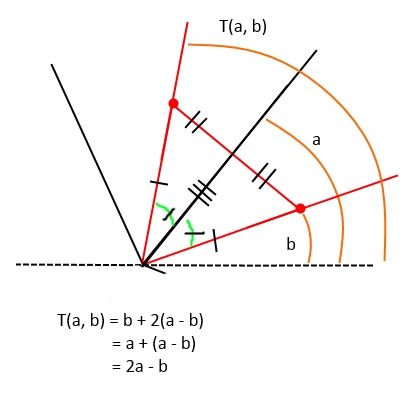
Well if only certain fold diagrams have this property, how do we tell which ones do? How do we prove correctness? It's hard to tell just by looking at all the folds without physically folding it yourself, so it's useful to look at a really simple case: paths going clockwise around a point where fold segments intersect. Because reflections around multiple edges rooted at a same point preserves radial distance [see image], you only have to keep track of the angles of the fold segments and the angle of v. In this case, the transformation around each fold segment, in order, would result in the same point, or the same angle plus 2 * pi.
.
.

.
From that:
.

.
The case of n begin odd can be thrown out because, as you see, it's only true for specific angles (specific offsets epsilon from a1), but the definition above states that it should be true for EVERY angle around the vertex.
.
(as a side note, this is a variant of Kawasaki's Theorem, but since I came up with it independently, along with everything else described here, I'm claiming all credit for my own variant)
.
This is a very nice equation. It allows us to solve for any missing angle if one is needed, and also acts as a really simple validator. You can check each vertex one by one with this equation to check the simple case of correctness-by-rotating-around. However, that is a very simple case. Paths can take any form, but they all need to exhibit the property listed above, not just paths spinning around vertexes.
.
However, each vertex is connected to each other by the very fold segments that we're rotating around by. When you transfer a pt from one vertex to another by just connecting the two via a fold segment, pt doesn't change (pt stays in the same face, it's just the origin is changing). Since all fold diagrams are complete anyway, you can connect any vertex to any other by following the path from one to the next, rotating around each vertex as you go. Thus, it can be proven that a fold diagram can be flat folded by simply checking each vertex and seeing if it conforms to the above theorem.
.
As a caveat, this doesn't ensure that there are no self-intersections. I don't think there is a way to both achieve interactive framerates and also ensure no self-intersection, but I'll get back to you on that.
.
Yup. So that's that.
.
Implementation
.
So the implementation of this is fairly easy.
.
It's tempting to try to implement a flat folded origami interpreter by trying to represent each fold segment. However, if you travel along this path, it leads to lots of trees connecting faces (that you have to build from the edges) and a lot of searching over spaces and it's just not fun. Believe me, that was what my first implementation was like.
.
The way I'm now doing everything is by having a soup of vertexes that all have a vector of angles, sorted counter-clockwise, of all the edges connecting them and other vertexes. Finding both sides of a fold segment given one end requires a raycast by the fold segment's angle relative to the vertex. For faster use, this can be accelerated using nice structures, or, since the origami is only changing rarely in our case, we can just spend the time to bake them into each vertex and then go about our merry way.
.
struct vertex{ dvec2 pt; vector angles; // sorted over [0, 2*PI) vector bakedConnections; int angleToTraverseTree = 0; vertex(dvec2 p) { pt = p; } void sortAngles() { std::sort(angles.begin(), angles.end()); } void removeDuplicates() { // get rid of duplicates. im not worried about performance here for (int a = 1; a < angles.size(); ++a) { double diff = abs(angles[a] - angles[a - 1]); if (diff < epsilon) { angles.erase(angles.begin() + a); --a; } } // catch the 0-2pi case double diff = abs(angles[angles.size() - 1] - angles[0]); if (diff - 2 * PI < epsilon) { angles.erase(angles.begin() + angles.size() - 1); } }};vector verts;.
Besides the vertex manual labor of adding, and sometimes iteratively adding, angles to vertexes, there's only 1 more thing that's critical to the implementation: taking this structure and actually folding the paper. In order to do this you first plot out the direction any individual point will take across vertexes (because this only allows rotations and trading off of origins, and that preserves the origami property). If you do this and follow each point in the piece of paper to the same vertex and the same face, you'll have the completed origami.
.

.
void creaseTraversalTree(){ vector processed; vector leftToProcess; for (vertex& v : verts) v.angleToTraverseTree = 0; for (int i = 1; i < verts.size(); ++i) leftToProcess.push_back(i); processed.push_back(0); while (leftToProcess.size() != 0) { vector::iterator leftIter; for (leftIter = leftToProcess.begin(); leftIter != leftToProcess.end(); ++leftIter) { int vId = *leftIter; bool found = false; for (int angleId = 0; angleId < verts[vId].angles.size(); ++angleId) { int closest = getClosestVertexAlongDirection(verts[vId].pt, verts[vId].angles[angleId]); if (closest == -1) continue; vector::iterator iter = std::find(leftToProcess.begin(), leftToProcess.end(), closest); if (iter == leftToProcess.end()) { verts[vId].angleToTraverseTree = angleId; leftToProcess.erase(leftIter); found = true; break; } } if (found) break; } }}.
dvec2 fold(dvec2 ptOriginal){ dvec2 pt = ptOriginal; int vId = getAnyVertexInFace(pt); double angle, rad; int angleAt = getBiggestAngleLessThan(vId, pt); while (1) { { dvec2 ptRelV = pt - verts[vId].pt; angle = atan2(ptRelV.y, ptRelV.x); if (angle < 0) angle += 2 * PI; rad = length(ptRelV); } vertex& curV = verts[vId]; int shiftSign = (curV.angleToTraverseTree > angleAt) ? 1 : -1; for (int i = angleAt; i != curV.angleToTraverseTree; i += shiftSign) { int correctedI = i % curV.angles.size(); angle = 2 * curV.angles[correctedI] - angle; } pt = rad * dvec2(cos(angle), sin(angle)) + curV.pt; if (vId == 0) break; assert(curV.bakedConnections.size() != 0); int newVert = curV.bakedConnections[curV.angleToTraverseTree]; // find the new angleAt to preserve the rotation double angleToFind = rotClamp(curV.angles[curV.angleToTraverseTree], PI); int i; bool found = false; for (i = 0; i < verts[newVert].angles.size(); ++i) { if (abs(angleToFind - verts[newVert].angles) < epsilon) { found = true; break; } } if (!found) printf("something funky going on with vertex %d and angle %d\n", vId, angleAt); angleAt = (i - 1 + verts[newVert].angles.size()) % verts[newVert].angles.size(); vId = newVert; } return pt;}.
Conclusion
.
So, Here's some screenshots of everything in action:
.
[creases in a piece of paper with the corresponding folded points, generated as described above]
.

[the internal data structure of the above paper]
.

[a finished folded crane, without the folded wings]
.
Also, since I'm not that good at explaining things clearly, here's the link to the github for the project. This, if you're interested in looking at it, probably explains everything a bit more clearly, if you can get past the messy 1-file codebase.
.
Well, that should be everything! Next step: autocompleting origami, and maybe non-planar folds!
.
:D