I recently worked on a path-finding algorithm used to move an AI agent into an organically generated dungeon.
It's not an easy task but because I've already worked on Team Fortress 2 cards in the past, I already knew navigation meshes (navmesh) and their capabilities.
Why Not Waypoints?
As described in this paper, waypoint networks were in the past used in video games to save valuable resources. It was an acceptable compromise : level designers already knew where NPCs could and could not go. However, as technology has evolved, computers got more memory that became faster and cheaper.
In other words, there was a shift from efficiency to flexibility.
In a way, navigation meshes are the evolution of waypoints networks because they fulfill the same need but in a different way.
One of the advantages of using a navigation mesh is that an agent can go anywhere in a cell as long as it is convex because it is essentially the definition of convex. It also means that the agent is not limited to a specific waypoint network, so if the destination is out of the waypoint network, it can go directly to it instead of going to the nearest point in the network. A navigation mesh can also be used by many types of agents of different sizes, rather than having many waypoint networks for agents of different sizes.
Using a navigation mesh also speeds up graph exploration because, technically, a navigation mesh has fewer nodes than an equivalent waypoint network (that is, a network that has enough points to cover a navigation mesh).
The navigation mesh Graph
To summarize, a navigation mesh is a mesh that represents where an NPC can walk. A navigation mesh contains convex polygonal nodes (called cells). Each cell can be connected to each other using connections defined by an edge shared between them (or portal edge). In a navigation mesh, each cell can contain information about itself. For example, a cell may be labeled as toxic, and therefore only those units capable of resisting this toxicity can move across it.
Personally, because of my experience, I view navigation meshes like the ones found in most Source games.

However, all cells in Source's navigation meshes are rectangular. Our implementation is more flexible because the cells can be irregular polygons (as long as they're convex).
Navigation Meshes In practice
A navigation mesh implementation is actually three algorithms :
- A graph navigation algorithm
- A string pulling algorithm
- And a steering/path-smoothing algorithm
In our cases, we used A*, the simple stupid funnel algorithm and a traditional steering algorithm that is still in development.
Finding our cells
Before doing any graph searches, we need to find 2 things :
- Our starting cell
- Our destination cell
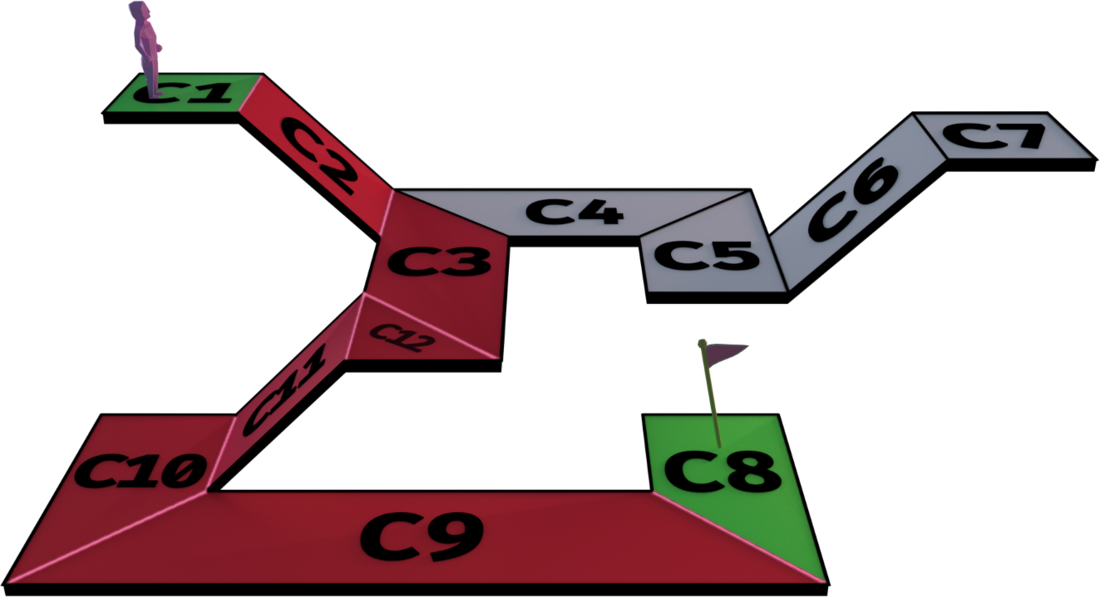
For example, let's use this navigation mesh :
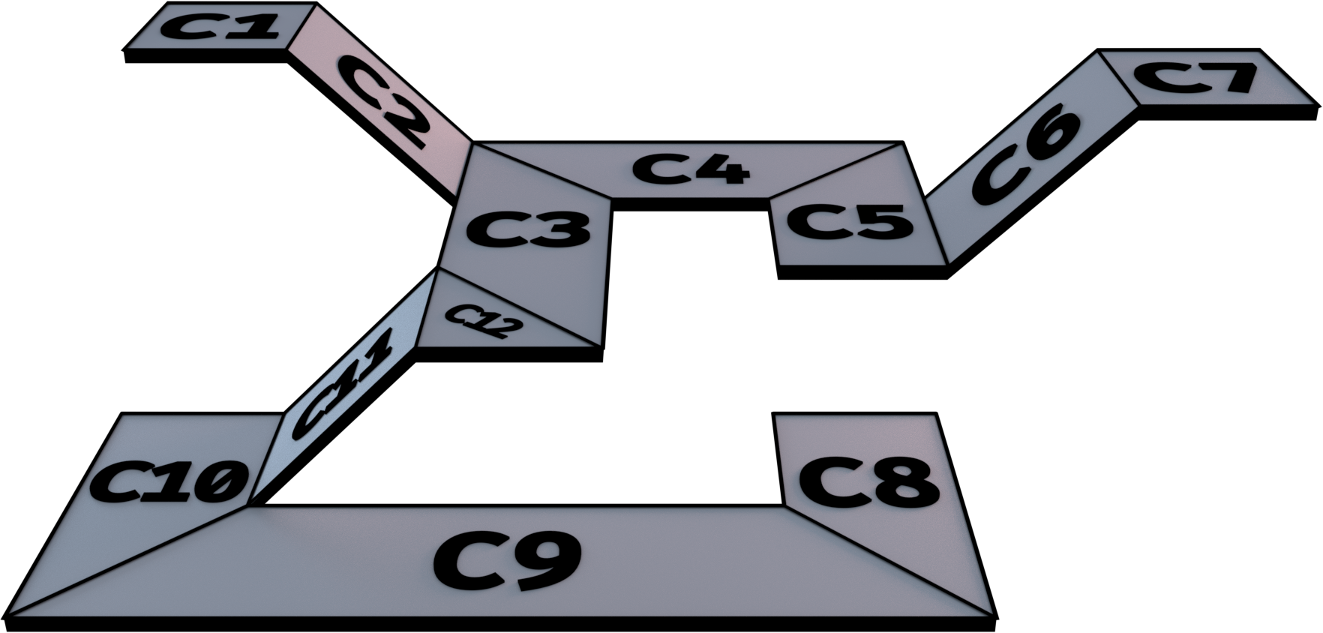
In this navigation meshes, every edge that are shared between 2 cells are also portal edges, which will be used by the string pulling algorithm later on.
Also, let's use these points as our starting and destination points:
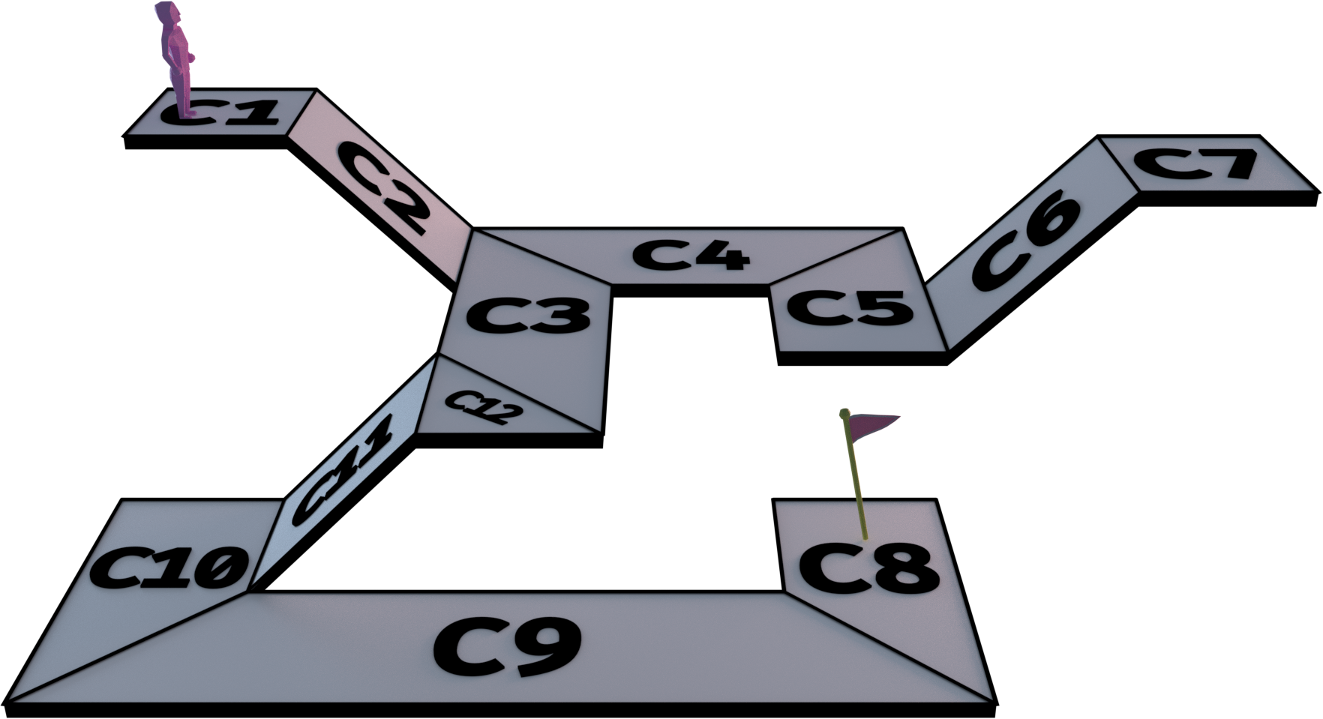
Where our buddy (let's name it Buddy) stands is our staring point, while the flag represents our destination.
Because we already have our starting point and our destination point, we just need to check which cell is closest to each point using an octree. Once we know our nearest cells, we must project the starting and destination points onto their respective closest cells.
In practice, we do a simple projection of both our starting and destination points onto the normal of their respective cells.
Before snapping a projected point, we must first know if the said projected point is outside its cell by finding the difference between the area of the cell and the sum of the areas of the triangles formed by that point and each edge of the cell. If the latter is remarkably larger than the first, the point is outside its cell.
The snapping then simply consists of interpolating between the vertices of the edge of the cell closest to the projected point. In terms of code, we do this:
Vector3f lineToPoint = pointToProject.subtract(start);
Vector3f line = end.subtract(start);
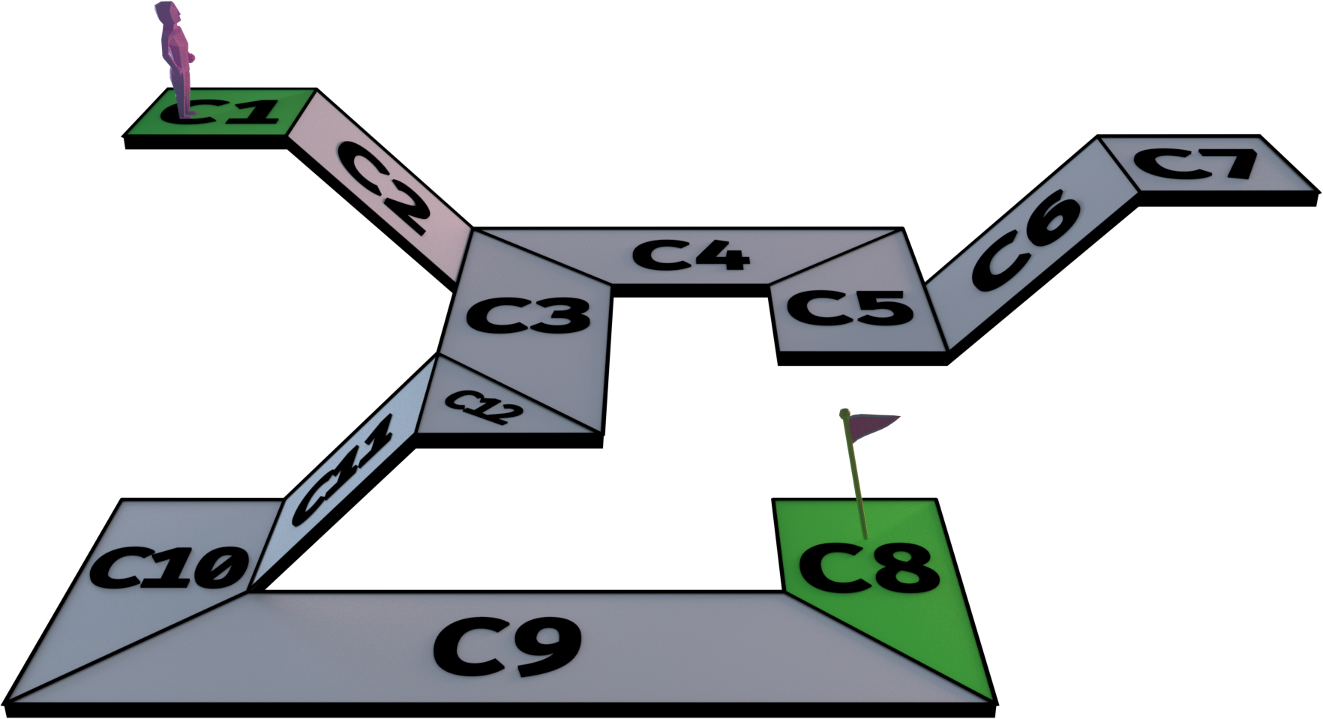
Vector3f returnedVector3f = new Vector3f().interpolateLocal(start, end, lineToPoint.dot(line) / line.dot(line));In our example, the starting and destination cells are C1 and C8 respectively:
Graph Search Algorithm
A navigation mesh is actually a 2D grid of an unknown or infinite size. In a 3D game, it is common to represent a navigation mesh graph as a graph of flat polygons that aren't orthogonal to each other.
There are games that use 3D navigation meshes, like games that use flying AI, but in our case it's a simple grid.
For this reason, the use of the A* algorithm is probably the right solution.
We chose A* because it's the most generic and flexible algorithm. Technically, we still do not know how our navigation mesh will be used, so going with something more generic can have its benefits...
A* works by assigning a cost and a heuristic to a cell. The closer the cell is to our destination, the less expensive it is. The heuristic is calculated similarly but we also take into account the heuristics of the previous cell. This means that the longer a path is, the greater the resulting heuristic will be, and it becomes more likely that this path is not an optimal one.
We begin the algorithm by traversing through the connections each of the neighboring cells of the current cell until we arrive at the end cell, doing a sort of exploration / filling. Each cell begins with an infinite heuristic but, as we explore the mesh, it's updated according to the information we learn. In the beginning, our starting cell gets a cost and a heuristic of 0 because the agent is already inside of it.
We keep a queue in descending order of cells based on their heuristics. This means that the next cell to use as the current cell is the best candidate for an optimal path. When a cell is being processed, it is removed from that queue in another one that contains the closed cells.
While continuing to explore, we also keep a reference of the connection used to move from the current cell to its neighbor. This will be useful later.
We do it until we end up in the destination cell. Then, we "reel" up to our starting cell and save each cell we landed on, which gives an optimal path.
A* is a very popular algorithm and the pseudocode can easily be found. Even Wikipedia has a pseudocode that is easy to understand.
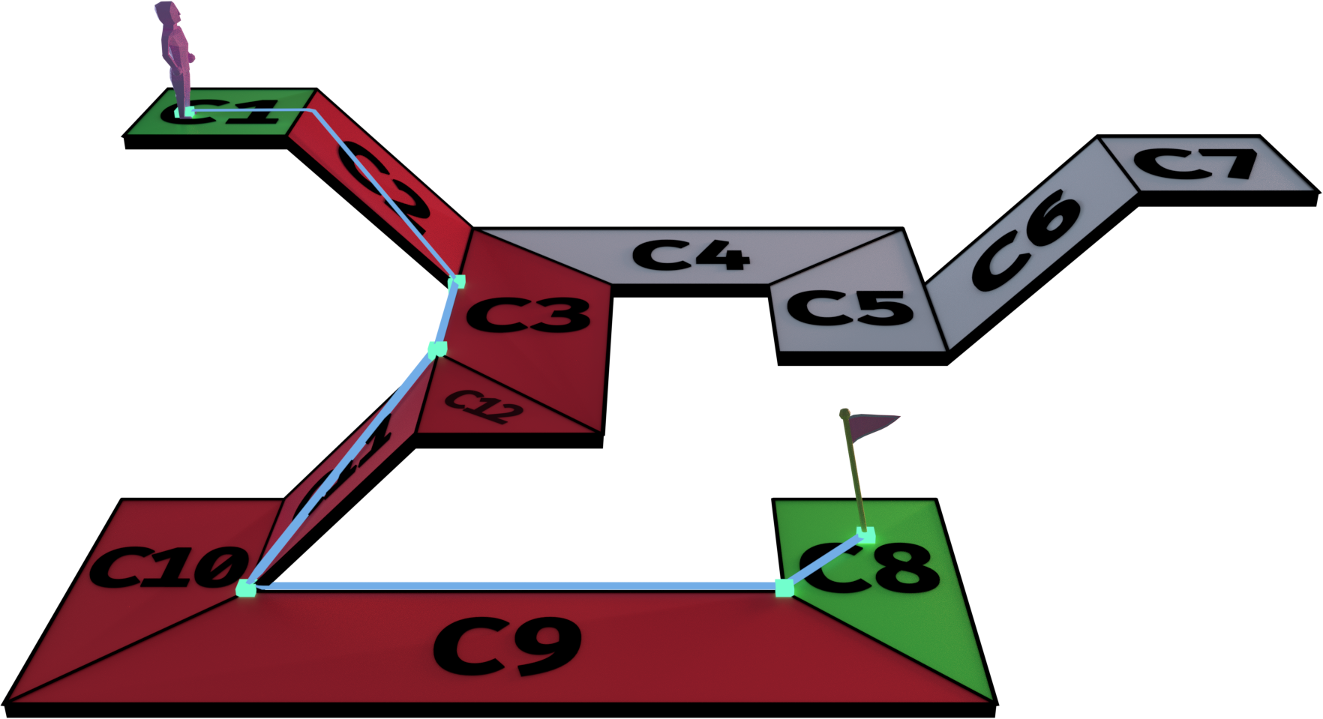
In our example, we find that this is our path:
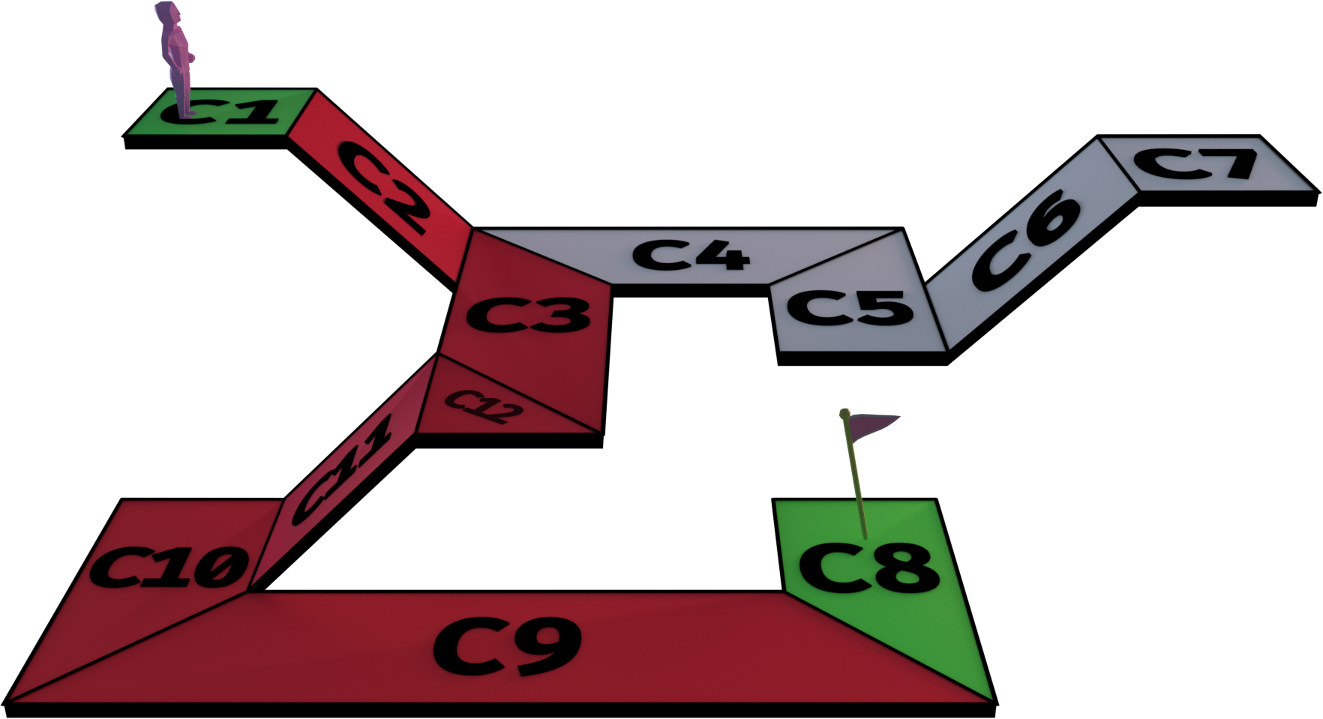
And here are highlighted (in pink) the traversed connections:
The String Pulling Algorithm
String pulling is the next step in the navigation mesh algorithm. Now that we have a queue of cells that describes an optimal path, we have to find a queue of points that an AI agent can travel to. This is where the sting pulling is needed.
String pulling is in fact not linked to characters at all : it is rather a metaphor.
Imagine a cross. Let's say that you wrap a silk thread around this cross and you put tension on it. You will find that the string does not follow the inner corner of it, but rather go from corner to corner of each point of the cross.
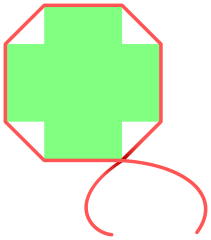
This is precisely what we're doing but with a string that goes from one point to another.
There are many different algorithms that lets us to do this. We chose the Simple Stupid Funnel algorithm because it's actually...
...stupidly simple.
To put it simply (no puns intended), we create a funnel that checks each time if the next point is in the funnel or not. The funnel is composed of 3 points: a central apex, a left point (called left apex) and a right point (called right apex). At the beginning, the tested point is on the right side, then we alternate to the left and so on until we reach our point of destination. (as if we were walking)
![[funnel_explanation.png]](http://4.bp.blogspot.com/_-u6ZJlBFOL0/S5ThwxU6ijI/AAAAAAAAAMQ/h6rDezeVRQM/s1600/funnel_explanation.png&key=613d7a315ed2d2a9f89613b654f77b806c0ad0e8054dc21b3598ce60a9379cbd)
When a point is in the funnel, we continue the algorithm with the other side.
If the point is outside the funnel, depending on which side the tested point belongs to, we take the apex from the other side of the funnel and add it to a list of final waypoints.
The algorithm is working correctly most of the time. However, the algorithm had a bug that add the last point twice if none of the vertices of the last connection before the destination point were added to the list of final waypoints. We just added an if at the moment but we could come back later to optimize it.
In our case, the funnel algorithm gives this path:
The Steering Algoritm
Now that we have a list of waypoints, we can finally just run our character at every point.
But if there were walls in our geometry, then Buddy would run right into a corner wall. He won't be able to reach his destination because he isn't small enough to avoid the corner walls.
That's the role of the steering algorithm.
Our algorithm is still in heavy development, but its main gist is that we check if the next position of the agent is not in the navigation meshes. If that's the case, then we change its direction so that the agent doesn't hit the wall like an idiot. There is also a path curving algorithm, but it's still too early to know if we'll use that at all...
We relied on this good document to program the steering algorithm. It's a 1999 document, but it's still interesting ...
With the steering algoritm, we make sure that Buddy moves safely to his destination. (Look how proud he is!)

So, this is the navigation mesh algorithm.
I must say that, throughout my research, there weren't much pseudocode or code that described the algorithm as a whole. Only then did we realize that what people called "Navmesh" was actually a collage of algorithms rather than a single monolithic one.
We also tried to have a cyclic grid with orthogonal cells (i.e. cells on the wall, ceiling) but it looked like that A* wasn't intended to be used in a 3D environment with flat orthogonal cells. My hypothesis is that we need 3D cells for this kind of navigation mesh, otherwise the heuristic value of each cell can change depending on the actual 3D length between the center of a flat cell and the destination point.
So we reduced the scope of our navigation meshes and we were able to move an AI agent in our organic dungeon. Here's a picture :
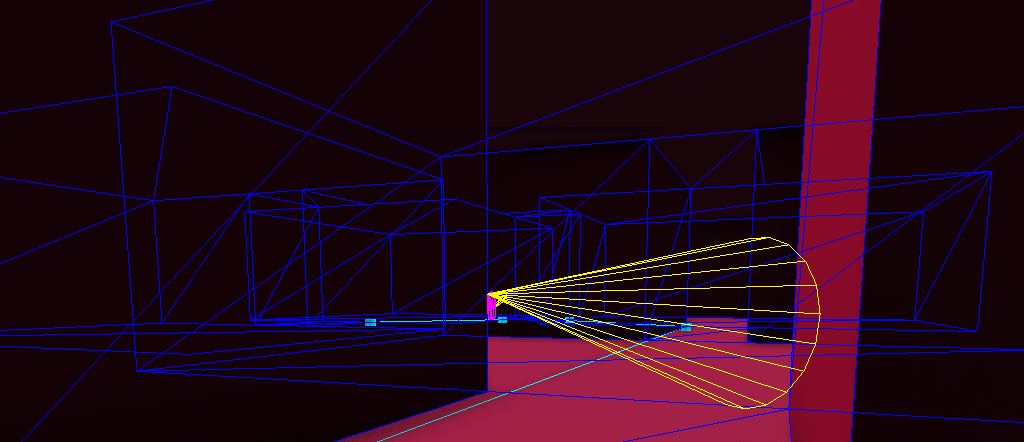
Each cyan cubes are the final waypoints found by the String pulling and blue lines represents collisions meshes. Our AI is currently still walking into walls, but the steering is still being implemented.

Better add a Minkowski'y sum. As result of stripe algo you have a sequence of corners near wich character have to go. Add to each corner a circle with radius enought to bypass a wall, usually it is radius of collision capsula for human-like character. Then connect circles by tangent lines. In case portals enought wide to pass throug, it never will walk thru the walls.
Also in case all NPC have same safe radius Minkowsky sum can be accounted at navmesh building time. to do it just required to shift walls projections inside navplanes by NPCs safe radius along wall normal.