When creating AI for video games, one of the most important aspects is its placement. The position of the AI character can completely change his behavior and future decisions. In this tutorial, we'll be exploring how the environment of the game can influence our AI and how we should be using it properly.
This article is taken from the book Practical Game AI Programming written by Micael DaGraca and published by Packt Publishing. This book teaches you to create Game AI and implement cutting-edge AI algorithms from scratch.
Visual interactions are the basic ones that don't influence the gameplay directly but help to polish our video game and characters, making them part of the environment that we are creating, contributing significantly to the immersion of the player in the game. This shows us the importance of the environment being part of the game and not merely existing to help fill the screen. It's getting more usual to see these types of interaction in games and players expect them. If there's an object in the game, it should do something, important or not.
We can find one of the first examples of environment interaction in the original Castlevania, released in 1986 for the Nintendo Entertainment System. Right from the start, the player can use the whip to destroy the candles and fire pits that originally made up part of the background.
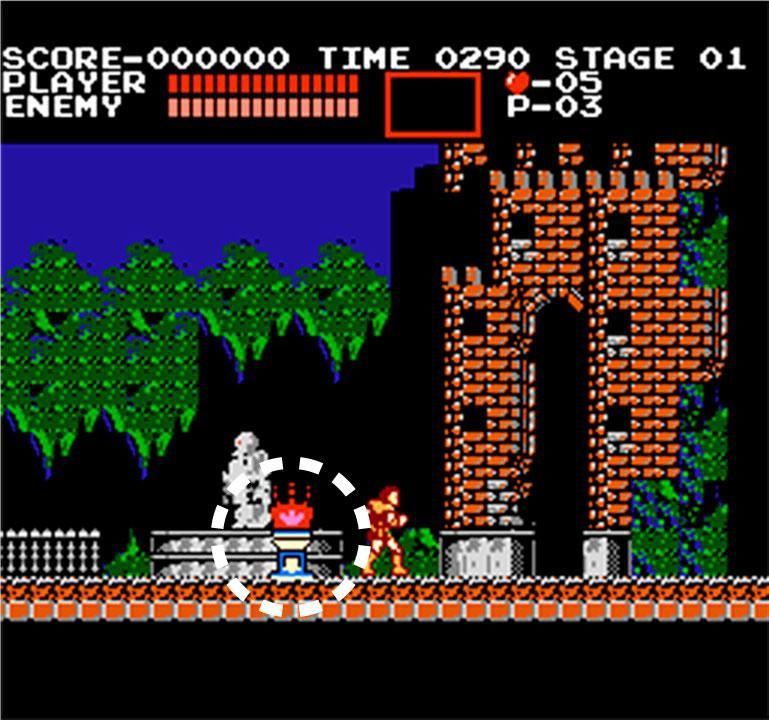
This game and a few others released at the time, opened many doors and possibilities in terms of the perception that we have in relation to the background or environment that surround the characters of the game. Obviously, because of the hardware limitations of this generation of consoles, it was much harder to create simple things that we see as common by today's standards. But every generation of consoles kept bringing more capabilities and creators like us kept using that in our favor to create amazing games.
So, our first example of a visual interaction is the object in the background that can be destroyed without interfering directly with the gameplay. This type of interaction can be seen in multiple games and is as simple as coding an object to animate when it's attacked. Then, we can decide if the object drops some points or collectibles just to reward the player for exploring the game.
We'll now move on to our next example, the assets in the game that are animated or which move when the characters pass through them. It's the same principle as the destroyable object but this time, a subtler interaction that requires the character to move near the position where the asset is positioned. This can be applied to different things inside the game, from the grass moving, to dust or water, birds that fly away, or people that perform a funny gesture; there are endless possibilities.
When we analyze these interactions, we can easily determine that they don't necessarily have an artificial intelligence behind them, where most of the time, it is just a Boolean function that activates according to some predetermined action. But they make up part of the environment and, for that reason, they need to be taken into consideration when we want a good integration between environment and AI.
Creating basic environment interactions
As we saw previously, the environment became part of the video game experience and that sparked many new concepts and ideas for future game titles. The next step was to integrate those slight changes into the gameplay and use them to shape the way characters behave inside the game. This definitely had a positive contribution to video game history, where everything inside the scene started to gain life and the player became aware of those rich surroundings. Using the environment to achieve goals inside the game started to be part of the gameplay experience.
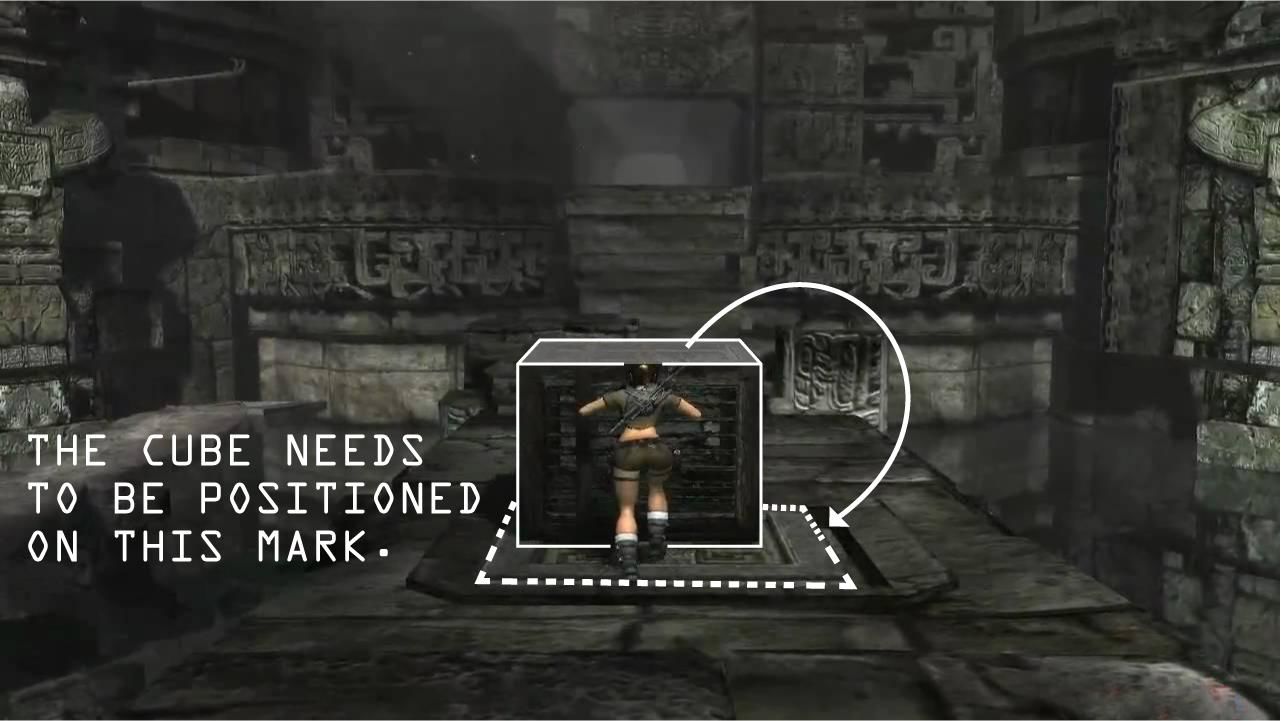
To demonstrate one example of an environment object that directly influences the gameplay, we have the Tomb Raider franchise that showcases this perfectly. In this example, our character, Lara Croft, needs to push the cube until it is positioned on top of the marked area. This will change the environment and unlock a new path that allows the player to move forward in the level.
We can find this type of challenge in a number of games where it's necessary to trigger a specific position in the map in order to make something happen in another part, and this can be used to accomplish a specific objective in the game. Usually we need to change the environment as it is, in order to progress on that level. So, when we plan the map or stage, we take those interactions into consideration and then we create all the rules that belong to each interaction. For example:
if(cube.transform.position == mark.transform.position)
{
  openDoor = true;
}
Now let's imagine for a minute that Lara Croft had an allied character whose main task was to help her put that box in place? And that's exactly one type of interaction that we will be looking at in this chapter, where the AI character understands how the environment works and how to use it.
Moving environment objects with Tomb Raider
Let's jump right into that scenario and try to recreate the situation where we have an AI character that is able to help our player achieve his goal. For this example, let's assume that our player is trapped in a position where he cannot access the interactive object that releases him from that situation. The character that we'll be creating needs to be able to find the cube and push it toward the desired position.
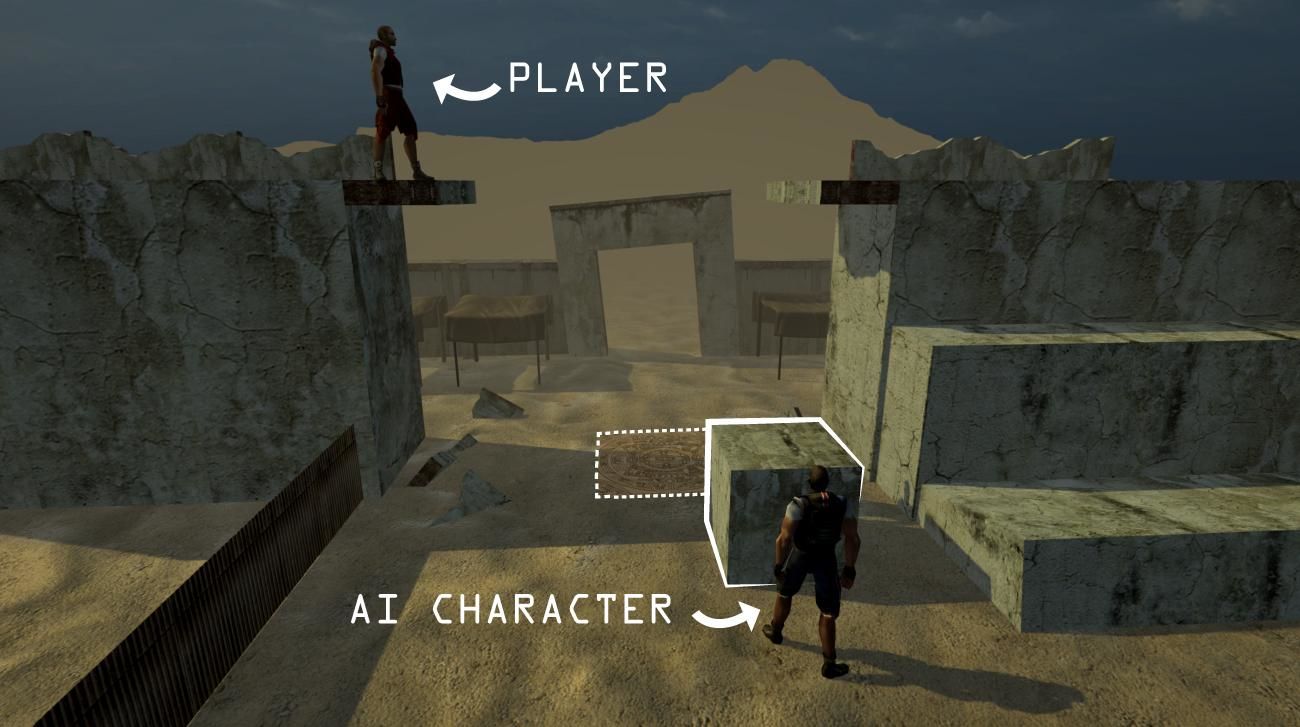
So now that we have all the characters and objects set in our environment example, let's plan how the AI character should behave in this situation. First, he needs to see that the player is near so he can start searching and move the cube to the right position. Let's assume that if the cube is on that mark, a new block will rise from the sand allowing the player to proceed in the level. The AI character can push the cube in four different directions, left, right, front, and back, making sure it aligns perfectly with the position mark.

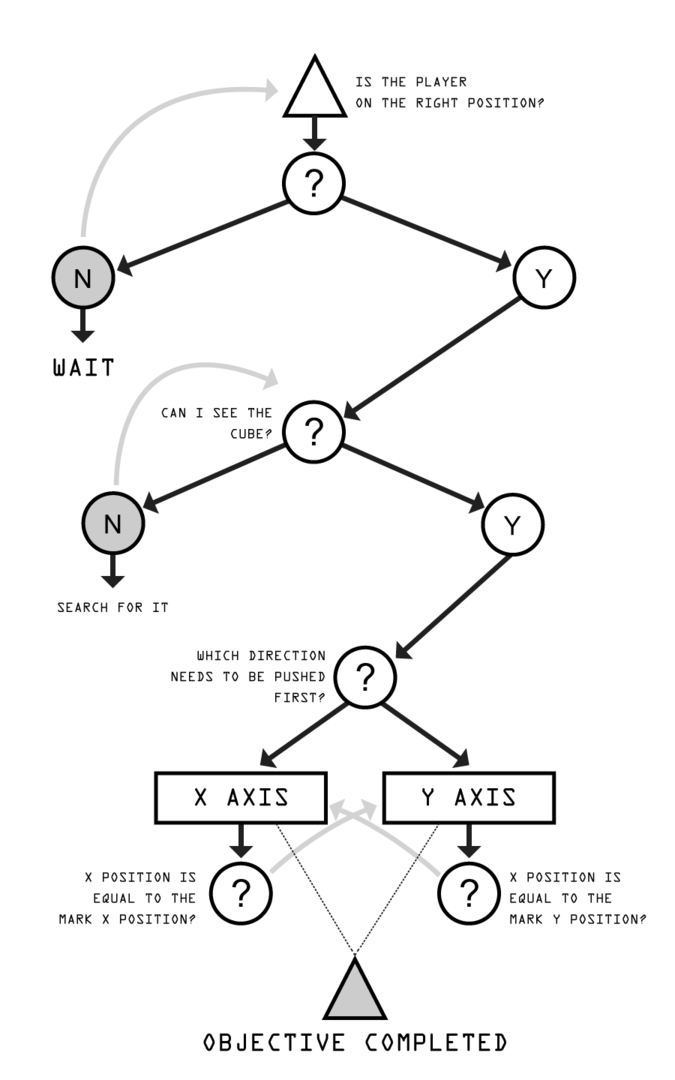
The AI character needs to question and validate every action demonstrated in the behavior tree previously. The first and most important thing in order to proceed with the objective is the character needs to be sure that the player is positioned on his mark.
If the player has not arrived yet, our character needs to wait and hold position. If the player has arrived already, the AI character proceeds and asks himself if he is near the cube object or not. If not, our character needs to go toward the cube, and once that action is validated, he will ask the same question again. Once the answer is yes and the character is near the cube, he needs to calculate in which direction the cube needs to be pushed first.
Then he will be pushing towards the Y AXIS or X AXIS until the cube is aligned with the MARK POSITION and the objective gets completed.
public GameObject playerMesh;
public Transform playerMark;
public Transform cubeMark;
public Transform currentPlayerPosition;
public Transform currentCubePosition;

public float proximityValueX;
public float proximityValueY;
public float nearValue;

private bool playerOnMark;


void Start () {

}

void Update () {

  // Calculates the current position of the player
  currentPlayerPosition.transform.position = playerMesh.transform.position;

  // Calculates the distance between the player and the player mark of the X axis
  proximityValueX = playerMark.transform.position.x - currentPlayerPosition.transform.position.x;

  // Calculates the distance between the player and the player mark of the Y axis
  proximityValueYplayerMark.transform.position.y - currentPlayerPosition.transform.position.y;

  // Calculates if the player is near of his MARK POSITION
  if((proximityValueX + proximityValueY) < nearValue)
  {
     playerOnMark = true;
  }
}
We start adding the information into our code that allows the character to validate if the player is near his marked position. For this, we create all the variables necessary to calculate the distances of the player and the position that he needs to be in. playerMesh refers to the 3D model of the player where we'll extract his position and use it as currentPlayerPosition.
To know if he is near his mark, we need a variable that represents the MARK POSITION and in this example, we created the playerMark variable where we can write down the position in which we want our player to be. Then we added three variables that allow us to know if the player is near. proximityValueX will calculate the distance between the player and the mark on the X axis. proximityValueY will calculate the distance between the player and the mark on the Y axis.
Then we have the nearValue where we can define how far the player can be from the MARK POSITION so that our AI character can start working on the objective. Once the player is near his mark, the playerOnMark Boolean changes to true.
To calculate the distance between the player and his mark, we used this: Distance between the player and his mark is the same as (mark.position - player.position).
Now, to discover if the AI character is near the cube, we will be doing the same equation, calculating the distance between the AI and the cube. Also, we completed the code, as follows, with the positions of both marks (player and cube mark):
public GameObject playerMesh;
public Transform playerMark;
public Transform cubeMark;
public Transform currentPlayerPosition;
public Transform currentCubePosition;

public float proximityValueX;
public float proximityValueY;
public float nearValue;

public float cubeProximityX;
public float cubeProximityY;
public float nearCube;

private bool playerOnMark;
private bool cubeIsNear;


void Start () {

   Vector3 playerMark = new Vector3(81.2f, 32.6f, -31.3f);
   Vector3 cubeMark = new Vector3(81.9f, -8.3f, -2.94f);
   nearValue = 0.5f;
   nearCube = 0.5f;
}

void Update () {

  // Calculates the current position of the player
  currentPlayerPosition.transform.position = playerMesh.transform.position;

  // Calculates the distance between the player and the player mark of the X axis
  proximityValueX = playerMark.transform.position.x - currentPlayerPosition.transform.position.x;

  // Calculates the distance between the player and the player mark of the Y axis
  proximityValueY = playerMark.transform.position.y - currentPlayerPosition.transform.position.y;

  // Calculates if the player is near of his MARK POSITION
  if((proximityValueX + proximityValueY) < nearValue)
  {
     playerOnMark = true;
  }

  cubeProximityX = currentCubePosition.transform.position.x - this.transform.position.x;
  cubeProximityY = currentCubePosition.transform.position.y - this.transform.position.y;

  if((cubeProximityX + cubeProximityY) < nearCube)
  {
     cubeIsNear = true;
  }

  else
  {
     cubeIsNear = false;
  }
}
Now, our AI character knows if he is near the cube or not, this will answer the question and determine if he can proceed to the next branch that we have planned. But what happens when our character is not near the cube? He will need to walk toward the cube. So, we'll add that into our code:
public GameObject playerMesh;
public Transform playerMark;
public Transform cubeMark;
public Transform cubeMesh;
public Transform currentPlayerPosition;
public Transform currentCubePosition;

public float proximityValueX;
public float proximityValueY;
public float nearValue;

public float cubeProximityX;
public float cubeProximityY;
public float nearCube;

private bool playerOnMark;
private bool cubeIsNear;

public float speed;
public bool Finding;


void Start () {

   Vector3 playerMark = new Vector3(81.2f, 32.6f, -31.3f);
   Vector3 cubeMark = new Vector3(81.9f, -8.3f, -2.94f);
   nearValue = 0.5f;
   nearCube = 0.5f;
   speed = 1.3f;
}

void Update () {

  // Calculates the current position of the player
  currentPlayerPosition.transform.position = playerMesh.transform.position;

  // Calculates the distance between the player and the player mark of the X axis
  proximityValueX = playerMark.transform.position.x - currentPlayerPosition.transform.position.x;

  // Calculates the distance between the player and the player mark of the Y axis
  proximityValueY = playerMark.transform.position.y - currentPlayerPosition.transform.position.y;

  // Calculates if the player is near of his MARK POSITION
  if((proximityValueX + proximityValueY) < nearValue)
  {
      playerOnMark = true;
  }

  cubeProximityX = currentCubePosition.transform.position.x - this.transform.position.x;
  cubeProximityY = currentCubePosition.transform.position.y - this.transform.position.y;

  if((cubeProximityX + cubeProximityY) < nearCube)
  {
      cubeIsNear = true;
  }

  else
  {
      cubeIsNear = false;
  }

  if(playerOnMark == true && cubeIsNear == false && Finding == false)
  {
     PositionChanging();
  }

  if(playerOnMark == true && cubeIsNear == true)
  {
     Finding = false;
  }

}

void PositionChanging () {

  Finding = true;
  Vector3 positionA = this.transform.position;
  Vector3 positionB = cubeMesh.transform.position;
  this.transform.position = Vector3.Lerp(positionA, positionB, Time.deltaTime * speed);
}
So far, our AI character is able to calculate the distance between himself and the cube; if they are too far apart, he will go toward the cube. Once this quest is completed, he can move on to the next phase and start pushing the cube. The last thing that he needs to calculate is how far the cube is from the mark position and he then decides which side needs to be pushed first by taking into consideration how far it is from each side.
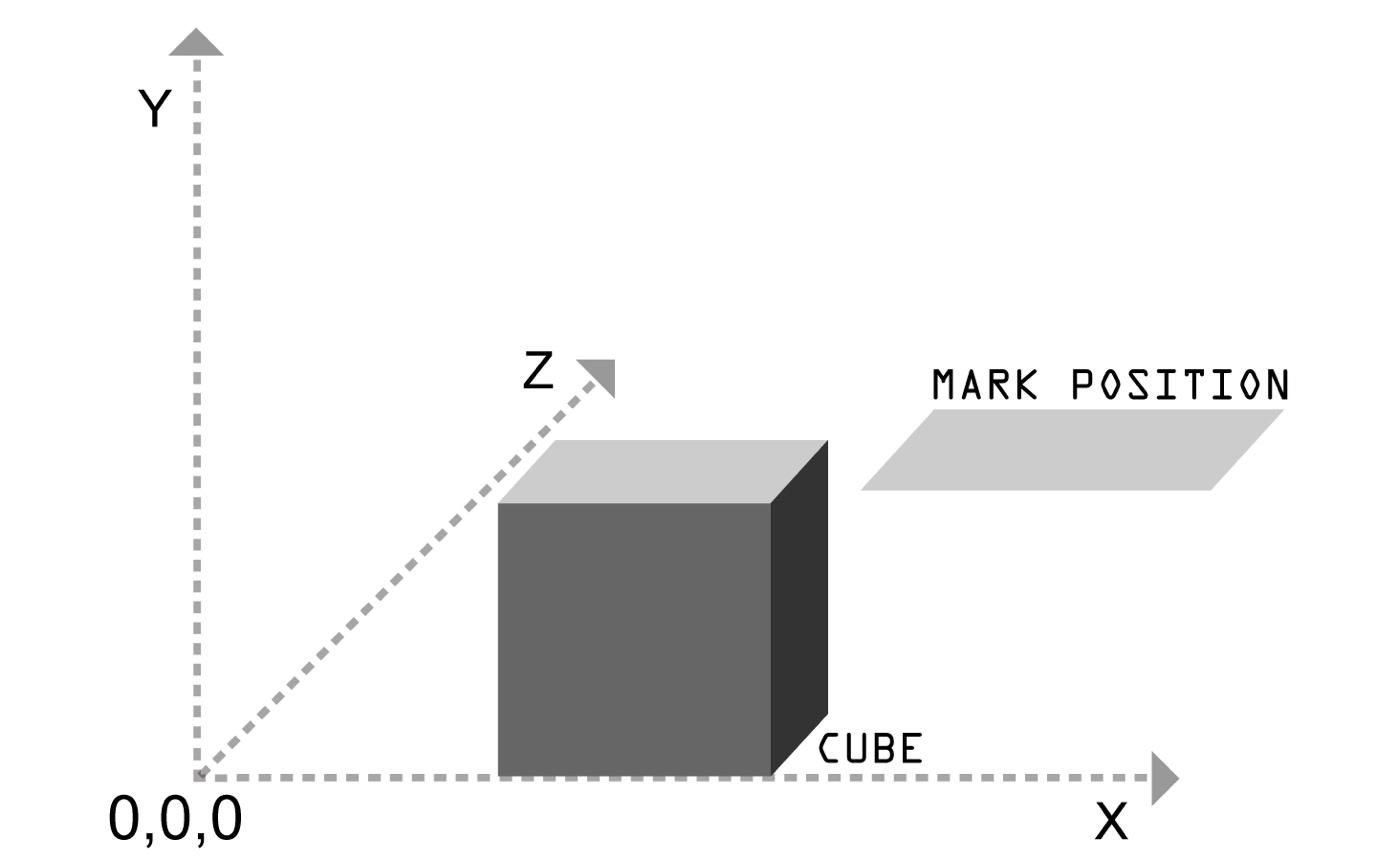
The cube can only be pushed on the X axis or Z axis and the rotation isn't relevant for now as the button is activated once the cube is on top of it. Taking that into consideration, our character AI needs to calculate how far the cube is from the X MARK POSITION and Z MARK POSITION.
Then he will compare the two different axis values and choose which one is farther away from the desired position and start pushing from that one. The character will push in that direction until the cube is aligned with the marked position and then switch to the other side, and push it until it's completely on top of the MARK POSITION:
public GameObject playerMesh;
public Transform playerMark;
public Transform cubeMark;
public Transform cubeMesh;
public Transform currentPlayerPosition;
public Transform currentCubePosition;

public float proximityValueX;
public float proximityValueY;
public float nearValue;

public float cubeProximityX;
public float cubeProximityY;
public float nearCube;

public float cubeMarkProximityX;
public float cubeMarkProximityZ;

private bool playerOnMark;
private bool cubeIsNear;

public float speed;
public bool Finding;


void Start () {

        Vector3 playerMark = new Vector3(81.2f, 32.6f, -31.3f);
        Vector3 cubeMark = new Vector3(81.9f, -8.3f, -2.94f);
        nearValue = 0.5f;
        nearCube = 0.5f;
        speed = 1.3f;
}

void Update () {

  // Calculates the current position of the player
  currentPlayerPosition.transform.position = playerMesh.transform.position;

  // Calculates the distance between the player and the player mark of the X axis
  proximityValueX = playerMark.transform.position.x - currentPlayerPosition.transform.position.x;

  // Calculates the distance between the player and the player mark of the Y axis
  proximityValueY = playerMark.transform.position.y - currentPlayerPosition.transform.position.y;

  // Calculates if the player is near of his MARK POSITION
  if((proximityValueX + proximityValueY) < nearValue)
  {
     playerOnMark = true;
  }

  cubeProximityX = currentCubePosition.transform.position.x - this.transform.position.x;
  cubeProximityY = currentCubePosition.transform.position.y - this.transform.position.y;

  if((cubeProximityX + cubeProximityY) < nearCube)
  {
     cubeIsNear = true;
  }

  else
  {
     cubeIsNear = false;
  }

  if(playerOnMark == true && cubeIsNear == false && Finding == false)
  {
      PositionChanging();
  }

  if(playerOnMark == true && cubeIsNear == true)
  {
      Finding = false;
    }

   cubeMarkProximityX = cubeMark.transform.position.x - currentCubePosition.transform.position.x;
   cubeMarkProximityZ = cubeMark.transform.position.z - currentCubePosition.transform.position.z;

   if(cubeMarkProximityX > cubeMarkProximityZ)
   {
     PushX();
   }

   if(cubeMarkProximityX < cubeMarkProximityZ)
   {
     PushZ();
   }

}

void PositionChanging () {

  Finding = true;
  Vector3 positionA = this.transform.position;
  Vector3 positionB = cubeMesh.transform.position;
  this.transform.position = Vector3.Lerp(positionA, positionB, Time.deltaTime * speed);
}
With the final actions added to our code, our AI character should be able to conclude its objective and find and push the cube to the desired position, so the player can proceed and finish the level. In this example, we focused on how to calculate distances between objects of the scene and characters. This will help create similar types of interactions where it's necessary to put an object in the game in a certain position.
The example demonstrates an allied AI character that helps the player, but the same principles could be applied if we wanted the opposite effect (being an enemy) where the character would need to find the cube as fast as possible to stop the player.
Obstructive environment objects with Age of Empires
As we saw previously, we can use or move objects in the game to fulfill an objective, but what happens if the character has an object obstructing his way? The object could be placed by the player or simply designed to be in that position of the map and either way, the AI character should be able to determine what to do in that situation.
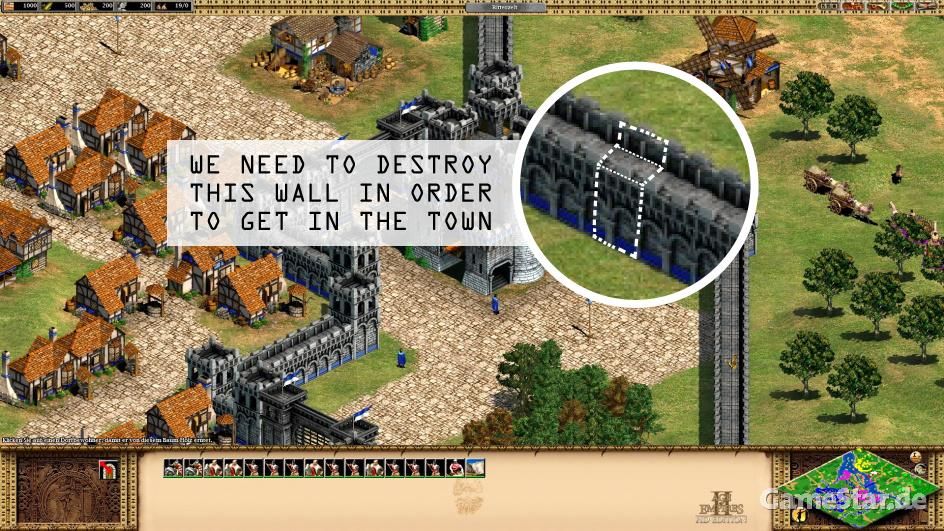
We can observe this behavior, for example, in a strategy game called Age of Empires II developed by Ensemble Studios. Every time the characters of the game can't access the enemy territory because of their surrounded fortified walls, the AI characters focus and start destroying a portion of the wall so they can get in.
This type of interaction is very smart and important as well, because otherwise they would just be going around the wall searching for an entry and that wouldn't look intelligent. Because the fortified wall is created by the player, it can be placed anywhere, with any shape or form and for that reason, it is necessary to think about that when developing an AI opponent.
This example is also relevant because, in the planning phase, when we are creating behavior trees, we need to think about what happens if something gets in the way of the character and he can't accomplish his objectives. That will be explored in depth in a future chapter of the book, but for now, we'll simplify this situation and analyze how the AI character should behave if an environment object is interfering with his objective.
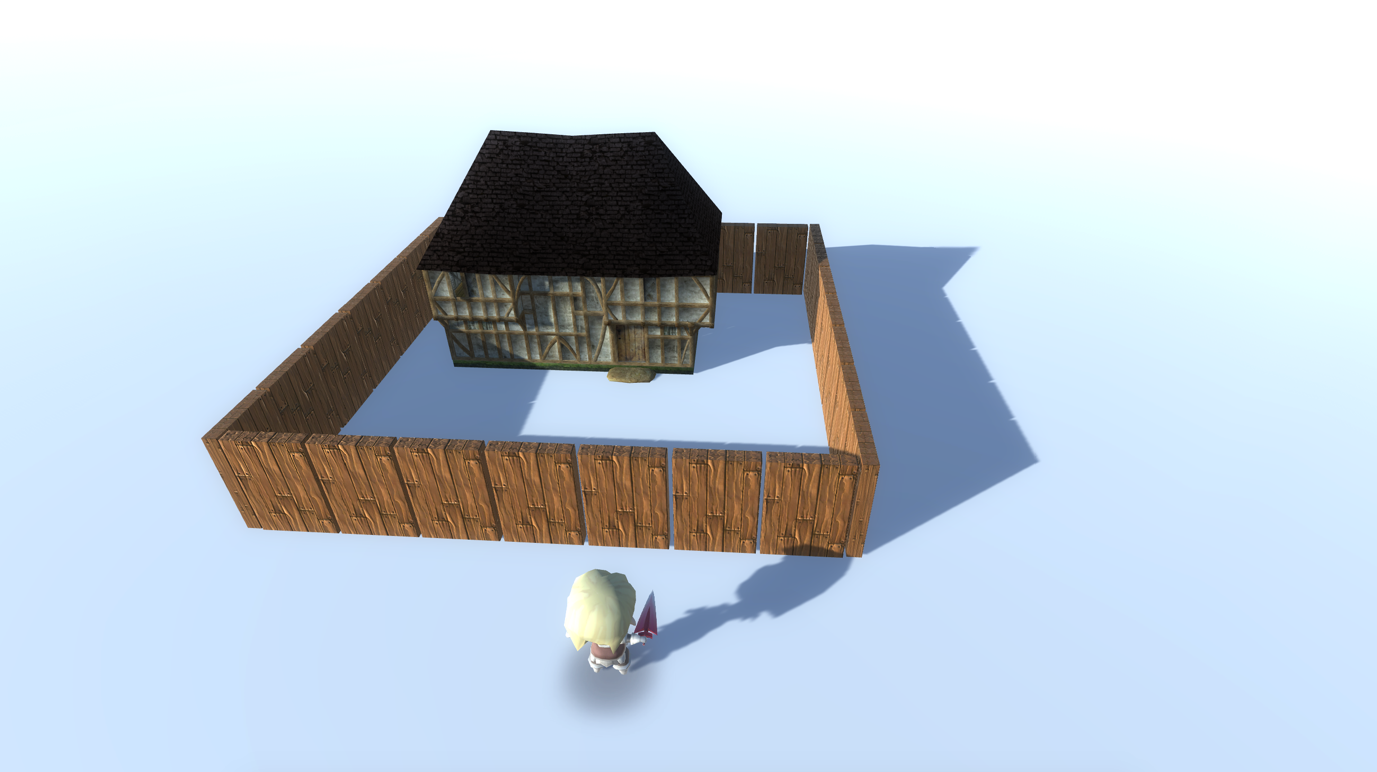
In our example, the AI character needs to enter the house but when he arrives near, realizes that it is surrounded by wooden fences and he can't pass through. At that point, we want the character to choose a target and start attacking until that portion of the fence is destroyed so he can find a way to enter the house.
For this example, we´ll need to calculate which fence our character needs to attack, taking into consideration the distance and the current health state of the fence. The fence with low HP should have a higher priority to be attacked first compared to a fence that is at full HP, so we'll be including that in our calculation.
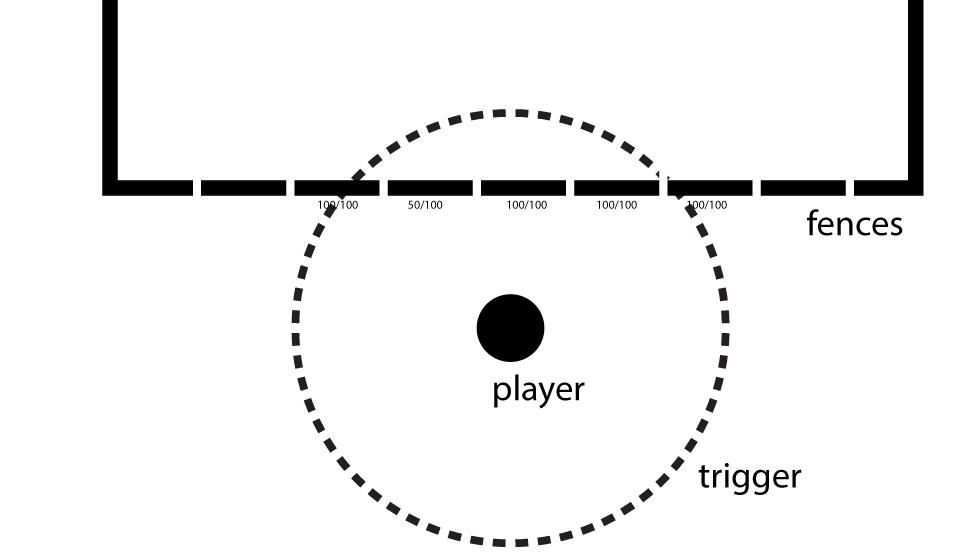
We want to define a circumference around the character where the closest fences give their information to the AI so he can decide which one is the easiest to destroy. This can be done with different methods, either by using collision detection on the fences that get triggered by the player, or having them calculate the distance between fences/objects and the player; we define a distance value where the player perceives the condition of the fence. For this example, we'll be calculating the distance and use it to alert the character about the HP of the fences.
Let's start by creating the code that will be implemented on the fence object; all of them will have the same script as follows:
public float HP;
public float distanceValue;
private Transform characterPosition;
private GameObject characterMesh;

private float proximityValueX;
private float proximityValueY;
private float nearValue;

// Use this for initialization
void Start () {

  HP = 100f;
  distanceValue = 1.5f;

  // Find the Character Mesh
  characterMesh = GameObject.Find("AICharacter");
}

// Update is called once per frame
void Update () {

  // Obtain the Character Mesh Position
  characterPosition = characterMesh.transform;

  //Calculate the distance between this object and the AI Character
  proximityValueX = characterPosition.transform.position.x - this.transform.position.x;
  proximityValueY = characterPosition.transform.position.y - this.transform.position.y;

  nearValue = proximityValueX + proximityValueY;
}
In this script, we added the basic information about the HP and distances that we'll be using to connect with the AI character. This time, we are adding the script that calculates the distances into the environment object instead of the character; this gives more dynamism to the object and allows us to create more things with it.
As an example, if the characters of the game are the ones responsible for creating the fences, they will have different states, such as currently building, completed, and damaged; then the character will receive that information and use it to his advantage.
Let's move forward and define our AI character to interact with the environment object. His primary objective is to access the house, but when he arrives near, he realizes that he cannot get inside because it's surrounded by the wood fences. After analyzing the situation, we want our character to destroy a fence so he can finally accomplish his objective and get into the house.
In the character script, we'll be adding a static function, where the fences can input their information about their current health; this will help the AI character choose a better fence to destroy.
public static float fenceHP;
public static float lowerFenceHP;
public static float fencesAnalyzed;
public static GameObject bestFence;

private Transform House;

private float timeWasted;
public float speed;


void Start () {

        fenceHP = 100f;
        lowerFenceHP = fenceHP;
        fencesAnalyzed = 0;
        speed = 0.8;

        Vector3 House = new Vector3(300.2f, 83.3f, -13.3f);

}

void Update () {

        timeWasted += Time.deltaTime;

        if(fenceHP > lowerFenceHP)
        {
            lowerFenceHP = fenceHP;
        }

        if(timeWasted > 30f)
        {
            GoToFence();
        }
}

void GoToFence() {

        Vector3 positionA = this.transform.position;
        Vector3 positionB = bestFence.transform.position;
        this.transform.position = Vector3.Lerp(positionA, positionB, Time.deltaTime * speed);
}
We already added the basic information into our character. fenceHP will be the static variable where every fence triggered by the character gives their information about the current HP. Then the AI character analyzes the collected information and compares it with the lowest HP fence that is represented as lowerFenceHP.
The character has a timeWasted variable that represents the number of seconds that he has already spent looking for a good fence to attack. fencesAnalyzed will be used to know if there's already a fence in the code, and if not, it will have added the first fence that he finds; in the case of the fences having the same HP value, the character will attack them first. Now let's update our fence code, so they can access the character script and input some useful information.
public float HP;
public float distanceValue;
private Transform characterPosition;
private GameObject characterMesh;

private float proximityValueX;
private float proximityValueY;
private float nearValue;
void Start () {

        HP = 100f;
        distanceValue = 1.5f;

        // Find the Character Mesh
        characterMesh = GameObject.Find("AICharacter");
}

void Update () {

        // Obtain the Character Mesh Position
        characterPosition = characterMesh.transform;

        //Calculate the distance between this object and the AI Character
        proximityValueX = characterPosition.transform.position.x - this.transform.position.x;
        proximityValueY = characterPosition.transform.position.y - this.transform.position.y;

        nearValue = proximityValueX + proximityValueY;

        if(nearValue <= distanceValue){
            if(AICharacter.fencesAnalyzed == 0){
                AICharacter.fencesAnalyzed = 1;
                AICharacter.bestFence = this.gameObject;
            }

            AICharacter.fenceHP = HP;

            if(HP < AICharacter.lowerFenceHP){
                AICharacter.bestFence = this.gameObject;
            }
        }
}
We finally conclude this example, where the fence compares their current HP with the data that the character has (lowerFenceHP) and if their HP is lower than the lowest value that the character has, that fence will be considered the bestFence.
This example demonstrates how to adapt the AI character to different dynamic objects of the game; the same principle can be expanded and used to interact with almost any object. It's also relevant and useful to use the objects to interact with the character as well, linking information between the two.
In this post, we explored different ways to interact with the environment. The techniques demonstrated in this chapter can be expanded to a wide range of game genres and used to accomplish basic to advanced interactions between the AI characters and the environment.
Next, we will look at how to break down the environment by area and learn other advanced environment interactions with AI. To learn these advanced interactions, read this article How to create advanced environment interactions with AI.
This tutorial is an excerpt from "Practical Game AI Programming" by Micael DaGraca and published by Packt. Get the complete eBook for just $10 (limited period offer).