
Creating a Very Simple GUI System for Small Games - Part I
If you are writing your own game, sooner or later you will need some sort of user interface (or graphic user interface = GUI). There are some existing libraries lying around and there are a lot of discussion threads that deals with eternal problem
Coordinate System and Positioning
The most important thing of every GUI system is positioning of elements on your screen. Graphics APIs are using screen space coordinates in range [-1, 1]. Well... it's good, but not really good if we are creating / designing a GUI. So how to determine the position of an element? One option is to use an absolute system, where we set real pixel coordinates of an element. Simple, but not really usable. If we change resolution, our entire beautifully-designed system will go to hell. Hm.. second attempt is to use a relative system. That is much better, but also not 100%. Let's say we want to have some control elements at the bottom of the screen with a small offset. If relative coordinates are used, the space will differ depending on resolution which is not what we usually want. What I used at the end is a combination of both approaches. You can set position in relative and absolute coordinates. That is somewhat similar to the solution used in CEGUI. Steps described above were applied on the entire screen. During GUI design there is a very little number of elements that will meet this condition. Most of the time, some kind of panel is created and other elements are placed on this panel. Why? That's simple. If we move the panel, all elements on it move along with it. If we hide the panel, all elements hide with it. And so on. What I write so far for positioning is perfectly correct for this kind of situations as well. Again, a combination of relative and absolute positioning is used, but this time the relative starting point is not [0,0] corner of entire screen, but [0,0] of our "panel". This [0,0] point already has some coordinates on screen, but those are not interesting for us. A picture is worth a thousand words. So, here it is: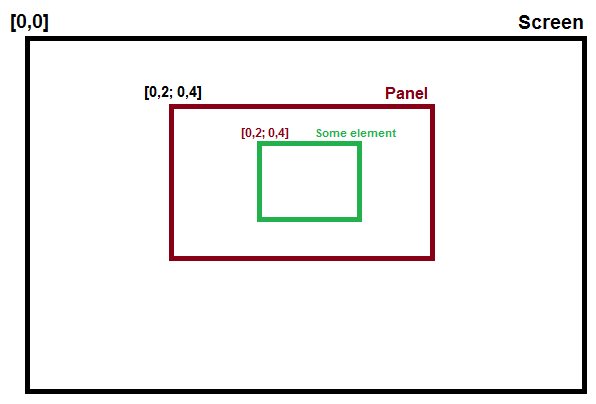 Figure 3: Position of elements. Black color represents screen (main window) and position of elements within it. Panel is positioned within Screen. Green element is inside Panel. It's positions are within Panel.
 pixel = [a, b] point = [pixel(a) / width, pixel(b) / height] screen_space = 2 * point - 1 If we want to use the GUI without a graphics API, lets say do it in Java, C#... and draw elements into image, you can just stick with pixels. Anchor System All good? Good. Things will be little more interesting from now on. A good thing in GUI design is to use anchors. If you have ever created a GUI, you know what anchors are. If you want to have your element stickied to some part of the screen no matter the screen size, that's the way you do it - anchors. I have decided to use a similar but slighty different system. Every element I have has its own origin. This can be one of the four corners (top left - TL, top right - TR, bottom left - BL, bottom right - BR) or its center - C. The position you have entered is than relative to this origin. Default system is TL. 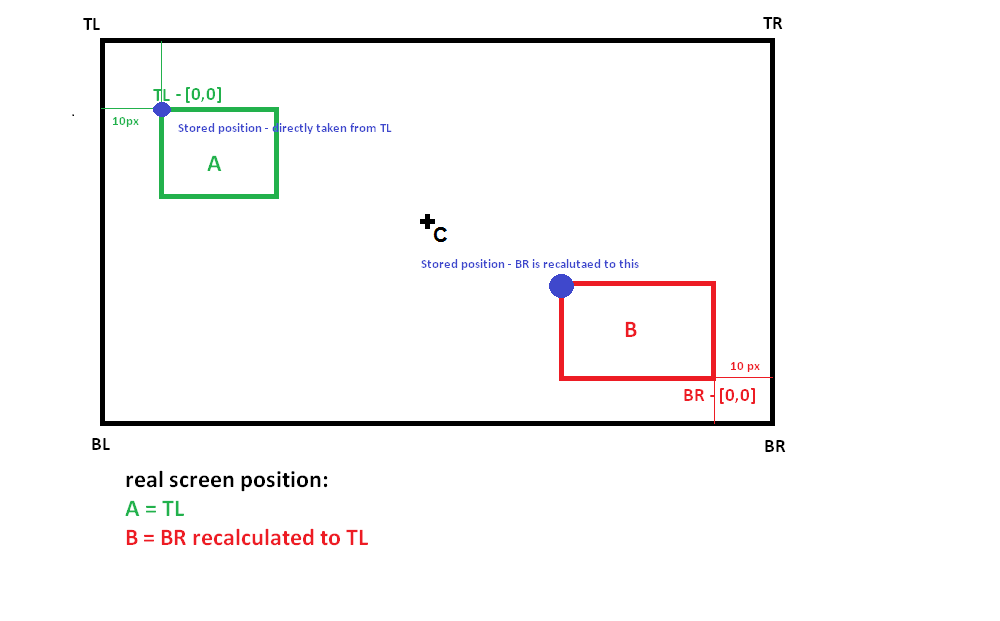 Figure 4: Anchors of screen elements
 <position x="0" y="0" offset_x="0" offset_y="0" origin="TL" /> <position x="0" y="0" offset_x="0" offset_y="0" origin="TR" /> <position x="0" y="0" offset_x="0" offset_y="0" origin="BL" /> <position x="0" y="0" offset_x="0" offset_y="0" origin="BR" /> All In One In the following code, you can see full calculation and transformation from user input (eg. from above XML) into internal element coordinate system, that is using pixels. First, we calculate pixel position of the corner as provided by our GUI user. We also need to calculate element width and height (proportions of elements will be discussed further in the next part). For this, we need proportions of the parent - meaning its size and pixel coordinate of TL corner. float x = parentProportions.topLeft.X; x += pos.x * parentProportions.width; x += pos.offsetX; float y = parentProportions.topLeft.Y; y += pos.y * parentProportions.height; y += pos.offsetY; float w = parentProportions.width; w *= dim.w; w += dim.pixelW; float h = parentProportions.height; h *= dim.h; h += dim.pixelH; For now, we have calculated the pixel position of our reference corner. However, internal storage of our system must be unified, so everything will be converted to a system with [0,0] in TL. //change position based on origin if (pos.origin == TL) { //do nothing - top left is default } else if (pos.origin == TR) { x = parentProportions.botRight.X - (x - parentProportions.topLeft.X); //swap x coordinate x -= w; //put x back to top left } else if (pos.origin == BL) { y = parentProportions.botRight.Y - (y - parentProportions.topLeft.Y); //swap y coordinate y -= h; //put y back to top left } else if (pos.origin == BR) { x = parentProportions.botRight.X - (x - parentProportions.topLeft.X); //swap x coordinate y = parentProportions.botRight.Y - (y - parentProportions.topLeft.Y); //swap y coordinate x -= w; //put x back to top left y -= h; //put y back to top left } else if (pos.origin == C) { //calculate center of parent element x = x + (parentProportions.botRight.X - parentProportions.topLeft.X) * 0.5f; y = y + (parentProportions.botRight.Y - parentProportions.topLeft.Y) * 0.5f; x -= (w * 0.5f); //put x back to top left y -= (h * 0.5f); //put y back to top left } //this will overflow from parent element proportions.topLeft = MyMath::Vector2(x, y); proportions.botRight = MyMath::Vector2(x + w, y + h); proportions.width = w; proportions.height = h; With the above code, you can easily position elements in each corner of a parent element with almost the same user code. We are using float instead of int for pixel coordinate representations. This is OK, because at the end we transform this to screen space coordinates anyway. Proportions
Once we established position of an element, we also need to know its size. Well, as you may remember, we have already needed proportions for calculating the element's position, but now we discuss this topic a bit more. Proportions are very similar to positioning. We again use relative and absolute measuring. Relative numbers will give us size in percents of parent and pixel offset is, well, pixel offset. We must take in mind one important thing - aspect ratio (AR). We want our elements to keep it every time. It would not be nice if our icon was correct on one system and deformed on another. We can repair this by only specifying one dimension (width or height) and the relevant aspect ratio for this dimension. See the difference in example below: a) <size w="0.1" offset_w="0" ar="1.0" /> - create element of size 10% of parent W b) <size w="0.1" h="0.1" offset_w="0" offset_h="0" /> - create element of size 10% of parent W and H Both of them will create an element with the same width. Choice a) will always have correct AR, while choice b) will always have the same size in respect of its parent element. While working with relative size, it is also a good thing to set some kind of maximal element size in pixels. We want some elements to be as big as possible on small screens but its not neccessary to have them oversized on big screens. A typical example will be phone and tablet. There is no need for an element to be extremly big (eg. occupy let's say 100x100 pixels) on a tablet. It can take 50x50 as well and it will be enough. But on smaller screens, it should take as much as possible according to our relative size from user input. Fonts
Special care must be taken for fonts. Positioning and proportions differ a little from classic GUI elements. First of all, for font positioning it is often good to put origin into its center. That way, we can center very easily fonts inside parent elements, for example buttons. As mentioned before, to recalculate position from used system into system with TL origin, we need to know the element size.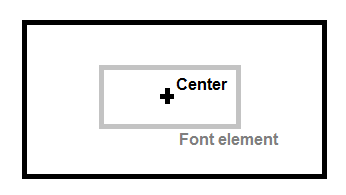 Figure 5: Origin in center of parent element for centered font positioning
 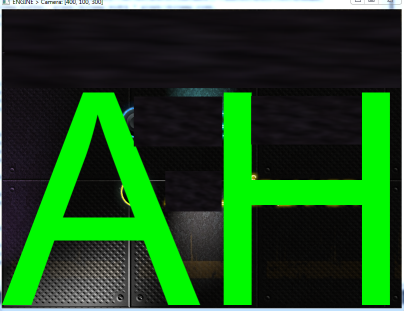 Figure 6: Text rendered with settings: origin is TL (top left), height is set to be 100% of parent height. You may notice, text is not filling the whole area. Why ?
 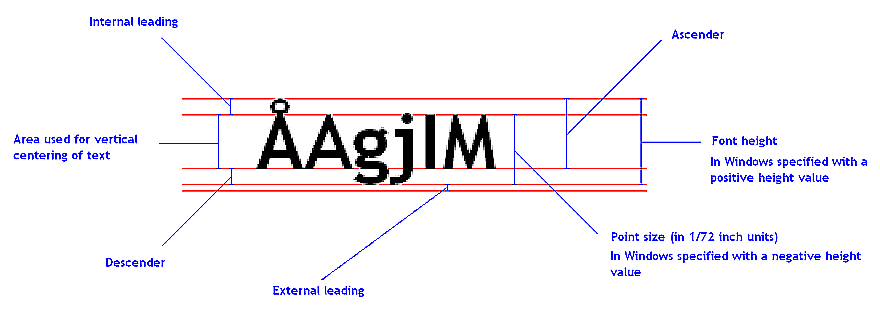 Figure 7: Font metrics
 Discussion
This will be all for now. I have described the basics of positioning and sizing of GUI elements that I have used in my design. There are probably better or more complex ways to do it. This one used here is easy and I have not run across any problems using it. I have written a simple C# application to speed up the design of the GUI. It uses the basics described here (but no fonts). You can place elements, change their size and image, drag them to see positions of them. You can download the source of application and try it for yourself. But take it as "alpha" version, I have written it for fast prototyping during one evening. In future parts (don't worry, I have already written them and only doing finishing touches) I will focus on basic types of elements, controls, rendering. That is, after all, one of the important things in GUI :-)Article Update Log
22 May 2014: Added links to following parts 3 May 2014: Initial releaseRelated Tutorials
Balancing Game Development and Creative Direction in Indie Production
A practical look at how indie developers can balance creative direction with hands-on game development. This article co…
 huseyin_onur
My Unreal Engine Development Process: From Core Idea to Playable Build
A practical overview of my Unreal Engine development process, covering how I move from a core game idea to a playable b…
huseyin_onur

Introducing LaneGraph: The Ultimate Road Network Solution for Unity
Discover the power of LaneGraph, a lightweight and flexible lane-based navigation system for Unity. LaneGraph makes it…
Retargeting Mixamo Characters with Root Motion In Unreal Engine 5.4.
I have always found Retargeting Mixamo Characters To have Root Motion is a serious lengthy Tast, Recently I stumbled up…

How To Make A SIMPLE Main Menu In Unity
In this tutorial for unity, i go over how to make a simple main menu for unity, it's an unlisted video because i do not…
 FlipThaSwitzh

Guide to Gameplay Balance
A perspective on competitive gameplay balance, from a background of "shooter" sandbox design.
 Tucker933
Discussion
More from Martin Prantl
Creating a Very Simple GUI System for Small Games - Part III
If you are writing your own game, sooner or later you will need some sort of user interface (or graphic user interface …
Basic OpenAL sound manager for your project
Adding sound to your project can be a terrifying experience. You have to find the right library, right sound format and…
Creating a Very Simple GUI System for Small Games - Part II
If you are writing your own game, sooner or later you will need some sort of user interface (or graphic user interface …
Discussion